
Karbeen KMT-75D-XIN
Karbeen 6.5 Cub Extra Large Home Safe
Model: KMT-75D-XIN
Instruction Manual
1. Introduction
This manual provides essential instructions for the safe and efficient operation of your Karbeen 6.5 Cub Extra Large Home Safe. Please read this manual thoroughly before installation and use, and retain it for future reference.
2. Safety Information
- Always keep emergency keys in a secure location away from the safe and out of reach of unauthorized individuals.
- Do not store emergency keys inside the safe.
- Ensure the safe is securely mounted to a floor or wall to prevent unauthorized removal.
- Avoid exposing the safe to extreme temperatures or humidity.
- Regularly check battery levels to ensure proper function of the digital keypad.
- While the safe offers robust protection, it is not entirely fireproof or waterproof. Take appropriate precautions for highly sensitive items.
3. Package Contents
Verify that all components are present:
- Karbeen 6.5 Cub Home Safe Unit
- Emergency Keys (4)
- Expansion Screws (6)
- Non-slip Foot Mats (4)
- USB Type-C Cable (1)
- User Manual (this document)

Figure 3.1: Product dimensions and included accessories.
4. Product Features
- 6.5 Cubic Feet Capacity: Spacious interior for various valuables.
- Digital Backlit Keypad: For quick and secure access, visible in low light.
- Drop Slot: Conveniently deposit cash and documents without opening the main safe door. Features an anti-fishing design.
- Heavy-Duty Construction: Made from low-carbon alloy steel with 6x20mm solid locking bolts and a 60mm thick reinforced steel door panel for enhanced security.
- Dual Alarm System: Activates if incorrect codes are entered consecutively or if the safe is shaken.
- Mute Mode: Allows silent operation of the keypad.
- Internal LED Lighting: Dual LED lights illuminate the interior for better visibility.
- Full Velvet Lining: Protects contents from scratches.
- External Power Supply Option: Use a USB Type-C cable for temporary power if batteries are depleted.

Figure 4.1: Detailed view of safe features.

Figure 4.2: Safe construction and protection features.
5. Setup
5.1 Initial Unlocking
Upon first use, the safe is typically locked. Use one of the emergency keys to open the safe:
- Locate the hidden keyhole cover on the keypad panel.
- Insert an emergency key and turn it clockwise.
- While the key is turned, rotate the knob on the keypad panel clockwise to open the safe door.
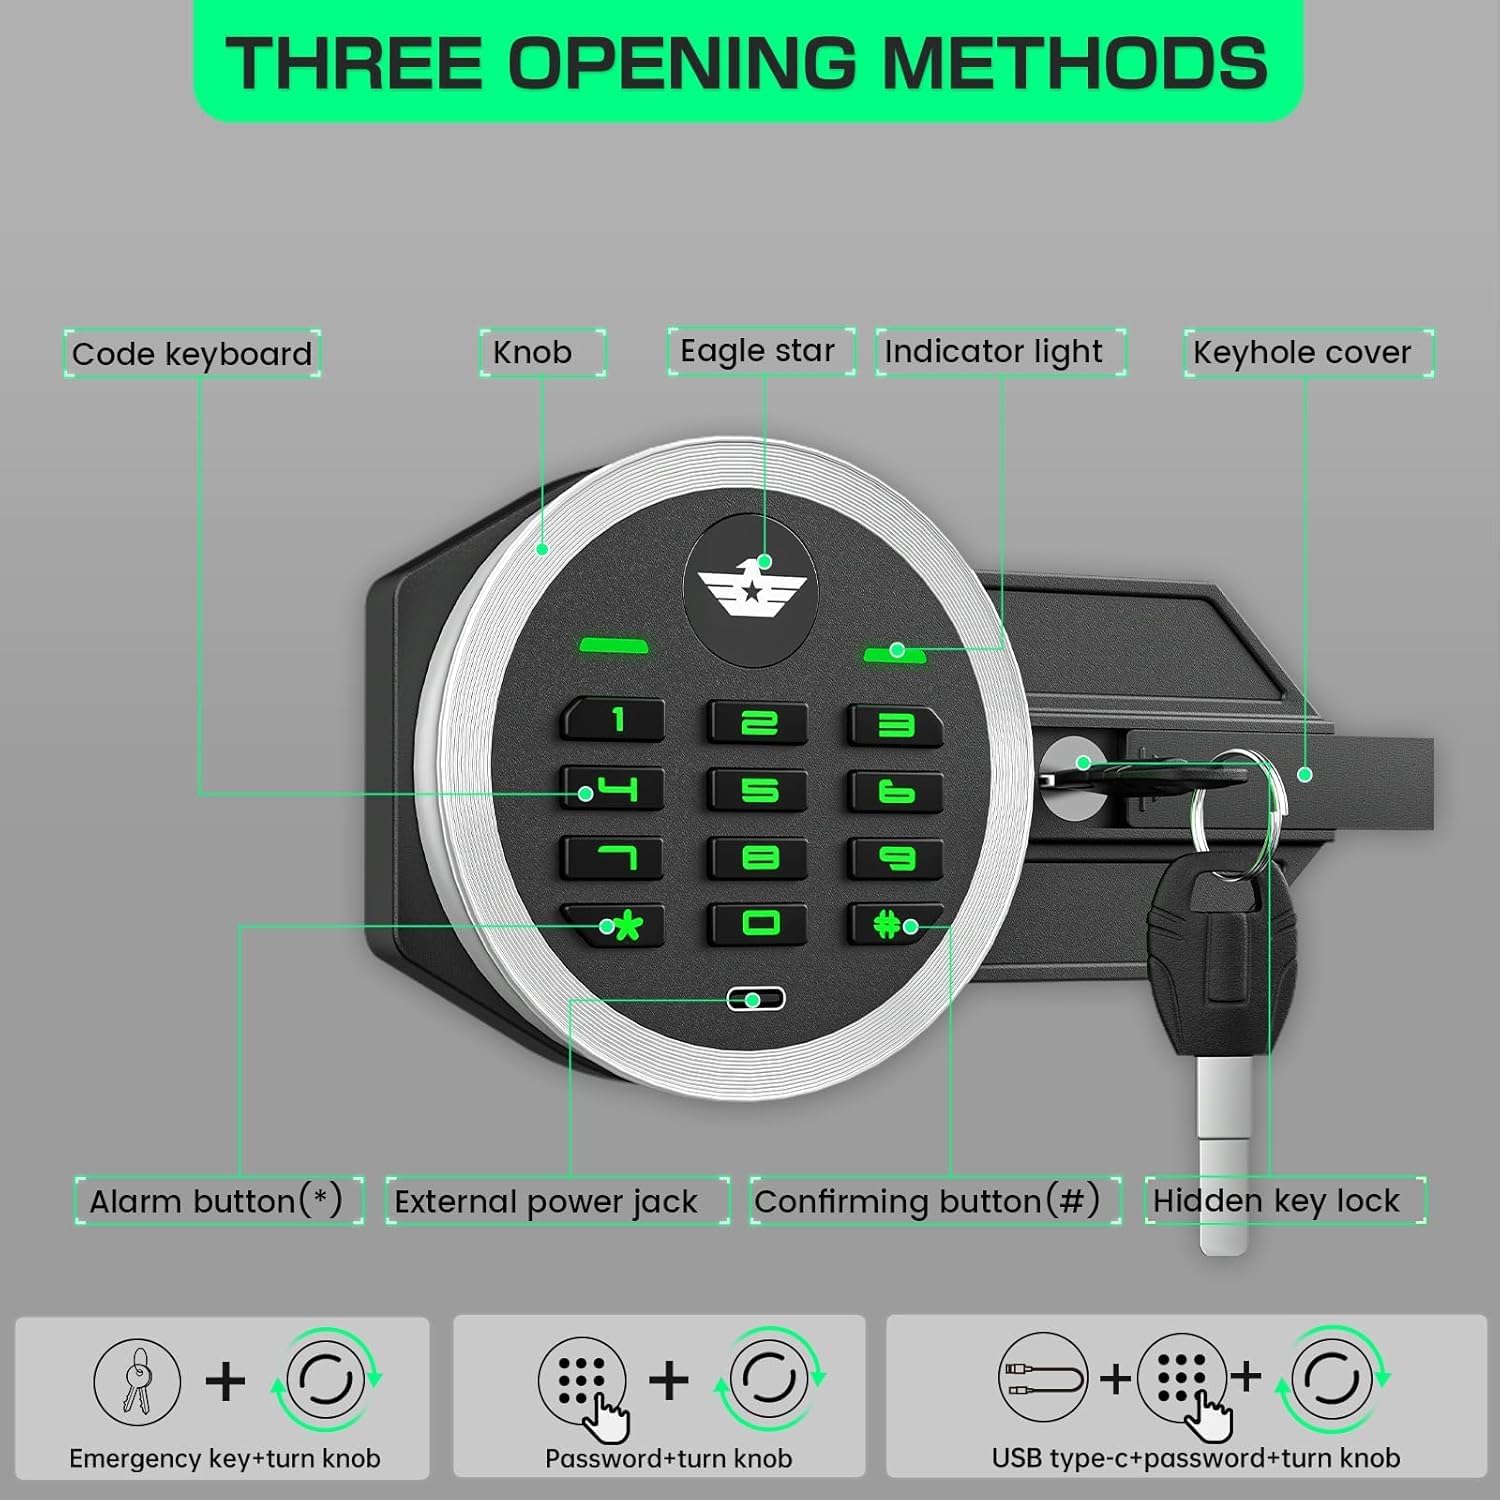
Figure 5.1: Unlocking methods and keypad components.
5.2 Battery Installation
The digital keypad requires batteries (not included) for operation. The battery compartment is usually located on the inside of the safe door.
- Open the safe door using the emergency key.
- Locate the battery compartment cover on the back of the keypad assembly inside the door.
- Remove the cover and insert the required number of AA batteries, ensuring correct polarity (+/-).
- Replace the battery compartment cover.
5.3 Setting User Code
After installing batteries, you can set your personal access code:
- With the safe door open, press the internal reset button (usually a small red button or a button labeled "SET" on the inside of the door).
- The keypad will beep, and an indicator light will flash, indicating it's ready for programming.
- Enter your desired 3-8 digit code on the keypad.
- Press the "#" button to confirm. The safe will beep again, confirming the new code is set.
- Test the new code with the door open before closing it.
5.4 Mounting the Safe
For optimal security, it is recommended to mount the safe to a floor or wall using the provided expansion screws.
- Choose a suitable location for mounting.
- Mark the drilling points through the pre-drilled holes at the back or bottom of the safe.
- Drill pilot holes into the wall or floor using an appropriate drill bit.
- Align the safe with the drilled holes and insert the expansion screws.
- Tighten the screws securely to anchor the safe.

Figure 5.2: Wall/Floor mounting instructions.
6. Operating Instructions
6.1 Opening the Safe with Digital Keypad
- Enter your personal 3-8 digit code.
- Press the "#" button to confirm.
- Within 5 seconds, rotate the knob clockwise to open the safe door.
6.2 Using the Drop Slot
The top drop slot allows for quick deposits without needing to open the main safe compartment.
- Pull the handle on the drop slot drawer.
- Place cash, receipts, or small documents into the drawer.
- Push the drawer back in. Items will fall into the upper compartment of the safe.
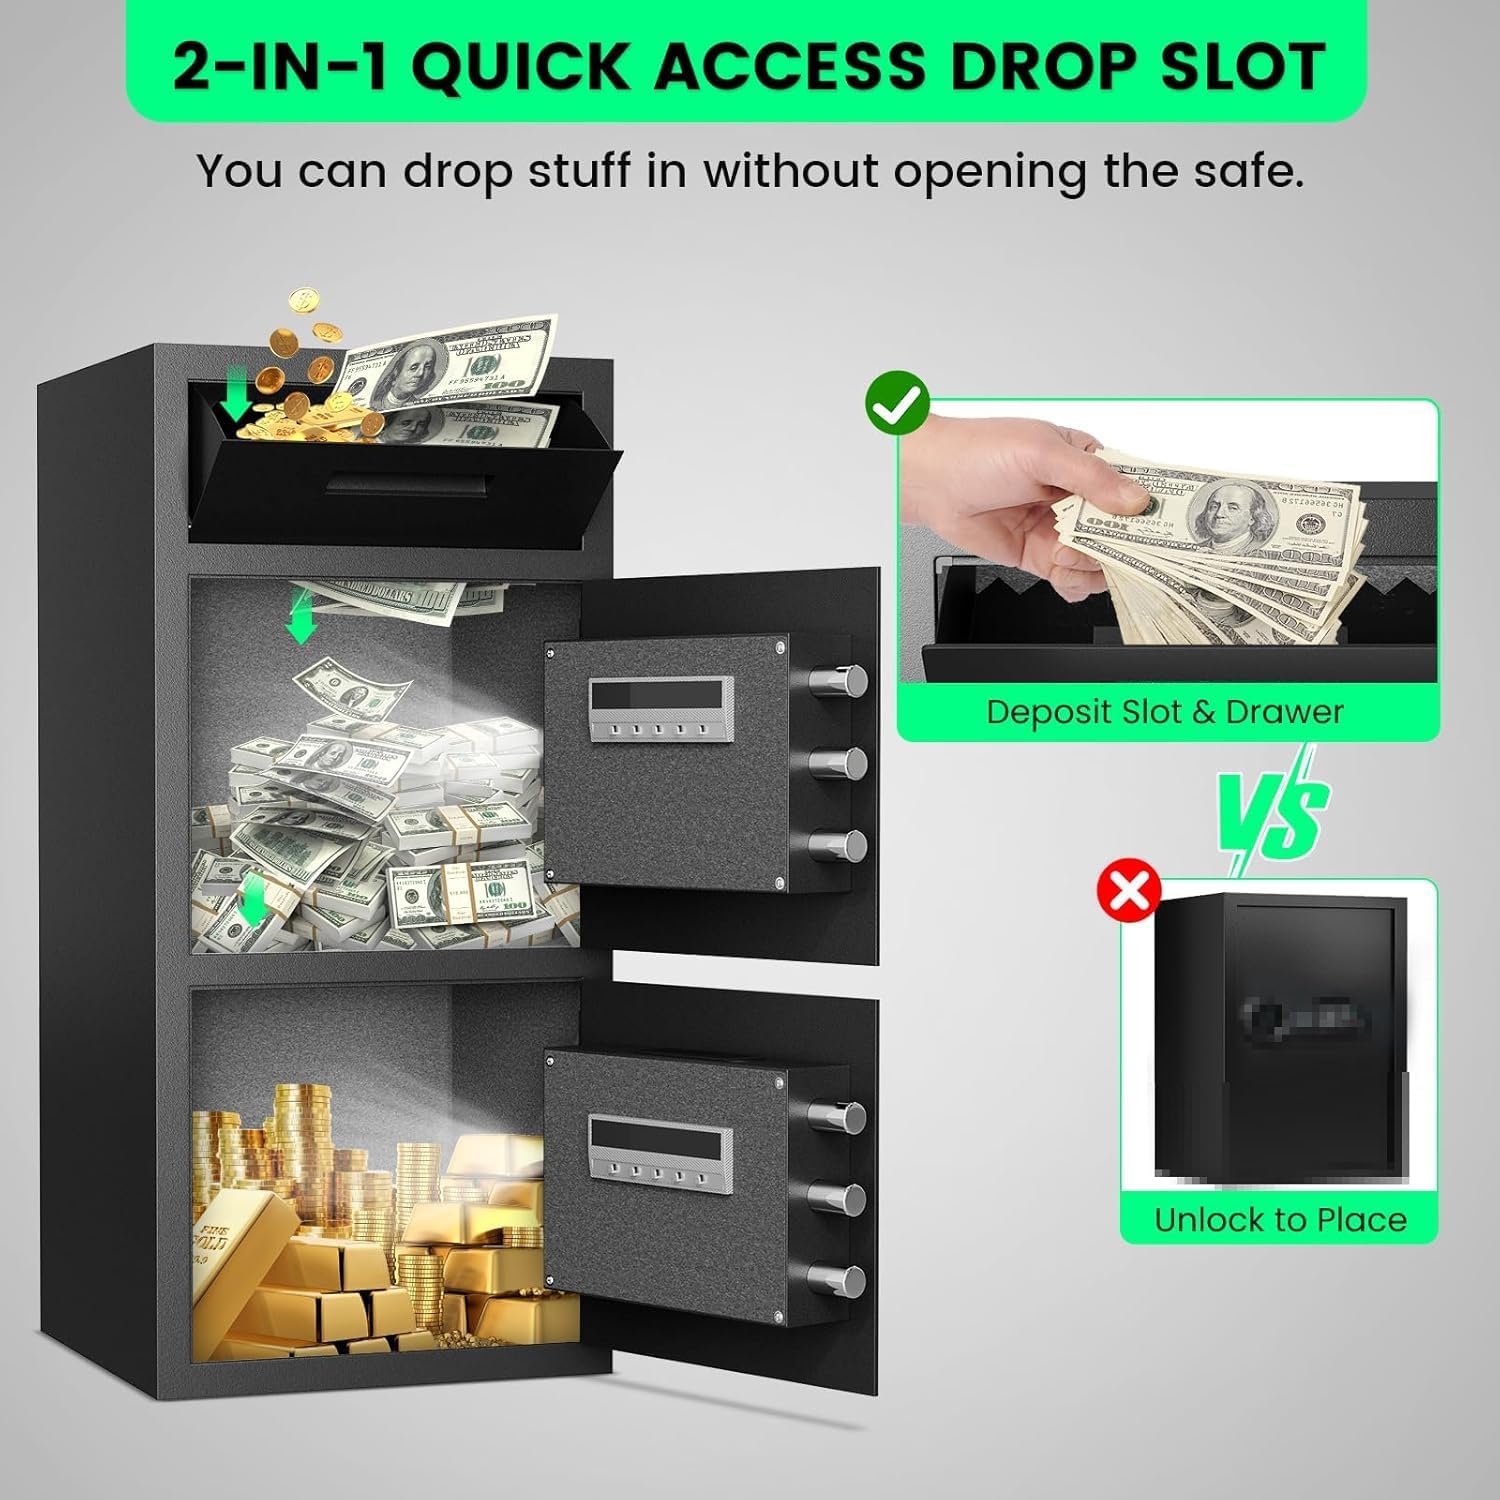
Figure 6.1: Depositing items via the drop slot.
6.3 Mute Mode Function
To enable or disable the keypad sound:
- Press the "*" button twice.
- Then press the "#" button.
- The keypad sound will toggle between mute and un-mute.
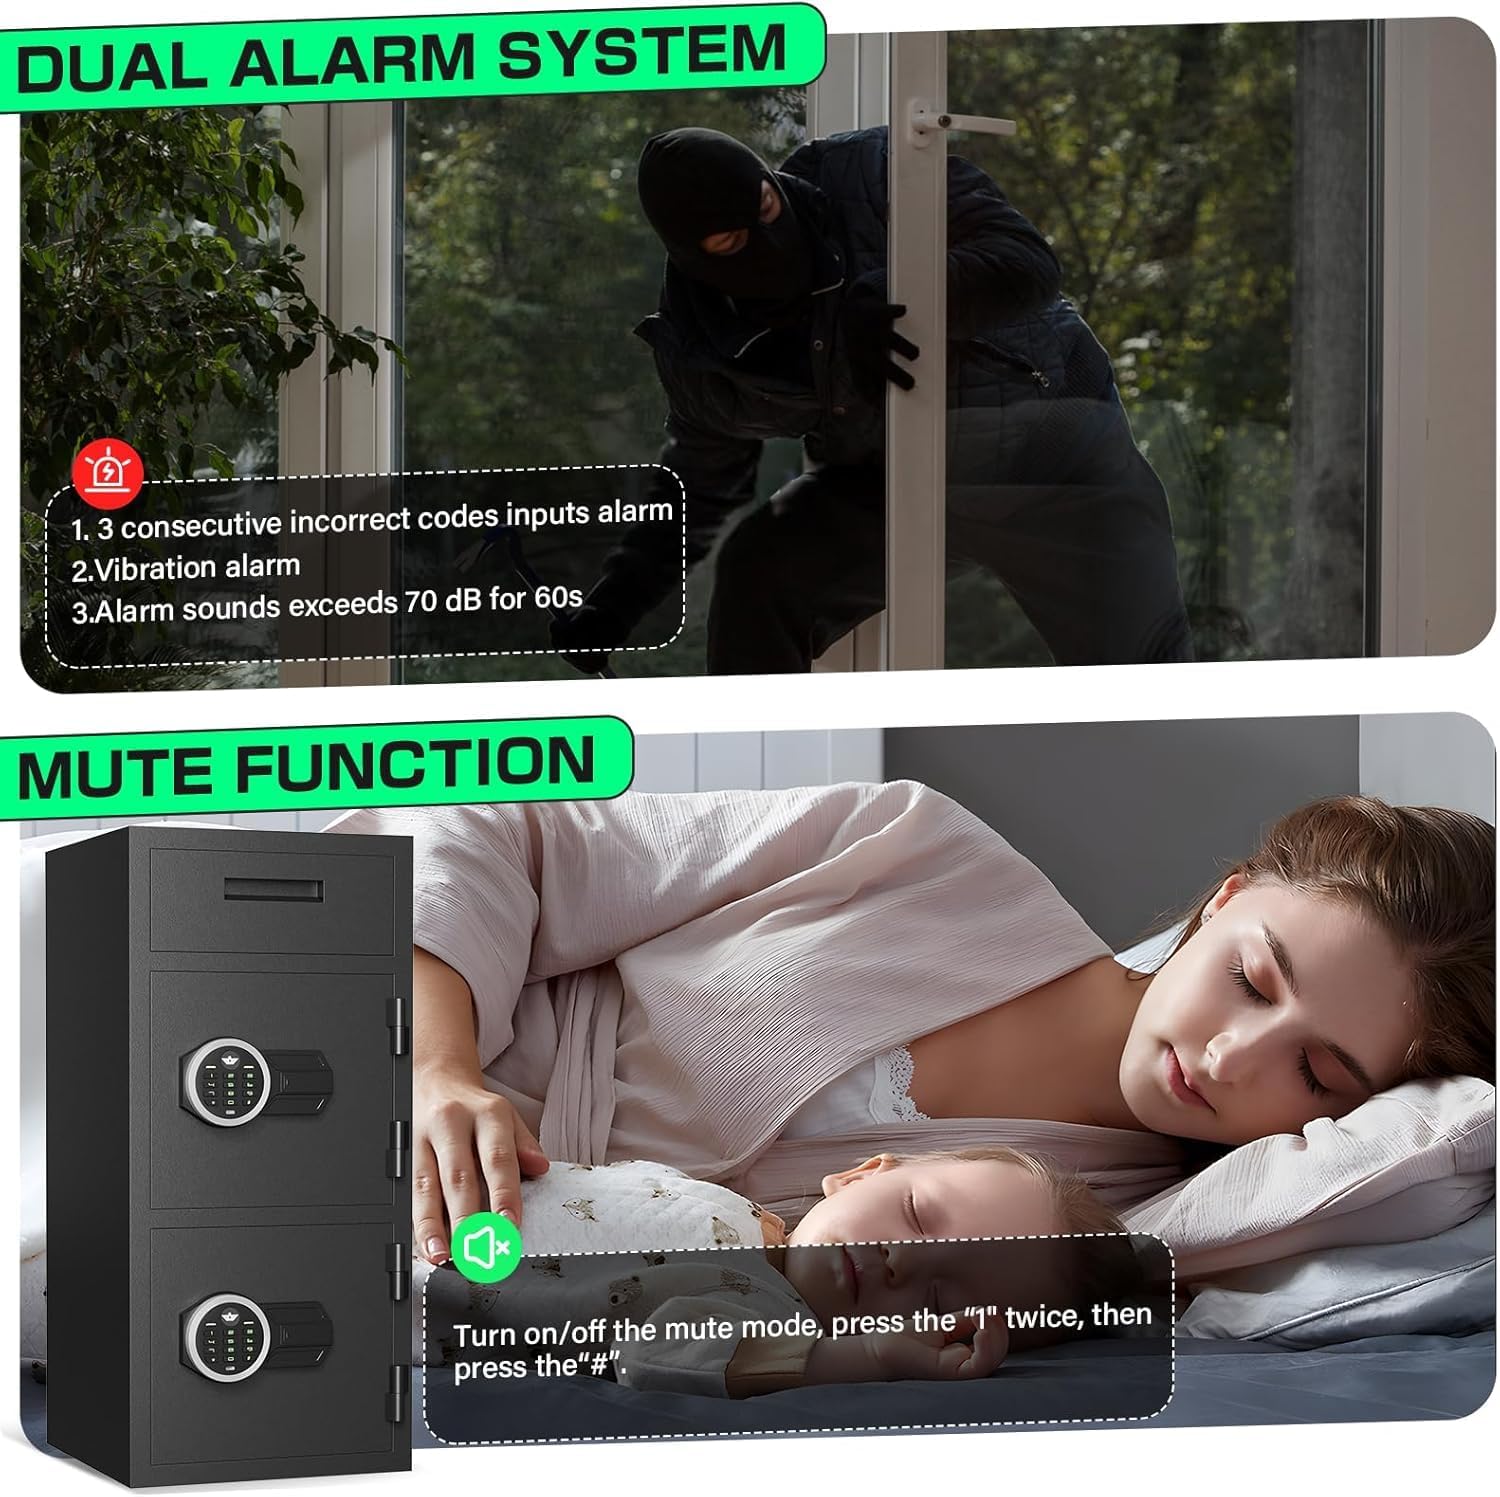
Figure 6.2: Mute mode and dual alarm system.
6.4 External Power Supply
If the internal batteries are depleted, you can use the provided USB Type-C cable for temporary external power:
- Connect the USB Type-C cable to the external power jack on the keypad.
- Connect the other end to a power source (e.g., power bank, USB adapter).
- Enter your code and press "#", then rotate the knob to open the safe.
- Replace the internal batteries immediately after opening.
7. Maintenance
- Battery Replacement: Replace batteries annually or when the low battery indicator appears. Use high-quality alkaline batteries.
- Cleaning: Wipe the safe's exterior with a soft, damp cloth. Avoid abrasive cleaners or solvents.
- Locking Mechanism: Do not lubricate the locking mechanism or keypad. If issues arise, contact customer support.
- Emergency Keys: Periodically check the location of your emergency keys.
8. Troubleshooting
| Problem | Possible Cause | Solution |
|---|---|---|
| Safe does not open with code. | Incorrect code entered; low batteries; keypad malfunction. | Re-enter code carefully. Replace batteries. Use external power or emergency key. |
| Keypad is unresponsive. | Dead batteries; loose battery connection. | Replace batteries. Ensure batteries are correctly installed. Use external power. |
| Alarm sounds unexpectedly. | Incorrect code entered multiple times; safe was shaken. | Enter correct code to disarm. Avoid shaking the safe. |
| Door does not close properly. | Obstruction in the door frame; locking bolts misaligned. | Check for obstructions. Ensure safe is on a level surface. |
9. Specifications
| Feature | Detail |
|---|---|
| Brand | Karbeen |
| Model Number | KMT-75D-XIN |
| Product Dimensions (D x W x H) | 13.78"D x 13.78"W x 29.53"H |
| Capacity | 6.5 Cubic Feet |
| Lock Type | Electronic Combination Lock, Key |
| Material | Low Carbon Steel |
| Special Features | Anti-Theft, Drop Slot, Dual Alarm, Mute Mode |
| Mounting Type | Floor Mount, Wall Mount |
| Item Weight | 46.1 Pounds |
| Included Components | 4 emergency keys, 6 expansion screws, 4 non-slip foot mats, 1 USB type-c cable, 1 user manual |
10. Warranty and Support
For warranty information and customer support, please refer to the documentation included with your purchase or visit the official Karbeen store on Amazon: Karbeen Store.
You may also contact customer service for assistance with product inquiries, troubleshooting, or replacement parts.
Ask a question about this manual
Ask about setup, troubleshooting, compatibility, parts, safety, or missing instructions. Manuals+ will review the question and use this page’s manual context to help answer it.