Introduction
Thank you for choosing the EUHOMY Self-Cleaning Bottom Loading Water Dispenser. This manual provides essential information for the safe operation, installation, maintenance, and troubleshooting of your new appliance. Please read it thoroughly before use and retain it for future reference.
Important Safety Information
To reduce the risk of fire, electric shock, or injury, always follow basic safety precautions when using this appliance.
- Read all instructions before using the water dispenser.
- Ensure the power supply matches the voltage specified on the appliance.
- Do not immerse the appliance, cord, or plug in water or other liquids.
- Unplug from the outlet when not in use and before cleaning.
- Keep children away from the hot water dispenser button. The child safety lock requires a two-step operation to prevent accidental scalding.
- Do not operate any appliance with a damaged cord or plug, or after the appliance malfunctions or has been damaged in any manner.
- This appliance is for indoor use only.
- Do not use with water that is microbiologically unsafe or of unknown quality without adequate disinfection.
Product Overview
The EUHOMY water dispenser provides instant access to hot, warm, and cold water. It features a bottom-loading design for easy bottle replacement and a self-cleaning function for hygiene.

Figure 1: Front view of the EUHOMY water dispenser, showcasing the three spouts and control panel.

Figure 2: Dimensions of the water dispenser (12"D x 14"W x 41"H) and compatibility with 3-gallon and 5-gallon water bottles.
Key Features:
- Bottom Loading: Eliminates heavy lifting of water bottles.
- Three Temperatures: Dispenses hot (185-194°F), warm (room temperature), and cold (46.4-51°F) water.
- Self-Cleaning Function: Utilizes UV technology to reduce contaminants in the water tank.
- Child Safety Lock: Prevents accidental hot water dispensing.
- Display Lights: Indicators for power, heating, cooling, and self-cleaning status.
Setup Guide
1. Unpacking
- Carefully remove the water dispenser from its packaging.
- Inspect the unit for any shipping damage. If damaged, do not operate and contact customer service.
- Remove all packing materials, including any tape or protective films.
2. Placement
- Place the dispenser on a flat, level, and stable surface.
- Ensure there is adequate ventilation around the unit (at least 4 inches from walls).
- Avoid direct sunlight or heat sources.
- Do not place in an area where the temperature will drop below 50°F (10°C).
3. Water Bottle Installation
- Open the lower cabinet door of the dispenser.
- Remove the cap from a new 3 or 5-gallon water bottle.
- Insert the probe from the dispenser into the water bottle. Ensure a secure fit.
- Slide the water bottle into the cabinet and close the door.

Figure 3: Demonstrates the easy bottom-loading process for a water bottle.
4. Initial Flush
Before first use, or after extended periods of non-use, it is recommended to flush the system to remove any residual manufacturing taste or impurities.
- Once the water bottle is installed, plug the dispenser into a grounded electrical outlet.
- Allow the tanks to fill for approximately 5-10 minutes.
- Dispense at least 2-3 cups of water from each spout (hot, warm, cold) to ensure all air is purged and the system is filled. Discard this water.
5. Power Connection
Plug the power cord into a standard 110V-60HZ grounded electrical outlet. The indicator lights will illuminate.
Operating Instructions
1. Dispensing Water
The dispenser offers three temperature options: Hot, Warm (Room Temperature), and Cold.

Figure 4: Control panel showing temperature options and child safety lock mechanism.
- Cold Water: Place your cup under the cold water spout and press the cold water button.
- Warm Water: Place your cup under the warm water spout and press the warm water button.
- Hot Water: This spout is equipped with a child safety lock. To dispense hot water, first slide the red safety lock switch, then press the hot water button.
2. Child Safety Lock
The hot water button features a two-step child safety lock to prevent accidental burns. Always ensure the safety lock is engaged when not dispensing hot water.
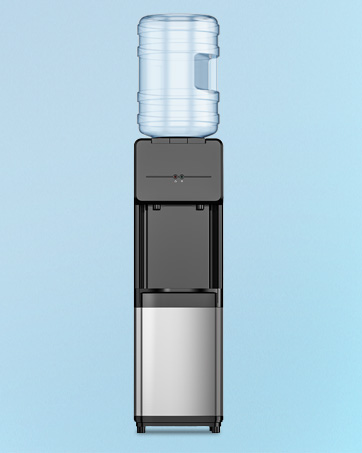
Figure 5: Detail of the child safety lock switch for hot water dispensing.
3. Self-Cleaning Function
The dispenser is equipped with UV technology for self-cleaning, which helps reduce harmful contaminants in the water tank and improves water taste. The self-cleaning cycle activates automatically under certain conditions:
- If there is no water in the cold water tank, the UV light will run for 30 minutes.
- If there is water in the cold water tank, the UV light will still activate for 15 minutes.
- If the water cooler is turned on but the water pump is not working, the UV light will automatically activate for 15 minutes every two hours.

Figure 6: Illustration of the UV self-cleaning technology in action within the water tank.
Maintenance
1. Regular Cleaning
- Exterior: Wipe the exterior surfaces with a soft, damp cloth. Do not use abrasive cleaners or solvents.
- Drip Tray: The drip tray should be emptied and cleaned regularly to prevent overflow and bacterial growth. Remove the tray, wash with mild soap and water, rinse thoroughly, and replace.
2. Self-Cleaning Cycle
The integrated UV self-cleaning system helps maintain hygiene. Ensure the dispenser is always connected to power for this feature to operate effectively.
3. Water Bottle Replacement
When the water bottle is empty, replace it following the "Water Bottle Installation" steps in the Setup Guide.
Troubleshooting
| Problem | Possible Cause | Solution |
|---|---|---|
| No water dispenses. | Water bottle empty or not properly installed. Air lock in the system. | Replace water bottle. Ensure probe is fully inserted. Dispense water from all spouts to clear air. |
| Water is not cold/hot enough. | Dispenser recently plugged in. Heating/cooling switches off. | Allow 15-30 minutes for water to reach desired temperature. Ensure heating/cooling functions are active (check indicator lights). |
| Water tastes unusual (initial use). | Residual manufacturing taste. | Perform initial flush as described in the Setup Guide. Dispense and discard several cups of water. |
| Water leaking. | Water bottle cap not sealed properly. Dispenser not level. Internal component issue. | Check water bottle for cracks or improper seal. Ensure dispenser is on a level surface. If leaking persists, unplug and contact customer support. |
If you encounter issues not listed here, or if solutions do not resolve the problem, please contact EUHOMY customer support.
Specifications
| Feature | Detail |
|---|---|
| Model Number | WC003-X3U |
| Brand | EUHOMY |
| Dimensions (D x W x H) | 12" x 14" x 41" |
| Weight | 36.4 pounds |
| Wattage | 550 watts |
| Hot Water Temperature | 185-194°F (85-90°C) |
| Cold Water Temperature | 46.4-51°F (8-10.5°C) |
| Power Supply | 110V~60HZ |
| UPC | 850075221141 |
Warranty and Customer Support
EUHOMY products are manufactured to high-quality standards. For warranty information, product registration, or technical assistance, please refer to the warranty card included with your purchase or visit the official EUHOMY website.
For direct support, please contact EUHOMY customer service. Have your model number (WC003-X3U) and purchase date ready when contacting support.


