
1. Introduction
This manual provides detailed instructions for the setup, operation, and maintenance of your BOYI GMK104 Barebones Mechanical Keyboard Kit. The GMK104 is a full-size (104-key) customizable keyboard kit featuring tri-mode connectivity (Bluetooth 5.0, 2.4GHz wireless, and USB Type-C wired), a gasket-mounted design, hot-swappable PCB, south-facing RGB backlighting, a smart display screen, and a multi-functional knob. It supports QMK/VIA for advanced customization.

Image: The GMK104 barebones keyboard kit, showcasing its layout and hot-swappable sockets.
2. Package Contents
Verify that all items are present in your package:
- GMK104 Barebones Keyboard Kit (104-key PCB, case, plate, dampening materials)
- USB Type-C Cable
- 2.4GHz Wireless Receiver
- Keycap Puller

Image: A keycap puller, an essential tool for installing and removing keycaps.
3. Setup Instructions
3.1 Installing Switches and Keycaps
- Prepare Switches: Ensure your mechanical switches are 3-pin or 5-pin compatible. Align the pins carefully.
- Insert Switches: Gently push each switch into the hot-swap socket on the PCB until it clicks into place. Ensure pins are straight to avoid bending.
- Install Keycaps: Place the desired keycaps onto the installed switches. Use the included keycap puller for easier installation and removal.

Image: A close-up view of the keyboard's PCB with hot-swappable sockets and pre-lubricated stabilizers, ready for switch installation.
3.2 Connectivity Modes
The GMK104 supports three connection modes:
- Wired (USB Type-C): Connect the keyboard to your computer using the provided USB-C cable. The keyboard will automatically switch to wired mode and begin charging.
- 2.4GHz Wireless: Insert the 2.4GHz receiver into a USB port on your computer. Switch the keyboard to 2.4GHz mode using the switch on the back or side of the keyboard (refer to specific model for exact location).
- Bluetooth 5.0: The keyboard supports up to three Bluetooth devices.
- Switch the keyboard to Bluetooth mode.
- Press FN + Q, FN + W, or FN + E to select a Bluetooth channel. The corresponding key will flash, indicating pairing mode.
- On your device, search for "GMK104" in the Bluetooth settings and connect. The key will stop flashing once connected.

Image: Visual representation of the keyboard's tri-mode connectivity, including USB-C, 2.4GHz wireless, and Bluetooth, connecting to various devices like laptops, tablets, and smartphones.
4. Operating Instructions
4.1 Smart Display and Knob Functions
The keyboard features a smart display screen and a multi-functional knob located in the upper right corner.
- Display Screen: Shows time, date, battery status, and connection mode. It can also display custom images or GIFs.
- Knob: By default, rotates to adjust system volume. Pressing the knob typically mutes/unmutes audio.
- Multimedia Buttons: Two buttons adjacent to the screen control backlight effects and screen display options.
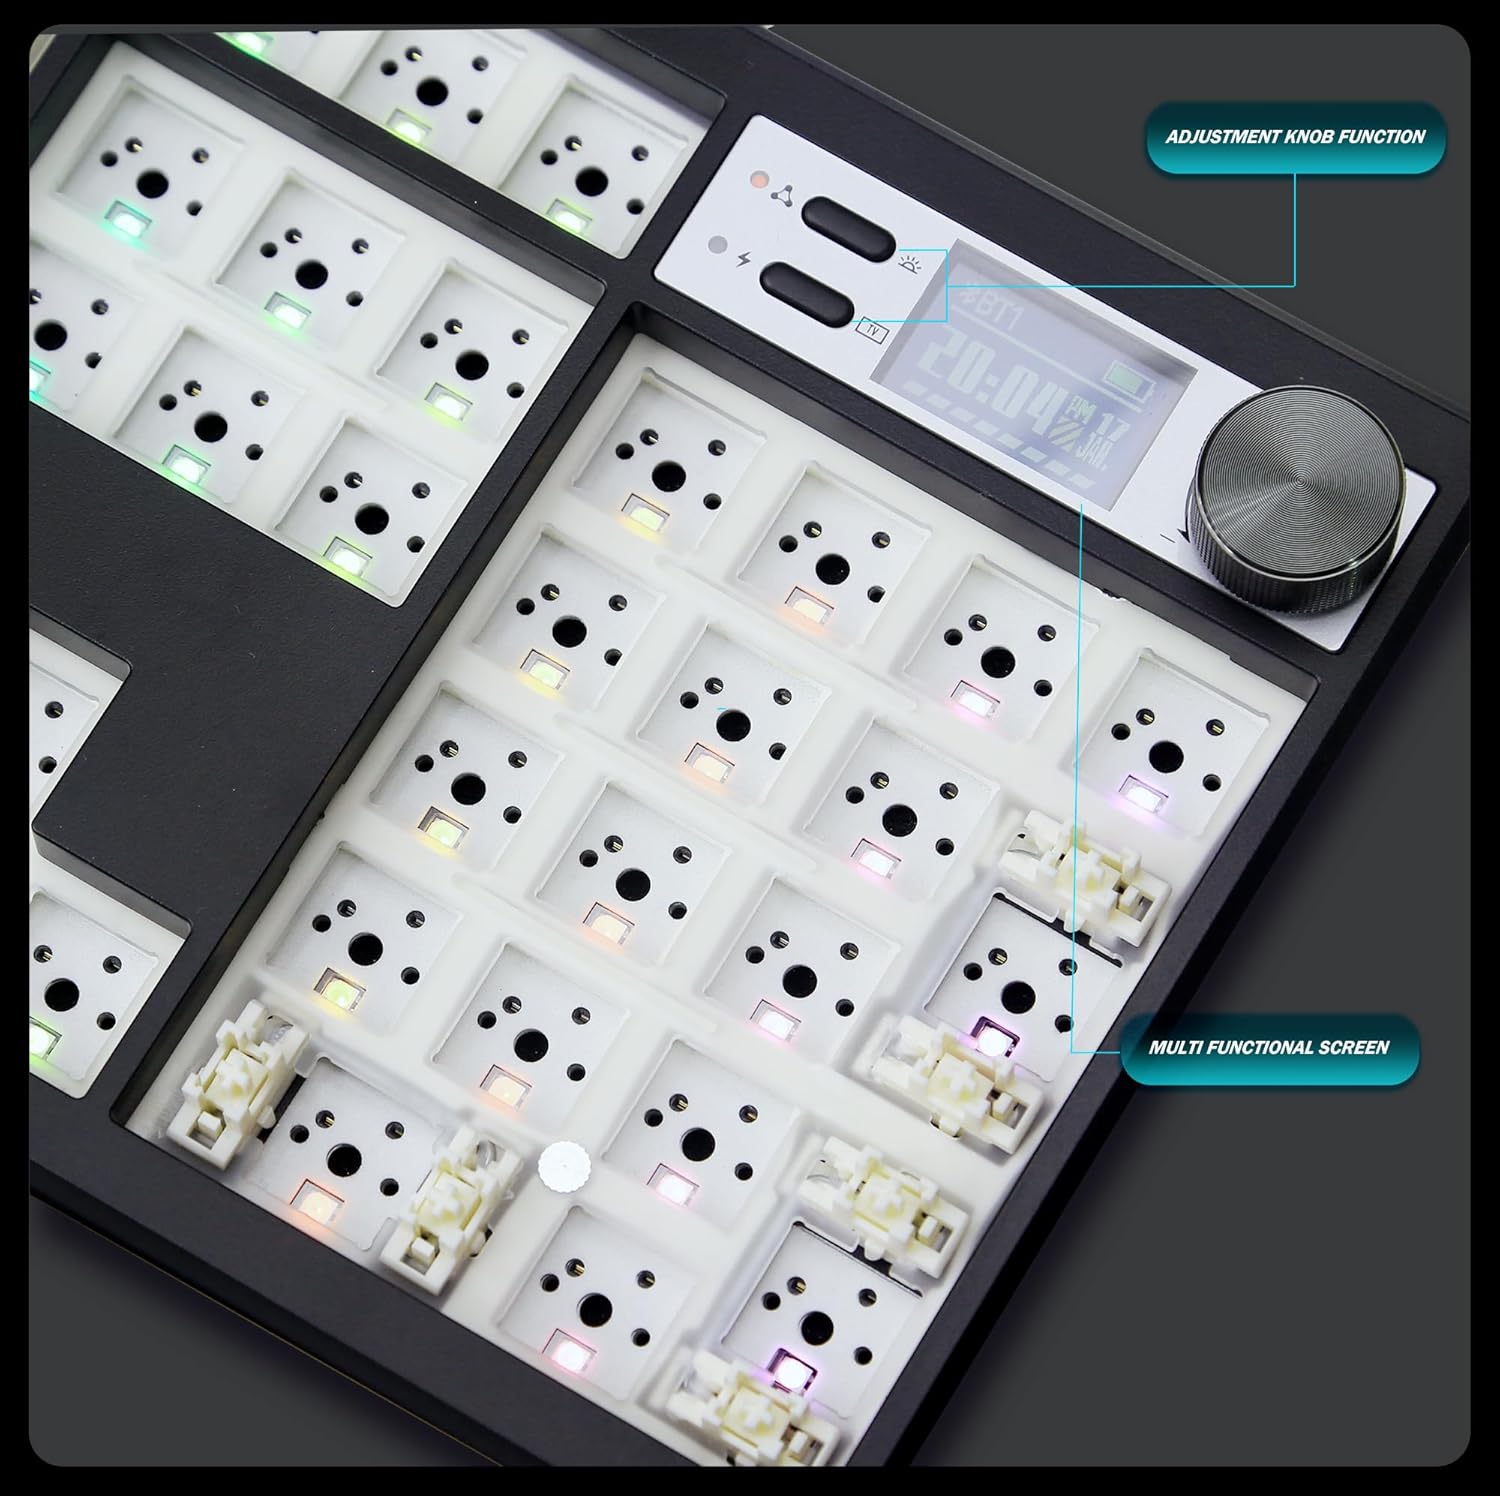
Image: A detailed view of the integrated smart display screen showing time and battery, alongside the textured multi-functional knob and two control buttons.
4.2 RGB Backlighting
The keyboard features south-facing RGB backlighting with various effects.
- Press FN + \| to cycle through different RGB lighting effects.
- Use the dedicated multimedia button next to the screen to adjust backlight brightness or toggle effects.
4.3 QMK/VIA Programming
The GMK104 is fully programmable using QMK/VIA software, allowing you to remap keys, create macros, and customize lighting effects.
- Download the VIA software from the official website.
- Connect the keyboard in wired mode.
- Use the VIA interface to customize key assignments, layers, and lighting.

Image: A screenshot illustrating the VIA software interface, showing key remapping and customization options for the keyboard layout.
4.4 Battery Management
The keyboard is equipped with a 4000mAh battery for extended wireless use.
- The smart display shows the current battery level.
- Connect the USB-C cable to charge the keyboard. It can be used while charging.
- To conserve battery, the screen can be turned off using the dedicated multimedia button.
5. Maintenance
5.1 Cleaning
- Disconnect the keyboard from all power sources before cleaning.
- Use a soft, dry cloth to wipe the surface of the keyboard.
- For deeper cleaning, remove keycaps using the keycap puller and use compressed air to clear debris from between switches.
- Avoid using harsh chemicals or abrasive materials.
5.2 Switch and Keycap Replacement
Thanks to the hot-swappable PCB, switches and keycaps can be easily replaced without soldering.
- Use the keycap puller to gently remove keycaps.
- Use a switch puller (not included) to carefully remove switches from the PCB.
- Insert new switches and keycaps as described in Section 3.1.
6. Troubleshooting
- Keyboard not responding: Ensure the keyboard is charged and properly connected (wired, 2.4GHz receiver, or Bluetooth paired). Try switching between connection modes.
- Keys not registering: Check if switches are fully seated in their sockets. Remove and re-insert the switch if necessary. Ensure switch pins are not bent.
- Bluetooth connection issues: Ensure the keyboard is in Bluetooth pairing mode (FN+Q/W/E). Forget the device on your computer/device and re-pair. Ensure no interference from other wireless devices.
- RGB lighting not working: Check if the lighting is turned off or set to minimum brightness. Cycle through lighting effects using FN + \| or the dedicated button.
- VIA software not detecting keyboard: Ensure the keyboard is connected via USB-C cable. Restart the VIA software and/or your computer.
7. Specifications
| Feature | Detail |
|---|---|
| Model Number | GMK104 |
| Connectivity | Bluetooth 5.0, 2.4GHz Wireless, USB Type-C Wired |
| Layout | Full Size (104 Keys) |
| Mounting Style | Gasket Mounted |
| Hot-Swappable | Yes (3-pin/5-pin switches) |
| Backlighting | South-Facing RGB |
| Programmability | QMK/VIA Compatible |
| Battery Capacity | 4000mAh |
| Special Features | Smart Display Screen, Multi-functional Knob |
| Compatible OS | Windows, macOS |
| Product Dimensions | 10"L x 4"W x 1"H (approx.) |
| Item Weight | 1.5 pounds (approx.) |
8. Warranty and Support
For warranty information and technical support, please refer to the official BOYI website or contact customer service directly.
Contact Information:
- Email: boyiservice2020@163.com
- Amazon Store: Visit the BOYI Store on Amazon and click "Ask a question" to contact us.