
1. Introduction
Thank you for choosing the Generic Long Reach Ratcheting Bypass Lopper. This tool is designed for efficient and precise cutting of branches, making pruning tasks easier and safer. Please read this manual carefully before using the lopper to ensure proper operation, maintenance, and safety.
2. Safety Information
Always prioritize safety when operating any gardening tool. Failure to follow these instructions may result in injury or damage to the tool.
- Wear Protective Gear: Always wear safety glasses, gloves, and appropriate footwear when using the lopper.
- Keep Clear: Ensure bystanders, especially children and pets, are at a safe distance from the work area.
- Inspect Before Use: Before each use, check the lopper for any damage, loose parts, or dull blades. Do not use if damaged.
- Proper Grip: Maintain a firm grip on the handles to prevent slippage.
- Stable Footing: Ensure you have stable footing before making a cut, especially when reaching for higher branches.
- Avoid Overreaching: Do not overreach or cut above shoulder height. Use the telescoping feature to extend reach safely.
- Cut Within Capacity: Do not attempt to cut branches thicker than the specified maximum cutting capacity (1.75 inches).
- Blade Care: The blade is sharp. Handle with extreme care. Keep fingers away from the blade during operation and cleaning.
- Storage: Store the lopper in a dry, secure place, out of reach of children.
3. Product Overview
The Generic Long Reach Ratcheting Bypass Lopper features extendable handles and a powerful ratcheting mechanism for efficient pruning.
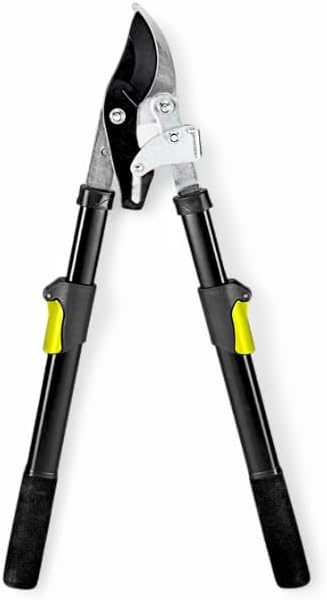
Figure 1: Overall view of the lopper with handles extended.
Components:
- Bypass Blade: High-carbon steel blade for clean, precise cuts.
- Anvil/Hook: Supports the branch during cutting.
- Ratcheting Mechanism: Increases cutting power with multiple squeezes.
- Telescoping Handles: Extendable handles for increased reach.
- Locking Mechanism: Secures handles at desired length.
- Cushioned Grips: Provide comfort and reduce hand fatigue.
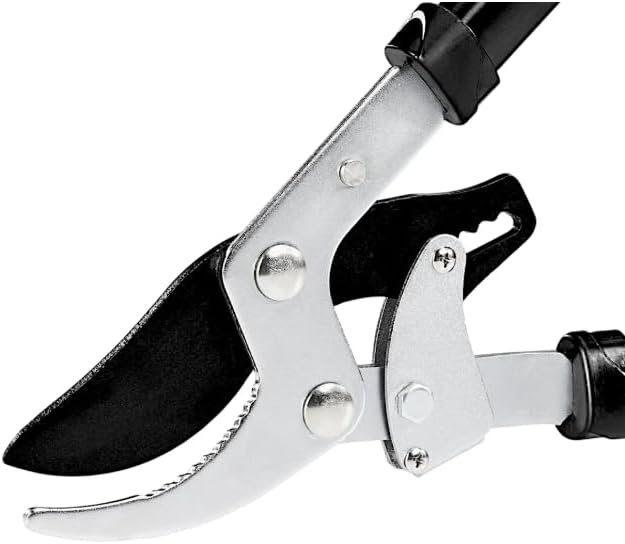
Figure 2: Detail of the ratcheting mechanism and blade assembly.
4. Setup
The lopper comes pre-assembled. Before first use, perform the following steps:
- Unpack: Carefully remove the lopper from its packaging.
- Inspect: Check for any shipping damage. Ensure all components are present and secure.
- Adjust Handle Length:
- Locate the locking mechanisms on each handle (typically a lever or button).
- Release the lock.
- Extend or retract the handles to your desired length (from 24.8 in. to 33.5 in.).
- Engage the locking mechanism firmly to secure the handles in place. Ensure both handles are locked at the same length for balanced operation.

Figure 3: Lopper with handles retracted, ready for adjustment.
5. Operating Instructions
Follow these steps for effective and safe pruning:
- Identify Target Branch: Select the branch you wish to cut. Ensure it is within the lopper's cutting capacity (up to 1.75 inches).
- Position the Lopper: Open the lopper blades wide enough to encompass the branch. Position the branch between the bypass blade and the anvil/hook. For best results, place the branch as deep into the jaws as possible.
- Engage Ratcheting Mechanism:
- Squeeze the handles together until you feel resistance and hear a click. This engages the ratcheting mechanism.
- Release the pressure slightly, allowing the handles to open slightly, but keep the blade engaged with the branch.
- Squeeze again. The ratcheting action allows you to apply increasing pressure in stages, making it easier to cut through thick branches with less effort.
- Repeat squeezing and releasing until the cut is complete.
- Complete the Cut: Continue the ratcheting action until the blade passes completely through the branch.
- Remove Lopper: Once the cut is made, open the handles fully and remove the lopper from the branch.

Figure 4: Demonstrating the lopper in use on a tree branch.

Figure 5: Detailed view of the blade making a cut.
6. Maintenance
Regular maintenance ensures the longevity and optimal performance of your lopper.
- Clean After Each Use: Remove sap, dirt, and debris from the blades and moving parts using a stiff brush and a damp cloth. For stubborn sap, use a specialized cleaner or rubbing alcohol.
- Dry Thoroughly: Ensure the lopper is completely dry before storage to prevent rust.
- Lubricate: Apply a light coat of machine oil or silicone spray to the pivot points, blade, and ratcheting mechanism periodically to ensure smooth operation and prevent rust.
- Sharpen Blades: Over time, the blade will dull. Sharpen the bypass blade using a sharpening stone or file, following the original bevel angle. Only sharpen the outer edge of the blade. If unsure, consult a professional.
- Check Fasteners: Periodically check all screws and bolts to ensure they are tight. Do not overtighten.
- Storage: Store the lopper in a clean, dry environment, preferably hung or in a protective sheath, away from moisture and extreme temperatures.
7. Troubleshooting
| Problem | Possible Cause | Solution |
|---|---|---|
| Difficulty cutting branches | Dull blade; branch too thick; sap buildup; insufficient leverage. | Sharpen blade; ensure branch is within 1.75" capacity; clean blade; use full ratcheting action. |
| Handles sticking or stiff | Lack of lubrication; dirt/debris in mechanism; rust. | Clean and lubricate pivot points and ratcheting mechanism; remove rust and lubricate. |
| Handles not locking securely | Locking mechanism dirty or damaged; handles not fully extended/retracted. | Clean locking mechanism; ensure handles are fully engaged at desired length; inspect for damage. |
| Uneven or ragged cuts | Dull blade; improper positioning of branch. | Sharpen blade; ensure branch is placed deep into the jaws for a clean bypass cut. |
8. Specifications
- Model: LOPPER59704
- Brand: Generic
- Blade Type: Bypass
- Blade Material: High-Carbon Steel
- Cutting Capacity: Up to 1.75 inches (4.45 cm)
- Handle Length (Adjustable): 24.8 inches to 33.5 inches (63 cm to 85 cm)
- Overall Dimensions (Retracted): Approximately 33"L x 10"W (84 cm L x 25 cm W)
- Features: Ratcheting mechanism, Telescoping handles, Cushioned grips
9. Warranty and Support
For information regarding warranty coverage or technical support, please refer to the retailer or manufacturer's official website where the product was purchased. Keep your proof of purchase for any warranty claims.
For general inquiries or assistance, please contact the manufacturer, ONE STOP GARDENS, through their customer service channels.