Introduction
This manual provides detailed instructions for the installation, operation, and maintenance of your Thermalright TL-M12QR X3 120mm PC Case Cooling Fans. These fans feature a daisy-chain design for simplified cable management, high airflow performance, Addressable RGB (ARGB) lighting with dual infinity mirrors, and durable S-FDB bearings. Please read this manual thoroughly before installation and use to ensure optimal performance and longevity of your product.

Image: Thermalright TL-M12QR X3 120mm PC Case Cooling Fans 3-pack, showcasing their vibrant ARGB lighting.
Setup
1. Unpacking and Component Check
Carefully remove the fans and accessories from the packaging. Verify that all components are present:
- Thermalright TL-M12QR 120mm Fans (3 units)
- Connecting Cable (1 unit)
- Mounting Screws
2. Fan Installation
The TL-M12QR fans feature a snap-on splicing structure for easy installation and disassembly. This modular design allows multiple fans to be connected directly to each other, reducing cable clutter.

Image: Visual guide demonstrating the simple snap-on installation and disassembly process for the fans.
- Align the first fan with the desired mounting location in your PC case or radiator. Secure it using the provided mounting screws.
- To connect additional fans, align the side of the next fan with the installed fan. Gently push them together until they snap securely into place. The wireless splicing mechanism will connect the power and ARGB signals between the fans.
- Repeat for any additional fans in the cluster.
3. Cable Management
The daisy-chain design significantly simplifies cable management, requiring only one main cable connection for a cluster of fans.
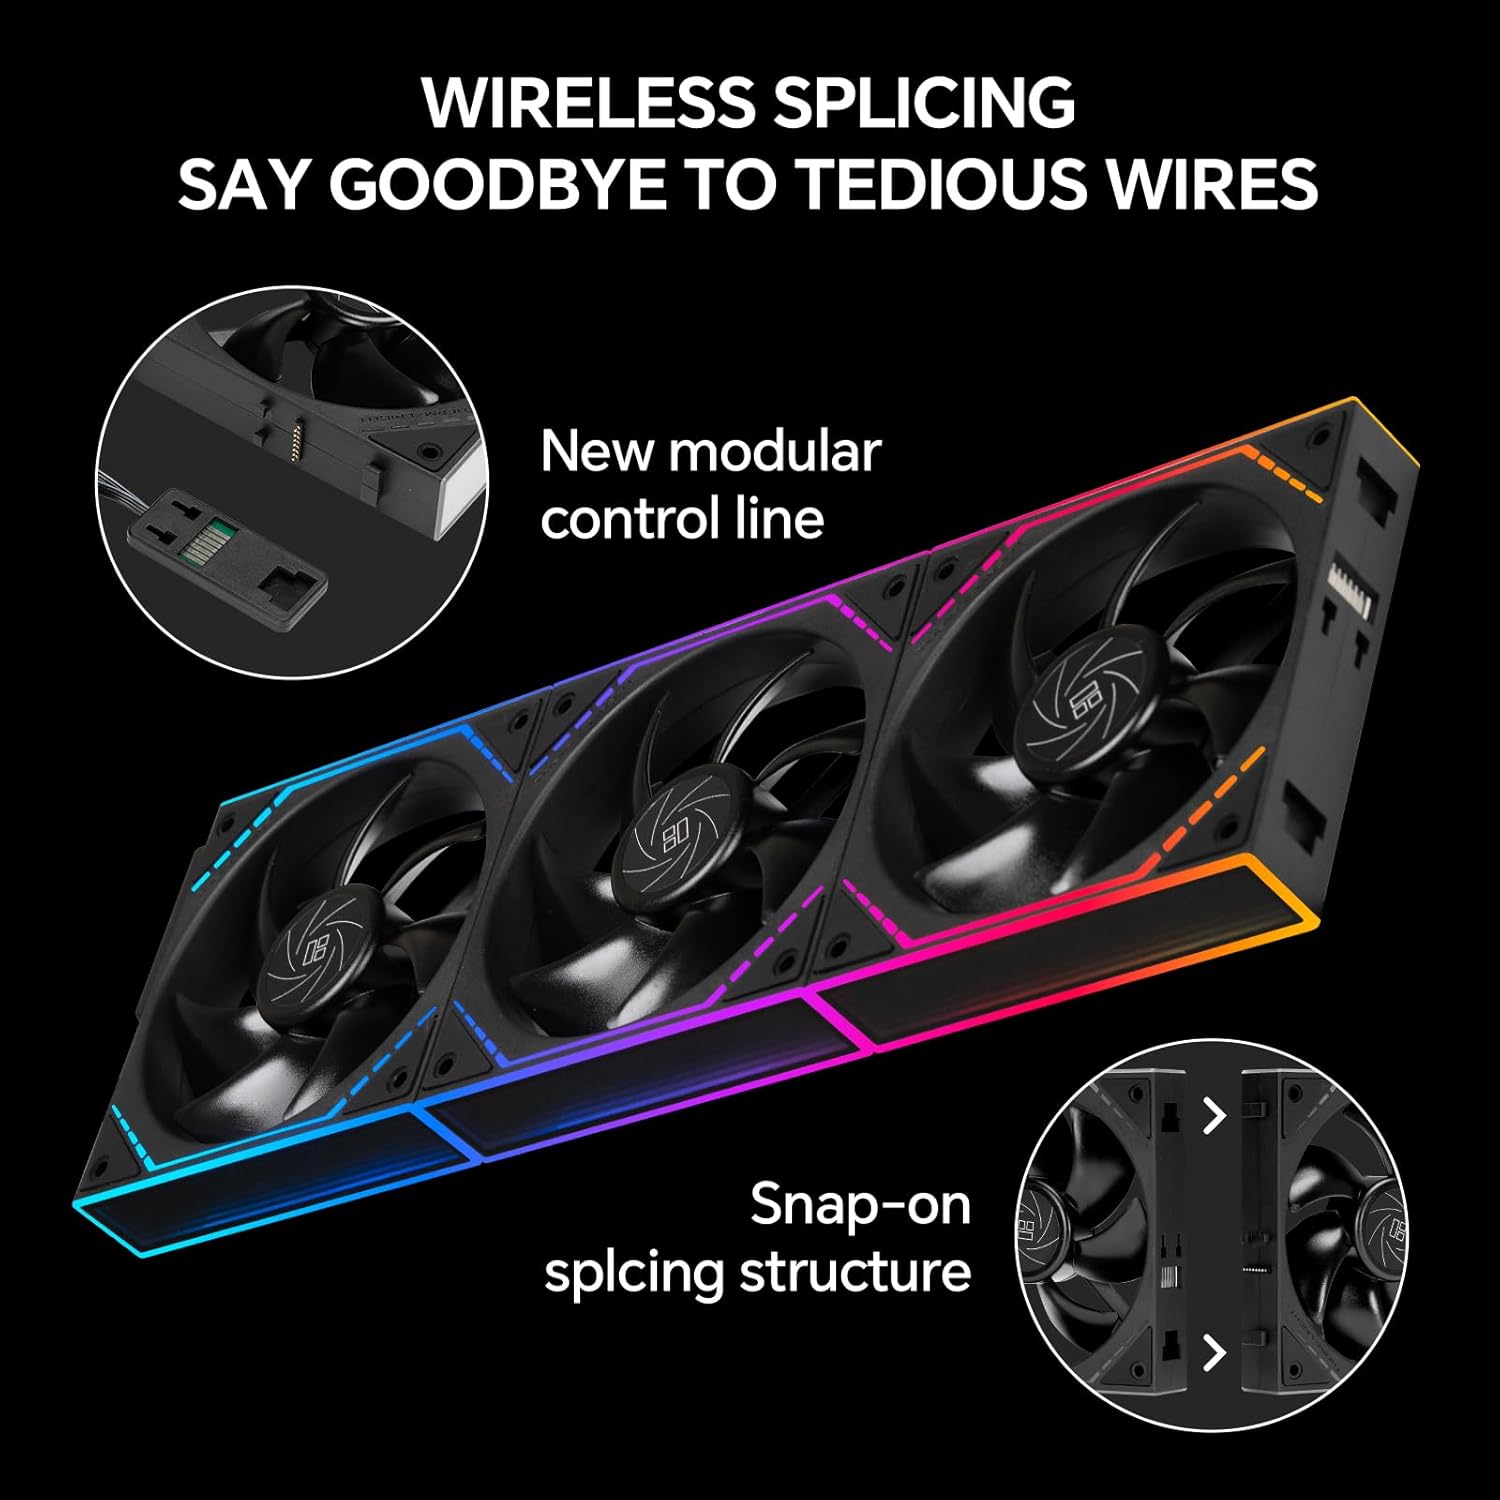
Image: Illustration of the wireless splicing feature and the modular control line, highlighting reduced cable complexity.

Image: The 4-pin PWM cable and 3-pin 5V ARGB connector for fan power and lighting control.
- Connect the 4-pin PWM cable from the fan cluster to an available 4-pin fan header on your motherboard. This allows for automatic speed control based on system temperature.
- Connect the 3-pin 5V ARGB cable from the fan cluster to an available 3-pin 5V Addressable RGB header on your motherboard. This enables synchronization and control of the lighting effects.
- Ensure all connections are secure.
Operating
1. Fan Speed Control
The Thermalright TL-M12QR fans utilize a 4-pin PWM (Pulse Width Modulation) connection for precise speed control. When connected to a compatible motherboard header, the fan speed will automatically adjust based on the CPU or system temperature, optimizing cooling performance and noise levels.
- You can configure fan curves and control speeds through your motherboard's BIOS/UEFI settings or dedicated software provided by your motherboard manufacturer.
- The fans operate at a maximum speed of 1500 RPM, providing high airflow for effective cooling.
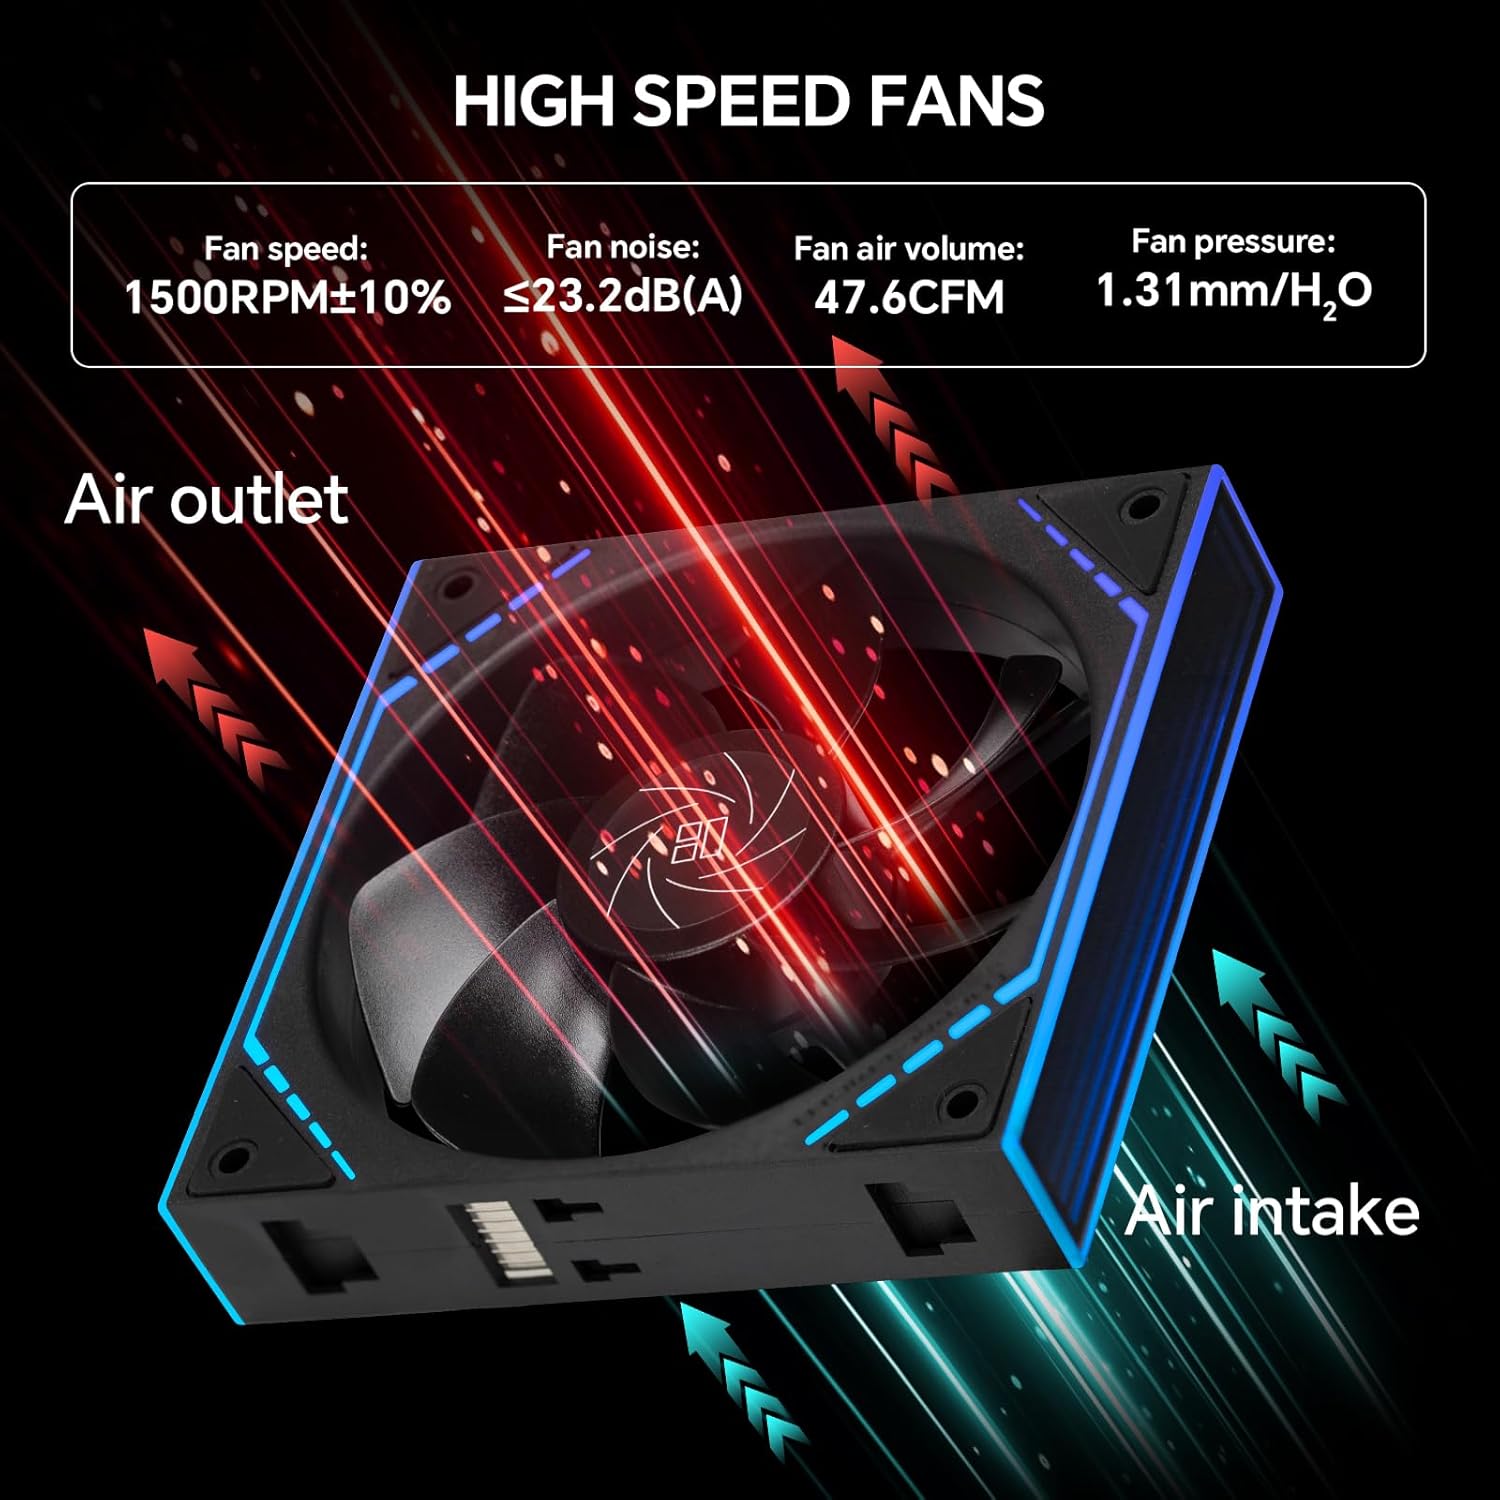
Image: Airflow diagram and performance specifications for the high-speed fans.
2. ARGB Lighting Control
The fans feature unique ARGB infinity mirror lighting effects and bezel ARGB lines. These can be synchronized with your motherboard's ARGB software for a cohesive lighting scheme.

Image: ARGB sync lighting effects, compatible with various motherboard software (ASUS Aura Sync, GIGABYTE RGB Fusion, MSI Mystic Light Sync, ASRock Polychrome Sync).
- Ensure the 3-pin 5V ARGB cable is correctly connected to your motherboard's ARGB header.
- Use your motherboard's ARGB control software (e.g., ASUS Aura Sync, GIGABYTE RGB Fusion, MSI Mystic Light Sync, ASRock Polychrome Sync) to customize lighting patterns, colors, and synchronization with other ARGB components.
- The dual infinity mirror design creates a depth effect, enhancing the visual appeal of your PC build.

Image: Various custom lighting effects achievable with the TL-M12Q fan series.
3. Product Videos
For a visual demonstration of the fans in action, please refer to the following videos:
Video: This video demonstrates the Thermalright TL-M12Q fans integrated into a PC build, showcasing their ARGB lighting effects and overall visual appeal within a system.
Video: This video provides a detailed look at the Thermalright TL-M12Q series case fans, highlighting their design, ARGB lighting, and the daisy-chain connection mechanism.
Maintenance
1. Bearing Care
The Thermalright TL-M12QR fans are equipped with high-durability S-FDB (Fluid Dynamic Bearing) technology. These bearings are designed for low-friction and low-noise operation, providing a long service life without requiring maintenance. Do not attempt to disassemble the fan for bearing maintenance.

Image: Illustration of the long-lasting S-FDB bearing, emphasizing its maintenance-free design.
2. Cleaning
Regular cleaning helps maintain optimal airflow and performance.
- Power off your PC and disconnect it from the power source before cleaning.
- Use a can of compressed air to gently blow away dust from the fan blades and frame. Hold the fan blades to prevent them from spinning rapidly during cleaning, which can damage the bearings.
- For stubborn dirt, use a soft, dry cloth to wipe the fan blades and frame. Avoid using liquid cleaners directly on the fans.
Troubleshooting
1. Fans Not Spinning
- Check Power Connection: Ensure the 4-pin PWM cable is securely connected to a functional fan header on your motherboard.
- BIOS Settings: Verify that the fan header is enabled in your motherboard's BIOS/UEFI settings and that the fan curve is configured correctly (e.g., not set to 0 RPM at low temperatures if you expect constant spin).
- Daisy-Chain Integrity: If multiple fans are daisy-chained, ensure all fans are properly snapped together to establish electrical contact.
2. ARGB Lights Not Working or Incorrect Colors
- Check ARGB Connection: Ensure the 3-pin 5V ARGB cable is securely connected to a 3-pin 5V Addressable RGB header on your motherboard. (Note: Do NOT connect to a 4-pin 12V RGB header, as this can damage the LEDs).
- Motherboard Software: Use your motherboard's ARGB control software to verify settings and apply desired lighting effects. Ensure the software recognizes the ARGB device.
- Daisy-Chain Integrity: For daisy-chained fans, confirm that each fan is correctly connected to the next to ensure the ARGB signal propagates through the chain. If one fan in the chain is not lighting up, try swapping its position or testing it individually.
3. Excessive Noise
- Check Mounting: Ensure fans are securely mounted and not vibrating against the PC case or other components. The fans include silicone rubber pads for vibration damping.
- Dust Buildup: Clean the fans as described in the Maintenance section to remove any dust that might be causing imbalance or increased noise.
- Fan Speed: Adjust fan speeds through your motherboard's BIOS/UEFI or software. Higher RPMs naturally produce more noise.
Specifications
| Feature | Specification |
|---|---|
| Product Dimensions | 4.7 x 0.98 x 4.88 inches (120 x 25 x 124 mm) |
| Item Model Number | TL-M12QRX3 |
| Brand | Thermalright |
| Power Connector Type | 4-Pin PWM |
| Voltage | 12 Volts |
| Wattage | 1.8 watts |
| Cooling Method | Air |
| Compatible Devices | Desktop PC Cases, CPU Coolers (Air/Water) |
| Noise Level | 23.2 Decibels (Max) |
| Material | Industrial Grade PBT Polymers, Silicone Rubber |
| Maximum Rotational Speed | 1500 RPM |
| Bearing Type | S-FDB (Fluid Dynamic Bearing) |
| Lighting | Addressable RGB (ARGB) with Dual Infinity Mirrors |
Warranty
Thermalright products are covered by a standard manufacturer's warranty. For specific warranty terms and conditions, please refer to the warranty information provided with your purchase or visit the official Thermalright website. Keep your proof of purchase for warranty claims.
Support
If you encounter any issues or have questions regarding your Thermalright TL-M12QR X3 fans that are not covered in this manual, please contact Thermalright customer support through their official website or the retailer from whom you purchased the product. Provide your model number (TL-M12QRX3) and a detailed description of the issue for faster assistance.


