
1. Product Overview
The BOMGE 602B-4Ch 2x400W is a versatile 6-channel powered mixer amplifier designed for various audio applications. It integrates a mixer and a power amplifier, providing 2x400W output at 4 ohms. Key features include USB and Bluetooth connectivity, 6 high-quality microphone preamps with switchable +48V phantom power, 256 digital signal processing (DSP) effects, and a 7-band main output equalizer.

Figure 1: Front Panel Layout and Controls
This unit combines essential audio processing and amplification into a single device, suitable for live sound, studio recording, and public address systems.
2. Setup Instructions
2.1 Unpacking and Initial Inspection
Carefully remove the mixer from its packaging. Inspect the unit for any signs of damage during transit. Retain the packaging for future transport or storage.
2.2 Power Connection
- Ensure the mixer's power switch is in the OFF position.
- Connect the provided power cable to the AC input on the rear panel of the mixer.
- Plug the other end of the power cable into a standard 110V AC power outlet.

Figure 2: Rear Panel with Power and Speaker Outputs
2.3 Connecting Microphones and Line Inputs
The mixer supports both XLR and 1/4'' unbalanced plugs for mono channels.
- For microphones, connect the XLR cable to the MIC/LINE input jack.
- For line-level instruments or devices, use a 1/4'' TS cable for the LINE input.
- If using condenser microphones, activate the +48V phantom power by pressing the corresponding button for the channel. Ensure all connections are made before engaging phantom power.

Figure 3: XLR and 6.35mm Input Connections
2.4 Connecting Speakers
The mixer features 2x400W power output at 4 ohms.
- Connect your passive speakers to the OUTPUT A and OUTPUT B jacks on the rear panel using appropriate speaker cables.
- Ensure the speakers' impedance matches the mixer's output specifications (4 ohms recommended).
2.5 Bluetooth Connectivity
- Press the 'MODE' button on the USB/MP3 player section until 'Bluetooth' mode is selected.
- On your Bluetooth device (smartphone, tablet), search for available devices and select 'pmx-602b' (or similar name).
- Once paired, audio from your device will stream to the mixer. Bluetooth range is approximately 15 feet.

Figure 4: Bluetooth Connection Setup
2.6 USB/Flash Drive Connection
- Insert a USB flash drive into the USB port on the mixer's front panel.
- The mixer will automatically detect the drive and enter playback mode.
- Use the controls in the USB/MP3 section to play, pause, and navigate tracks.

Figure 5: USB Flash Drive Connection
3. Operating Instructions
3.1 Channel Controls
Each mono channel (1-6) features the following controls:
- GAIN: Adjusts the input sensitivity for the connected microphone or instrument.
- 3-BAND EQ (HIGH, MID, LOW): Adjusts the treble, midrange, and bass frequencies for the channel.
- AUX: Controls the level of the channel signal sent to the AUX output.
- FX: Controls the level of the channel signal sent to the internal DSP effects processor.
- PAN: Adjusts the stereo position of the channel signal (left to right).
- VOLUME FADER: Controls the overall output level of the channel.
- PAD: Attenuates the input signal for high-level sources.
- MUTE: Silences the channel output.
- SOLO (PFL): Isolates the channel signal for monitoring through headphones without affecting the main mix.
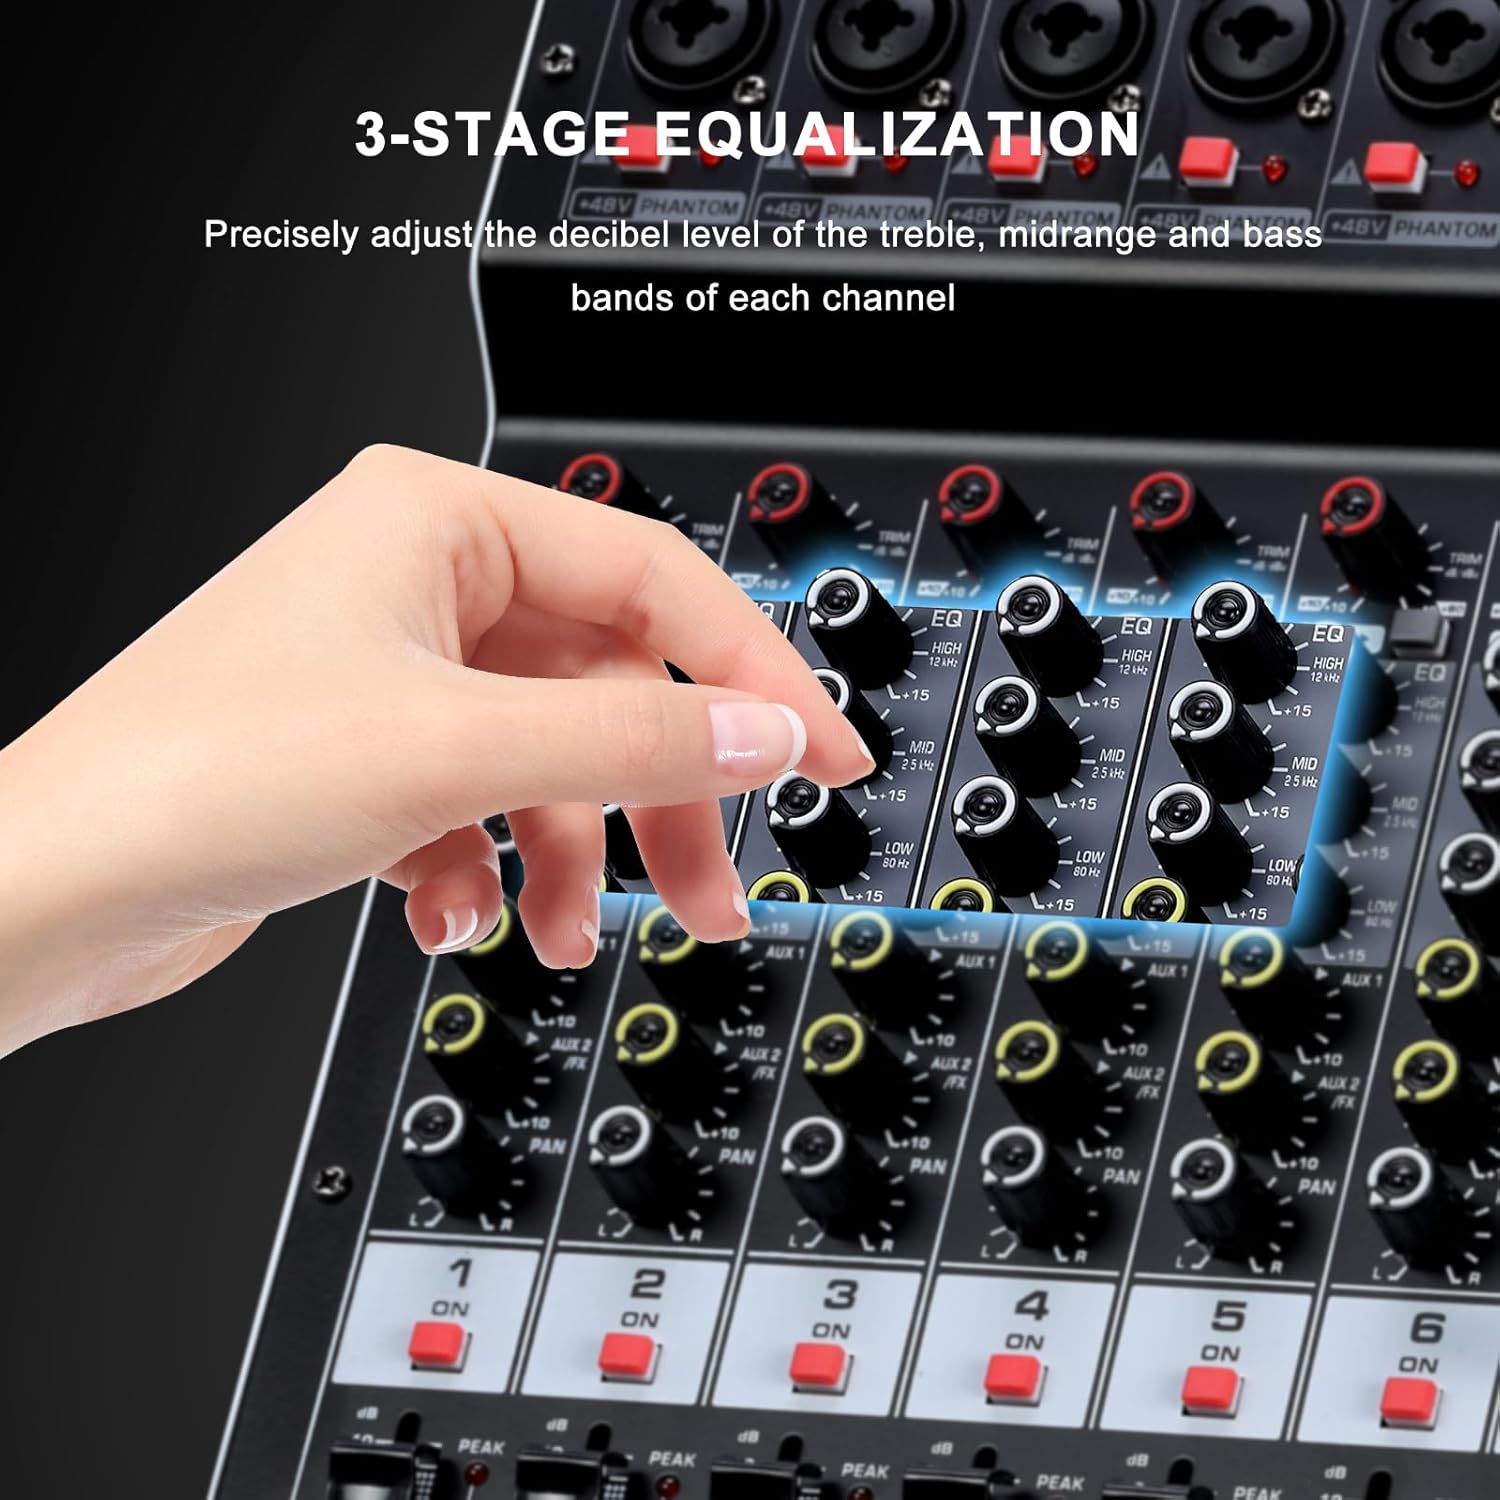
Figure 6: 3-Band Equalization Controls
3.2 DSP Effects
The mixer includes a 24-bit digital effects processor with 256 preset effects.
- Use the 'PROGRAM' knob to select one of the 256 available effects (e.g., Hall, Room, Chorus, Plate, Delay). The selected effect number will be displayed on the screen.
- Adjust the 'FX LEVEL' control to set the overall intensity of the selected effect.
- The 'FX MUTE' button can temporarily disable the effects.
- An FX foot switch input allows external control to turn effects on or off.
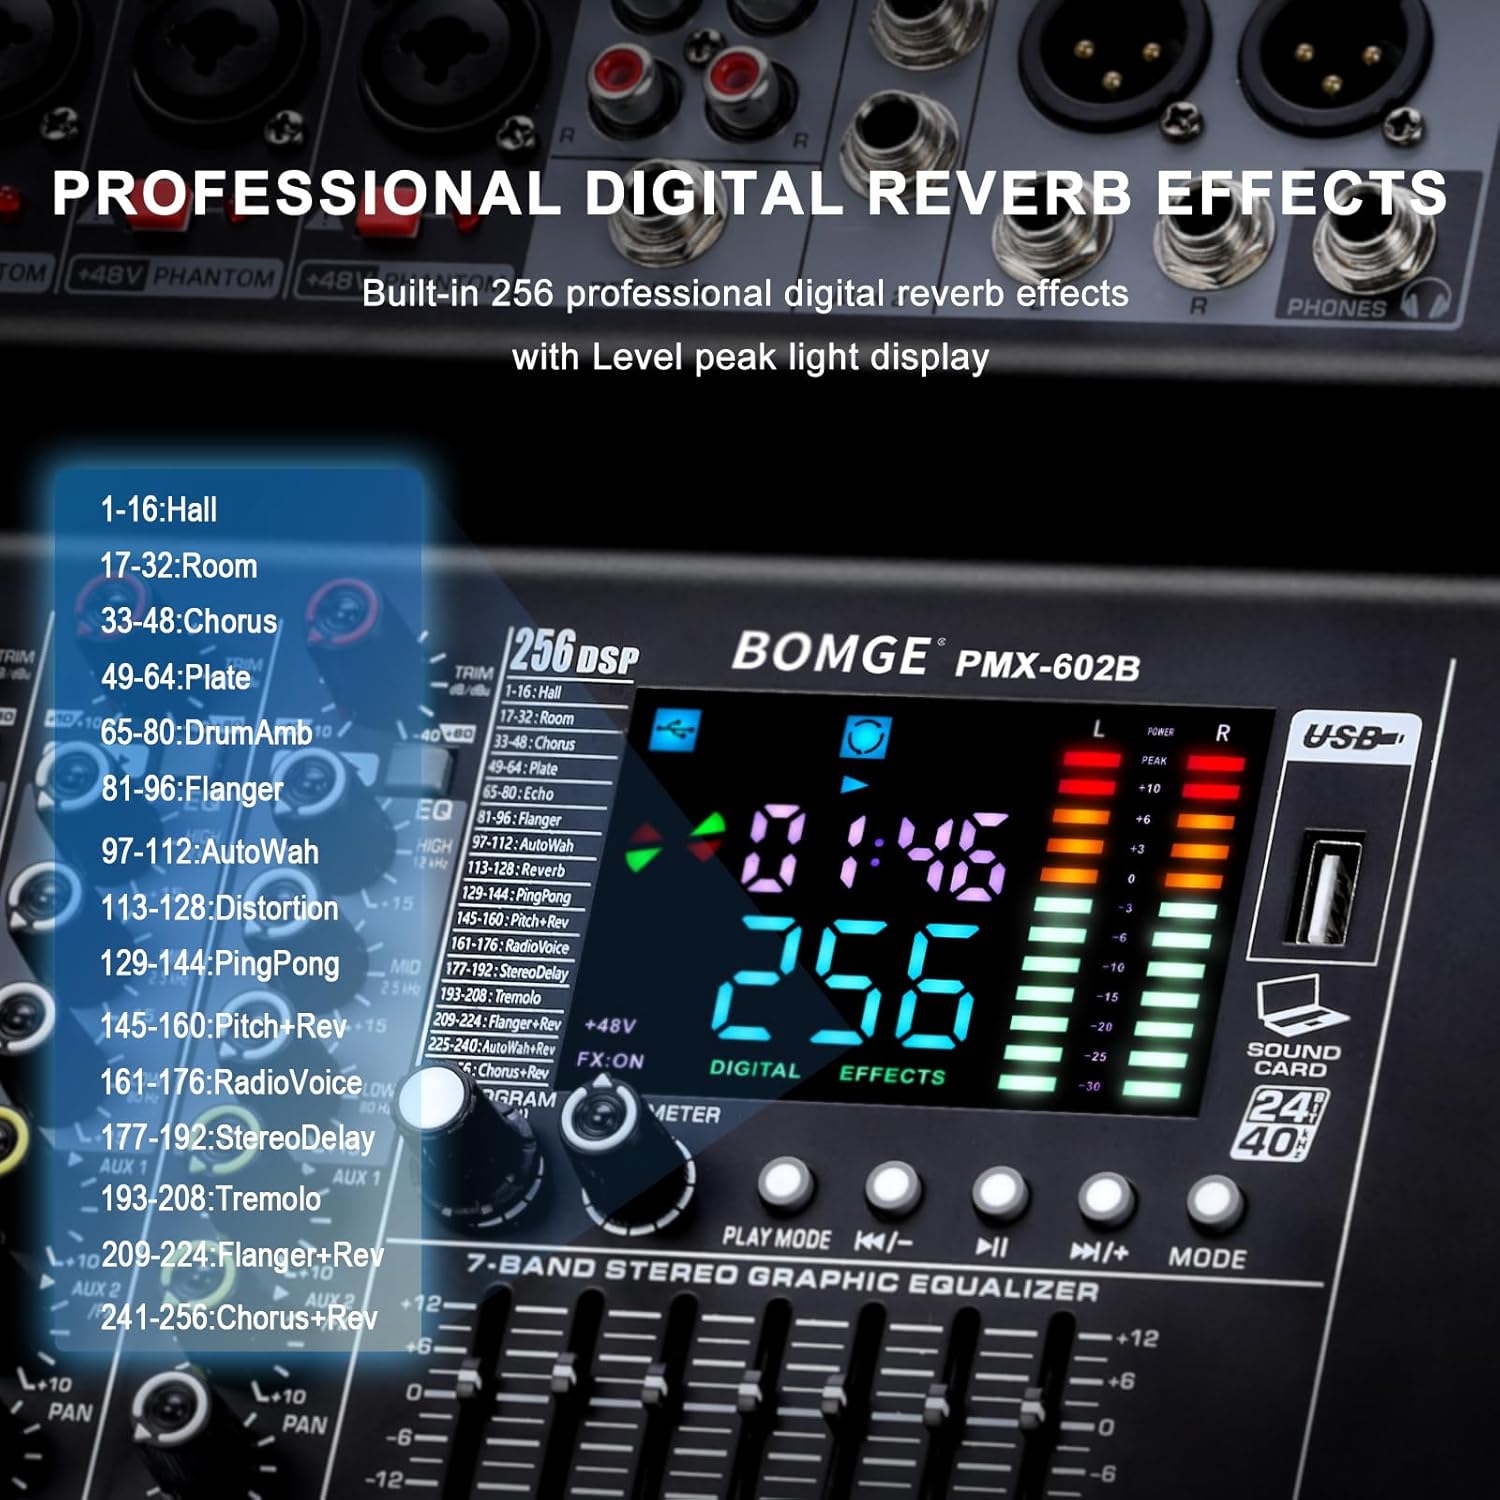
Figure 7: DSP Effects Selection and Display
3.3 Main Output 7-Band Equalizer
The main output features a 7-band graphic equalizer for fine-tuning the overall audio output.
- Adjust the faders for each frequency band to shape the sound of the main mix.
- This allows for compensation for room acoustics or specific sound preferences.
3.4 USB Playback and Recording
The USB interface supports playback of digital audio files and recording of the main mix.
- Playback: Insert a USB flash drive with audio files. Use the 'PLAY/PAUSE', 'PREV', 'NEXT', and 'MODE' buttons to control playback.
- Recording: The mixer can record the main output directly to a connected USB device. Refer to the specific instructions on the unit's display for initiating and stopping recordings.
- The mixer also functions as a USB sound card/audio interface for connection to a computer (MAC compatible).
3.5 Monitoring
Connect headphones to the headphone jack for monitoring the main signal or individual channels using the PFL (Pre-Fader Listen) function.
4. Maintenance
4.1 Cleaning
Regularly clean the mixer's exterior with a soft, dry cloth. Avoid using abrasive cleaners, solvents, or waxes, as these can damage the finish and controls. Ensure the unit is powered off and unplugged before cleaning.
4.2 Ventilation
Ensure that the ventilation openings on the mixer are not obstructed. Proper airflow is crucial to prevent overheating and ensure long-term reliability of the internal components.
4.3 Storage
When not in use for extended periods, store the mixer in a cool, dry place, away from direct sunlight and extreme temperatures. It is recommended to use the original packaging for protection.
5. Troubleshooting
This section addresses common issues you might encounter with your BOMGE powered mixer.
5.1 No Sound Output
- Check Power: Ensure the mixer is powered on and connected to a working outlet.
- Volume Levels: Verify that all channel faders, main output faders, and connected speaker volumes are turned up.
- Mute/Solo Buttons: Check if any channel's MUTE button is engaged or if a SOLO button is active, which would mute other channels.
- Connections: Confirm all audio cables (inputs, outputs, speakers) are securely connected.
- Input Source: Ensure the input source (microphone, instrument, Bluetooth, USB) is active and sending a signal.
5.2 Distorted Sound
- Gain Levels: Reduce the GAIN knob for the affected channel if the PEAK LED is frequently lighting up.
- Volume Levels: Lower channel faders or the main output fader to prevent clipping.
- Speaker Impedance: Ensure connected speakers match the mixer's impedance requirements (4 ohms).
- Cable Quality: Try different audio cables to rule out faulty wiring.
5.3 Bluetooth Connection Issues
- Mode Selection: Ensure the mixer is in Bluetooth mode.
- Device Visibility: Make sure your Bluetooth device's Bluetooth is enabled and discoverable.
- Distance: Keep the Bluetooth device within 15 feet of the mixer.
- Interference: Move away from other wireless devices that might cause interference.
5.4 USB Device Not Recognized
- Format: Ensure the USB flash drive is formatted correctly (e.g., FAT32).
- File Types: Verify that the audio files on the USB drive are supported by the mixer.
- Re-insert: Remove and re-insert the USB drive.
- Other Devices: Try a different USB flash drive to determine if the issue is with the drive itself.
5.5 Unusual Noise (e.g., Loud Fan)
- Normal Operation: Some fan noise is normal for powered equipment, especially under heavy load.
- Excessive Noise: If the fan noise is unusually loud or accompanied by other sounds, ensure proper ventilation. If the issue persists, contact customer support.
5.6 Safety Warning: Smoke or Malfunction
If you observe smoke, sparks, or hear unusual noises like an explosion from the unit, immediately disconnect the power cable from the wall outlet. Do not attempt to operate or repair the unit. Contact customer support for assistance.
6. Specifications
| Feature | Specification |
|---|---|
| Model Number | 602B-4Ch 2x400w |
| Brand | BOMGE |
| Number of Channels | 6 (Mono) + 1 (RCA Stereo) |
| Power Output | 2 x 400W (4 ohms) |
| Phantom Power | +48V (switchable) |
| DSP Effects | 256 presets |
| Equalization | 3-band EQ per channel, 7-band graphic EQ on main output |
| Connectivity | Auxiliary, Bluetooth, RCA, USB |
| Voltage | 110 Volts |
| Product Dimensions | 13"D x 14.17"W x 5.52"H (33cm x 36cm x 14cm) |
| Item Weight | 14.3 pounds (6.5 Kilograms) |

Figure 8: Product Dimensions
7. Warranty and Support
7.1 Warranty Information
Please refer to the warranty card included with your product or visit the official BOMGE website for detailed warranty terms and conditions. Typically, BOMGE products come with a limited manufacturer's warranty covering defects in materials and workmanship.
7.2 Customer Support
For technical assistance, troubleshooting not covered in this manual, or warranty claims, please contact BOMGE customer support. You can usually find contact information on the BOMGE official website or through your retailer.
BOMGE Official Store: Visit BOMGE Store on Amazon
