
1. Introduction
Thank you for choosing the GETSHOWERSET Matt Black Rain Shower System. This luxurious 2-in-1 shower system is designed to enhance your bathroom experience with its modern aesthetics and versatile functionalities, including a large LED rain/waterfall shower head, a bathtub spout, and a handheld shower. This manual provides essential information for safe installation, operation, and maintenance of your new shower system.
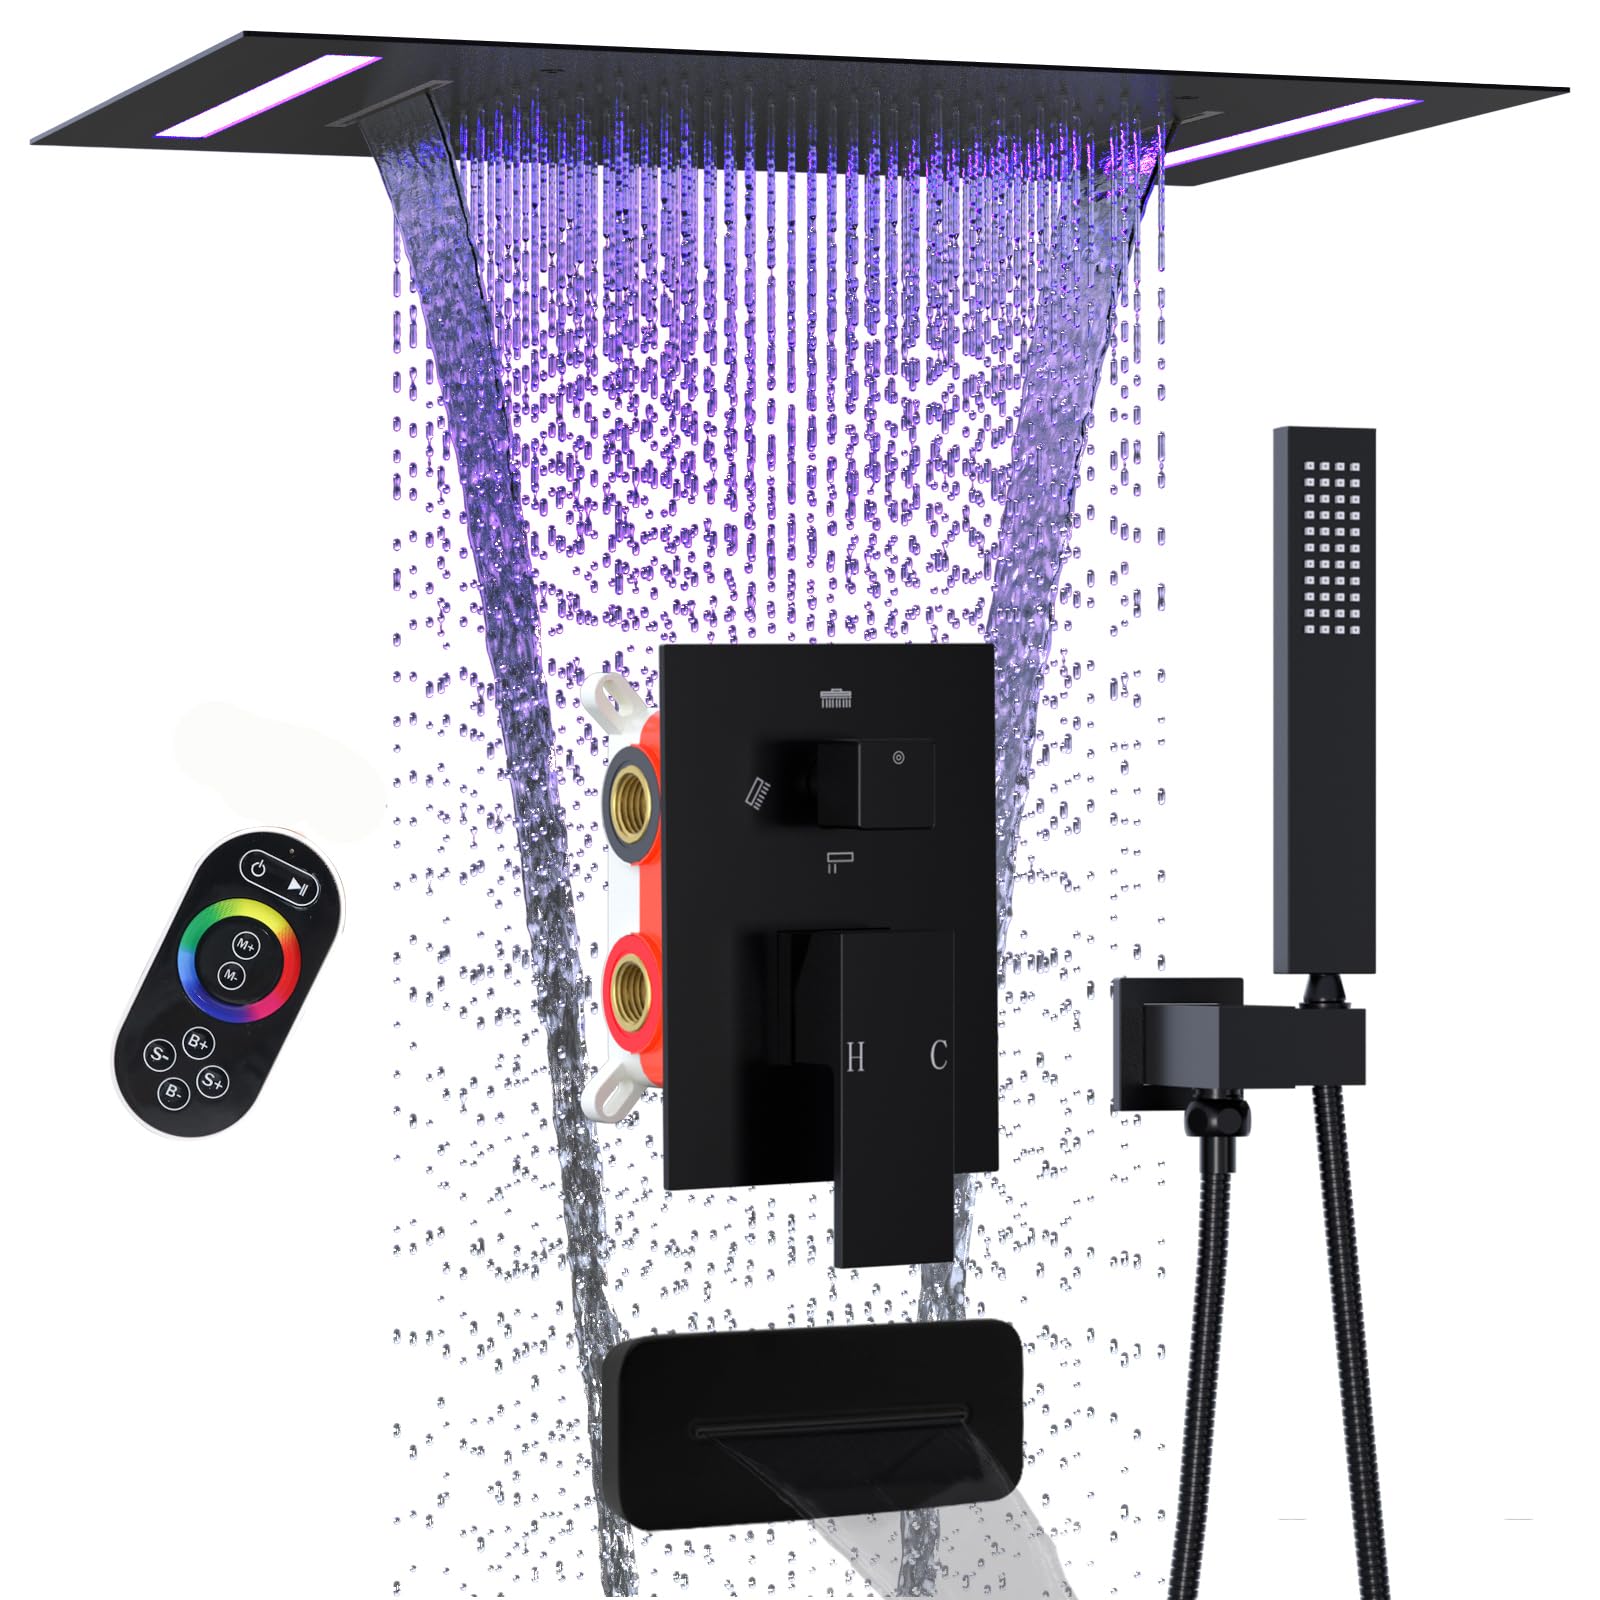
Figure 1: Overview of the GETSHOWERSET Matt Black Rain Shower System components and functions.
2. Safety Information
- Professional Installation Recommended: Installation of this shower system requires plumbing and electrical knowledge. It is highly recommended to hire a qualified professional for installation to ensure proper function and safety.
- Water Pressure: Ensure your water supply meets the minimum pressure requirement of 0.5 MPa (500 Kilopascal) for optimal performance.
- Anti-Scalding Protection: The shower valve is equipped with a pressure balance cartridge and check valve to prevent scalding from sudden changes in water pressure.
- Electrical Safety (LED): The LED lighting is powered by 100-240V AC. Ensure all electrical connections are made by a qualified electrician and comply with local electrical codes.
- Battery Safety (Remote): The LED remote control uses 3 x 1.5V AAA lithium batteries (not included). Do not mix old and new batteries. Dispose of used batteries responsibly.
- Product Weight: The system weighs approximately 30 pounds. Ensure the ceiling structure can safely support the weight of the shower head when filled with water.
3. Package Contents
Verify that all components are present and undamaged before proceeding with installation:
- 1 x 14 x 20 inch (35 x 50 cm) Ceiling-mounted LED Rain/Waterfall Shower Head
- 1 x Bathtub Spout
- 1 x Handheld Shower with Holder
- 1 x 4-Function Shower Valve and Trim Kit
- 1 x Shower Hose (59 inches, 304 stainless steel)
- 1 x LED Remote Control (AAA batteries not included)
- Mounting Hardware (screws, anchors, etc.)
4. Specifications
| Feature | Specification |
|---|---|
| Brand | GETSHOWERSET |
| Model | GS-2BS-14x20LED-93 |
| Color | Matt Black |
| Material | Brass, Stainless Steel |
| Finish Type | Matt Black |
| Number of Handles | 2 |
| Handle Material | Brass |
| Item Weight | 30 Pounds |
| Mounting Type | Ceiling Mount (Shower Head), Wall Mount (Tub Spout) |
| Shower Head Size | 14 x 20 inches (35 x 50 cm) |
| Maximum Pressure | 500 Kilopascal (0.5 MPa minimum) |
| LED Power Supply | 100-240V AC |
| Remote Control Batteries | 3 x 1.5V AAA (not included) |
5. Setup and Installation
Due to the complexity of this system, professional installation by a licensed plumber and electrician is strongly recommended. This section provides general guidelines; refer to the detailed installation diagrams provided with your product for specific steps.
5.1 Pre-Installation Checks
- Ensure all necessary plumbing lines (hot/cold water) and electrical wiring (for LED) are available at the installation site.
- Verify that the ceiling structure can support the weight of the shower head.
- Confirm water pressure meets the minimum requirement of 0.5 MPa.
5.2 Shower Valve Installation
The 4-function shower valve is designed for in-wall installation. It includes a pressure balance cartridge and check valve for safety. Ensure the valve is securely mounted and all connections are watertight. The front plate of the valve indicates the functions for easy reference.
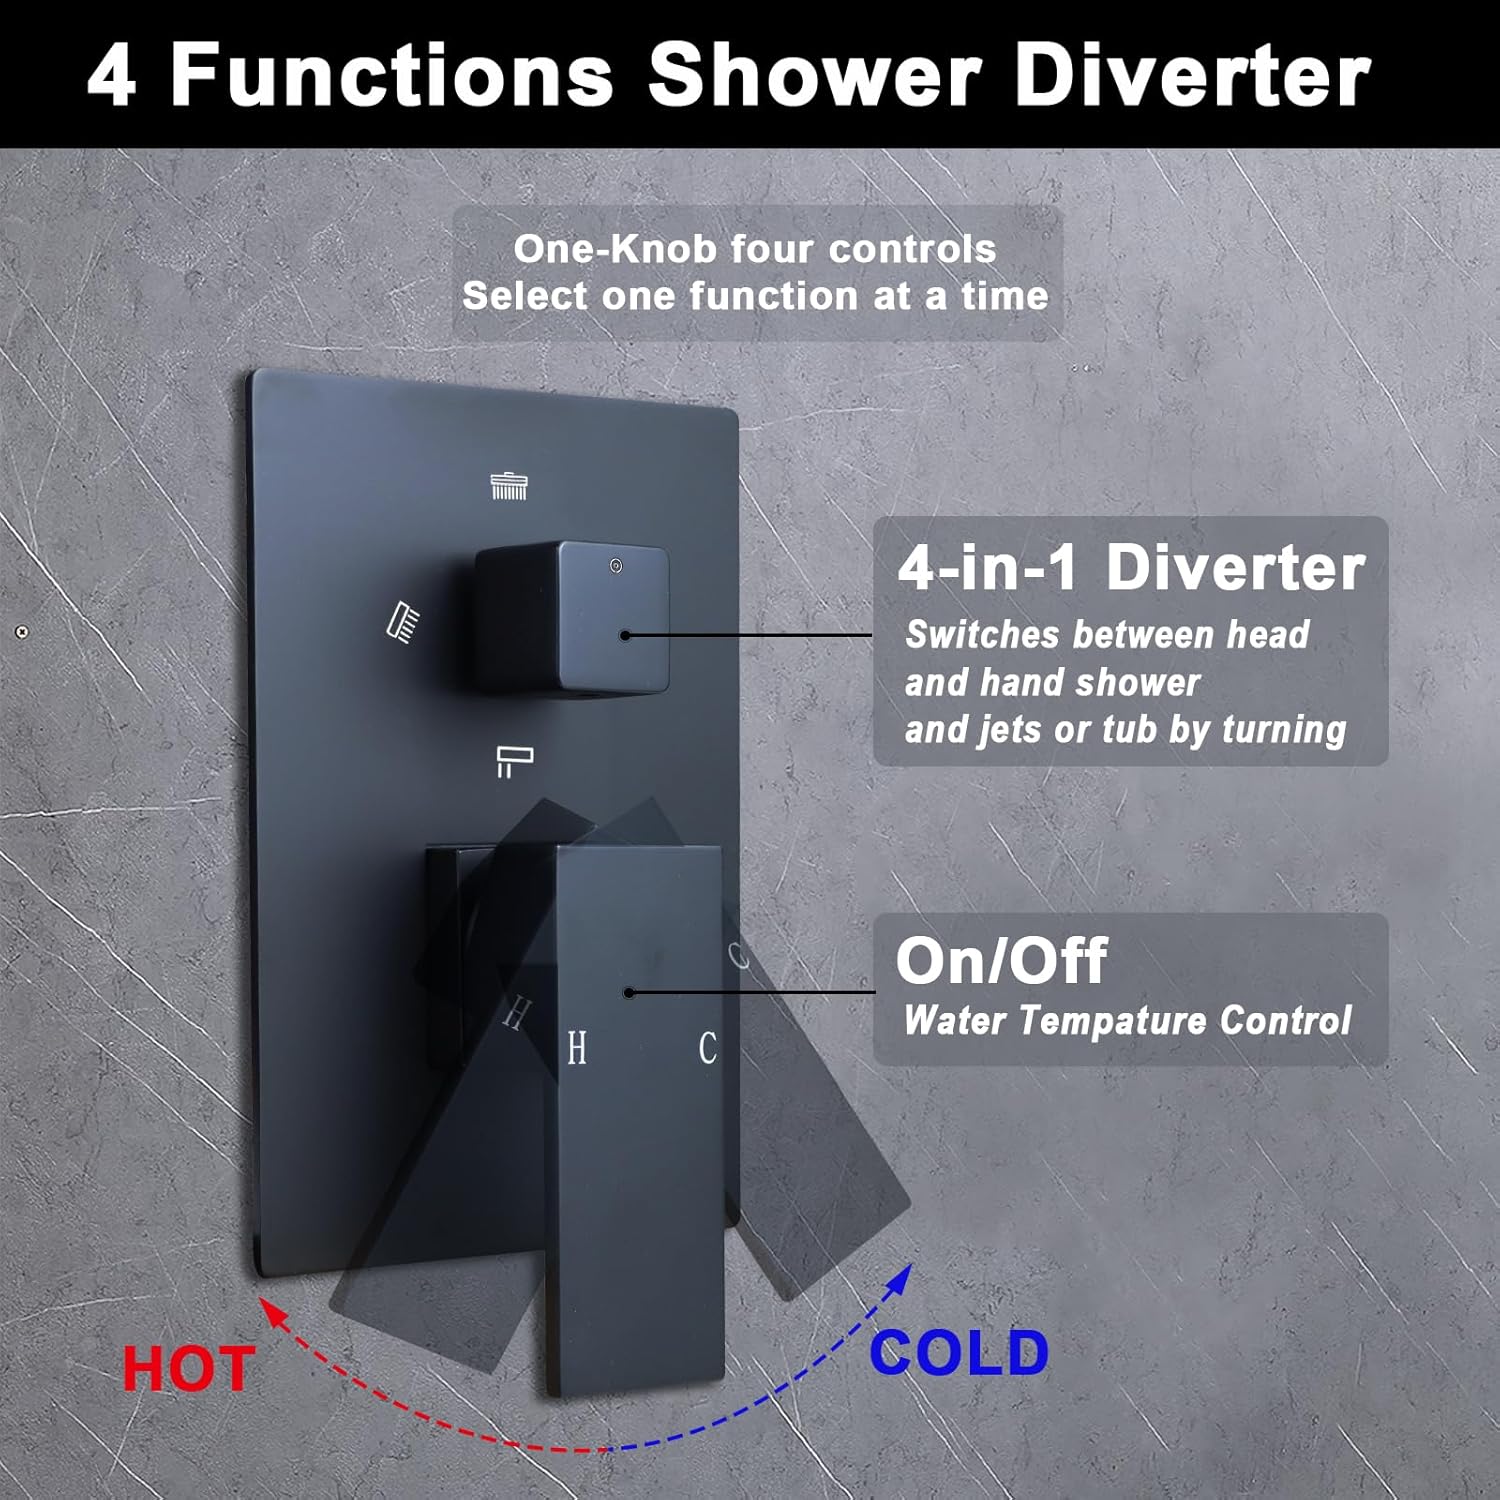
Figure 2: The 4-function shower diverter allows selection of one function at a time and controls water temperature.
5.3 LED Shower Head Installation
The 14x20 inch LED shower head is designed for ceiling mounting. Securely fasten the shower head to the ceiling structure. Connect the water supply lines and the 100-240V AC power supply for the LED lights. Ensure all electrical connections are properly insulated and grounded.

Figure 3: The LED shower head offers both rainfall and waterfall modes with customizable lighting.
5.4 Bathtub Spout Installation
The bathtub spout features an NPT 1/2 inch wall-mount threaded connection. Ensure a strong and leak-proof connection. The spout is adjustable for directing the water flow.

Figure 4: The bathtub spout can be adjusted to direct the waterfall stream.
5.5 Handheld Shower Installation
Install the handheld shower holder at a convenient height. Connect the 59-inch stainless steel shower hose to the handheld shower and the shower valve outlet. Ensure all connections are tight.

Figure 5: The handheld shower features high pressure and self-cleaning nozzles.
6. Operating Instructions
6.1 Water Flow Control
The shower system features a 4-function diverter knob on the shower valve. Rotate the knob to select one of the following functions:
- Rainfall Mode: Water flows from the main shower head in a gentle rain pattern.
- Waterfall Mode: Water flows from the main shower head in a broad waterfall stream.
- Bathtub Spout: Water flows from the bathtub spout.
- Handheld Spray: Water flows from the handheld shower.
The temperature control handle allows you to adjust the hot and cold water mix.

Figure 6: The main control panel allows selection of different shower modes.
6.2 LED Lighting Control
The LED lights in the shower head are controlled by a dedicated remote control. Insert 3 x 1.5V AAA batteries (not included) into the remote before use.
- Power ON/OFF: Use the power button on the remote to turn the LED lights on or off.
- Color Selection: Touch the color ring on the remote with your finger to select your desired light color.
- Color Temperature Adjusting: Use the 'M+' and 'M-' buttons to adjust the color temperature.
- Dynamic Brightness Adjusting: Use the 'B+' and 'B-' buttons to increase or decrease the brightness of the lights.
- Dynamic Speed Adjusting: Use the 'S+' and 'S-' buttons to adjust the speed of dynamic lighting modes.

Figure 7: The remote control for LED lighting allows for color, brightness, and speed adjustments.
7. Maintenance
7.1 Cleaning the Shower Head Nozzles
The shower head features flexible silicone nozzles. To prevent blockages and ensure optimal water flow, periodically clean any lime scale buildup by gently rubbing the nozzles with your fingers.

Figure 8: Flexible silicone nozzles allow for easy manual cleaning of lime scale.
7.2 General Cleaning
Clean the matt black finish with a soft, damp cloth. Avoid using abrasive cleaners, harsh chemicals, or scouring pads, as these can damage the finish. Dry the surfaces immediately after cleaning to prevent water spots.
8. Troubleshooting
If you encounter issues with your GETSHOWERSET Rain Shower System, refer to the following common problems and solutions:
- Low Water Pressure:
- Check if the main water supply valve is fully open.
- Ensure the minimum water pressure requirement of 0.5 MPa is met.
- Clean any mineral buildup from the shower head nozzles (refer to Section 7.1).
- Water Leaks:
- Check all threaded connections for tightness.
- Ensure plumbing tape or sealant was used correctly during installation.
- Inspect O-rings and gaskets for damage.
- LED Lights Not Working:
- Ensure the 100-240V AC power supply to the shower head is connected and active.
- Check the batteries in the remote control and replace them if necessary (3 x 1.5V AAA).
- Ensure the remote control is within range and pointed towards the receiver.
- Difficulty Switching Functions:
- Ensure the diverter knob is fully rotated to each position.
- If the knob is stiff, check for mineral buildup or internal obstruction (professional assistance may be required).
If these steps do not resolve the issue, please contact customer support.
9. Warranty and Support
The GETSHOWERSET Rain Shower System is guaranteed for 5 years from the date of purchase. This warranty covers manufacturing defects and material flaws under normal use and service.
For any questions regarding your product, installation, operation, or warranty claims, please contact GETSHOWERSET customer support via email. Please have your purchase receipt and model number (GS-2BS-14x20LED-93) available when contacting support.