
1. Important Safety Information
Read and understand all safety warnings and instructions before operating this pump. Failure to follow these instructions may result in electric shock, fire, serious injury, or property damage. Keep this manual for future reference.
- Electrical Safety: Ensure the power source matches the pump's voltage (115V AC). Do not operate the pump with a damaged cord or plug. Always use a ground fault circuit interrupter (GFCI) when operating the pump outdoors or in wet locations.
- Water Safety: Do not pump flammable or corrosive liquids. This pump is designed for clean water transfer. Do not immerse the motor in water.
- Personal Safety: Wear appropriate personal protective equipment (PPE) such as safety glasses and gloves. Keep children and unauthorized persons away from the operating pump.
- Overheat Protection: The pump features built-in automatic thermal overload protection. If the pump overheats, it will shut off automatically. Allow it to cool down before restarting.
- Placement: Place the pump on a stable, level surface. Ensure adequate ventilation around the motor.
2. Product Overview
The FOTING 1.6HP Shallow Well Pump (Model JGP11007) is a portable water transfer pump designed for various applications including garden irrigation, farm use, and draining. It features a 1.6 horsepower motor, capable of transferring up to 1600 gallons per hour (GPH).
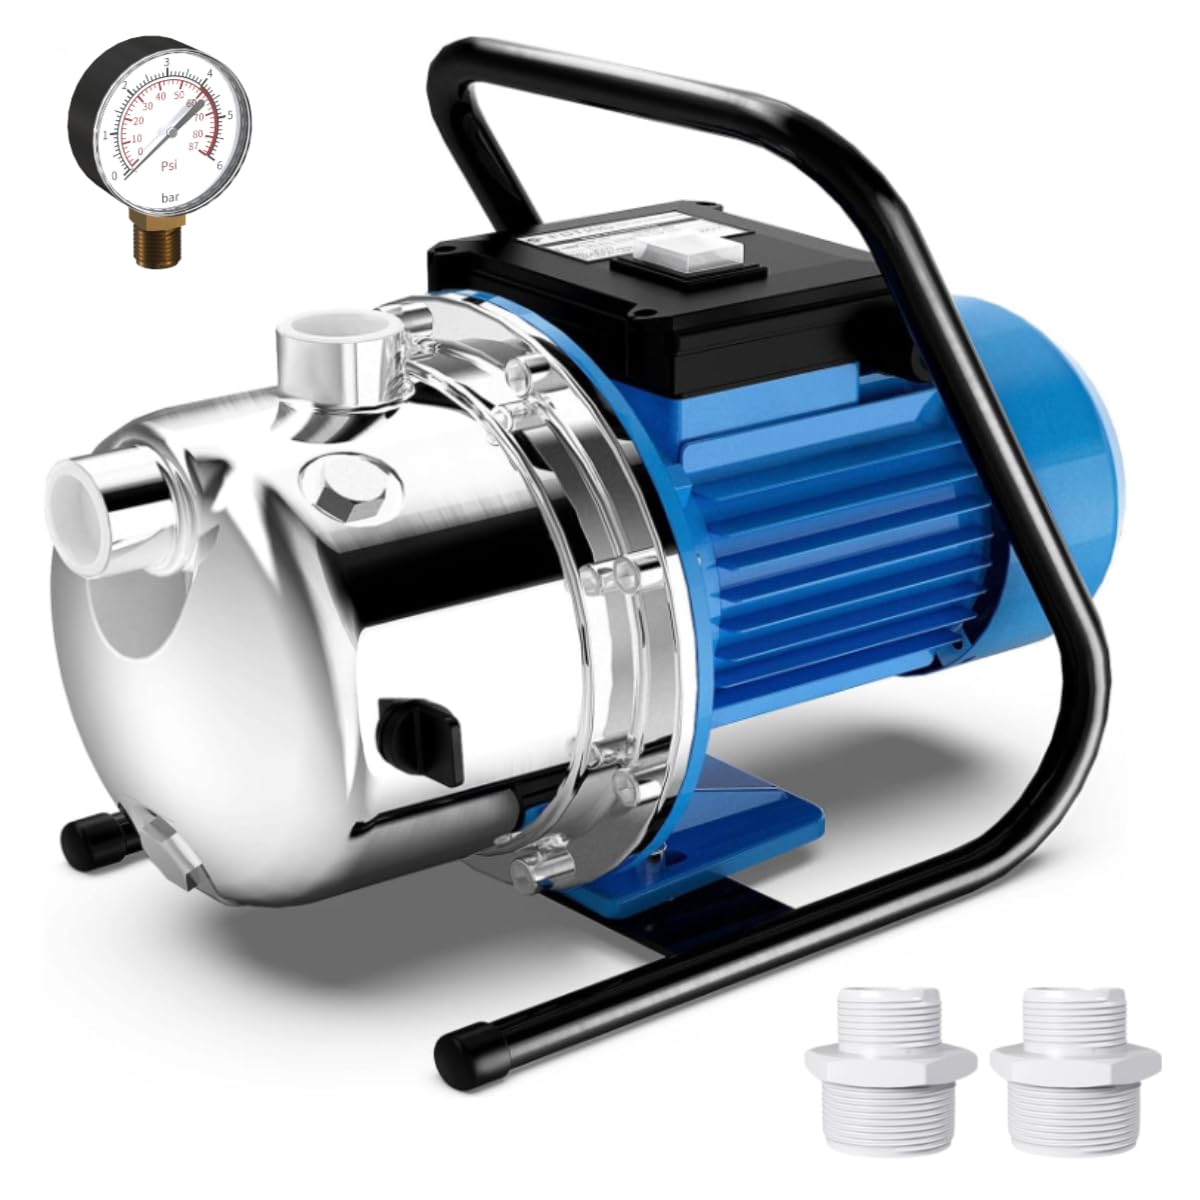
Figure 2.1: FOTING 1.6HP Shallow Well Pump (Model JGP11007) with included accessories.
Key Features:
- High Power Motor: 1.6 HP motor provides high flow and pressure.
- High Flow Rate: Max 1600 GPH for efficient water transfer.
- Impressive Lift and Suction: Max lift height up to 147 feet and max suction depth of 26 feet.
- Durable Construction: High-strength stainless steel head and aluminum body for corrosion and abrasion resistance.
- Portable Design: Lightweight with an easy-to-carry iron handle.
- Safety Features: Waterproof On/Off switch and built-in automatic thermal overload protection.
- Easy Connection: Equipped with 1" NPT outlet and inlet.

Figure 2.2: Detailed view of pump components including 1.6 HP motor, safety switch, pressure gauge, stainless steel head, and NPT fittings.

Figure 2.3: The pump features an easy-to-carry iron handle and a 6.6 ft power cable for portability.
3. Setup and Installation
Proper setup is crucial for the safe and efficient operation of your FOTING shallow well pump. Follow these steps carefully.
3.1 Unpacking and Inspection
- Carefully remove the pump and all accessories from the packaging.
- Inspect the pump for any signs of damage during shipping. Do not operate if damaged.
- Verify all components are present: pump unit, pressure gauge, and any included connectors.
3.2 Placement
- Position the pump on a firm, level surface near the water source.
- Ensure the pump is protected from direct weather exposure if used outdoors for extended periods.
- Maintain adequate clearance around the pump for ventilation and access.
3.3 Connecting Hoses
The pump is equipped with 1" NPT inlet and outlet ports. Water hoses are not included and must be purchased separately.
- Suction Hose: Connect a suitable suction hose (minimum 1" diameter) to the pump's inlet port. Ensure all connections are airtight to prevent air leaks, which can affect priming and performance. For shallow wells, ponds, or tanks, ensure the suction hose is submerged and includes a foot valve to prevent backflow.
- Discharge Hose: Connect a discharge hose (minimum 1" diameter) to the pump's outlet port. Secure all connections to prevent leaks under pressure.

Figure 3.1: Illustration of typical pump connections for water taps and self-priming applications.
3.4 Priming the Pump
Before first use, or if the pump has run dry, it must be primed. This involves filling the pump casing with water.
- Locate the priming port (usually a cap on top of the pump casing).
- Remove the priming cap.
- Slowly fill the pump casing with clean water until it overflows from the priming port.
- Replace the priming cap securely.
- Ensure the suction hose is fully submerged in the water source.

Figure 3.2: The priming port is located on the top of the pump head. Ensure it is securely closed after priming.
4. Operating Instructions
Once the pump is properly set up and primed, you can begin operation.
- Power Connection: Plug the 6.6 ft power cable into a grounded 115V AC power outlet. Ensure the outlet is protected by a GFCI.
- Start the Pump: Flip the waterproof On/Off switch to the "On" position. The pump motor will start.
- Monitor Performance: Observe the water flow and the pressure gauge (if installed). The pump should begin transferring water within a short period.
- Shut Down: To stop the pump, flip the On/Off switch to the "Off" position.
- After Use: Always turn off the switch after use. If the pump will not be used for an extended period, drain it completely to prevent freezing or stagnation.

Figure 4.1: The waterproof On/Off switch ensures safe operation in various conditions.
Important Operating Notes:
- Do not run the pump dry. Running without water can cause severe damage to the motor and seals.
- The pump is designed for a maximum fluid temperature of 95°F (35°C).
- The pump operates quietly, typically less than 60 dB, minimizing disturbance.

Figure 4.2: The pump is designed for quiet operation, typically below 60 dB.
5. Maintenance
Regular maintenance ensures the longevity and optimal performance of your pump.
- Cleaning: Periodically clean the exterior of the pump with a damp cloth. Do not use harsh chemicals or abrasive cleaners.
- Winterization: If the pump will be stored in an area subject to freezing temperatures, it must be completely drained of water to prevent damage. Disconnect hoses, remove priming cap, and tilt the pump to ensure all water exits.
- Storage: Store the pump in a dry, protected area when not in use.
- Check Connections: Regularly inspect all hose connections for leaks and tighten as necessary.
6. Troubleshooting
This section provides solutions to common issues you might encounter with your pump.
| Problem | Possible Cause | Solution |
|---|---|---|
| Pump does not start. |
|
|
| Pump runs but no water flows. |
|
|
| Low water flow or pressure. |
|
|
| Pump leaks water. |
|
|
7. Specifications
Technical specifications for the FOTING 1.6HP Shallow Well Pump (Model JGP11007).
| Feature | Specification |
|---|---|
| Brand | FOTING |
| Model Number | JGP11007 |
| Horsepower | 1.6 HP |
| Max Flow Rate | 1600 GPH |
| Max Lift Height | 147 feet |
| Max Suction Depth | 26 feet |
| Power Source | Corded Electric |
| Voltage/Frequency | 115V/60HZ |
| Max Pressure | 4.5 BAR |
| Discharge/Inlet | 1" NPT |
| Cable Length | 6.6 feet |
| Material | Aluminum, Stainless Steel |
| Max Fluid Temperature | 95°F (35°C) |

Figure 7.1: Visual summary of the pump's key specifications.

Figure 7.2: Performance curve illustrating the relationship between head and flow rate.
8. Warranty and Support
FOTING is committed to providing professional technical support and ensuring customer satisfaction.
- For warranty information, please refer to the documentation included with your purchase or contact FOTING customer service.
- For technical assistance, troubleshooting, or parts inquiries, please contact FOTING customer support.
- Keep your purchase receipt as proof of purchase for warranty claims.
"Quality, Service and Reputation" are the principles of FOTING's culture.
