1. Introduction
This manual provides comprehensive instructions for the installation, operation, and maintenance of your visiPower Smart Electronic Door Lock (Model Z17-17cm). This advanced lock offers multiple unlocking methods including fingerprint, password, IC card, mechanical key, and app control, ensuring enhanced security and convenience for your home or office.
2. Safety Information
Please read all safety instructions carefully before installation and use. Failure to follow these instructions may result in damage to the product, property, or personal injury.
- Do not expose the lock to direct water or extreme temperatures.
- Use only the specified battery type (4 AA batteries, not included).
- Do not attempt to disassemble or repair the lock yourself. Contact qualified personnel for service.
- Keep mechanical keys in a secure location outside the property.
- Ensure the door frame and door are structurally sound before installation.
3. Package Contents
Verify that all components are present in the package:
- Smart Electronic Door Lock (Front and Rear Panels)
- 17CM Lock Body (Mortise)
- Mechanical Keys (2)
- IC Cards (2)
- Installation Accessory Kit (screws, spindles, etc.)
- Instruction Manual (this document)

Image: Overview of the smart door lock components and included accessories. This includes the main lock unit, the mortise lock body, two mechanical keys, two IC cards, and various installation hardware.
4. Product Overview
The visiPower Smart Electronic Door Lock features a sleek design with integrated biometric and keypad functionalities. The front panel includes the touchscreen keypad, fingerprint sensor, and IC card reader. The rear panel houses the battery compartment and manual override.

Image: The visiPower Smart Electronic Door Lock, showing both the exterior and interior handles and panels. The exterior panel features a numeric keypad and a fingerprint sensor on the handle.

Image: A visual representation of the multiple unlocking methods supported by the smart lock, including fingerprint, password, IC card, mobile app, NFC, and traditional key.
5. Setup and Installation
The installation process is designed to be straightforward, requiring only a Phillips screwdriver. The lock is suitable for both left and right-handed doors. Ensure your door thickness is between 38mm and 55mm.
5.1 Pre-installation Check
- Confirm door opening direction (left or right).
- Measure door thickness.
- Ensure existing mortise cutout matches the provided 17CM lock body dimensions (270mm*62mm*69mm).
5.2 Installation Steps
- Prepare the Door: If replacing an existing lock, remove it. Ensure the door is clean and the mortise cutout is clear.
- Install the Mortise Lock Body: Insert the 17CM lock body into the door's mortise cutout and secure it with screws.
- Install Spindles and Cables: Insert the square spindles through the mortise. Connect the cable from the front panel to the rear panel.
- Attach Front and Rear Panels: Align the front and rear panels with the spindles and secure them to the door using the provided screws. Ensure the lock is level and operates smoothly.
- Install Batteries: Open the battery compartment on the rear panel and insert 4 AA batteries (not included), observing polarity.
- Test Operation: After installation, test all unlocking methods (mechanical key, default password if any) to ensure proper function before closing the door.

Image: A comprehensive diagram illustrating the dimensions of the smart lock components, including the main unit and the mortise lock body, crucial for accurate installation and fit.
6. Operating Instructions
The visiPower Smart Electronic Door Lock offers multiple convenient ways to unlock your door.
6.1 Initial Setup and Administrator Registration
Upon first power-up, you will need to register an administrator. The lock supports up to 9 administrators (fingerprints, passwords, or cards). The administrator has full authority to manage users and settings.
- Follow the voice prompts on the lock to register the first administrator fingerprint, password, or IC card.
- Download the "Tuya Smart" app from your mobile app store.
- Open the app, create an account, and add a new device. Follow the in-app instructions to connect your lock via Bluetooth (BLE) and Wi-Fi.
6.2 Unlocking Methods
The lock supports a total capacity of 300 users (fingerprints, passwords, or cards).
- Fingerprint Unlock: Place your registered finger on the fingerprint sensor. The lock will unlock in under 0.3 seconds.

Image: A close-up view of the smart lock's handle, highlighting the integrated fingerprint sensor with a blue light, signifying an active fingerprint scan for unlocking.
- Password Unlock: Enter your registered 6-12 digit password on the touchscreen keypad, followed by the '#' key.

Image: A hand interacting with the smart lock's touchscreen keypad, demonstrating the process of entering a password for access.
- IC Card Unlock: Tap your registered IC card against the card reader area on the front panel.

Image: A hand holding an IC card, demonstrating how to tap it against the smart lock's designated reading area for quick and easy unlocking.
- App Unlock (Tuya Smart App): Open the Tuya Smart app on your smartphone. If connected, you can remotely unlock the door. Note: Remote unlocking via app is primarily for when a visitor rings the doorbell; active remote unlocking without a doorbell trigger may not be supported.
- Mechanical Key Unlock: In case of emergency or battery depletion, insert the mechanical key into the hidden keyhole and turn to unlock.
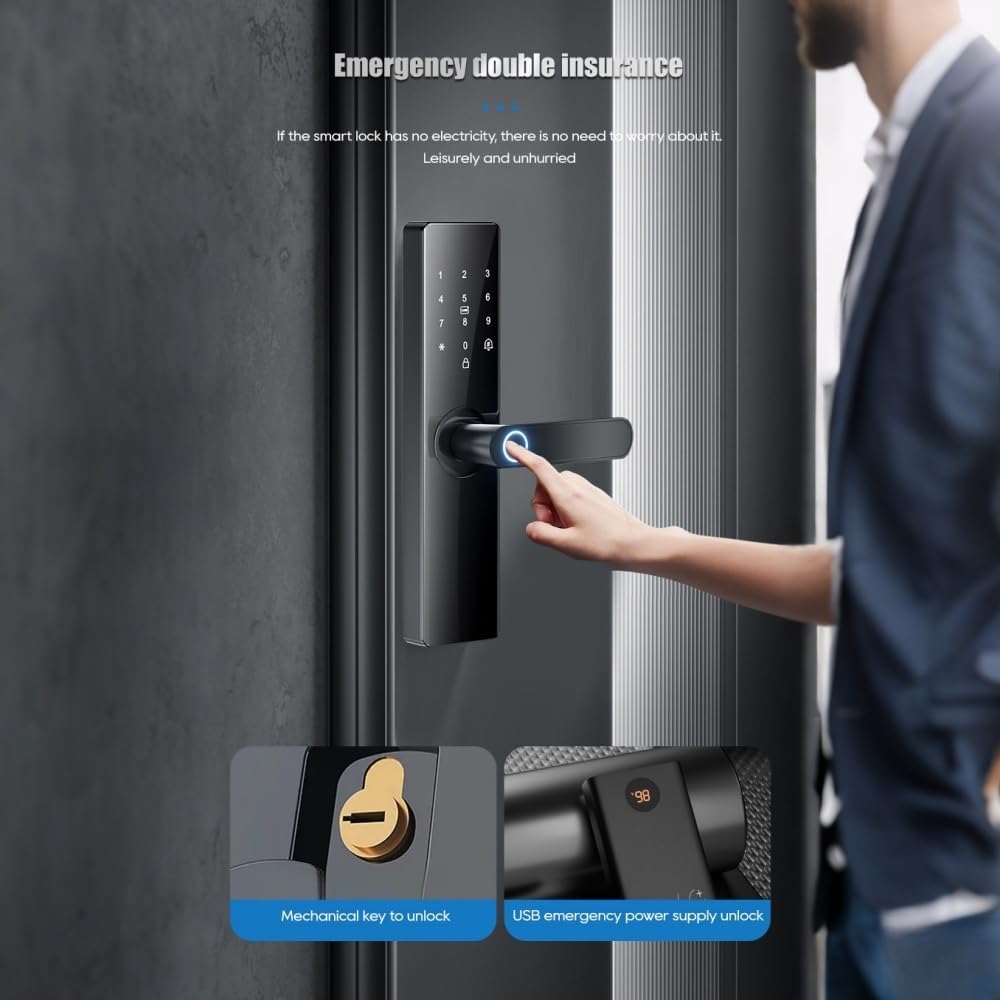
Image: This image illustrates two emergency unlocking methods: using a traditional mechanical key and providing temporary power via a USB Type-C port for emergency access when batteries are depleted.
6.3 Automatic Locking
The lock can be set to automatically secure itself within 3-900 seconds after being unlocked. This feature enhances security by ensuring the door is always locked after entry or exit.
6.4 Dual Verification Mode
For enhanced security, you can enable a dual verification mode where two registered users (e.g., two fingerprints, or a fingerprint and a password) must authenticate simultaneously to unlock the door. This is suitable for high-security areas.
7. Maintenance
Proper maintenance ensures the longevity and optimal performance of your smart lock.
- Battery Replacement: Replace the 4 AA batteries approximately every six months, or when the low battery alarm is triggered.
- Cleaning: Wipe the lock surface with a soft, dry cloth. Avoid using abrasive cleaners or solvents that could damage the finish or electronic components.
- Fingerprint Sensor: Keep the fingerprint sensor clean and dry for accurate recognition.
- Mechanical Parts: Periodically check that all screws are tight and the handles operate smoothly. Do not lubricate the lock cylinder unless specifically instructed by the manufacturer.
8. Troubleshooting
If you encounter issues with your smart lock, refer to the following common problems and solutions:
| Problem | Possible Cause | Solution |
|---|---|---|
| Lock does not respond. | Dead batteries. | Replace batteries. Use a 5V mobile power bank via Type-C for emergency power. |
| Fingerprint not recognized. | Fingerprint not registered, dirty sensor, or incorrect placement. | Ensure finger is clean and dry. Re-register fingerprint if necessary. Try different angle. |
| Password not accepted. | Incorrect password, or multiple incorrect attempts. | Verify password. After multiple incorrect inputs, the lock will temporarily disable for 90 seconds. Wait and try again. |
| App cannot connect to lock. | Bluetooth/Wi-Fi off, lock not in pairing mode, or network issues. | Ensure Bluetooth is on. Check Wi-Fi signal. Restart lock and app. Re-pair if necessary. |
| Lock makes unusual noises. | Mechanical obstruction or internal issue. | Check for any obstructions around the latch or bolt. If issue persists, contact support. |

Image: This diagram illustrates the various alarm features of the smart lock, including alerts for attempted prying, low battery status, and multiple incorrect password entries.
9. Specifications
| Feature | Detail |
|---|---|
| Brand | visiPower |
| Model Number | Z17-17cm |
| Lock Type | Biometric |
| Material | Aluminum |
| Unlocking Methods | APP, Mechanical Keys, Fingerprint, Password, IC Card |
| Power Type | 4 x AA Batteries (not included) |
| Emergency Power | Type-C USB |
| Password Length | 6-12 bits |
| User Capacity | 300 (including 9 administrators) |
| Applicable Door Thickness | 38~55mm |
| Product Dimensions (L x W x H) | 270mm x 62mm x 69mm (10.5 x 2.3 x 2.7 inches) |
| Item Weight | 5 pounds |
| Connectivity Protocol | Wi-Fi (via Tuya Smart App) |
| Country of Origin | China |
10. Warranty and Support
For warranty information and technical support, please refer to the warranty card included with your product or visit the official visiPower website. Keep your purchase receipt as proof of purchase for warranty claims.
For further assistance, you may contact visiPower customer service through the contact details provided on their official website or within the Tuya Smart application.


