1. Introduction
This manual provides essential information for the safe and effective operation, setup, and maintenance of your Reboot RBM2500 PRO 8-in-1 Multiprocess Welder. Please read this manual thoroughly before using the equipment to ensure proper function and safety.
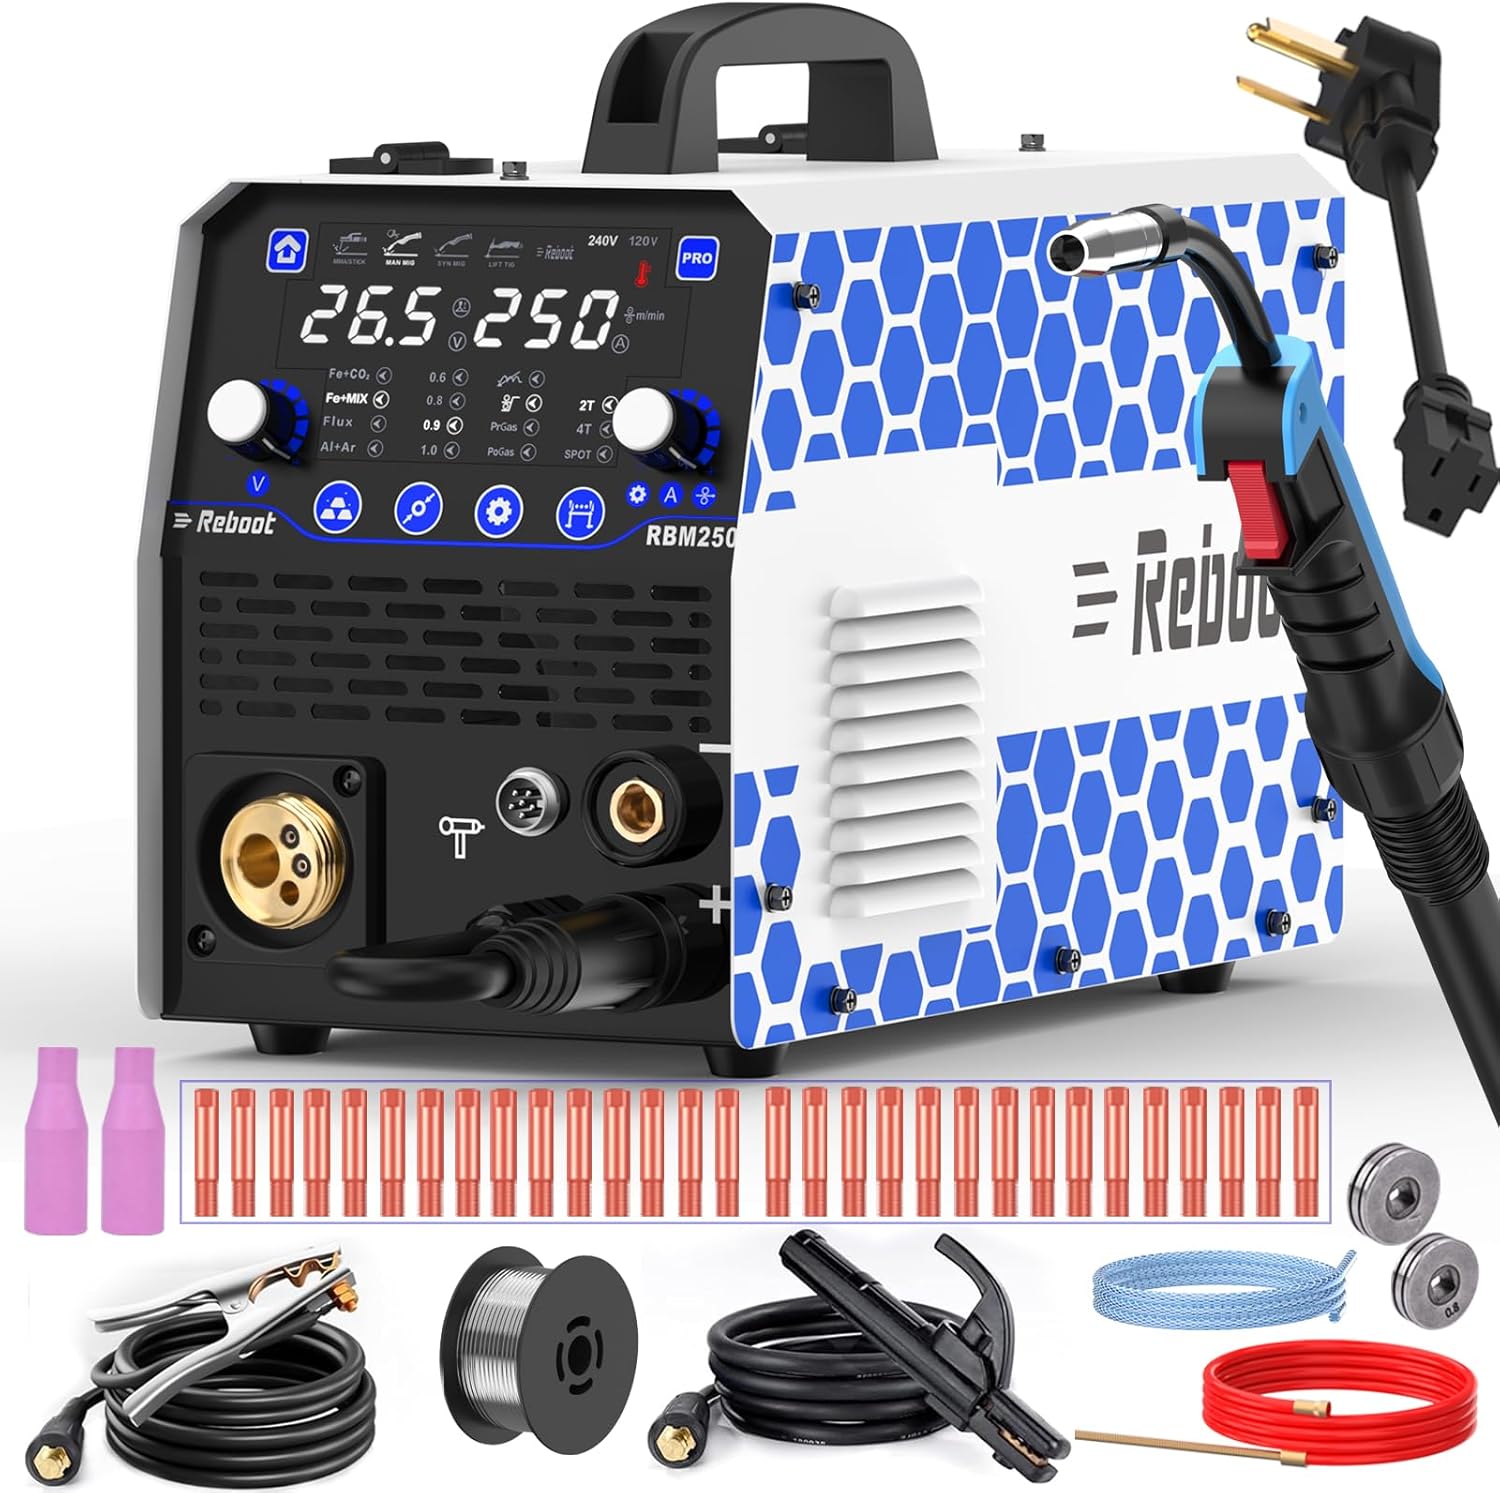
Image 1.1: The Reboot RBM2500 PRO Multiprocess Welder with included accessories, showcasing its compact design and various components.
2. Safety Information
WARNING: Welding can be dangerous. Always follow safety precautions to prevent injury or death.
- Electric Shock: Can kill. Do not touch live electrical parts. Wear dry welding gloves and protective clothing. Ensure the workpiece is properly grounded.
- Fumes and Gases: Can be hazardous to your health. Keep your head out of the fumes. Use enough ventilation or exhaust at the arc to keep fumes and gases away from the breathing zone.
- Arc Rays: Can injure eyes and burn skin. Wear a welding helmet with a proper shade of filter to protect your face and eyes. Wear appropriate protective clothing to protect your skin.
- Fire and Explosion: Welding sparks can cause fire or explosion. Keep flammable materials away from the welding area. Have a fire extinguisher readily available.
- Hot Parts: Can cause severe burns. Do not touch hot parts with bare hands. Allow equipment to cool before handling.
- Read the Manual: Always read and understand the entire instruction manual before installation, operation, or maintenance.
3. Package Contents
Upon unpacking, verify that all items listed below are present and undamaged. If any items are missing or damaged, contact your supplier immediately.
- Reboot RBM2500 PRO Multiprocess Welder
- MB15 MIG Torch (10ft) with Teflon liner for aluminum welding
- Ground Clamp with cable
- Electrode Holder with cable
- 10 each of .030" conductive nozzles
- 10 each of .035" conductive nozzles
- 10 each of .040" conductive nozzles
- 2pcs ceramic nozzles
- Welding wire 1.1lb
- Gas hose and conversion line
- Three wire feed wheels: one knurled type 0.8/1.0 mm (pre-installed), one V-type 0.8/1.0 mm (for solid wire), one U-type 1.0/1.2 mm (for aluminum wire)
- User Manual
Note: Lift TIG Torch and Spool Gun are not included and must be purchased separately.

Image 3.1: Overview of the RBM2500 PRO welder and its complete set of accessories.
4. Product Overview
The Reboot RBM2500 PRO is an 8-in-1 multiprocess welding machine designed for versatility and performance. It features advanced soft-start technology for stable arc ignition and reduced spatter, and dual voltage flexibility for operation on 110V or 220V power sources.
4.1 Key Features
- Advanced Soft-Start Technology: IGBT control ramps up current/voltage (1-3s) to reduce inrush current by 80% and extend capacitor lifespan. Achieves less than 5% spatter.
- 8-in-1 Versatility: Supports Gasless MIG, Gas MIG, MAG, Lift TIG, Stick, Spot, Spool Gun, and Aluminum welding modes.
- Dual Voltage: Compatible with 110V and 220V power supplies with auto-sensing technology.
- Digital Display: Monitors real-time amperage and voltage for consistent arc performance.
- Synergic and Manual MIG: Synergic mode simplifies setup by selecting wire size, while Manual mode allows fine-tuning of parameters.
- 2T/4T Functionality: 2T for short welds (press to weld, release to stop), 4T for extended welding operations (press and release to start, press and release again to stop).

Image 4.1: The large LED display provides accurate data and is easy to read.

Image 4.2: The RBM2500 PRO offers 8 welding processes in one compact machine.
5. Setup
5.1 Power Connection
The RBM2500 PRO supports dual voltage input (110V/220V). The machine automatically senses the input voltage. Connect the appropriate power cord to a suitable electrical outlet. Ensure the outlet provides stable voltage within ±15% of the nominal voltage.
5.2 Wire Feed System Setup
The welder comes with three types of wire feed wheels: a pre-installed 0.8/1.0 mm knurled roller, a 0.8/1.0 mm V-groove roller (for solid wire), and a 1.0/1.2 mm U-groove roller (for aluminum wire). Select the appropriate roller for your welding wire type and size.
- Open the wire feed compartment.
- If changing the roller, remove the existing roller and install the desired one, ensuring it is securely seated.
- Place the welding wire spool onto the spindle.
- Feed the wire through the wire pressing wheel and into the wire feeding roller mechanism.
- Close the wire feed compartment.

Image 5.1: Components of the stable and smooth wire feed structure.
5.3 Gas Connection (for Gas MIG/MAG)
For Gas MIG or MAG welding, connect the gas hose to the gas inlet on the rear of the welder. The welder uses a hose barb fitting. You will need to provide a suitable fitting to connect the included gas hose to your gas tank regulator.
5.4 Torch and Clamp Connections
- MIG Torch: Connect the MIG torch to the Euro connector on the front panel.
- Ground Clamp: Connect the ground clamp cable to the negative (-) terminal. Secure the ground clamp to the workpiece or welding table, ensuring good electrical contact.
- Electrode Holder (for Stick/MMA): Connect the electrode holder cable to the positive (+) terminal.
- Teflon Liner for Aluminum Welding: The included Teflon liner is for aluminum welding. To install, remove the cap/nut at the welder end of the MIG torch lead, pull out the coiled metal liner, and carefully push the Teflon liner inside the lead. Reattach the cap/nut.

Image 5.2: Front and rear panel button and port introduction.
6. Operating Modes
The RBM2500 PRO offers multiple welding processes. Use the control panel to select the desired mode and adjust parameters.
6.1 Mode Selection
Use the 'Weld mode selection button' on the control panel to cycle through the available welding processes: Gasless MIG, Gas MIG, MAG, Lift TIG, Stick (MMA), Spot, Spool Gun, and Aluminum welding modes.
6.2 MIG Welding (Synergic and Manual)
- Synergic MIG: Simplifies setup. Select the wire size and material type, and the machine automatically sets optimal voltage and wire speed. You can make minor adjustments to the voltage offset.
- Manual MIG: Provides full control over welding parameters. Adjust current (wire speed) and voltage independently according to your welding habits and specific application. The display shows voltage and wire speed (in meters per minute).
6.3 2T/4T Functionality
- 2T (Two-Touch): Press and hold the torch trigger to weld; release to stop. Suitable for short welds.
- 4T (Four-Touch): Press and release the torch trigger to start welding; press and release again to stop. Facilitates long welding operations and reduces welder fatigue.
6.4 Aluminum Welding
The RBM2500 PRO supports aluminum welding using either the included Teflon liner in the MIG gun or an optional spool gun (purchased separately). Ensure you use the U-groove wire feed roller and appropriate aluminum welding wire.

Image 6.1: Two methods for aluminum welding: Teflon liner or spool gun.

Image 6.2: Visual representation of various welding modes and their typical setups.
7. Maintenance
Regular maintenance ensures the longevity and optimal performance of your welding machine.
- Cleaning: Periodically clean the internal components of the welder using compressed air to remove dust and metal particles. Ensure the machine is unplugged before cleaning.
- Cable Inspection: Regularly inspect all cables (power, ground, torch) for cuts, fraying, or damage. Replace damaged cables immediately.
- Consumables: Replace MIG contact tips, nozzles, and TIG electrodes as they wear out to maintain weld quality.
- Wire Feed System: Keep the wire feed rollers clean and free of debris. Ensure the wire liner is clear and not kinked.
- Storage: Store the welder in a clean, dry environment, away from excessive dust, moisture, and corrosive materials.
8. Troubleshooting
This section addresses common issues you might encounter. For problems not listed here or if solutions do not resolve the issue, contact technical support.
| Problem | Possible Cause | Solution |
|---|---|---|
| No power to the machine | Power cord unplugged, circuit breaker tripped, faulty power switch | Check power connections, reset circuit breaker, contact service if switch is faulty. |
| No arc / Weak arc | Poor ground connection, incorrect settings, worn consumables, wrong wire size | Ensure good ground contact, verify welding parameters, replace contact tip/electrode, use correct wire. |
| Wire feeding issues | Wire spool tangled, incorrect wire feed roller, clogged liner, tension too loose/tight | Untangle wire, use correct roller for wire type, clean/replace liner, adjust wire tension. |
| Excessive spatter | Incorrect voltage/wire speed, dirty workpiece, wrong gas mixture | Adjust parameters, clean workpiece, ensure correct shielding gas. |
| Overheating protection activated | Exceeded duty cycle, poor ventilation | Allow machine to cool down, ensure adequate airflow around the welder. |
9. Specifications
| Feature | Detail |
|---|---|
| Model Number | RBM2500D PRO |
| Input Voltage | 120V / 240V AC |
| Max Output Current | 250 Amp |
| Welding Processes | Gasless MIG, Gas MIG, MAG, Lift TIG, Stick (MMA), Spot, Spool Gun, Aluminum Welding |
| Item Weight | 25.1 pounds |
| Package Dimensions | 19.2 x 13.2 x 12.9 inches |
| Manufacturer | Reboot |
10. Warranty and Support
10.1 Warranty
The Reboot RBM2500 PRO welding machine is guaranteed for one year from the date of purchase. This warranty covers manufacturing defects and workmanship under normal use. Please retain your proof of purchase for warranty claims.
10.2 Technical Support
For technical assistance, troubleshooting guidance, or warranty inquiries, please contact Reboot customer service. Our team is available to provide support and ensure your satisfaction with the product.
Contact information can typically be found on the manufacturer's website or on the product packaging.


