1. Introduction
This manual provides detailed instructions for the installation, operation, and maintenance of your LESANM 12-inch Square Ceiling Mount Exhaust Fan with Adjustable LED Light. Please read this manual thoroughly before installation and use to ensure proper function and safety.

Image 1.1: Overview of the LESANM Exhaust Fan with Light and its adjustable color temperature feature.

Image 1.2: Demonstration of effective moisture and odor control.

Image 1.3: Highlighting the quiet operation of the fan.
2. Safety Information
Always follow basic safety precautions when installing, operating, and maintaining this product to reduce the risk of fire, electric shock, or injury to persons.
- Ensure power is disconnected at the circuit breaker before installation or servicing.
- All wiring must be performed by a qualified electrician in accordance with local electrical codes.
- Do not install in areas where the temperature may exceed 104°F (40°C).
- This fan is designed for indoor use only.
- Do not use this fan with any solid-state speed control device unless specifically designed for it.
- Wear safety glasses and gloves during installation.
3. Package Contents
Verify that all components are present before beginning installation:

Image 3.1: All accessories included in the package.
- Exhaust Fan Unit with LED Light
- Flexible Ducting
- Hose Clamps (2)
- Mounting Screws (4)
- Instruction Manual (this document)
4. Specifications
| Feature | Specification |
|---|---|
| Brand | LESANM |
| Model Number | Ventilation Vents Fan |
| Electric Fan Design | Exhaust Fan |
| LED Light Wattage | 12 watts |
| Air Flow Capacity | 100 Cubic Feet Per Minute (CFM) |
| Noise Level | 1.0 Sones |
| Light Color Temperature | Adjustable (4000K, 5000K, 6000K) |
| Voltage | 110-220V |
| Installation Type | DIY, Ceiling Mount |
| Product Dimensions (Fan Unit) | 5.92 x 12.2 x 12.2 inches |
| Suitable Ceiling Opening | 9.84" x 9.84" (25cm x 25cm) |
| Item Weight | 4.2 pounds |
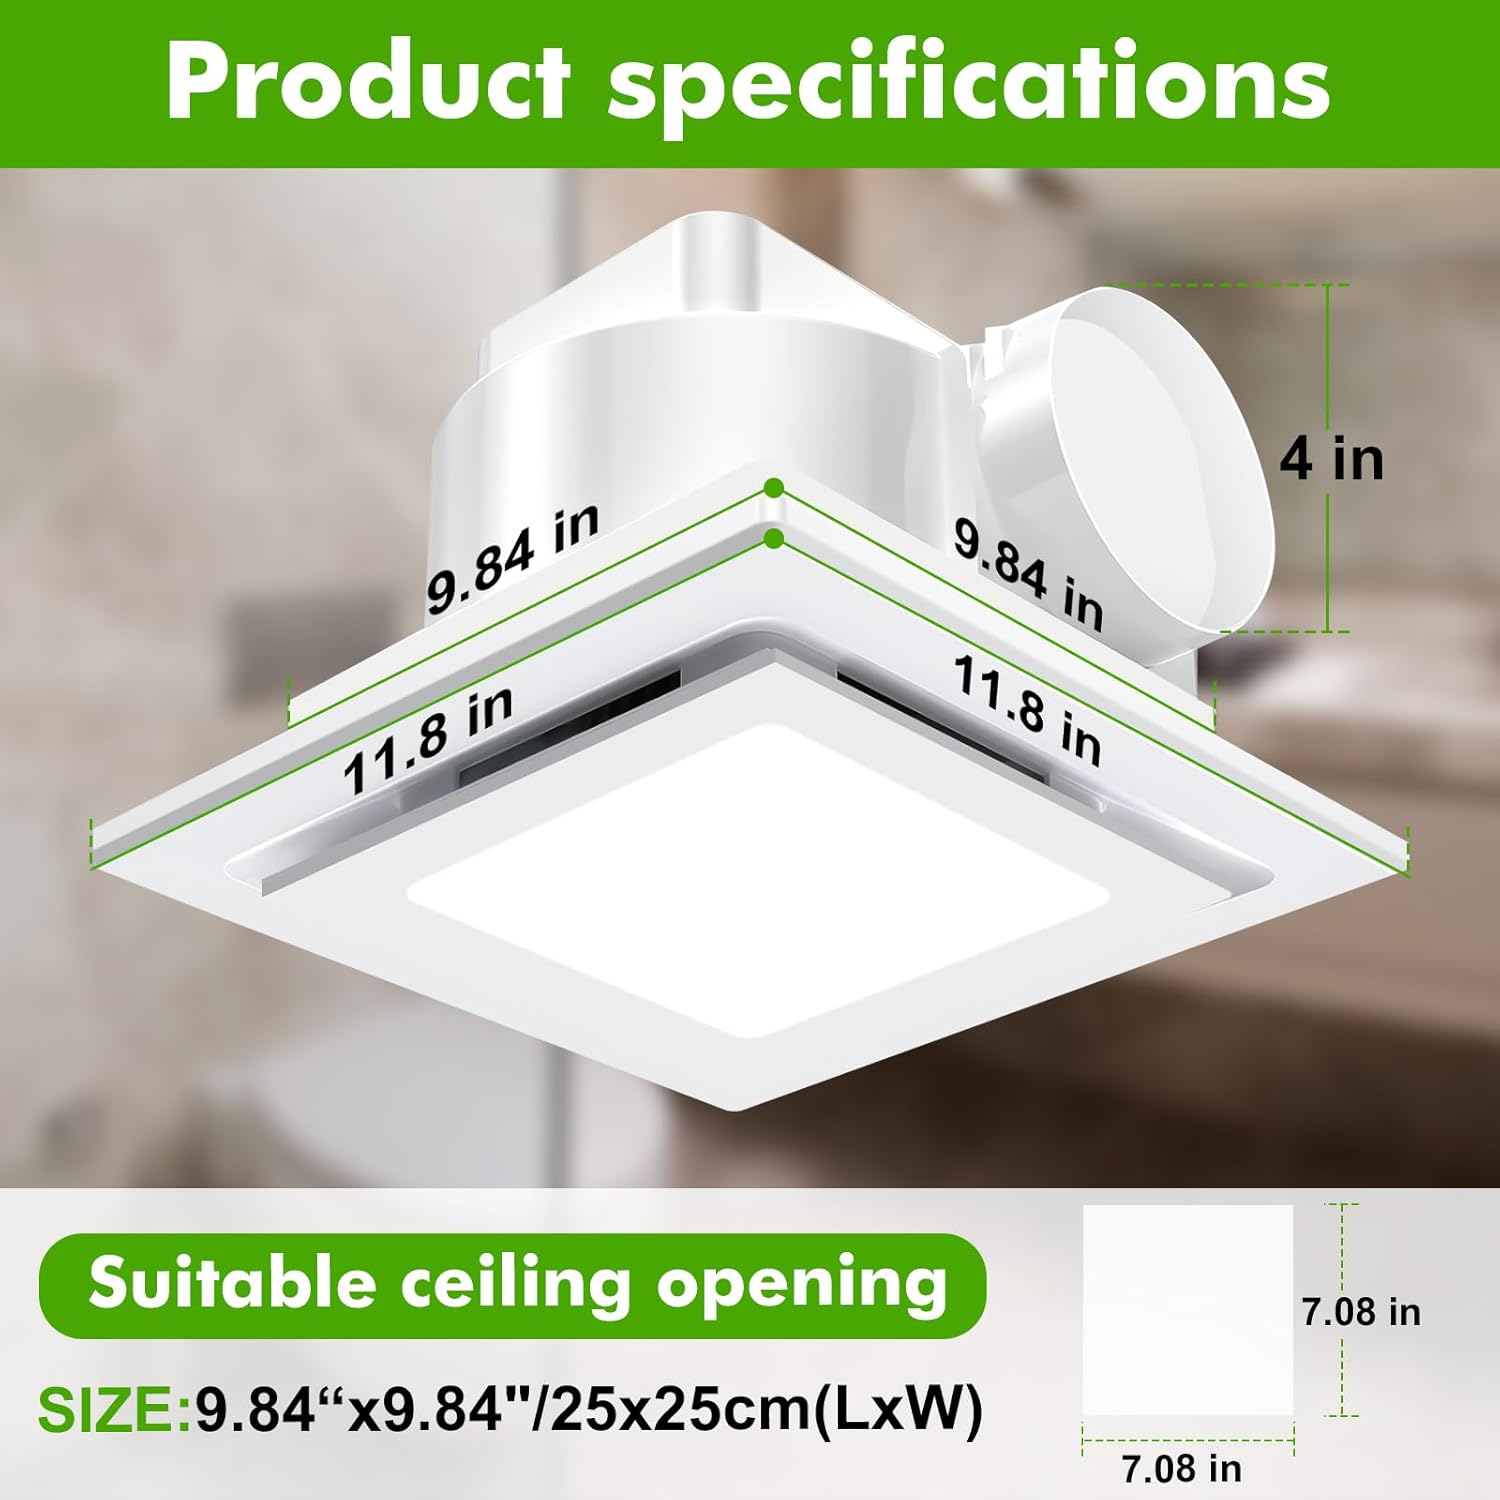
Image 4.1: Product dimensions and suitable ceiling opening.
5. Installation (Setup)
This section outlines the general steps for installing the exhaust fan. Professional installation is recommended if you are not familiar with electrical wiring or ceiling work.
- Prepare the Installation Area:
- Turn off power to the installation area at the main circuit breaker.
- Locate a suitable ceiling joist or framing for secure mounting. Ensure the ceiling opening is approximately 9.84" x 9.84" (25cm x 25cm).
- Mount the Fan Housing:
- Insert the fan housing into the prepared ceiling opening.
- Secure the fan housing to the ceiling joists or framing using the provided mounting screws. Ensure it is firmly attached.
- Connect Ducting:
- Attach the flexible ducting to the fan's exhaust port.
- Secure the ducting with one of the provided hose clamps.
- Route the ducting to an appropriate exterior vent. Ensure the ducting is as straight as possible to maximize airflow.
- Electrical Wiring:
- Connect the fan's electrical wires to the household wiring according to local electrical codes. Typically, this involves connecting live, neutral, and ground wires.
- Ensure all connections are secure and insulated.
- Install the Grille/Light Cover:
- Once wiring is complete and secure, attach the fan grille/light cover to the fan housing.
- Ensure it snaps or screws into place securely.
- Restore Power:
- Turn the power back on at the circuit breaker.
- Test the fan and light functions.

Image 5.1: General installation steps for a ceiling mount exhaust fan.
6. Operation
The LESANM Exhaust Fan with Light is designed for simple operation via a standard wall switch.
6.1 Fan Operation
To operate the exhaust fan, simply toggle the wall switch connected to the unit. The fan will activate, providing ventilation for your space.
6.2 Light Operation and Color Temperature Adjustment
The integrated LED light features adjustable color temperatures (4000K, 5000K, 6000K). To change the light color:
- Turn the light ON using the wall switch.
- To cycle through the color temperatures, quickly turn the wall switch OFF and then ON again. Each toggle will switch to the next color temperature.
- The light will remember the last selected color temperature when turned off for more than 10 seconds.

Image 6.1: How to adjust the LED light color temperature.
7. Maintenance
Regular maintenance ensures optimal performance and longevity of your exhaust fan.
7.1 Cleaning the Grille
- Turn off power to the fan at the circuit breaker.
- Carefully remove the fan grille/light cover.
- Wash the grille with mild soap and water. Do not use abrasive cleaners.
- Rinse thoroughly and dry completely before reattaching.
7.2 Cleaning the Fan Interior
- With the power off and grille removed, gently wipe the fan blades and interior surfaces with a damp cloth.
- Ensure no moisture enters the motor or electrical components.
- Allow all parts to dry completely before reassembling.
Note: Do not lubricate the motor. The motor is permanently lubricated and sealed.
8. Troubleshooting
If you experience issues with your exhaust fan, refer to the following common problems and solutions:
| Problem | Possible Cause | Solution |
|---|---|---|
| Fan does not operate. | No power; loose wiring; faulty switch. | Check circuit breaker; verify wiring connections; test wall switch. |
| Light does not turn on. | No power; loose wiring; LED failure. | Check circuit breaker; verify wiring connections; contact support if LED is faulty. |
| Fan is noisy. | Loose mounting; debris in fan blades; ducting obstruction. | Ensure fan is securely mounted; clean fan blades; check ducting for blockages. |
| Poor ventilation. | Ducting obstruction; improper ducting size; fan motor issue. | Check ducting for blockages or kinks; ensure ducting matches fan outlet size; contact support if motor is suspected. |
If the problem persists after attempting these solutions, please contact customer support.
9. Warranty and Support
LESANM products are manufactured to high-quality standards. For specific warranty information, please refer to the warranty card included with your purchase or visit the official LESANM website. For technical support, replacement parts, or any questions regarding your product, please contact LESANM customer service.
Contact Information: (Please refer to your purchase documentation or the manufacturer's website for the most current contact details.)


