
1. Introduction
The ECO-WORTHY Dual-Axis Solar Tracker is designed to maximize the energy capture of your solar panels by continuously orienting them towards the sun. This system significantly increases photovoltaic electricity production compared to fixed solar panels.
- Enhanced Energy Production: Dual-axis tracking ensures optimal sun exposure throughout the day, boosting electricity output by at least 40%.
- Wide Tracking Range: A 2-axis drive and sensitive sun sensor allow for a 270° rotation, enabling panels to absorb sunlight from all cardinal directions (North, South, East, West).
- Wind Resistance: Equipped with an air speed sensor, the tracker automatically adjusts to a stable horizontal angle during strong winds, enhancing system stability and safety.
- Versatile Installation: Suitable for various locations including yards, farms, fields, and flat roofs, requiring a ground space of 114.2 x 114.2 inches (2.9 x 2.9 meters) and a height of 1485mm.
2. Safety Information
Please read and understand all safety instructions before installation and operation. Failure to follow these instructions may result in electric shock, fire, serious injury, or property damage.
- Electrical Safety: Always disconnect power before performing any maintenance or installation. Ensure all wiring is done by qualified personnel and complies with local electrical codes.
- Mechanical Safety: The solar tracker involves moving parts. Keep hands and clothing clear of moving components during operation.
- Weight and Stability: The tracker and solar panels are heavy. Ensure proper lifting techniques and secure anchoring to prevent tipping or collapse.
- Wind Conditions: While the tracker has wind resistance features, in extreme wind conditions (e.g., above 60 km/h or 38.5 mph), it is recommended to secure or temporarily remove solar panels as per local guidelines and product specifications to prevent damage.
- Environmental Considerations: Install the tracker in a location free from obstructions and away from flammable materials.
3. Package Contents
Verify that all components listed below are present in your package. If any parts are missing or damaged, please contact ECO-WORTHY customer support.
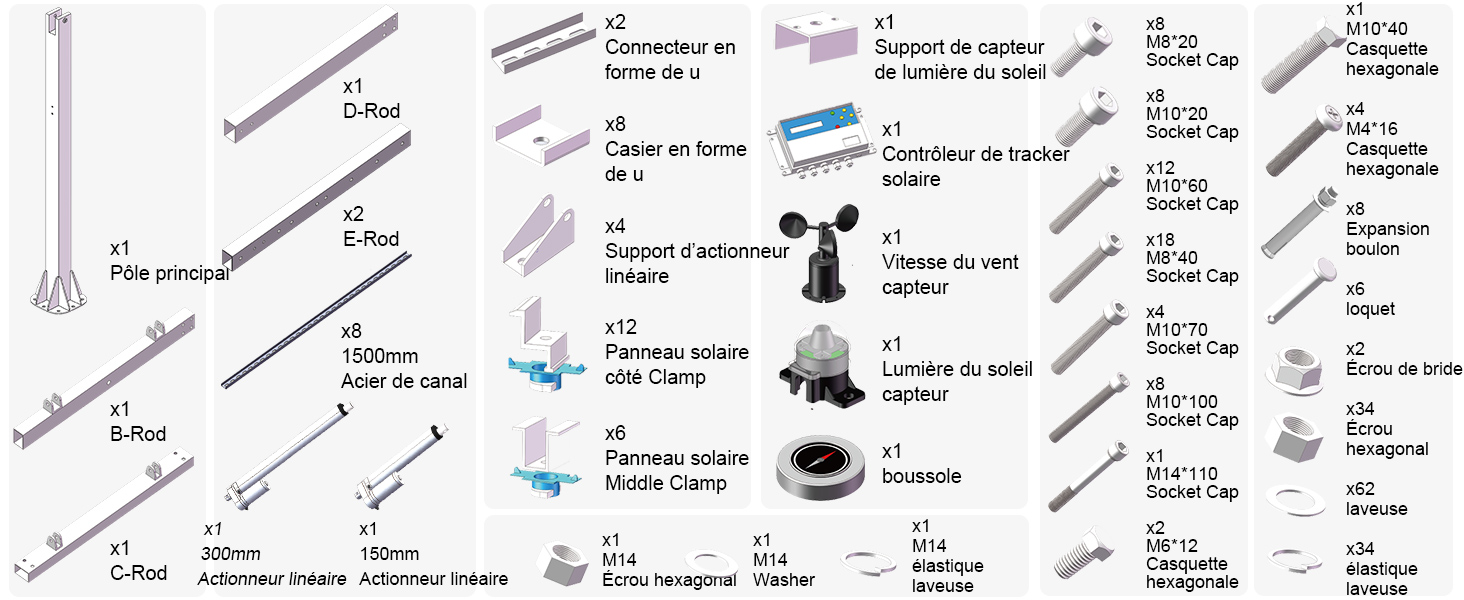
Image: Detailed view of all components and accessories included in the package.
The package typically includes:
- Main Pole (1)
- B-Rod, C-Rod, D-Rod, E-Rod (various quantities)
- Linear Actuators (2)
- U-shaped Connectors (2)
- Linear Actuator Supports (4)
- Sun Light Sensor Support (1)
- Solar Tracker Controller (1)
- Wind Speed Sensor (1)
- Sun Light Sensor (1)
- Compass (1)
- Solar Panel Side Clamps (12)
- Solar Panel Middle Clamps (6)
- Various bolts, nuts, and washers (quantities as per diagram)
Note: A battery/power box to power the support is required but not included in the package.
4. Specifications
| Feature | Specification |
|---|---|
| Brand | ECO-WORTHY |
| Model Number | TRACKER |
| Material | Metal |
| Item Dimensions (L x W x H) | 3 x 3 x 1.49 meters (118.1 x 118.1 x 58.7 inches) |
| Item Depth | 1485 millimeters (58.5 inches) |
| Finish Type | Raw |
| Installation Type | Universal Mount |
| UPC | 810127139022 |
| Crossbar Length | 114.2 inches (2900 mm) |
| Crossbar Width | 29.4 inches (1000 mm) |
| Vertical Bar Length (each side) | 45.6 inches (1160 mm) |
| Vertical Bar Width | 30.3 inches (770 mm) |
| Actuator Force | 1500N |
5. Setup and Installation
Follow these steps for proper installation of your ECO-WORTHY Dual-Axis Solar Tracker. Ensure you have all components listed in Section 3 before beginning.
5.1 Site Preparation and Space Requirements
The tracker requires a minimum ground space of 114.2 inches x 114.2 inches (approximately 2.9m x 2.9m) and a height of 1485mm (58.5 inches). Choose a location with unobstructed sunlight throughout the day.

Image: Installation space requirements for the solar tracker.
5.2 Panel Compatibility and Arrangement
The tracker is designed to accommodate various solar panel configurations. For example, it can hold 6 ECO-WORTHY 170W panels. When using different panels, calculate based on the available space and the following dimensions:
- Crossbar Length: 114.2 inches (2900 mm)
- Crossbar Width: 29.4 inches (1000 mm)
- Vertical Bar Length (each side): 45.6 inches (1160 mm)
- Vertical Bar Width: 30.3 inches (770 mm)

Image: Guide for adapting various solar panel sizes to the tracker.

Image: Solar panel width calculation for optimal fit.
5.3 Step-by-Step Installation
The installation process involves four main steps:

Image: Four-step installation guide.
- Fix the Base: Use expansion screws to securely fix the main pole's base to the ground. Ensure the base is level and stable.
- Assemble the Frame: Connect the various rods (A-E) and linear actuators to the main pole according to the assembly diagram.
- Install Controller and Crossbars: Mount the solar tracker controller in a protected location. Install the 8 crossbars that will support the solar panels.
- Attach Solar Panels: Securely install your solar panels onto the crossbars using the provided clamps. Ensure even weight distribution.
6. Operating Instructions
The ECO-WORTHY Dual-Axis Solar Tracker operates automatically to follow the sun's path, optimizing energy generation.
6.1 How the Tracker Works

Image: Diagram explaining the operational flow of the solar tracker.
The system uses a sensitive sun tracking sensor (1) to detect the sun's position. This sensor sends an angle offset signal to the controller (2). The controller processes this information and sends a turn signal to the driver set (3), which consists of linear actuators. The actuators adjust the angle of the solar panels, ensuring they are always facing the sun for maximum energy absorption (4).

Image: Comparison of energy efficiency between dual-axis tracking and fixed panels.
6.2 270° Rotation Capability

Image: Illustrates the 270° rotation capabilities and movement limits.
The dual-axis design allows the solar panels to rotate up to 270 degrees, tracking the sun from sunrise to sunset across the sky. This includes adjusting for seasonal changes in the sun's altitude.
6.3 Controller Settings
The solar tracker controller allows for customization of various parameters, including wind protection settings and tracking sensitivity. Refer to the controller's display and buttons for navigation.
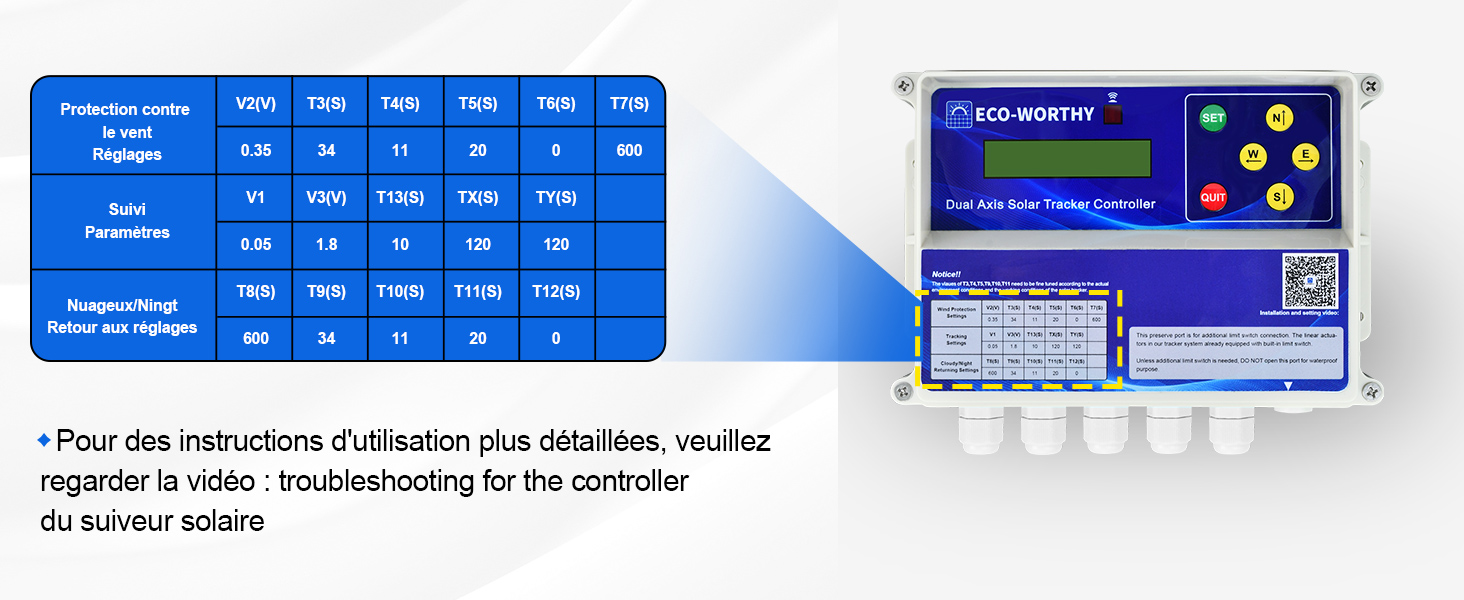
Image: Solar tracker controller interface and parameter table.
For detailed instructions on adjusting controller settings, please refer to the specific video titled "troubleshooting for the controller du suiveur solaire" or contact customer support.
7. Maintenance
Regular maintenance ensures the longevity and optimal performance of your ECO-WORTHY Dual-Axis Solar Tracker.
- Cleaning Solar Panels: Periodically clean the surface of the solar panels to remove dust, dirt, and debris that can reduce efficiency. Use a soft cloth and water.
- Inspect Moving Parts: Annually inspect all moving parts, including linear actuators, gears, and pivot points, for wear, corrosion, or damage. Lubricate as necessary.
- Check Fasteners: Ensure all bolts, nuts, and clamps are securely tightened. Re-tighten any loose fasteners.
- Wiring Inspection: Check all electrical connections and wiring for signs of wear, fraying, or corrosion. Ensure connections are secure and waterproof.
- Sensor Calibration: Verify the sun tracking sensor and wind speed sensor are clean and functioning correctly. Recalibrate if tracking accuracy or wind response is compromised.
- Wind Protection System: The integrated air speed sensor automatically adjusts the tracker to a horizontal position during strong winds. Ensure this feature is operational and consider manual adjustment or securing panels in extreme weather conditions (e.g., winds exceeding 60 km/h or 38.5 mph) as a precautionary measure.
8. Troubleshooting
If you encounter issues with your solar tracker, refer to the following common problems and solutions:
| Problem | Possible Cause | Solution |
|---|---|---|
| Tracker not moving or not tracking the sun |
|
|
| Actuator not retracting/extending fully |
|
|
| Panels not returning to horizontal in strong wind |
|
|
| Reduced power generation |
|
|
For more detailed troubleshooting and advanced controller settings, please refer to the official ECO-WORTHY support resources or the video mentioned in Section 6.3.
9. Warranty and Support
ECO-WORTHY products are designed for reliability and performance. This product comes with a standard manufacturer's warranty against defects in materials and workmanship. Please retain your proof of purchase for warranty claims.
9.1 Warranty Information
Specific warranty terms and duration may vary by region and product. For detailed warranty information, please visit the official ECO-WORTHY website or contact customer service.
9.2 Customer Support
If you require assistance with installation, operation, maintenance, or troubleshooting, please contact ECO-WORTHY customer support through the following channels:
- Website: Visit the official ECO-WORTHY website for FAQs, support articles, and contact forms.
- Email: Send an email to the support team for technical assistance.
- Phone: Contact the dedicated customer service line during business hours.
Please have your product model (TRACKER) and purchase details ready when contacting support.


