1. Introduction
Thank you for choosing the Altera Homestep Walking Pad. This manual provides essential information for the safe and efficient use of your new walking pad. Please read all instructions carefully before operation and retain this manual for future reference.
2. Safety Instructions
To reduce the risk of serious injury, read all important precautions and instructions in this manual and on your walking pad before use.
- Always place the walking pad on a level, stable surface.
- Keep children and pets away from the walking pad during operation.
- Ensure adequate clear space around the walking pad (at least 0.6 meters on all sides).
- Do not use the walking pad if you weigh more than 90 kg (198 lbs).
- Wear appropriate athletic footwear.
- Always attach the safety key clip to your clothing before starting the walking pad.
- If you feel faint, dizzy, or experience pain, stop exercising immediately.
- Unplug the walking pad from the power outlet when not in use or before cleaning/maintenance.
- Do not operate the walking pad if it has a damaged cord or plug, or if it is not working properly.
3. Package Contents
- Altera Homestep Walking Pad
- Remote Control
- Power Cable
- User Manual (this document)
4. Product Overview
Familiarize yourself with the main components and features of your Altera Homestep Walking Pad.

Image 4.1: The Altera Homestep Walking Pad shown with its remote control.

Image 4.2: Detailed view of the LED display and remote control buttons. The display shows Time, Speed, Distance, and Calories. The remote has buttons for Speed Control (+/-), Mode (M), Start/Hold, and Stop.

Image 4.3: Diagram illustrating remote control functions: '+' to increase speed, 'M' to change mode, '-' to reduce speed, 'START/HOLD' to start/continue, and 'STOP' to pause.

Image 4.4: View of the walking pad's underside, highlighting anti-slip leveling feet, transport wheels, and the manual power switch.

Image 4.5: Diagram showing the multi-layered running belt construction, including wear-resistant surface, noise reduction, impact absorption, and high-resistance support layers.
5. Setup
- Unpack: Carefully remove the walking pad and all components from the packaging.
- Placement: Place the walking pad on a flat, stable, and non-slip surface. Ensure there is sufficient space around the unit for safe operation.
- Power Connection: Connect the power cable to the walking pad and then to a grounded electrical outlet.
- Safety Key: Locate the safety key. This key must be in place for the walking pad to operate. Attach the clip of the safety key to your clothing before starting.
- Power On: Flip the manual power switch (refer to Image 4.4) to the 'ON' position. The LED display should illuminate.
6. Operating Instructions
6.1 Using the Remote Control
The walking pad is controlled via the included remote control. Ensure the remote has working batteries.
- Start/Hold: Press the "START/HOLD" button to begin or resume your workout. The walking pad will start at a low speed.
- Stop: Press the "STOP" button to pause or end your workout.
- Speed Adjustment: Use the "+" button to increase speed and the "-" button to decrease speed. The speed range is 1 km/h to 6 km/h.
- Mode Selection: Press the "M" button to cycle through different display modes (Time, Speed, Distance, Calories).
6.2 LED Display
The integrated LED display provides real-time feedback on your workout progress (refer to Image 4.2).
- TIME: Displays the duration of your workout.
- SPEED: Shows your current walking speed in km/h.
- DIST: Indicates the distance you have walked.
- CAL: Estimates the calories burned during your session.
6.3 Adjustable Incline
The Altera Homestep Walking Pad features two manual incline positions to vary your workout intensity.
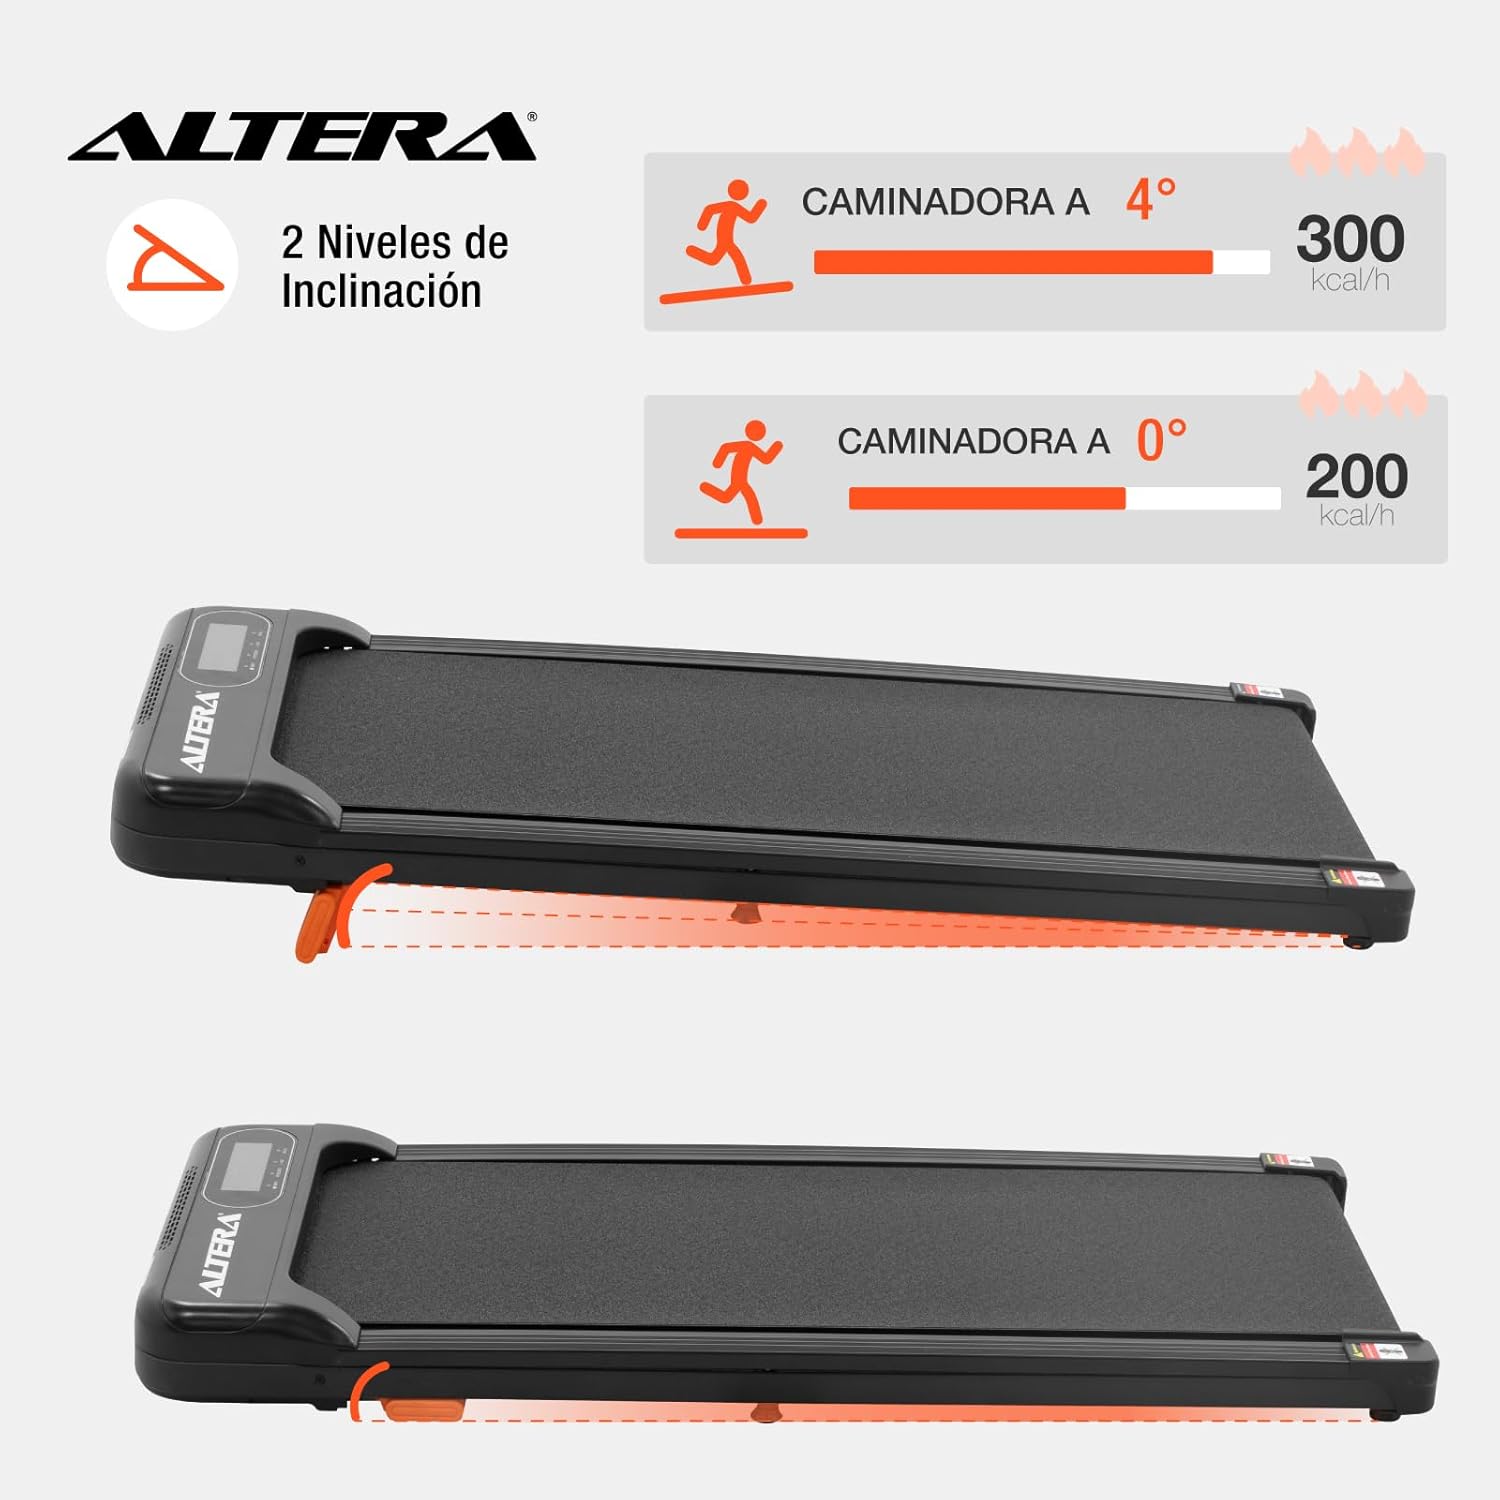
Image 6.1: Illustration of the two incline levels: 0 degrees (flat) and 4 degrees (inclined), showing estimated calorie burn difference.
To adjust the incline:
- Ensure the walking pad is turned off and unplugged.
- Carefully lift the front of the walking pad.
- Deploy or retract the small orange support feet located at the front underside of the unit to select your desired incline level.
- Ensure the support feet are securely locked in place before resuming use.
6.4 Transport and Storage
The walking pad is designed for easy storage and portability.
- To move the unit, ensure it is powered off and unplugged.
- Lift the front end slightly to engage the transport wheels (refer to Image 4.4).
- Roll the walking pad to your desired storage location. Its compact design allows it to fit in small spaces.
7. Maintenance
Regular maintenance ensures the longevity and optimal performance of your walking pad.
- Cleaning: Wipe down the walking pad with a damp cloth after each use. Do not use abrasive cleaners or solvents.
- Belt Lubrication: The walking belt may require lubrication periodically. Refer to the manufacturer's guidelines for specific lubrication instructions and recommended lubricants.
- Belt Tension: Check the walking belt tension regularly. If the belt slips or feels loose, it may need adjustment. Consult a qualified technician if you are unsure how to adjust it.
- Storage: Store the walking pad in a dry, cool place away from direct sunlight and moisture.
8. Troubleshooting
| Problem | Possible Cause | Solution |
|---|---|---|
| Walking pad does not start. |
|
|
| Belt slips or hesitates. |
|
|
| Remote control not responding. |
|
|
9. Specifications

Image 9.1: Technical specifications table and dimensional diagram of the Altera Homestep Walking Pad.
| Feature | Detail |
|---|---|
| Model Number | CAM-HOM-02 |
| Motor Power | 1.5 HP |
| Speed Range | 1 - 6 km/h |
| Maximum User Weight | 90 kg (198 lbs) |
| Incline Levels | 2 (manual, up to 4 degrees) |
| Running Belt Dimensions | 95 cm x 36 cm |
| Product Dimensions (L x W x H) | 110 x 46 x 10 cm |
| Product Weight | 17 kg |
| Material | Metal, Plastic |
| Features | Bluetooth, Portable, LED Display, Anti-slip belt, Transport wheels |
| Power Source | Electric Cord (110V) |
10. Warranty and Support
For warranty information or technical support, please refer to the contact details provided with your purchase or visit the official Altera website. Keep your proof of purchase for warranty claims.


