Introduction
Thank you for choosing the CIRYCASE FM143 Digital Meat Thermometer. This device is designed to provide fast and accurate temperature readings for various cooking applications, including meat, liquids, frying, and candy making. With its dual probe design and intelligent features, it helps ensure your food is cooked to perfection. Please read this manual carefully before use to ensure proper operation and maintenance.
Product Overview
The CIRYCASE FM143 thermometer features a foldable main probe and an additional wired probe for versatile use. Its large backlit LCD display ensures clear readability in any lighting condition.
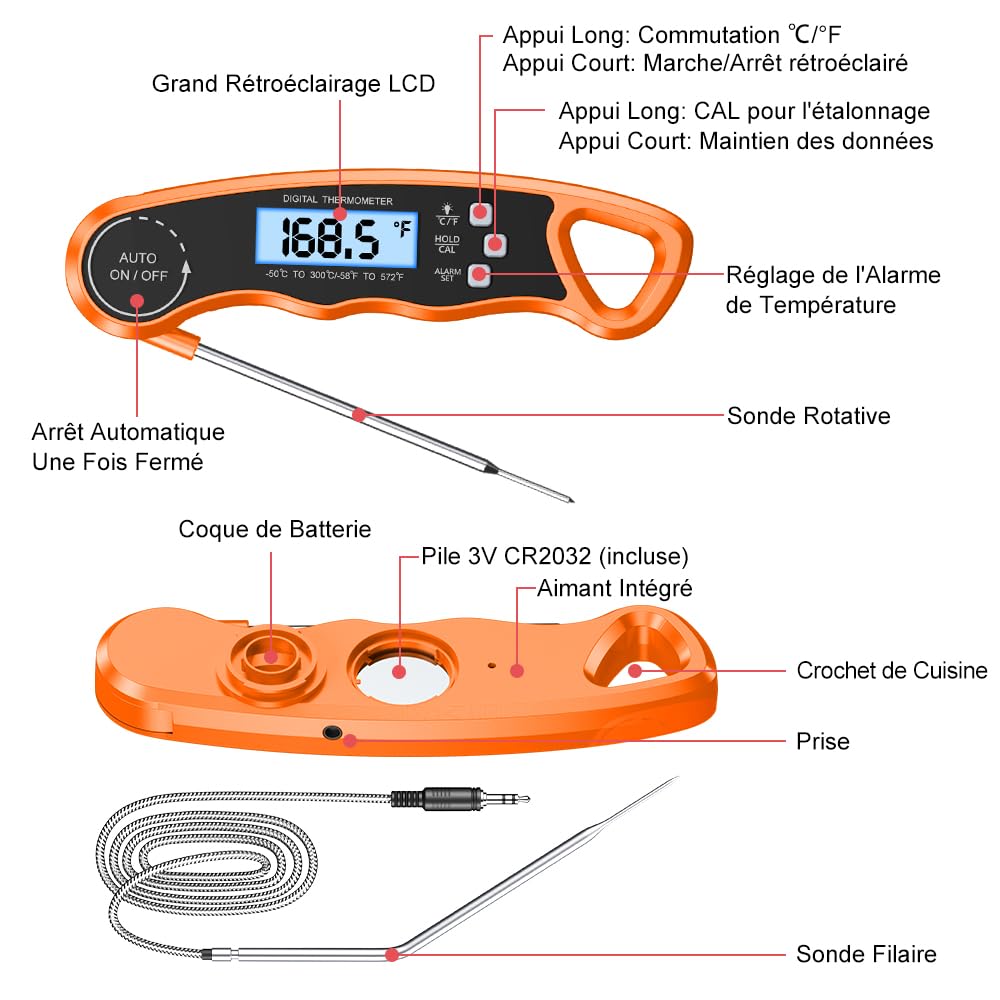
Figure 1: Overview of the CIRYCASE FM143 Digital Meat Thermometer, highlighting its main components including the foldable probe, wired probe, display, and control buttons.
Key Components:
- Main Foldable Probe: 12 cm (4.7 inches) food-grade stainless steel probe for quick, direct temperature readings. Automatically turns on/off when folded/unfolded.
- Wired Probe: 16.5 cm (6.5 inches) heat-resistant food-grade probe with a 102 cm (40 inches) braided stainless steel cable, ideal for oven or grill use.
- LCD Display: Large, backlit screen for clear temperature readings.
- Control Buttons:
- °C/°F Button: Short press to toggle backlight, long press to switch between Celsius and Fahrenheit.
- HOLD/CAL Button: Short press to hold the current temperature reading, long press for calibration.
- ALARM SET Button: Used to set the desired temperature alarm.
- Integrated Magnet: For convenient storage on metallic surfaces.
- Hanging Hole: For hanging on kitchen hooks.
- Battery Compartment: Houses the CR2032 battery.
Setup
1. Battery Installation
- Locate the battery compartment on the back of the thermometer.
- Open the compartment cover.
- Insert the included CR2032 battery with the positive (+) side facing up.
- Close the battery compartment cover securely.
2. Power On/Off
- To power on, simply unfold the main probe. The display will light up.
- To power off, fold the main probe back into its original position. The device will also automatically shut off after 10 minutes of inactivity to conserve battery life.
3. Selecting Temperature Unit (°C/°F)
- With the thermometer powered on, press and hold the "°C/°F" button for 3 seconds to switch between Celsius and Fahrenheit.
Operating Instructions
1. Basic Temperature Measurement (Foldable Probe)
- Unfold the main probe to power on the thermometer.
- Insert the tip of the probe into the thickest part of the food, avoiding bone or gristle.
- The temperature reading will appear on the LCD display within 2-3 seconds.

Figure 2: The thermometer in use, demonstrating its fast and precise temperature measurement capabilities for cooked food.
2. Using the Wired Probe (Oven/Grill Safe)
- Plug the wired probe into the designated port on the side of the thermometer.
- Insert the tip of the wired probe into the food you are cooking in an oven, grill, or smoker. Ensure the cable is not exposed to direct flame or extreme heat that could damage it.
- Close the oven/grill door, allowing the cable to pass through.
- Monitor the temperature reading on the main unit outside the heat source.

Figure 3: The wired probe in use, allowing for safe and continuous temperature monitoring of food cooking inside an oven.
3. Setting the Temperature Alarm
The alarm function notifies you when your food reaches a desired temperature.
- Press the "ALARM SET" button once. The target temperature will flash.
- Use the "°C/°F" button to increase the target temperature and the "HOLD/CAL" button to decrease it.
- Press "ALARM SET" again to confirm and exit the setting mode.
- An alarm will sound when the measured temperature reaches your set target. The alarm will continue for up to one minute unless a button is pressed.

Figure 4: Instructions for setting a custom temperature alarm on the thermometer, ensuring food reaches the desired doneness.
4. Hold Function
- Press the "HOLD/CAL" button once to freeze the current temperature reading on the display. This is useful when you need to remove the probe from the heat source to read the temperature more comfortably.
- Press the "HOLD/CAL" button again to release the hold and resume live temperature readings.
5. Calibration
To ensure consistent accuracy, the thermometer can be recalibrated using ice water.
- Prepare a glass of ice water (crushed ice and water, stirred well). The temperature should be 0°C (32°F).
- Insert the probe into the ice water, ensuring the tip is fully submerged but not touching the bottom or sides of the glass.
- Wait for the reading to stabilize.
- Press and hold the "HOLD/CAL" button for 3 seconds until "CAL" appears on the display.
- If the reading is not 0°C (32°F), use the "°C/°F" and "ALARM SET" buttons to adjust the reading to 0°C (32°F).
- Press "HOLD/CAL" again to confirm calibration.
Maintenance and Care
Cleaning
- Always clean the probe thoroughly after each use with a damp cloth and mild detergent.
- Do not immerse the main unit in water or place it in a dishwasher, as this can damage the electronic components.
- Wipe the main unit with a soft, damp cloth.
Storage
The thermometer offers multiple convenient storage options:
- Magnetic Back: Attach the thermometer to any metallic surface, such as a refrigerator or oven door, using its strong integrated magnets.
- Hanging Hole: Hang the thermometer on a kitchen hook for easy access.
- Compact Size: Its compact design allows it to fit easily into any kitchen drawer.

Figure 5: Various storage options for the thermometer, including magnetic attachment to a refrigerator and hanging on a kitchen hook.
Battery Replacement
- When the display becomes dim or the thermometer stops responding, it's time to replace the battery.
- Follow the battery installation steps in the Setup section to replace the CR2032 battery.
Troubleshooting
- No Display/Dim Display: Check battery installation. Replace the CR2032 battery if necessary.
- Inaccurate Readings: Ensure the probe is inserted correctly into the thickest part of the food, avoiding bone. Perform a calibration using ice water as described in the Operating Instructions.
- Alarm Not Sounding: Verify that the alarm temperature has been set correctly.
- Wired Probe Not Working: Ensure the wired probe is securely plugged into the port. Check the cable for any visible damage.
Specifications
| Feature | Detail |
|---|---|
| Temperature Range | -50°C to 300°C (-58°F to 572°F) |
| Temperature Accuracy | ±1°C (±2°F) |
| Response Time | 2-3 seconds |
| Foldable Probe Length | 12 cm (4.7 inches) |
| Wired Probe Length | 16.5 cm (6.5 inches) |
| Wired Probe Cable Length | 102 cm (40 inches) |
| Display Type | Digital LCD with Backlight |
| Battery Type | 1 x CR2032 (included) |
| Auto-Off | 10 minutes of inactivity |
| Dimensions (L x W x H) | 16 x 11 x 2 cm (6.3 x 4.3 x 0.8 inches) |
| Weight | 100 grams (3.5 ounces) |
| Material | Plastic (outer), Food-grade Stainless Steel (probes) |
| Connectivity Technology | Wired |
| Care Instructions | Wipe clean |
Warranty and Support
CIRYCASE products are manufactured with high-quality standards. For any questions, concerns, or technical support regarding your FM143 Digital Meat Thermometer, please refer to the contact information provided with your purchase or visit the official CIRYCASE website. Please retain your proof of purchase for warranty claims.


