
Introduction
This manual provides detailed instructions for the installation, programming, operation, and maintenance of your Veise Keypad Door Lock with Handle, Model KS04. Please read this manual thoroughly before installation and use to ensure proper function and safety.
Package Contents
Verify that all components are present before beginning installation:
- Keypad Door Lock with Handle
- Screws (various sizes)
- Latch
- Strike Plate
- Mounting Plate
- 2 Keys
- Installation Manual
- User Manual
Tools Required (Not Included)
- Phillips Head Screwdriver
- 4 AA Alkaline Batteries (Do not use rechargeable batteries for optimal performance)
Installation Guide
It is strongly recommended to leave the door open or ajar during installation. Do not close the door before the batteries are inserted.
1. Measure Door Dimensions
Before installation, confirm your door's dimensions to ensure compatibility. The door thickness should be 1-3/8" to 2" (35mm to 50mm). The hole diameter should be 2-1/8" (54mm). The backset can be 2-3/8" or 2-3/4" (60mm or 70mm). Ensure the door frame is aligned with the door and the strike hole is drilled a minimum of 1" (25mm) deep.
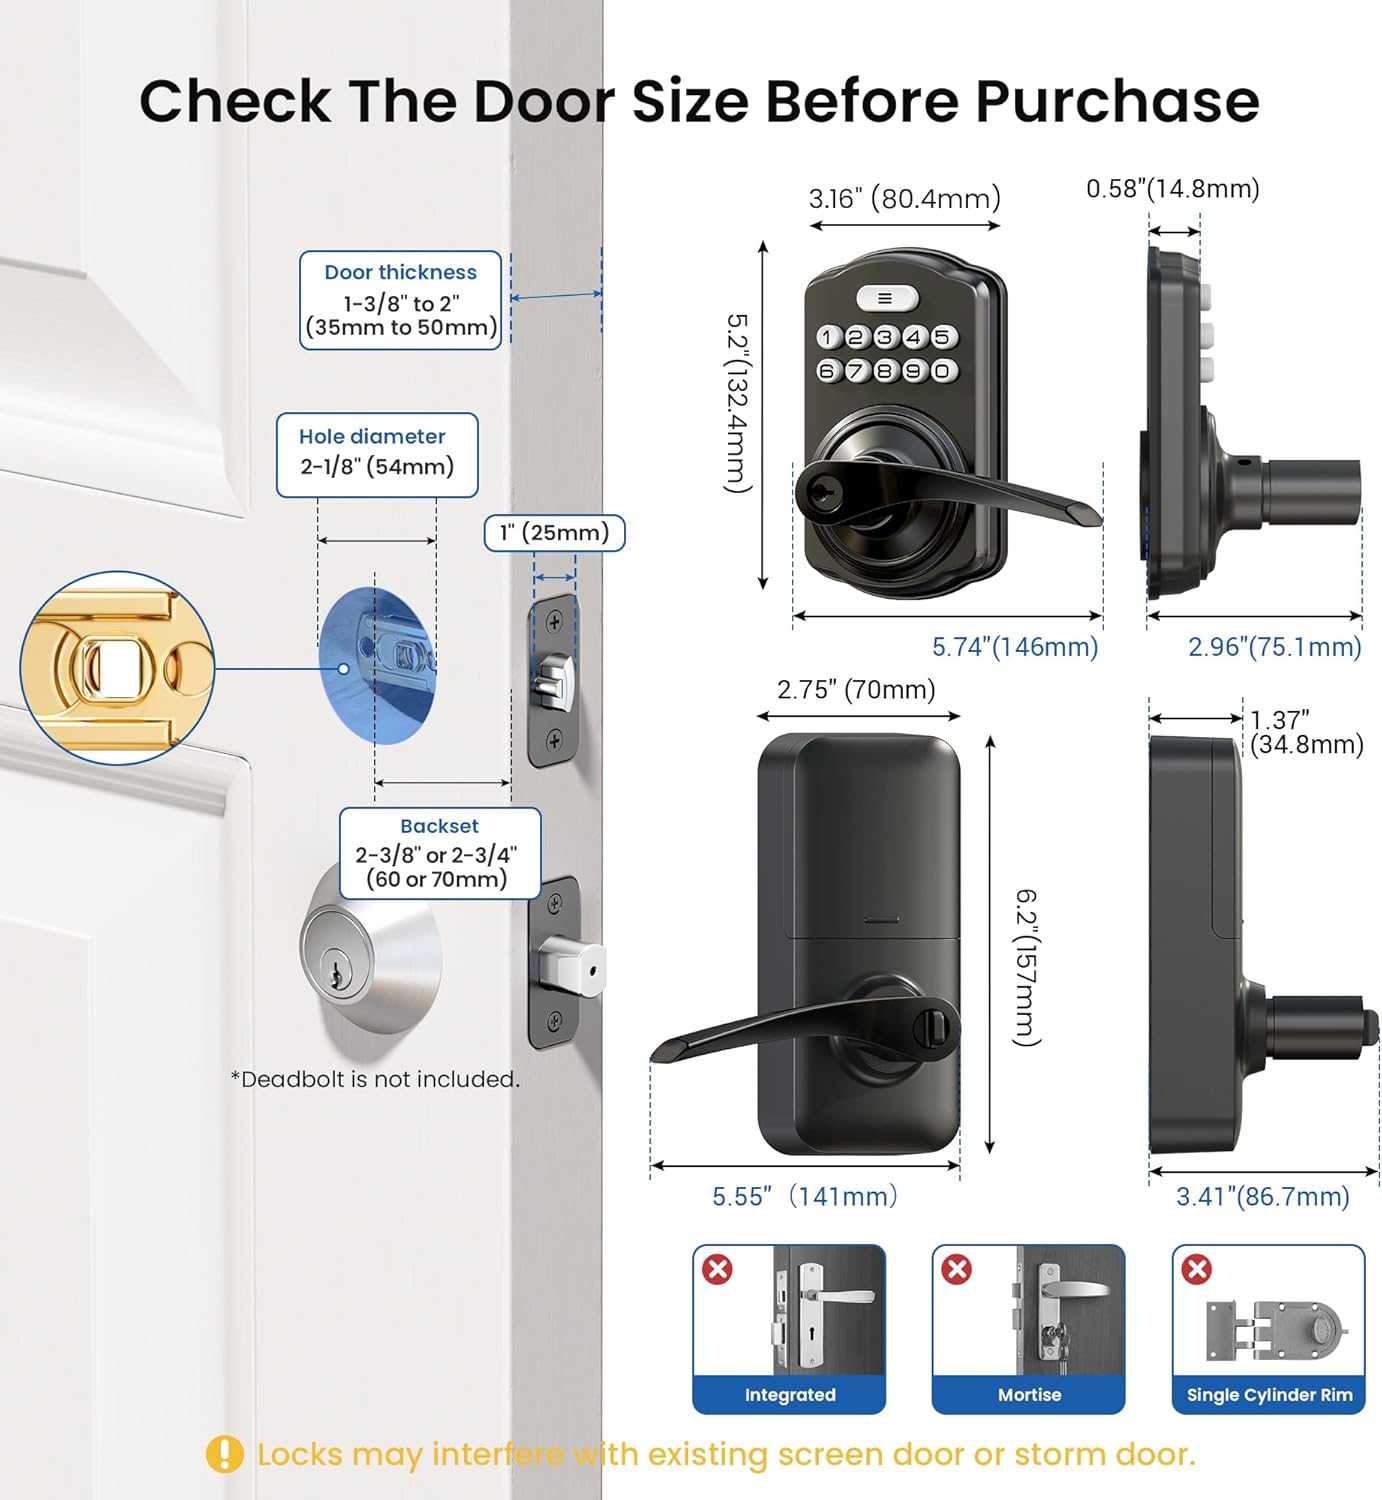
Image: Diagram illustrating door thickness, hole diameter, and backset measurements required for installation.

Image: Close-up diagram showing specific measurements for door preparation, including hole diameter and backset.
2. Install the Latch and Strike Plate
Ensure the beveled edge of the latch tongue faces the direction the door swings shut. For a 2-3/4" (70mm) backset, extend the latch length by pulling the locking square hole. Install the strike plate on the door frame, aligning it with the latch direction.

Image: Visual guide for installing the latch, showing correct orientation and extension for different backsets.
3. Install Exterior Assembly
Determine the correct handle direction (right-handed or left-handed door). Route the cable above the latch and insert the torque blade horizontally into the latch slot. Install the mounting plate with the mounting plate screws, ensuring it is parallel to the door edge. Do not overtighten screws.

Image: Steps for installing the exterior assembly, including cable routing and torque blade insertion.
4. Install Interior Assembly
Keep the thumb turn in a vertical position. Tuck excess cable into the socket to avoid blocking screw holes or interfering with cover installation. Attach the interior assembly to the mounting plate, ensuring the interior assembly screws reach the screw threads on the mounting plate. Tighten the 3 screws.

Image: Guide for installing the interior assembly, showing cable management and screw placement.
5. Handle Orientation Adjustment (Optional)
If you need to reverse the lever direction, ensure the lock is in the unlocked state. Rotate the exterior handle down approximately 45° until it cannot be rotated, then remove it. For the interior lever, press the hole at the bottom of the interior assembly with the reset tool and pull out the lever. Swap the exterior and interior levers, aligning the hole with the inside joint point. Insert each lever and ensure it is securely installed.
Video: Demonstrates how to reverse the lever direction of the Veise KS04 lock, including removing and swapping the exterior and interior levers.
Video: Shows the process of changing the orientation of the handle's curve for the Veise KS04 lock.
6. Full Installation Video
Video: A comprehensive installation guide for the Veise KS04 Keypad Door Lock.
Operating Instructions
The Veise KS04 lock offers multiple ways to secure and access your door.
1. Programming Master and User Codes
The default master code is 12345678. Please change it to your own master code before programming. If setup is unsuccessful, the indicator light will flash red.
Video: Detailed instructions on how to program the Veise KS04 lock, including changing the master code, adding/deleting user codes, and setting one-time codes.
Change Master Code:
- Press the 'Menu' button (three horizontal lines) twice.
- Enter the Default Master Code (12345678).
- Press the 'Menu' button once.
- Press '1'.
- Enter your new master code (4-10 digits) and press the 'Menu' button.
- Enter your new master code again and press the 'Menu' button. (Flashing green light confirms successful setup).
Add User Code:
- Press the 'Menu' button twice.
- Enter your Master Code.
- Press the 'Menu' button once.
- Press '2'.
- Enter a new user code (4-10 digits) and press the 'Menu' button.
- Enter the new user code again and press the 'Menu' button. (Flashing green light confirms successful setup).
Delete User Code:
- Press the 'Menu' button twice.
- Enter your Master Code.
- Press the 'Menu' button once.
- Press '3'.
- Enter the unwanted user code and press the 'Menu' button. (Flashing green light confirms successful setup).
Add One-Time Code:
- Press the 'Menu' button twice.
- Enter your Master Code.
- Press the 'Menu' button once.
- Press '7'.
- Enter a new user code (4-10 digits) and press the 'Menu' button.
- Enter the new user code again and press the 'Menu' button. (Flashing green light confirms successful setup).

Image: A visual representation of the one-time code feature, ideal for temporary access for service personnel.
2. Locking and Unlocking Methods
The Veise KS04 offers versatile access options including user codes, one-time codes, an interior thumbturn, and physical keys.

Image: Overview of secure locking options including keypad, thumb turn, and physical keys.
One-Touch Locking:
To lock the door from the outside, simply press and hold any key on the keypad for 2 seconds. The lock will engage, and the handle cannot be pulled down.
Key Access:
Insert the physical key into the keyhole and rotate to unlock or lock the door. This serves as a reliable backup.
Interior Thumbturn:
From the inside, use the thumbturn to manually lock or unlock the door for convenience and privacy.
3. Auto-Lock Feature
The auto-lock feature automatically locks the door after a set period. This can be enabled or disabled.

Image: A family with a dog, demonstrating the convenience of the auto-lock feature.
Enable/Disable Auto-Lock:
- Press the 'Menu' button twice.
- Enter your Master Code.
- Press the 'Menu' button once.
- Press '5'.
- Press '1' to enable Auto Lock or '2' to disable Auto Lock. (Flashing green light confirms successful setup).
Set Auto-Lock Time:
- Press the 'Menu' button twice.
- Enter your Master Code.
- Press the 'Menu' button once.
- Press '8'.
- Enter the new duration time (10-99 seconds) and press the 'Menu' button. (Flashing green light confirms successful setup).
4. Passage Mode
Passage Mode allows the door to remain unlocked for continuous access, ideal for gatherings or moving items.

Image: A person moving boxes, highlighting the utility of Passage Mode for temporary unrestricted access.
To activate Passage Mode, disable auto-lock and turn the interior thumbturn. Complete the setup via programming.
5. Anti-Peeping Code
Enhance security by entering random digits before or after your actual code. The lock will still recognize the correct sequence within the longer entry.

Image: Visual explanation of the anti-peeping code, showing how random digits can be added around the correct passcode.
6. Silent Mode
Enable Silent Mode to disable all sound prompts from the lock, useful for quiet environments.
Enable/Disable Silent Mode:
- Press the 'Menu' button twice.
- Enter your Master Code.
- Press the 'Menu' button once.
- Press '4'.
- Press '1' to disable Silent Mode or '2' to enable Silent Mode. (Flashing green light confirms successful setup).
7. Vacation Mode
Activate Vacation Mode for enhanced security when you are away for an extended period. Any attempt to tamper with the lock will trigger an alarm.
Enable Vacation Mode:
- Press the 'Menu' button twice.
- Enter your Master Code.
- Press the 'Menu' button once.
- Press '6'.
- Press the 'Menu' button. (Flashing green light confirms Vacation Mode enabled).
Disable Vacation Mode:
Enter your Master Code and press the 'Menu' button. (Vacation Mode is disabled).
Maintenance
1. Battery Life and Alerts
The lock operates on 4 AA batteries (not included) and offers 365+ days of battery life. A low-battery alert will notify you when it's time to replace the batteries.

Image: Illustration of the long battery life and low battery alert feature.
2. Durability and Protection
Constructed with high-density zinc alloy, the Veise KS04 is built for long-lasting home protection. It features an ANSI Grade 3 lock cylinder and IP55-rated protection, making it waterproof and resistant to various weather conditions.

Image: Features like Zinc Alloy construction, low battery alert, long battery life, and IP55 waterproof rating.

Image: The lock is shown enduring rain, highlighting its IP55 waterproof and weather-resistant capabilities.
Troubleshooting
- Lock not responding: Check battery levels and replace if necessary. Ensure batteries are inserted correctly.
- Codes not working: Verify that the correct master code is being used. Re-program user codes if needed. Ensure the lock is not in Vacation Mode.
- Handle not engaging: Check for any obstructions in the latch mechanism. Ensure the lock is properly reset after battery installation.
- Alarm sounding unexpectedly: Check if Vacation Mode is enabled. Ensure no unauthorized attempts to tamper with the lock have occurred.
- Difficulty with installation: Refer to the installation video and ensure all measurements are correct. Contact customer support if issues persist.
Product Specifications
| Brand | Veise |
| Model Name | KS04 |
| Lock Type | Keypad |
| Material | Zinc Alloy |
| Color | Matte Black |
| Item Dimensions L x W x H | 5.55 x 2.75 x 6.2 inches |
| Item Weight | 3.03 pounds |
| Batteries Required | 4 AA batteries |
| Special Features | High-density Zinc Alloy, Passage Mode, Auto Lock, One Touch Locking, Interior Thumbturn Locking, Anti-Peeping Code, Keyless Entry, One Time Code, Silent Mode, Backlit Keypad, Low Battery Alert, Left and Right Door, Easy Installation |
Warranty and Support
Veise offers at least a 2-year warranty on this product. For any questions or assistance, please contact Veise customer support:
- Phone Support: +1 (855) 400-3853 (USA) - Available Weekdays 9 AM–5 PM PST
- Email Service: 24/7 after-sales email support


