
MSI MAG B850M MORTAR WIFI (7E61-001R)
MSI MAG B850M MORTAR WIFI Motherboard User Manual
Model: MAG B850M MORTAR WIFI (7E61-001R)
1. Introduction
This manual provides detailed instructions for the installation, operation, maintenance, and troubleshooting of your MSI MAG B850M MORTAR WIFI motherboard. Please read this manual thoroughly before beginning the installation process to ensure proper setup and optimal performance of your system.
2. Key Features
- Supports AMD Ryzen 9000/8000/7000 Series Desktop CPUs: Designed for the latest AMD processors, offering high compatibility and performance.
- Supports DDR5 memory, DDR5 8200+ MT/s (OC): Provides cutting-edge memory support for faster data processing and enhanced gaming/application performance.
- Ultra Performance: Features a 12+2+1 Duet Rail Power System, Dual 8-Pin CPU Power Connectors, Core Boost, Memory Boost, and an 8-Layer PCB made from 56g thickened copper material for stable and robust power delivery.
- FROZR PROTECTION: Incorporates an extended heatsink, MOSFET thermal pads rated for 7W/mK, additional choke thermal pads, and EZ M.2 Shield Frozr II to ensure efficient heat dissipation for high-performance systems.
- EZ DIY: Simplifies the building process with features like EZ M.2 Shield Frozr II, EZ M.2 Clip II, EZ PCIe Release, and EZ Antenna for user-friendly installation.

Image: The MSI MAG B850M MORTAR WIFI motherboard showcasing its advanced cooling solutions, including extended heatsinks and thermal pads, designed for optimal heat dissipation.
3. Package Contents
Before you begin, please verify that all items listed below are included in your package. If any items are missing or damaged, contact your retailer.
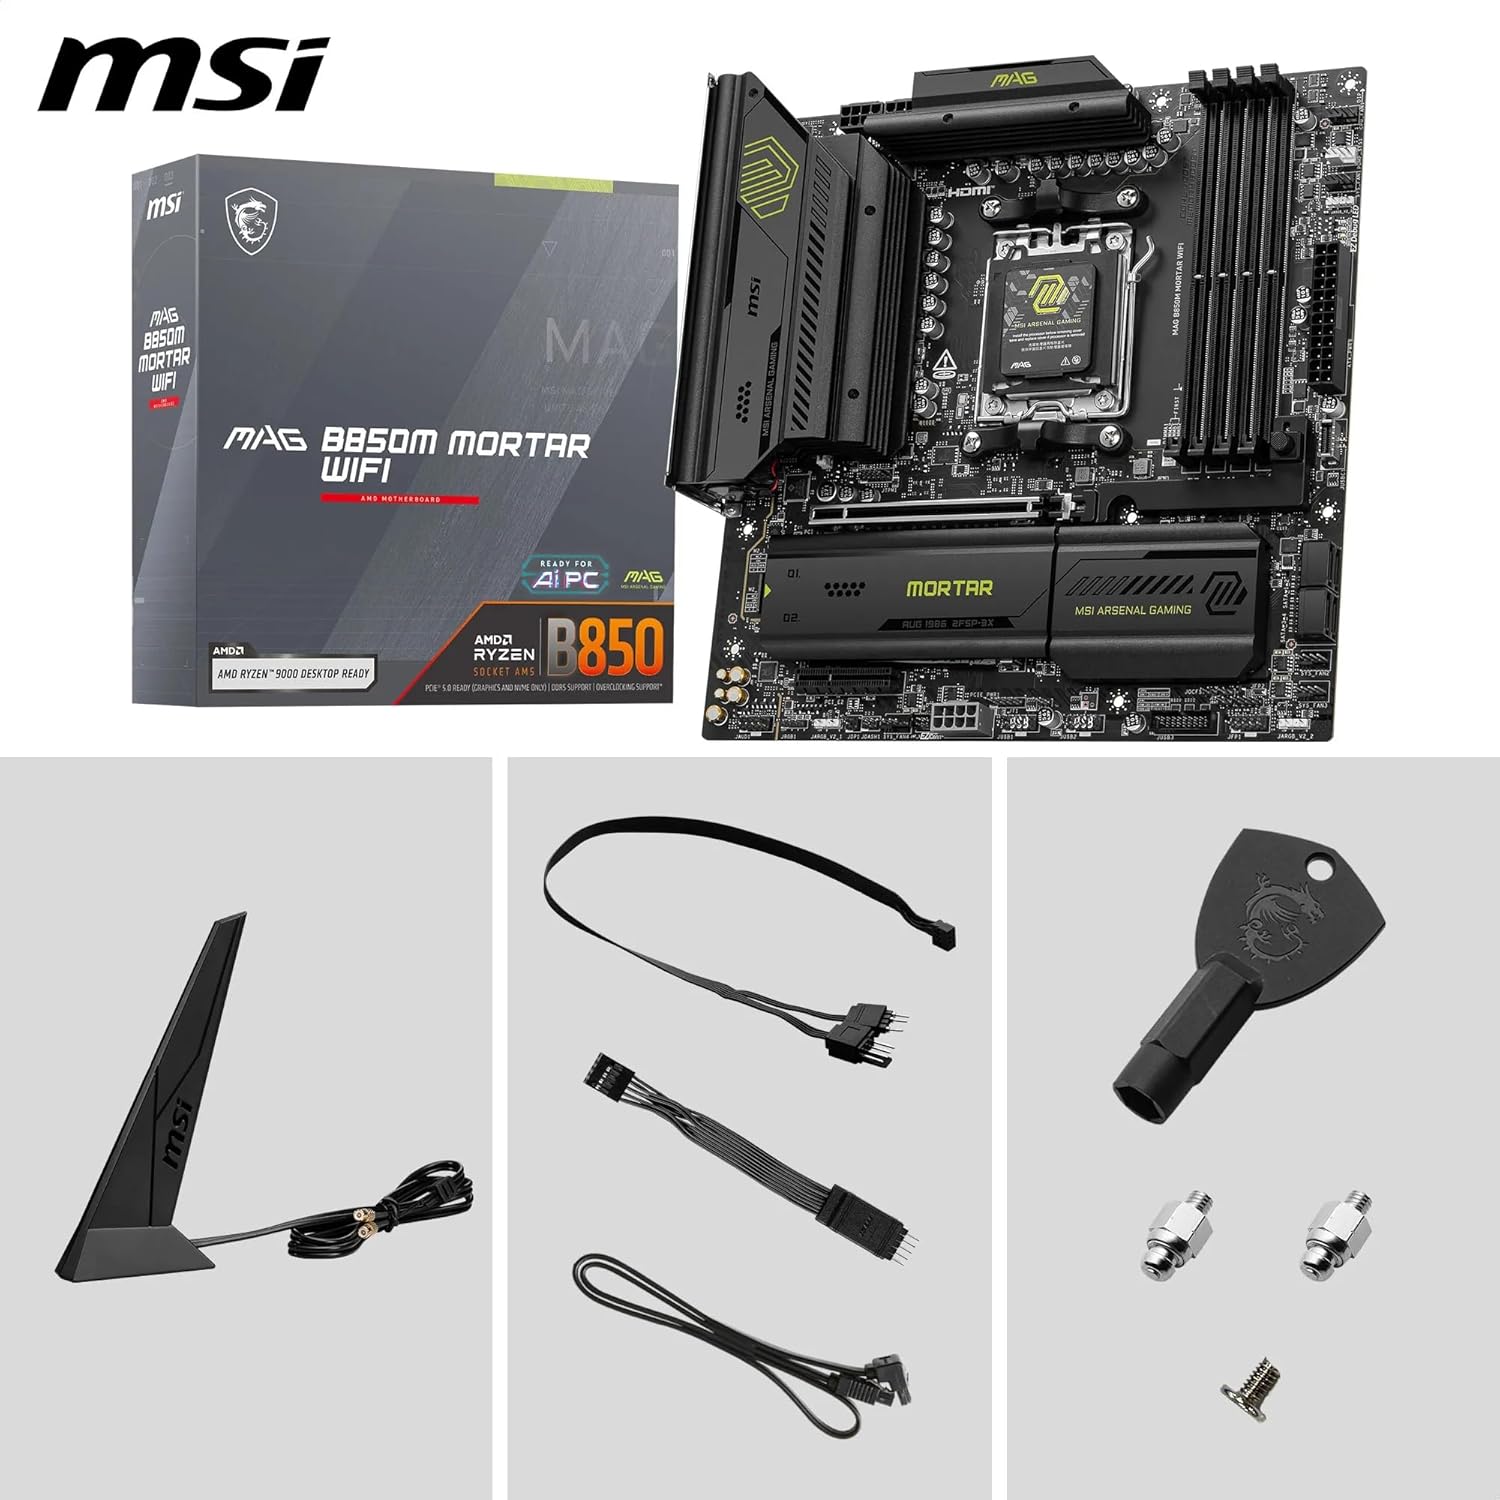
Image: The MSI MAG B850M MORTAR WIFI motherboard alongside its standard accessories, including the Wi-Fi antenna, SATA cables, and M.2 screws.
- MSI MAG B850M MORTAR WIFI Motherboard
- Wi-Fi Antenna
- SATA Data Cables
- M.2 SSD Screws and Standoffs
- User Manual and Quick Installation Guide
- Driver CD/USB (if included)
4. Setup
4.1. Component Installation
4.1.1. CPU Installation
- Open the CPU socket lever.
- Carefully align the CPU with the socket, ensuring the triangle marker on the CPU matches the one on the socket.
- Gently place the CPU into the socket without forcing it.
- Close the socket lever to secure the CPU.
4.1.2. Memory (RAM) Installation
- Open the clips on both ends of the DDR5 DIMM slots.
- Align the notch on the DDR5 memory module with the key in the DIMM slot.
- Press down firmly on both ends of the memory module until the clips snap into place.
4.1.3. M.2 SSD Installation

Image: Close-up view of the M.2 slots on the MSI MAG B850M MORTAR WIFI motherboard, highlighting the EZ M.2 Shield Frozr II for easy installation and thermal management.
- Locate the M.2 slots on the motherboard.
- Remove the EZ M.2 Shield Frozr II heatsink if present.
- Insert the M.2 SSD into the slot at a 30-degree angle.
- Secure the M.2 SSD with the EZ M.2 Clip II or the provided screw.
- Reattach the EZ M.2 Shield Frozr II heatsink for optimal cooling.
4.1.4. Graphics Card (PCIe) Installation
- Align your graphics card with the primary PCIe x16 slot.
- Press down firmly until the card is seated and the retention clip locks into place.
- Secure the card to your PC case with a screw.
4.2. Power Connections
- Connect the 24-pin ATX power connector from your power supply to the motherboard.
- Connect the Dual 8-Pin CPU power connectors (EPS12V) to the motherboard.
- Connect any necessary SATA power cables to your storage devices.
4.3. External Connections (Rear I/O)

Image: The rear I/O panel of the MSI MAG B850M MORTAR WIFI motherboard, displaying various ports including USB, HDMI, Ethernet, and audio jacks.
- Connect your monitor to the HDMI port on the motherboard or your graphics card.
- Connect your keyboard and mouse to the USB ports.
- Connect your Ethernet cable to the LAN port for wired network access.
- Attach the included Wi-Fi antenna to the designated connectors for wireless connectivity.
- Connect audio devices to the appropriate audio jacks.
4.4. Initial Boot
After all components are installed and connected, power on your system. The system should display the MSI logo and enter the BIOS/UEFI setup or begin the operating system installation process.
5. Operating
5.1. BIOS/UEFI Configuration
To enter the BIOS/UEFI setup, press the Del key during system startup. Here you can configure various system settings, including boot order, CPU/memory frequencies, and fan curves.
5.2. Driver Installation
After installing your operating system, install the necessary drivers for your motherboard components. These can typically be found on the included driver CD/USB or downloaded from the official MSI website. Key drivers include chipset, LAN, audio, and Wi-Fi drivers.
5.3. Software Utilities
MSI provides various software utilities to enhance your user experience, such as MSI Center for system monitoring and Mystic Light for RGB control. These can be downloaded from the MSI website.
6. Maintenance
6.1. Cleaning
Regularly clean your PC to prevent dust buildup, which can lead to overheating. Use compressed air to clear dust from heatsinks, fans, and other components. Ensure the system is powered off and unplugged before cleaning.
6.2. BIOS Updates
Periodically check the MSI website for BIOS/UEFI updates. Updates can improve system stability, add support for new hardware, or fix bugs. Follow the instructions provided by MSI carefully when performing a BIOS update.
6.3. Driver Updates
Keep your drivers updated to ensure optimal performance and compatibility with new software and hardware. Drivers can be updated through the MSI website or your operating system's update utility.
7. Troubleshooting
- No Power: Ensure all power cables (24-pin ATX, 8-pin CPU) are securely connected. Check your power supply unit (PSU) and wall outlet.
- No Display: Verify that your monitor is connected to the correct video output (motherboard or graphics card). Reseat your graphics card and RAM modules.
- System Instability/Crashes: Check CPU and GPU temperatures. Ensure RAM is properly seated and compatible. Update drivers and BIOS.
- Boot Device Not Found: Check SATA/M.2 cable connections to your storage drives. Verify boot order in BIOS/UEFI.
- No Internet Connection: Ensure Ethernet cable is connected or Wi-Fi antenna is attached. Install/update LAN/Wi-Fi drivers. Check network settings in your operating system.
8. Specifications

Image: An exploded diagram of the MSI MAG B850M MORTAR WIFI motherboard, illustrating its multi-layered PCB design and support for Lightning Gen5 and Gen4 PCIe.
| Feature | Detail |
|---|---|
| Product Dimensions | 9.57 x 9.57 x 1.97 inches |
| Item Weight | 2.65 pounds |
| Manufacturer | MSI Computer |
| ASIN | B0F4Q45RKX |
| Item Model Number | 7E61-001R |
| CPU Socket | Socket AM5 |
| Compatible Devices | Personal Computer, Server |
| RAM Memory Technology | DDR5 |
| Compatible Processors | AMD Ryzen 9000, AMD Ryzen 8000, AMD Ryzen 7000 Series Desktop CPUs |
| Chipset Type | AMD B850 |
| Memory Clock Speed | 8200 MHz (OC) |
| Platform | Windows 11 |
| Model Name | MAG B850M MORTAR WIFI |
| CPU Model | Ryzen 9 |
9. Warranty and Support
For detailed warranty information, please refer to the warranty card included with your product or visit the official MSI website. For technical support, driver downloads, and further assistance, please visit the MSI support page:
You can also find FAQs and community forums on the MSI website for additional help.
Related documentsMAG B850M MORTAR WIFI (7E61-001R)


Ask a question about this manual
Ask about setup, troubleshooting, compatibility, parts, safety, or missing instructions. Manuals+ will review the question and use this page’s manual context to help answer it.