
Introduction
This manual provides essential information for the safe and effective operation of your Acuvar 5K75MP Digital Camera. Designed for photography and video, this UHD vlogging camera offers advanced features such as 75MP high-resolution photos, vibrant 5K Ultra HD videos, fast autofocus, and an 18X digital zoom. Its 3.0-inch 180° flip screen is ideal for vlogging and content creation. With built-in WiFi, you can share content instantly and use the camera as a webcam. This compact point-and-shoot camera is user-friendly, making it suitable for beginners and experienced users alike.
What's in the Box
Your Acuvar 5K75MP Digital Camera package includes the following items:
- Acuvar 5K75MP Digital Camera Body
- 2 x Rechargeable Batteries
- Battery Charger
- 64GB SD Card
- USB Charging Cable
- Lens Cap
- Strap
- Cleaning Cloth
- Instruction Manual
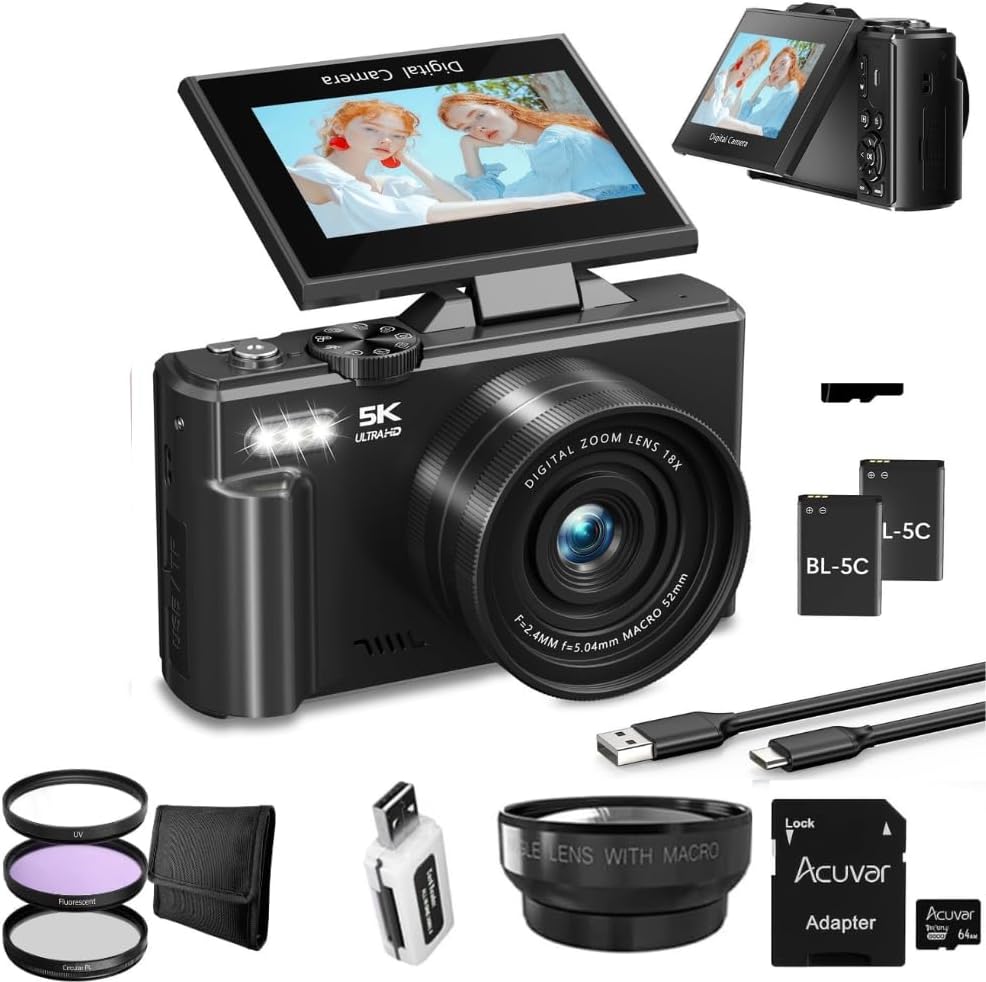
Figure 1: Acuvar 5K75MP Digital Camera with all included accessories, including the camera body, two batteries, charger, SD card, USB cable, lens cap, strap, cleaning cloth, and manual.
Setup
1. Charging the Batteries
Insert the rechargeable batteries into the provided battery charger. Connect the charger to a power source using the USB charging cable. The indicator light on the charger will show the charging status. Ensure both batteries are fully charged before first use.
Figure 2: The battery charger with two batteries inserted, ready for charging.
2. Inserting the Battery and SD Card
Locate the battery compartment on the bottom of the camera. Open the compartment and insert a charged battery, ensuring correct orientation. Close the compartment securely. Insert the 64GB SD card into the designated slot on the side of the camera until it clicks into place.

Figure 3: The included 64GB SD card, ready for insertion into the camera.
3. Attaching Lenses (if applicable)
If your kit includes additional lenses (e.g., wide-angle, macro), carefully align the lens with the camera's lens mount and twist clockwise until it locks into place. Ensure the lens cap is removed before use.
4. Attaching the Strap
Thread the camera strap through the strap loops on the sides of the camera. Secure the strap firmly to prevent accidental drops.
Operating Instructions
1. Power On/Off
Press and hold the Power button located on the top of the camera to turn it on or off. The 3.0-inch flip screen will illuminate.

Figure 4: Top and back view of the camera, highlighting the power button, shutter button, and mode dial.
2. Selecting Shooting Modes
Rotate the Mode Dial on the top of the camera to select your desired shooting mode (e.g., Photo, Video, Continuous Shooting, Timer Shooting, Automatic Shooting, Slow Motion, Time Lapse, Loop Recording).

Figure 5: The rotating function dial showing various shooting modes available on the camera.
3. Capturing Photos and Videos
In Photo mode, press the Shutter button halfway to focus, then fully press to capture a photo. In Video mode, press the Shutter button to start recording and press again to stop.
4. Using the Flip Screen
The 3.0-inch screen can be flipped 180° upwards, allowing for easy self-recording and vlogging. The display will automatically rotate to match the screen orientation.
5. Zoom Function
Use the 'T' (Telephoto) and 'W' (Wide) buttons on the back of the camera to adjust the 18X digital zoom. This allows you to capture distant subjects with clarity.

Figure 6: Visual representation of the 18X digital zoom, showing different levels of magnification.
6. WiFi Functionality
To activate WiFi, press and hold the UP/Flash button for approximately 3 seconds. Scan the QR code displayed on the camera screen or manually connect your smartphone to the camera's WiFi network (Camera Wi-Fi name: WD08, password: 12345678). Download the corresponding APP-HDV CAM application to control the camera remotely, download files, and share content to social media platforms.

Figure 7: The camera display showing WiFi information and a QR code for downloading the companion app. Download App
7. Using Photo Filters
Access the menu settings to apply various creative photo filters such as Sepia, Halo, Cross Processing, and Mono Red to enhance your photography.
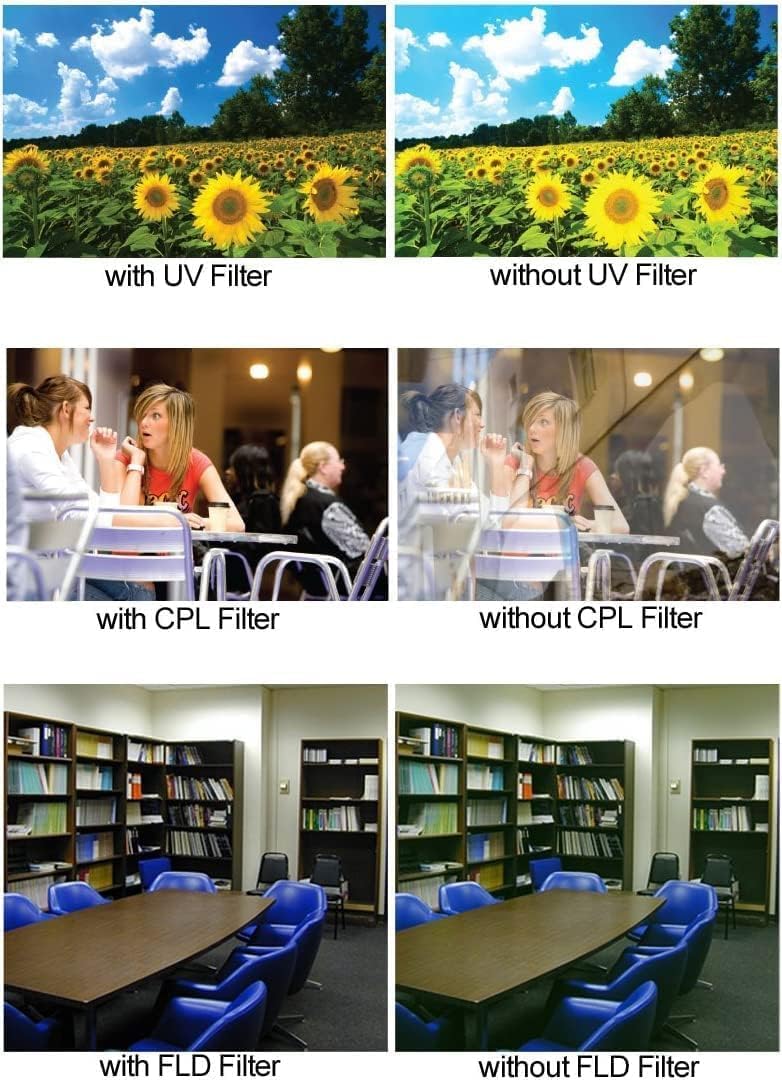
Figure 8: Comparison shots demonstrating the effects of UV, CPL, and FLD filters on images.
8. Menu Settings
Press the 'MENU' button to access various settings including:
- Rec Resolution: Adjust video resolution (e.g., 4K/30FPS).
- White Balance: Set automatic or manual white balance.
- Filter: Apply creative filters.
- Exposure Setting: Adjust exposure compensation.
- Metering Mode: Select metering modes (Average, Center, Spot, Matrix).
- Sharpness: Adjust image sharpness.
- Video Quality: Set video quality (e.g., High).
- ISO: Adjust ISO sensitivity (Auto, 100-6400).
- Time Watermark: Turn on/off date and time stamp.
- Rec Audio: Enable/disable audio recording.
- Image Rotation: Enable/disable automatic image rotation for the flip screen.
- Icon Display: Turn on/off display icons.
- Focus Mode: Select focus mode (Autofocus, Semi-Automatic, Fixed Focus).
- Wi-Fi: Turn on/off Wi-Fi.
- APP User Guide: Access the digital user guide.
- Light Source Frequency: Adjust for different lighting environments.
- LED Indicator: Turn on/off LED indicator.
- Auto Screen Saver: Set screen saver duration.
- Auto Power Off: Set auto power off duration.
- Display Brightness: Adjust screen brightness.
- Button Prompt: Turn on/off button sounds.
- Startup Music: Turn on/off startup music.
- Language: Select display language.
- Time Format: Set time display format.
- Time Set/Date Set: Adjust time and date.
- Format: Format the SD card.
- Device Info: View device information.
- Factory Reset: Reset camera to factory settings.
Maintenance
- Cleaning: Use the provided cleaning cloth to gently wipe the lens and screen. Avoid harsh chemicals.
- Battery Care: Store batteries in a cool, dry place. Do not expose to extreme temperatures. Fully charge batteries before extended storage.
- Storage: When not in use, store the camera in its protective bag in a dry, dust-free environment.
Troubleshooting
- Camera not turning on: Ensure the battery is fully charged and correctly inserted.
- Poor image/video quality: Check the selected resolution and quality settings in the menu. Ensure the lens is clean and free from smudges. Adjust ISO for low light conditions.
- Autofocus issues: Ensure the focus mode is set to 'Autofocus' in the menu settings.
- WiFi connection problems: Verify that WiFi is enabled on the camera and your smartphone. Ensure the correct network name and password are used. Try restarting both devices.
- SD card error: Ensure the SD card is correctly inserted. If the issue persists, try formatting the SD card via the camera's menu (note: this will erase all data).
Specifications
| Feature | Specification |
|---|---|
| Brand | Acuvar |
| Model Number | 5K75MP |
| Video Resolution | 5K Ultra HD (2160p) |
| Effective Still Resolution | 75 MP |
| Digital Zoom | 18 x |
| Screen Size | 3 Inches |
| Display Type | LCD (180° Flip Screen) |
| Autofocus | Yes |
| Connectivity Technology | Wi-Fi |
| Memory Storage Capacity | 64 GB (SD Card included) |
| Photo Sensor Technology | CMOS |
| Image Stabilization | Digital |
| Item Weight | 3 Ounces |
| Battery Type | Rechargeable |
| Special Feature | Webcam Functionality |
Official Product Video
Video 1: An overview of the Acuvar 75MP 5K Digital Camera, showcasing its features and capabilities.
Warranty & Support
This Acuvar 5K75MP Digital Camera comes with a 90-day warranty. For support or warranty claims, please refer to the contact information provided in your product packaging or visit the official Acuvar website.