
Introduction
This user manual provides comprehensive instructions for the safe and effective operation of your Vaporesso Vibe Nano Pro Kit. Please read this manual thoroughly before using the device to ensure optimal performance and longevity.

Figure 1: Vaporesso Vibe Nano Pro Kit - Front and Bottom View. This image displays the sleek design of the Vibe Nano Pro Kit, highlighting its compact form factor and the location of the USB-C charging port and airflow adjustment on the base.
Package Contents
Upon unboxing, please verify that all items listed below are present and in good condition:
- 1X Vaporesso Vibe Nano Pro Battery
- 1X Vaporesso Vibe Series 0.8Ω Dual Mesh Pod (Pre-installed)
- 1X User Manual & Warranty Card
Product Overview and Features
The Vaporesso Vibe Nano Pro Kit is designed for an enhanced user experience, featuring advanced technology and user-friendly functionalities.

Figure 2: Key Features of Vaporesso Vibe Nano Pro. This illustration highlights the core technologies integrated into the device, including the Dual Mesh coil for improved flavor, the long-lasting 1500mAh battery, the intelligent AXON chip, and the dual ECO/POWER modes for versatile performance.
- Dual Mesh Tech: Enhances flavor and pod lifespan.
- 1500mAh Battery: Provides extended usage with 5V/2A quick charge capability.
- AXON Chip: Intelligent and powerful chip for optimized performance.
- 0.96-inch TFT Screen: Displays essential vaping information clearly.
- ECO/PWR Modes: Two distinct modes for different vaping preferences.
- Ultra-fast 0.01s Auto-draw Activation: Instant response for immediate use.
- Ergonomic Mouthpiece: Designed for comfortable use.
Specifications
Detailed technical specifications for the Vaporesso Vibe Nano Pro Kit:
| Parameter | Value |
|---|---|
| Brand | Vaporesso |
| Product Name | Vibe Nano Pro Kit |
| Dimensions | 89.5 x 50.5 x 21.3mm |
| Pod Capacity | 4.5ml |
| Resistance Range (0.8Ω Pod) | ECO: 14W, 0.8Ω; PWR: 24W, 0.4Ω |
| Battery Capacity | 1500mAh |
| Display | 0.96'' TFT screen |
| Charging Current | Type-C, 2A |
| Weight | 80g |

Figure 3: Pod Compatibility and Power Settings. This image illustrates the different pod resistances (0.8Ω and 1.0Ω) compatible with the Vibe Nano Pro, along with their recommended wattage settings for both ECO and PWR modes, offering users flexibility in their vaping experience.

Figure 4: Vaporesso Vibe Series Comparison. This table provides a side-by-side comparison of various Vaporesso Vibe series devices, highlighting differences in screen type, battery capacity, charging specifications, and activation methods, demonstrating the Vibe Nano Pro's position within the product line.
Setup
1. Charging the Device
Before first use, fully charge the device. Connect the included Type-C USB cable to the charging port on the bottom of the device and plug the other end into a suitable power source (e.g., wall adapter, computer USB port). The 0.96'' TFT screen will indicate the charging status. The device supports 2A quick charging.
2. Filling the Pod
The Vaporesso Vibe Nano Pro Kit comes with a pre-installed 0.8Ω Dual Mesh Pod. To fill the pod:
- Remove the pod from the device.
- Locate the filling port on the pod.
- Carefully open the silicone plug.
- Insert the nozzle of your e-liquid bottle into the filling port and fill the 4.5ml pod.
- Securely close the silicone plug.
- Re-insert the pod into the device, ensuring it clicks into place.
Note: For first-time use or with a new pod, allow the e-liquid to soak into the coil for at least 5-10 minutes before vaping to prevent dry hits and ensure proper saturation.
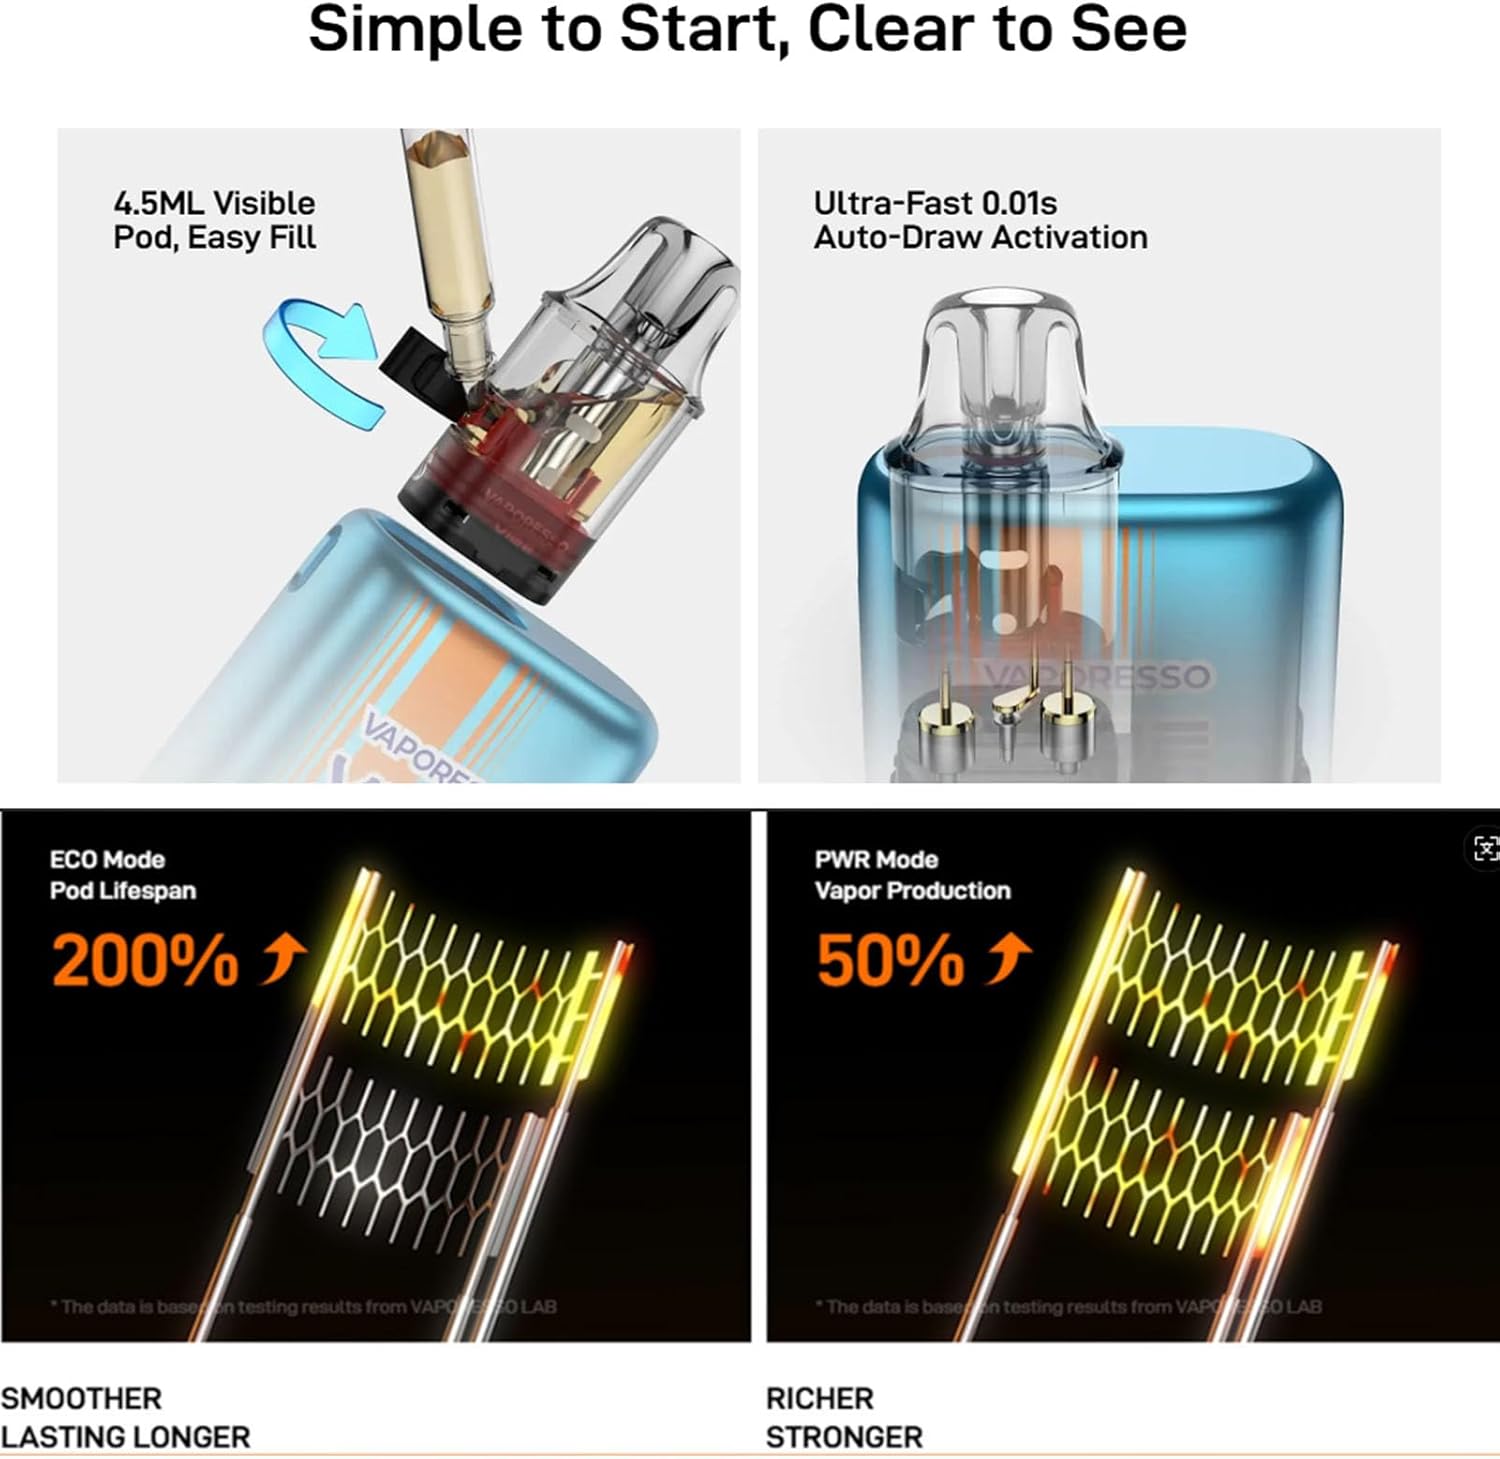
Figure 5: Pod Filling and Activation. This image demonstrates the easy top-fill mechanism of the 4.5ml visible pod and highlights the device's ultra-fast 0.01s auto-draw activation. It also visually represents the difference in vapor production between ECO and PWR modes, indicating smoother and richer experiences respectively.
Operating Instructions
1. Power On/Off
The Vaporesso Vibe Nano Pro Kit is primarily an auto-draw device. Simply inhale from the mouthpiece to activate. There is no manual power button for on/off functionality.
2. Switching Between ECO and PWR Modes
The device features a slider button to switch between ECO (Economy) and PWR (Power) modes. This slider also allows for simultaneous adjustment of power and airflow, enabling you to switch between a tighter or looser draw.
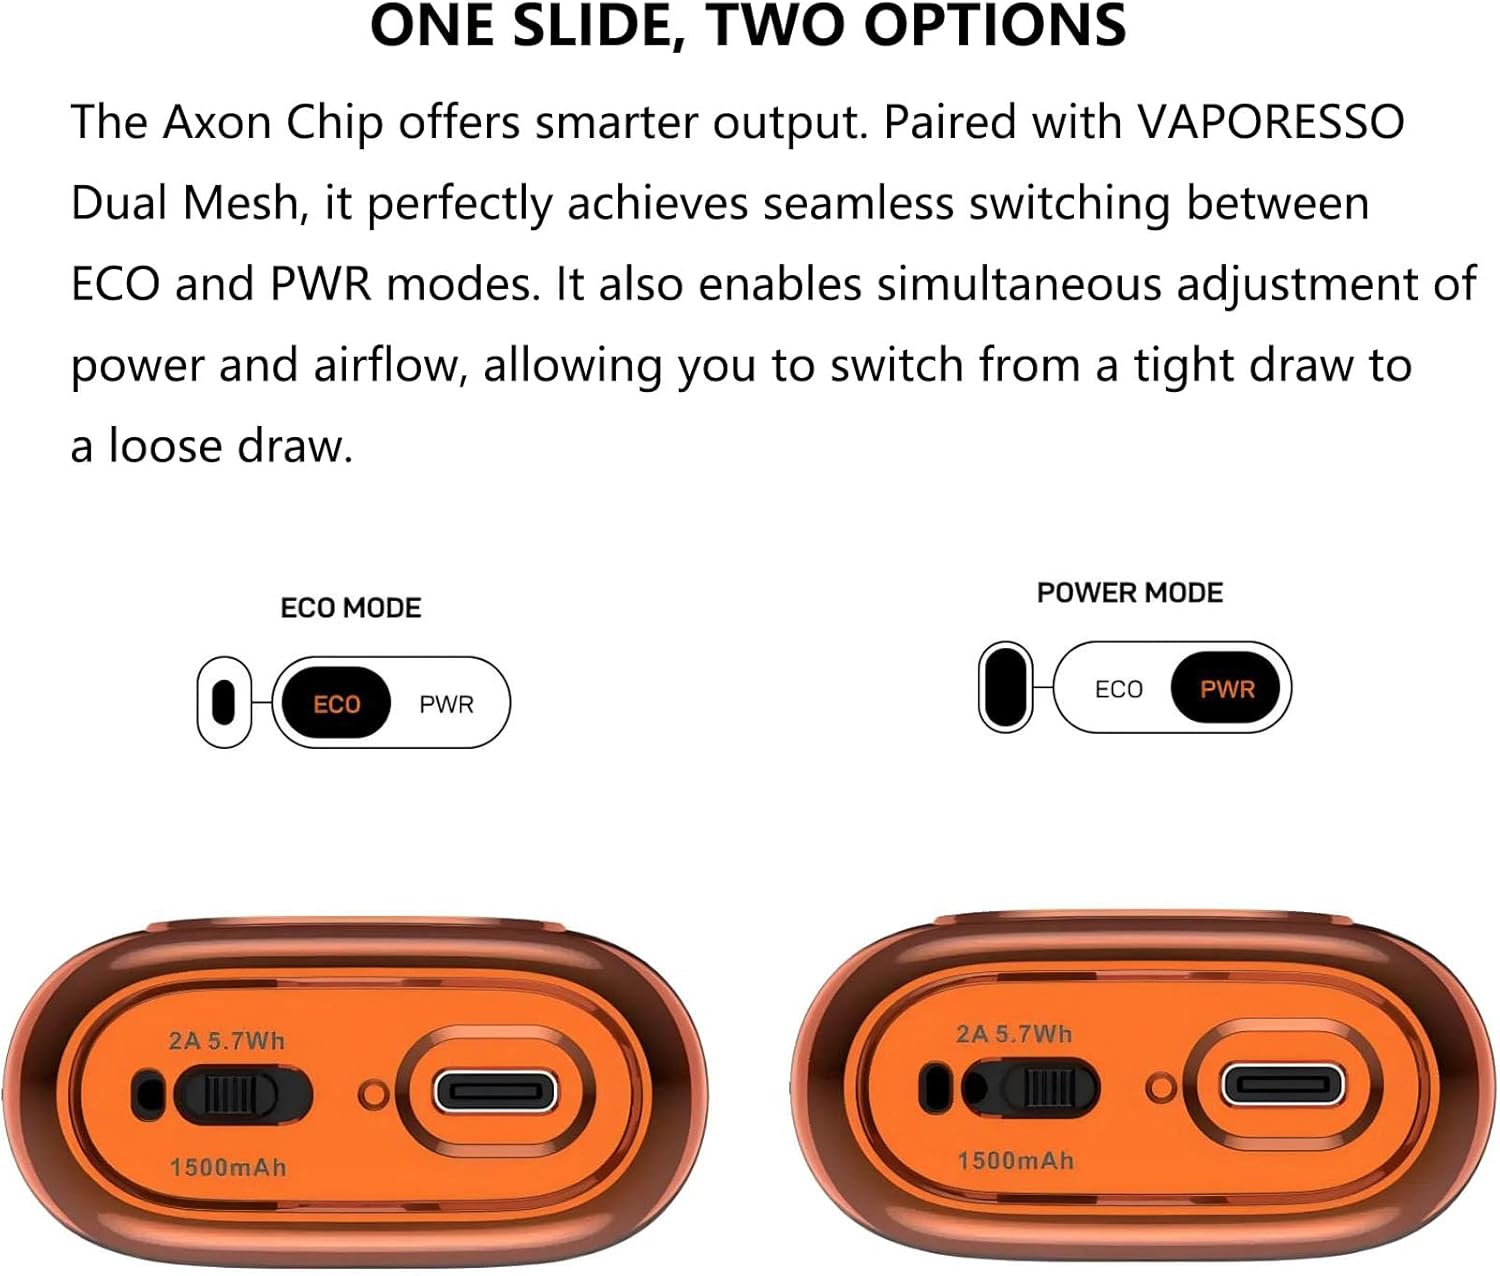
Figure 6: ECO and PWR Mode Selection. This diagram clearly shows the physical slider on the device that allows users to easily toggle between ECO mode for extended battery life and PWR mode for increased vapor production and flavor intensity.

Figure 7: Usage in ECO and PWR Modes. These images depict individuals using the Vaporesso Vibe Nano Pro, illustrating the device's adaptability for different times of day or preferences, with ECO mode for a perfect start and PWR mode for a more intense experience.
3. Resetting Puff Count (Hidden Mode)
To reset the puff counter displayed on the 0.96'' TFT screen:
- Slide the mode button (ECO/PWR slider) three times in quick succession.
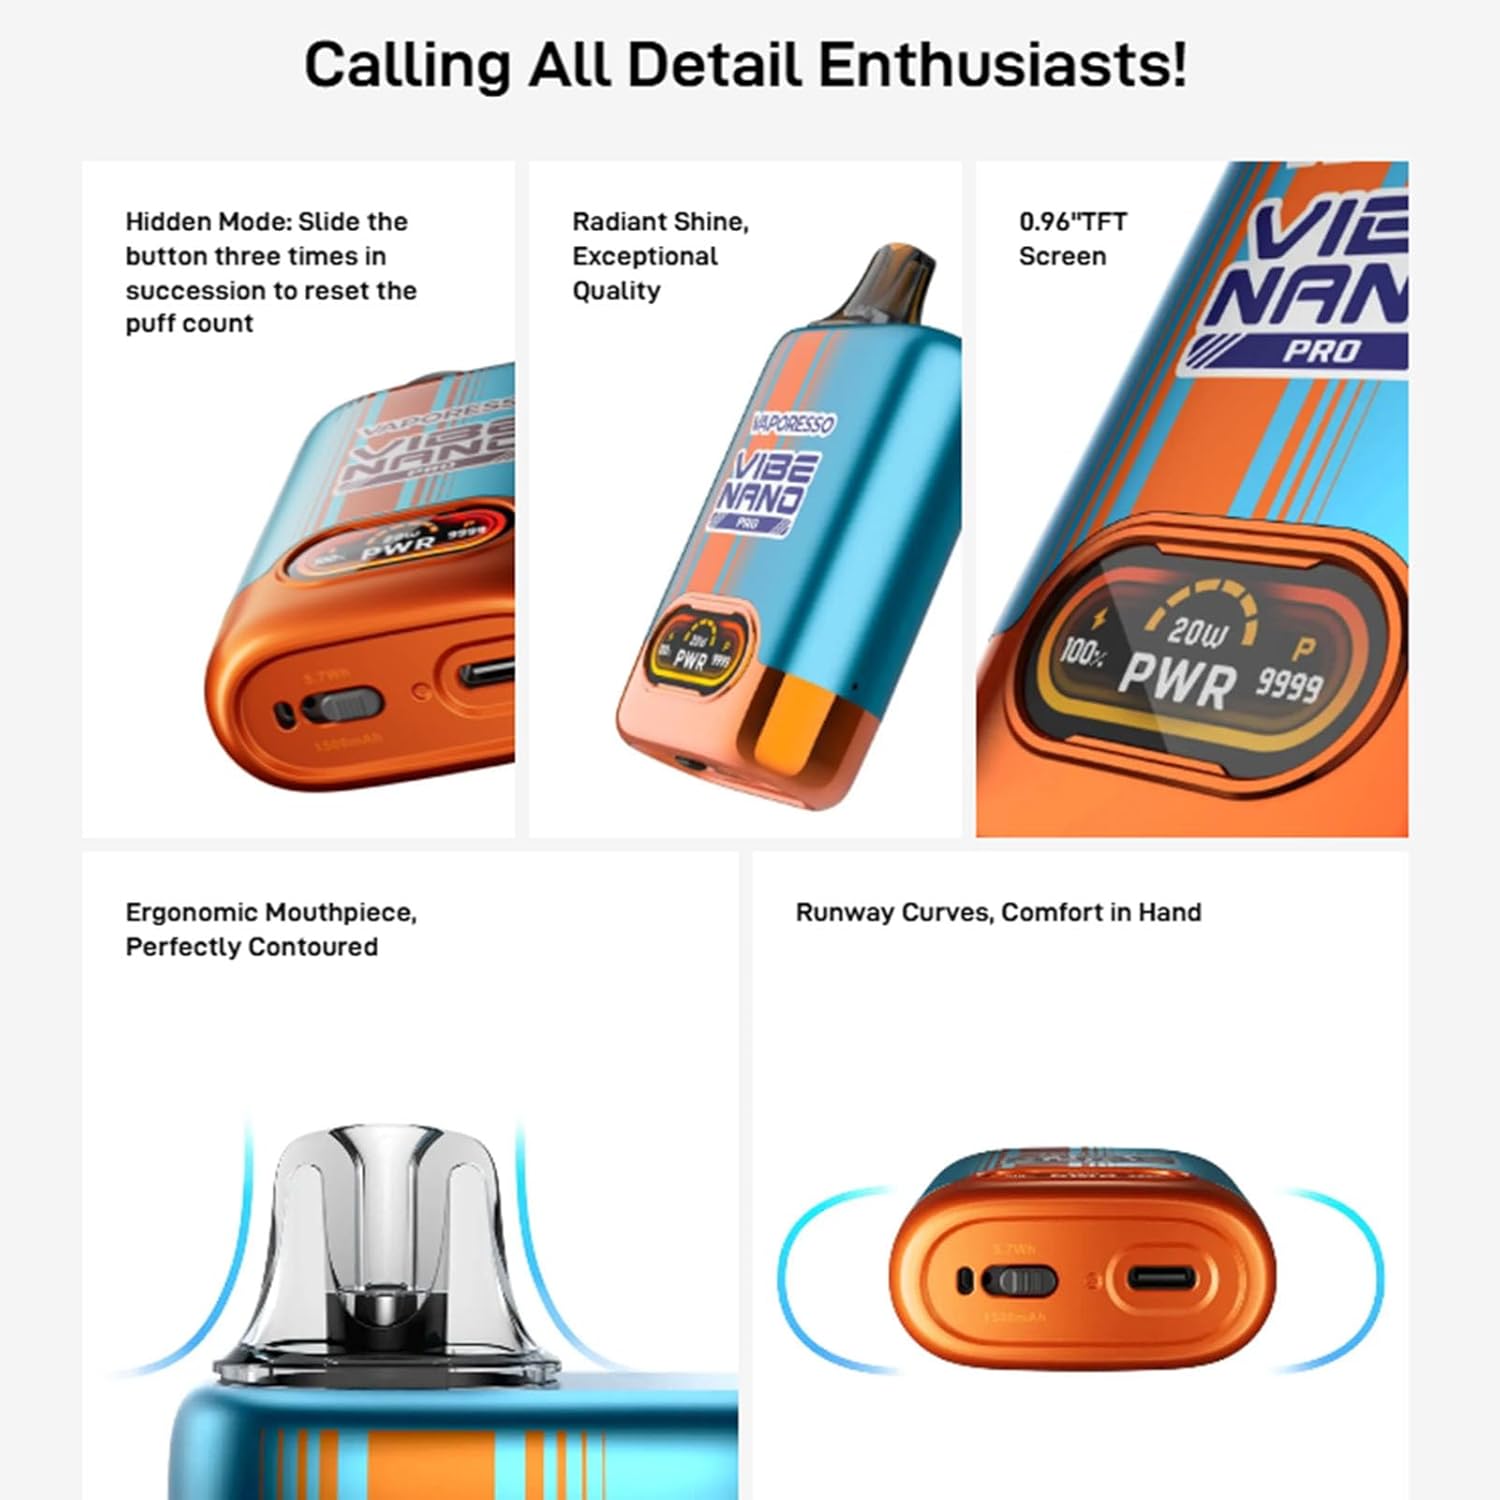
Figure 8: Device Details and Hidden Features. This composite image showcases various aspects of the Vibe Nano Pro, including the method to reset the puff count via a hidden mode, the device's radiant finish, the clear 0.96-inch TFT screen, the ergonomically designed mouthpiece, and the comfortable "Runway Curves" for in-hand feel.
Maintenance
1. Cleaning the Device
Regular cleaning helps maintain the device's performance and appearance:
- Wipe the device body with a dry, soft cloth.
- If e-liquid condensation accumulates around the pod connection area, gently wipe it with a cotton swab or tissue.
- Do not use harsh chemicals or abrasive cleaners.
2. Pod Replacement
The pod (with integrated coil) is a consumable part and should be replaced when you notice a burnt taste, reduced vapor production, or a change in flavor. To replace the pod:
- Remove the old pod from the device.
- Dispose of the old pod responsibly.
- Insert a new Vaporesso Vibe Series Pod into the device, ensuring it is securely seated.
- Fill the new pod with e-liquid as described in the "Setup" section and allow it to prime for 5-10 minutes.
Troubleshooting
If you encounter any issues with your Vaporesso Vibe Nano Pro Kit, please refer to the following common problems and solutions:
| Problem | Possible Cause | Solution |
|---|---|---|
| No vapor/Device not firing | Low battery; Pod not properly connected; Coil burnt out; Airflow sensor blocked. | Charge the device; Re-insert pod firmly; Replace pod; Clean airflow sensor. |
| Burnt taste | Coil dry/burnt; E-liquid level too low. | Ensure pod is primed; Refill e-liquid; Replace pod. |
| Leaking | Overfilled pod; Worn-out pod; Condensation. | Do not overfill; Replace pod; Clean condensation regularly. |
| Weak flavor/vapor | Coil nearing end of life; Low battery; Incorrect mode. | Replace pod; Charge device; Switch to PWR mode. |
Safety Information and Warnings
Important Safety Notice:
- This product is intended for use with nicotine-free e-liquids only.
- This product does not contain nicotine, tobacco, or any pre-filled cartridges/refills.
- Keep out of reach of children and pets.
- Do not expose the device to extreme temperatures, direct sunlight, or water.
- Do not disassemble or modify the device.
- Use only the provided charging cable and recommended power sources.
- If the device shows signs of damage, overheating, or unusual behavior, discontinue use immediately.
Warranty and Support
Your Vaporesso Vibe Nano Pro Kit comes with a warranty. Please refer to the included Warranty Card in your package for detailed terms and conditions, including warranty period and claim procedures.
For technical support, troubleshooting assistance beyond this manual, or warranty claims, please contact Vaporesso customer service or the retailer from whom you purchased the product. Contact information can typically be found on the Warranty Card or the official Vaporesso website.


