
MZK SG2402
MZK 13-inch 2-in-1 Electric Dethatcher and Scarifier User Manual
Model: SG2402
Important Safety Instructions
Read all instructions carefully before operating the dethatcher. Failure to follow these instructions may result in electric shock, fire, and/or serious injury.
- Always wear appropriate personal protective equipment, including safety glasses, gloves, and sturdy footwear.
- Ensure the work area is clear of bystanders, children, and pets.
- Inspect the power cord for damage before each use. Do not use if the cord is damaged.
- Keep hands and feet away from rotating parts.
- Disconnect the power supply before performing any adjustments, maintenance, or when clearing clogged material.
- Operate the machine only in daylight or good artificial light.
- Do not operate in wet conditions or rain.
- Use only manufacturer-recommended replacement parts and accessories.
- Store the dethatcher in a dry, secure location out of reach of children.
Product Overview
The MZK 13-inch 2-in-1 Electric Dethatcher and Scarifier is designed to remove thatch and aerate your lawn, promoting healthier grass growth. It features a powerful 13-Amp motor, a 13-inch working width, and adjustable depth settings.
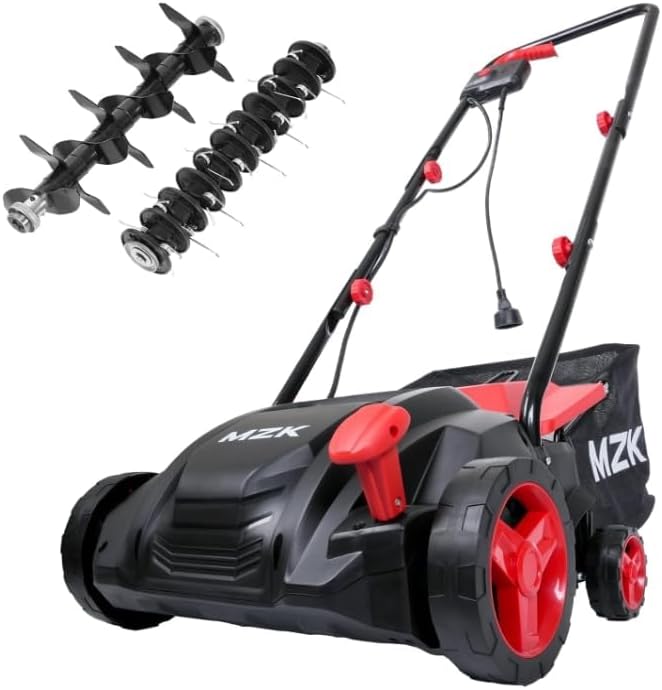
Image: The MZK 13-inch 2-in-1 Electric Dethatcher and Scarifier, showcasing its main body, handle, and the two interchangeable blade types (dethatching tines and scarifying blades).
Key Components:
- Powerful 13-Amp Motor: Provides 3700 RPM for efficient thatch removal.
- 13-inch Rake Path: Covers a significant area with each pass.
- 4-Position Height Adjustment: Allows precise control over dethatching/scarifying depth.
- 2-in-1 Blade System: Easily switch between dethatching tines and scarifying blades.
- 8-Gallon Thatch Collection Bag: Gathers debris for a cleaner lawn.
- Foldable Handle: For convenient storage.
- Dual Safety Switches: Enhances user safety during operation.
Assembly and Setup
Follow these steps to assemble your MZK Dethatcher and prepare it for use.
- Handle Assembly: Attach the upper and lower handle sections. Secure them using the provided knobs and bolts. Ensure all connections are tight.
- Blade Installation: The unit comes with one blade type pre-installed. To change blades, refer to the "2-in-1 Blade System" section. Ensure the blade is securely fastened before operation.
- Collection Bag Attachment: Hook the 8-gallon collection bag onto the rear discharge chute of the dethatcher. Ensure it is properly seated to prevent thatch from scattering.
- Power Cord Connection: Connect the dethatcher's power cord to a suitable outdoor extension cord. Use the cord secured mechanism to prevent accidental disconnection during operation.

Image: Close-up of the cord secured mechanism, illustrating how to protect the power cord connection from water and accidental disconnections.
Operating Instructions
Proper operation ensures effective results and prolongs the life of your dethatcher.
- Pre-Operation Check:
- Ensure the lawn is dry. Operating on wet grass can reduce effectiveness and cause clogging.
- Clear the lawn of any large debris, rocks, or foreign objects that could damage the blades.
- Verify that the collection bag is securely attached.
- Adjusting Depth: Select the desired working depth using the 4-position height adjustment lever. Start with a higher setting for light dethatching and adjust lower as needed.
- Starting the Machine: Engage the dual safety switches and press the power button to start the motor.
- Operating Technique:
- Push the dethatcher at a steady, moderate pace across your lawn.
- Overlap each pass slightly to ensure complete coverage.
- Avoid stopping the machine in thick thatch to prevent motor strain.
- Empty the collection bag frequently to maintain optimal performance.
- Stopping the Machine: Release the power button and safety switches. Wait for the blades to come to a complete stop before approaching the unit.


Image: A person operating the MZK Dethatcher across a lawn, demonstrating typical usage. Another image shows a close-up of the dethatcher's tines actively removing thatch from the grass.
Adjustable Depth Settings
The MZK Dethatcher offers four distinct depth settings to cater to various lawn conditions and tasks.

Image: Visual representation of the 4-position height adjustment lever and its corresponding depth settings, ranging from -0.47" to 0.16" relative to the ground.
| Setting | Depth | Recommended Use |
|---|---|---|
| 1 | 0.16" | Light raking, surface debris removal. |
| 2 | -0.16" | Moderate dethatching for thinner thatch layers. |
| 3 | -0.31" | Aggressive dethatching for thicker thatch layers. |
| 4 | -0.47" | Scarifying for soil aeration and overseeding preparation. |
Always start with a higher depth setting and gradually decrease it to avoid damaging your lawn or overloading the motor.
2-in-1 Blade System
The MZK Dethatcher comes with two interchangeable blade types: dethatching tines and scarifying blades, allowing for versatile lawn care.

Image: A comparison of the dethatching tines (top) and scarifying blades (bottom), illustrating their distinct designs and functions.
Changing Blades:
- Disconnect Power: Always unplug the dethatcher from the power source before attempting to change blades.
- Access Blades: Carefully tilt the machine to access the underside.
- Remove Current Blade: Use the appropriate tool (not specified, assume standard wrench/hex key) to loosen and remove the retaining bolts or clips holding the current blade assembly.
- Install New Blade: Position the desired blade assembly (dethatching tines or scarifying blades) onto the shaft, ensuring it is correctly aligned.
- Secure Blade: Re-fasten the retaining bolts or clips securely. Double-check that the blade is firmly attached and rotates freely without wobble.
Dethatching Tines: These spring-loaded tines gently rake the lawn surface to lift and remove accumulated thatch, moss, and dead grass without damaging healthy turf.
Scarifying Blades: These sharper, fixed blades cut into the soil surface, breaking up compacted soil, improving water and nutrient penetration, and preparing the lawn for overseeding.
Maintenance
Regular maintenance ensures optimal performance and extends the lifespan of your dethatcher.
- Cleaning: After each use, disconnect power and clean the unit. Remove any grass, thatch, or debris from the housing, blades, and collection bag. Use a brush or cloth; avoid using water directly on electrical components.
- Blade Inspection: Regularly inspect the dethatching tines and scarifying blades for wear, damage, or bending. Replace worn or damaged blades promptly to maintain effectiveness and safety.
- Storage: Store the dethatcher in a dry, well-ventilated area. The foldable handle allows for compact storage. Ensure the power cord is neatly wrapped and secured.
- Motor Care: The 13-Amp copper motor is designed for durability. Avoid overloading the motor by operating at appropriate depth settings and not forcing the machine through excessively thick thatch.
Troubleshooting
This section addresses common issues you might encounter with your dethatcher.
| Problem | Possible Cause | Solution |
|---|---|---|
| Machine does not start. | No power supply; Safety switch not engaged; Damaged power cord. | Check power outlet and extension cord. Ensure both safety switches are pressed. Inspect power cord for damage. |
| Reduced dethatching/scarifying performance. | Blades worn or damaged; Depth setting too high; Clogged blades/housing. | Inspect and replace blades if necessary. Adjust to a lower depth setting. Disconnect power and clear any debris from blades and housing. |
| Motor stops during operation. | Overload due to thick thatch/wet grass; Clogged blades. | Reduce depth setting. Operate on dry grass. Disconnect power and clear blades. Allow motor to cool if it overheated. |
| Thatch not collecting in bag. | Collection bag not properly attached; Bag full; Discharge chute clogged. | Ensure bag is securely attached. Empty the collection bag. Disconnect power and clear the discharge chute. |
Specifications
| Feature | Detail |
|---|---|
| Model Number | SG2402 |
| Power Source | Electric (AC) |
| Motor | 13 Amp Copper Motor, 3700 RPM |
| Cutting Width | 13 Inches |
| Height Adjustment | 4-Position (-0.47" to 0.16") |
| Collection Bag Capacity | 8 Gallons (30 Liters) |
| Item Weight | 19.5 lbs (22.8 lbs shipping weight) |
| Product Dimensions | 10"D x 13"W x 26"H |
| Color | Red |
Warranty and Support
For warranty information or technical support, please contact MZK customer service. Details regarding specific warranty periods and coverage are typically included with your product packaging or available on the manufacturer's official website.
Manufacturer: MZK
Contact: Refer to the contact information provided in your product documentation or visit the official MZK website for support resources.
Ask a question about this manual
Ask about setup, troubleshooting, compatibility, parts, safety, or missing instructions. Manuals+ will review the question and use this page’s manual context to help answer it.