
1. Important Safety Information
Read and understand all safety warnings and instructions before operating this snow blower. Failure to follow the warnings and instructions may result in electric shock, fire, and/or serious injury.
General Safety Warnings:
- Keep work area clean and well lit. Cluttered or dark areas invite accidents.
- Do not operate power tools in explosive atmospheres, such as in the presence of flammable liquids, gases, or dust. Power tools create sparks which may ignite the dust or fumes.
- Keep children and bystanders away while operating a power tool. Distractions can cause you to lose control.
Electrical Safety:
- Avoid body contact with earthed or grounded surfaces such as pipes, radiators, ranges, and refrigerators. There is an increased risk of electric shock if your body is earthed or grounded.
- Do not expose power tools to rain or wet conditions. Water entering a power tool will increase the risk of electric shock.
Personal Safety:
- Stay alert, watch what you are doing, and use common sense when operating a power tool. Do not use a power tool while you are tired or under the influence of drugs, alcohol, or medication.
- Dress properly. Do not wear loose clothing or jewelry. Keep your hair and clothing away from moving parts.
- Prevent unintentional starting. Ensure the switch is in the off-position before connecting to battery pack, picking up or carrying the tool.
2. Package Contents
Verify that all items listed below are included in your package. If any parts are missing or damaged, do not operate the snow blower and contact customer service.
- CUSHYBITE RY40890 40V HP Brushless 18-inch Cordless Electric Snow Blower Unit
- 6.0 Ah Battery
- Battery Charger
- Instruction Manual

Figure 1: The CUSHYBITE RY40890 40V HP Brushless 18-inch Cordless Electric Snow Blower, shown with its included 6.0 Ah battery and charger.
3. Assembly Instructions
Follow these steps to assemble your snow blower. Refer to the diagrams for visual guidance.
Step 1: Handle Assembly
- Unfold the handle assembly until it locks into place. Ensure all locking pins or levers are securely fastened.
- Attach the upper handle to the lower handle using the provided bolts and knobs. Tighten securely.

Figure 2: Side view of the snow blower, illustrating the handle assembly and overall structure.
Step 2: Chute Assembly
- Position the discharge chute onto the snow blower housing.
- Secure the chute with the retaining clips or bolts as indicated in the manual. Ensure the chute rotates freely.
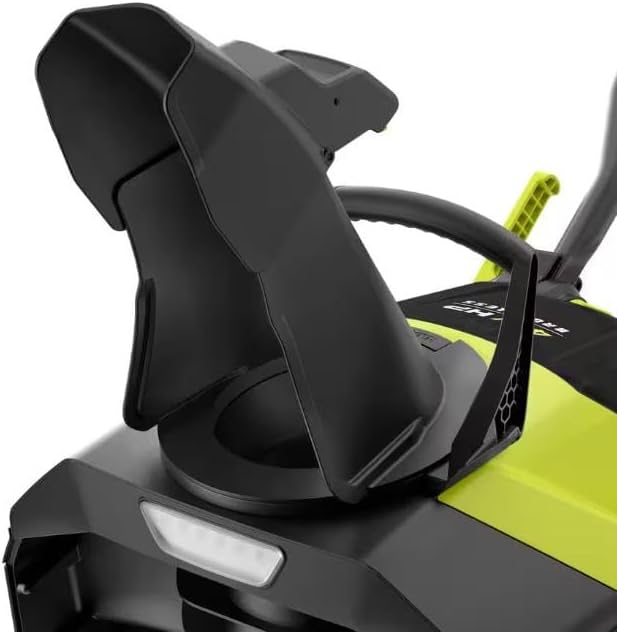
Figure 3: Close-up view of the 180-degree directional chute, showing its attachment points and rotation mechanism.
4. Setup
Battery Installation:
- Ensure the battery is fully charged before first use.
- Open the battery compartment cover on the snow blower.
- Slide the 6.0 Ah battery into the compartment until it clicks securely into place.
- Close the battery compartment cover.
Handle Adjustment:
Adjust the handle height to a comfortable operating position by loosening the adjustment knobs, setting the desired height, and then re-tightening the knobs.
5. Operating Instructions
Starting the Snow Blower:
- Ensure the battery is installed and the compartment is closed.
- Press and hold the safety button.
- While holding the safety button, squeeze the switch lever to start the motor. Release the safety button once the motor starts.
Clearing Snow:
- Push the snow blower forward at a steady pace. Do not force the unit through heavy snow.
- For deep or heavy snow, clear a narrower path or make multiple passes.
- The 18-inch clearing width and 10-inch clearing depth are designed for efficient removal of moderate snowfalls.

Figure 4: Front view of the snow blower, highlighting the auger and clearing path.
Chute Control:
Use the 180-degree directional chute to control the direction of snow discharge. Adjust the chute to throw snow away from cleared areas, windows, or other obstacles.
6. Maintenance
Cleaning:
- Always remove the battery pack before cleaning or performing any maintenance.
- Clean the snow blower thoroughly after each use. Remove any snow, ice, or debris from the auger housing, chute, and exterior surfaces.
- Use a damp cloth and mild soap for cleaning. Do not use harsh chemicals or abrasive cleaners.
Storage:
- Store the snow blower in a dry, protected area away from children.
- Remove the battery pack from the snow blower before storing for extended periods. Store the battery in a cool, dry place.
Battery Care:
- Charge the battery fully before storing and periodically during long storage periods to maintain battery health.
- Do not expose the battery or charger to extreme temperatures.
7. Troubleshooting
If you encounter issues with your snow blower, refer to the table below for common problems and solutions.
| Problem | Possible Cause | Solution |
|---|---|---|
| Snow blower does not start | Battery not charged or improperly installed; Safety button/switch not engaged. | Ensure battery is charged and correctly inserted; Fully engage safety button and switch. |
| Reduced snow clearing performance | Clogged auger housing or chute; Low battery charge. | Clear any obstructions (with battery removed); Recharge battery. |
| Snow blower stops during operation | Overload due to heavy snow; Low battery charge. | Reduce load by clearing narrower paths; Recharge battery. |
8. Specifications
- Model: RY40890
- Brand: CUSHYBITE
- Power Source: 40V Battery
- Motor Type: HP Brushless
- Clearing Width: 18 inches
- Clearing Depth: 10 inches
- Chute Rotation: 180 degrees
- Battery: 6.0 Ah Lithium-Ion (included)
- Charger: Included
9. Warranty and Support
For warranty information or technical support, please refer to the warranty card included with your product or contact CUSHYBITE customer service directly. Keep your proof of purchase for any warranty claims.