
Introduction
This manual provides comprehensive instructions for the installation, operation, and maintenance of your GIGABYTE B550M GAMING X WIFI6 Motherboard. Designed for AMD Ryzen 5000/4000/3000 Series Processors, this motherboard features a Digital Twin 5+3 Phase VRM Solution, Dual Channel DDR4 support, Wi-Fi 6, 1GbE LAN, and multiple high-speed storage options. Please read this manual thoroughly before proceeding with installation to ensure proper setup and optimal performance.

Figure 1: GIGABYTE B550M GAMING X WIFI6 Motherboard and its retail packaging. This image displays the overall product and its branding.
Setup and Installation
1. Safety Precautions
- Always disconnect the power cord from the wall outlet before touching any components.
- Wear an anti-static wrist strap or frequently touch a grounded metal object to discharge static electricity.
- Handle components by their edges to avoid touching sensitive parts.
2. Package Contents Verification
Before installation, ensure all components listed in your product's packing list are present.
3. Motherboard Overview
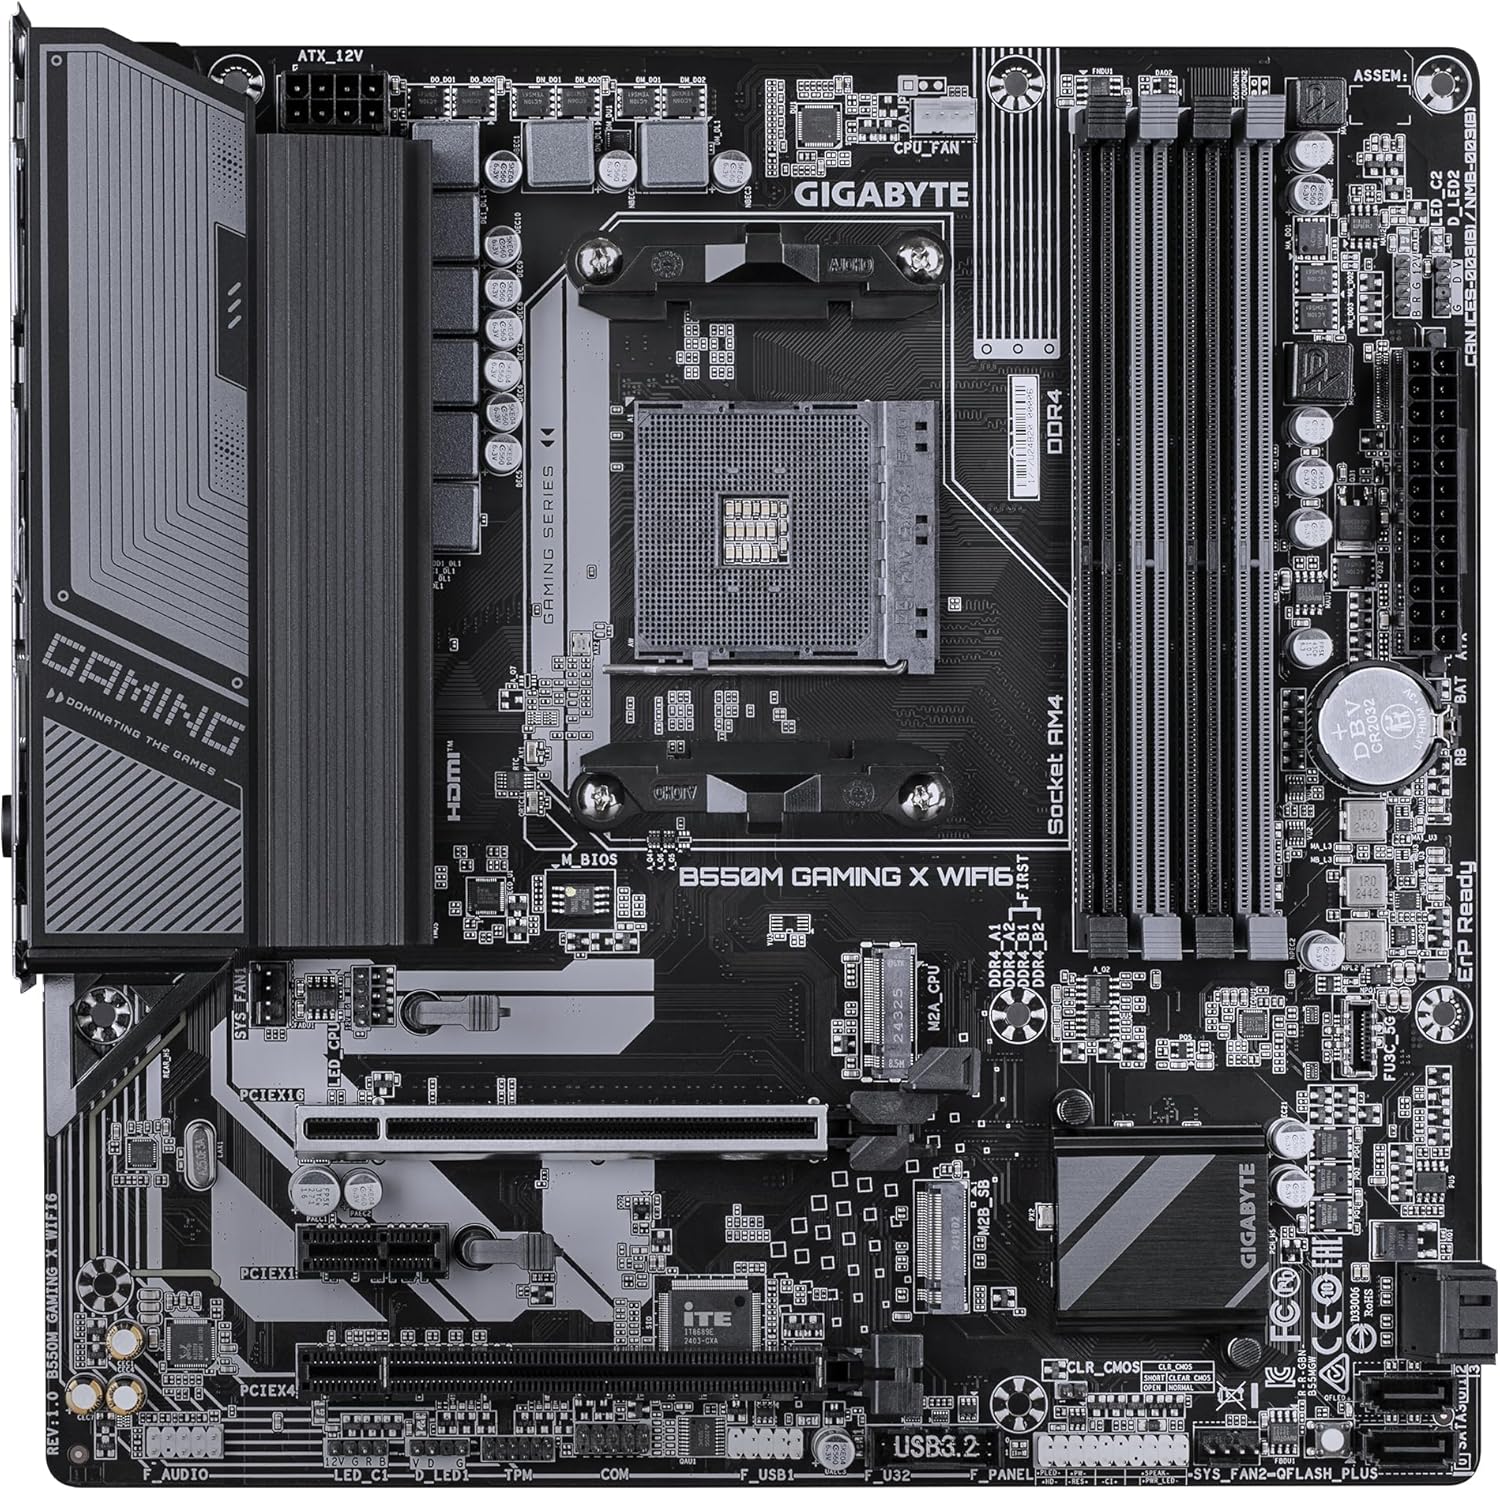
Figure 2: Top-down view of the GIGABYTE B550M GAMING X WIFI6 Motherboard, highlighting the CPU socket, DIMM slots, PCIe slots, and M.2 slots.

Figure 3: Angled view of the GIGABYTE B550M GAMING X WIFI6 Motherboard, showing the VRM heatsinks and overall layout.
4. Component Installation Steps
- CPU Installation: Carefully align your AMD Ryzen processor with the AM4 socket and gently place it. Close the retention lever to secure the CPU.
- CPU Cooler Installation: Install your compatible CPU cooler according to its manufacturer's instructions.
- Memory (RAM) Installation: Insert DDR4 memory modules into the DIMM slots. This motherboard supports Dual Channel DDR with 4 x DIMMs. Ensure modules are fully seated until the clips lock.
- M.2 SSD Installation: This motherboard features 2 x M.2 slots, including one PCIe 4.0 x1 slot for ultra-fast storage. Remove the M.2 heatsink (if present), insert the M.2 SSD, and secure it with the provided screw. Reattach the heatsink.
- Graphics Card (PCIe UD Card) Installation: Insert your graphics card into the PCIe 4.0 x16 slot. The EZ-Latch design facilitates quick release. Ensure it is fully seated and secured with the case's retention mechanism.
- Power Supply Connection: Connect the 24-pin ATX power connector and the 8-pin (or 4+4-pin) CPU power connector from your power supply to the motherboard.
- Front Panel Connections: Connect the power switch, reset switch, HDD LED, and USB/audio headers from your PC case to the corresponding pins on the motherboard. Refer to the motherboard's silkscreen labels for correct orientation.
- Wi-Fi Antenna Installation: Utilize the WIFI EZ Plug for quick and easy Wi-Fi antenna installation. Connect the antennas to the designated ports on the rear I/O panel.
5. Rear I/O Panel Connections
Connect your peripherals to the appropriate ports on the rear I/O panel.
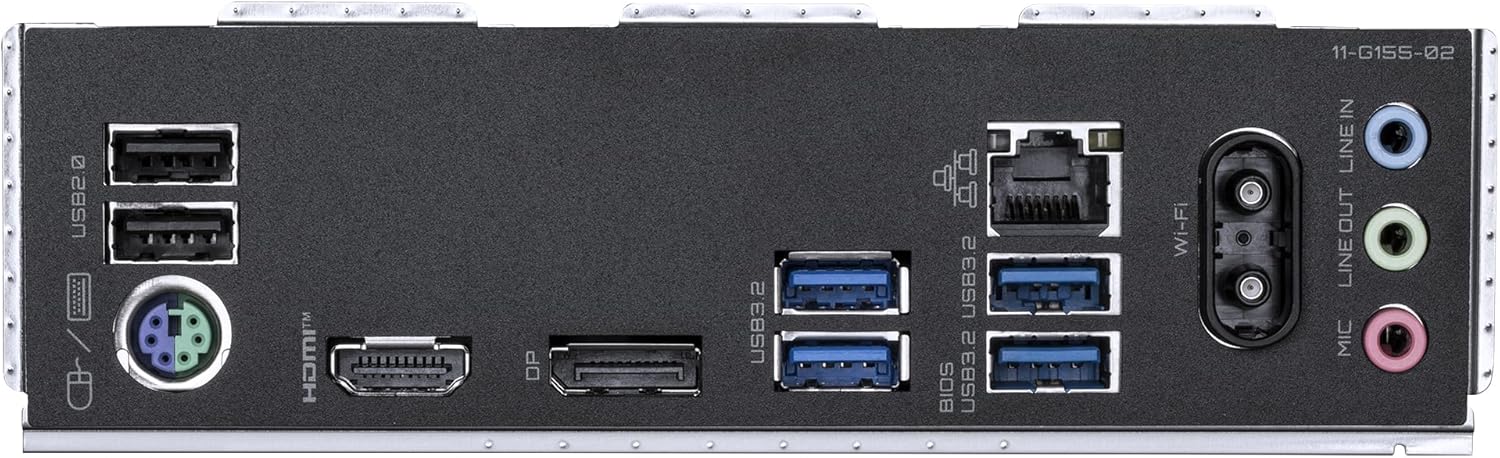
Figure 4: Rear I/O panel of the GIGABYTE B550M GAMING X WIFI6 Motherboard, showing USB ports, HDMI, DisplayPort, LAN, Wi-Fi antenna connectors, and audio jacks.
- USB Ports: Connect USB devices such as keyboards, mice, and external storage.
- Video Outputs: Use the HDMI or DisplayPort for monitor connections.
- LAN Port: Connect an Ethernet cable for wired network access.
- Audio Jacks: Connect speakers, headphones, or microphones.
Operating Instructions
1. First Boot and BIOS Access
Upon powering on your system for the first time, press the DEL key repeatedly during startup to enter the BIOS (Basic Input/Output System) setup. The BIOS offers extensive options for configuring your system.
2. BIOS Configuration
The GIGABYTE B550M GAMING X WIFI6 BIOS provides a wide range of settings to optimize performance, manage boot devices, and configure hardware. Key areas include:
- Boot Order: Set the priority for your storage devices to boot the operating system.
- Overclocking Settings: Adjust CPU and memory frequencies and voltages for enhanced performance (advanced users only).
- Fan Control: Configure fan speeds based on temperature sensors for optimal cooling and noise levels.
- Integrated Peripherals: Enable or disable onboard devices like audio, LAN, and USB controllers.
Note: It is recommended to disable automatic installation of GIGABYTE App Center from the BIOS settings to maintain control over software installations. You can manually download and install necessary utilities from the official GIGABYTE website.
3. Operating System Installation
After configuring the BIOS, you can proceed with installing your preferred operating system (e.g., Windows 10, Windows 11) from a bootable USB drive or DVD. Follow the on-screen instructions provided by the operating system installer.
4. Driver Installation
Once the operating system is installed, install the latest drivers for your motherboard's chipset, LAN, Wi-Fi, audio, and any other integrated components. These drivers are typically available on the GIGABYTE support website for your specific motherboard model.
Maintenance
1. BIOS Updates
Regularly check the GIGABYTE support website for BIOS updates. BIOS updates can improve system stability, add support for new hardware, and fix bugs. Follow the instructions provided by GIGABYTE for updating your BIOS. Ensure a stable power supply during the update process.
2. System Cleaning
To maintain optimal performance and longevity, periodically clean your computer's internal components.
- Disconnect power before cleaning.
- Use compressed air to remove dust from heatsinks, fans, and other components.
- Ensure proper ventilation within your PC case.
3. Thermal Management
The motherboard features VRM Thermal Armor Advanced for effective thermal dissipation. Ensure adequate airflow within your PC case to prevent overheating, especially during heavy loads. Monitor system temperatures using software utilities.
Troubleshooting
This section provides solutions to common issues you might encounter.
1. System Does Not Power On
- Check all power connections: 24-pin ATX, 8-pin CPU, and power supply cable to the wall outlet.
- Ensure the power supply switch is in the ON position.
- Verify front panel power switch connection to the motherboard.
2. No Display Output
- Confirm monitor is connected to the graphics card (or motherboard if using integrated graphics) and powered on.
- Reseat the graphics card and memory modules.
- Try a different video cable or monitor.
3. Operating System Fails to Boot
- Check BIOS boot order to ensure the correct drive is selected.
- Verify that the operating system is properly installed on the storage device.
- Run diagnostic tools if available.
4. Wi-Fi or LAN Connectivity Issues
- Ensure Wi-Fi antennas are securely connected.
- Check Ethernet cable connection for LAN.
- Install or update network drivers from the GIGABYTE website.
- Verify network settings in your operating system.
Specifications
| Feature | Detail |
|---|---|
| Brand | GIGABYTE |
| Model Name | B550M GAMING X WIFI6 |
| CPU Socket | Socket AM4 |
| Compatible Processors | AMD Ryzen 3000 Series, AMD Ryzen 4000 Series, AMD Ryzen 5000 Series |
| Chipset Type | AMD B550 |
| RAM Memory Technology | DDR4 |
| Memory Clock Speed | Up to 3200 MHz (and higher via OC) |
| VRM Solution | Digital Twin 5+3 Phase |
| M.2 Slots | 2 (1x PCIe 4.0, 1x PCIe 3.0) |
| Networking | Wi-Fi 6, 1GbE LAN |
| USB Ports | USB 3.2 Gen 1 and others |
| Video Outputs | HDMI, DisplayPort |
| Dimensions | 9.61 x 9.61 x 1.38 inches |
| Item Weight | 2.2 pounds |
| Platform Support | Windows 10, Windows 11 |
Warranty and Support
For detailed warranty information, please refer to the warranty card included with your product or visit the official GIGABYTE website. GIGABYTE provides technical support and resources for their products.
You can find additional support, drivers, and BIOS updates on the official GIGABYTE support page.
Visit the GIGABYTE Store on Amazon


