1. Introduction
This manual provides essential information for setting up, operating, maintaining, and troubleshooting your Blackview MP200 Mini PC. The Blackview MP200 is a compact desktop computer designed for various applications, including office work, home theater, and light gaming, featuring an Intel Core i5-11400H processor, 16GB RAM, and a 512GB SSD.
Please read this manual thoroughly before using your device to ensure proper operation and to maximize its lifespan.

The Blackview MP200 Mini PC, showcasing its compact design and front-facing ports.
2. Package Contents
Upon opening the package, please verify that all items are present and in good condition:
- Blackview MP200 Mini PC
- Power Adapter
- HDMI Cable
- User Manual
- VESA Mount (optional, may vary by package)
3. Device Layout and Ports
Familiarize yourself with the various ports and components of your Blackview MP200 Mini PC.
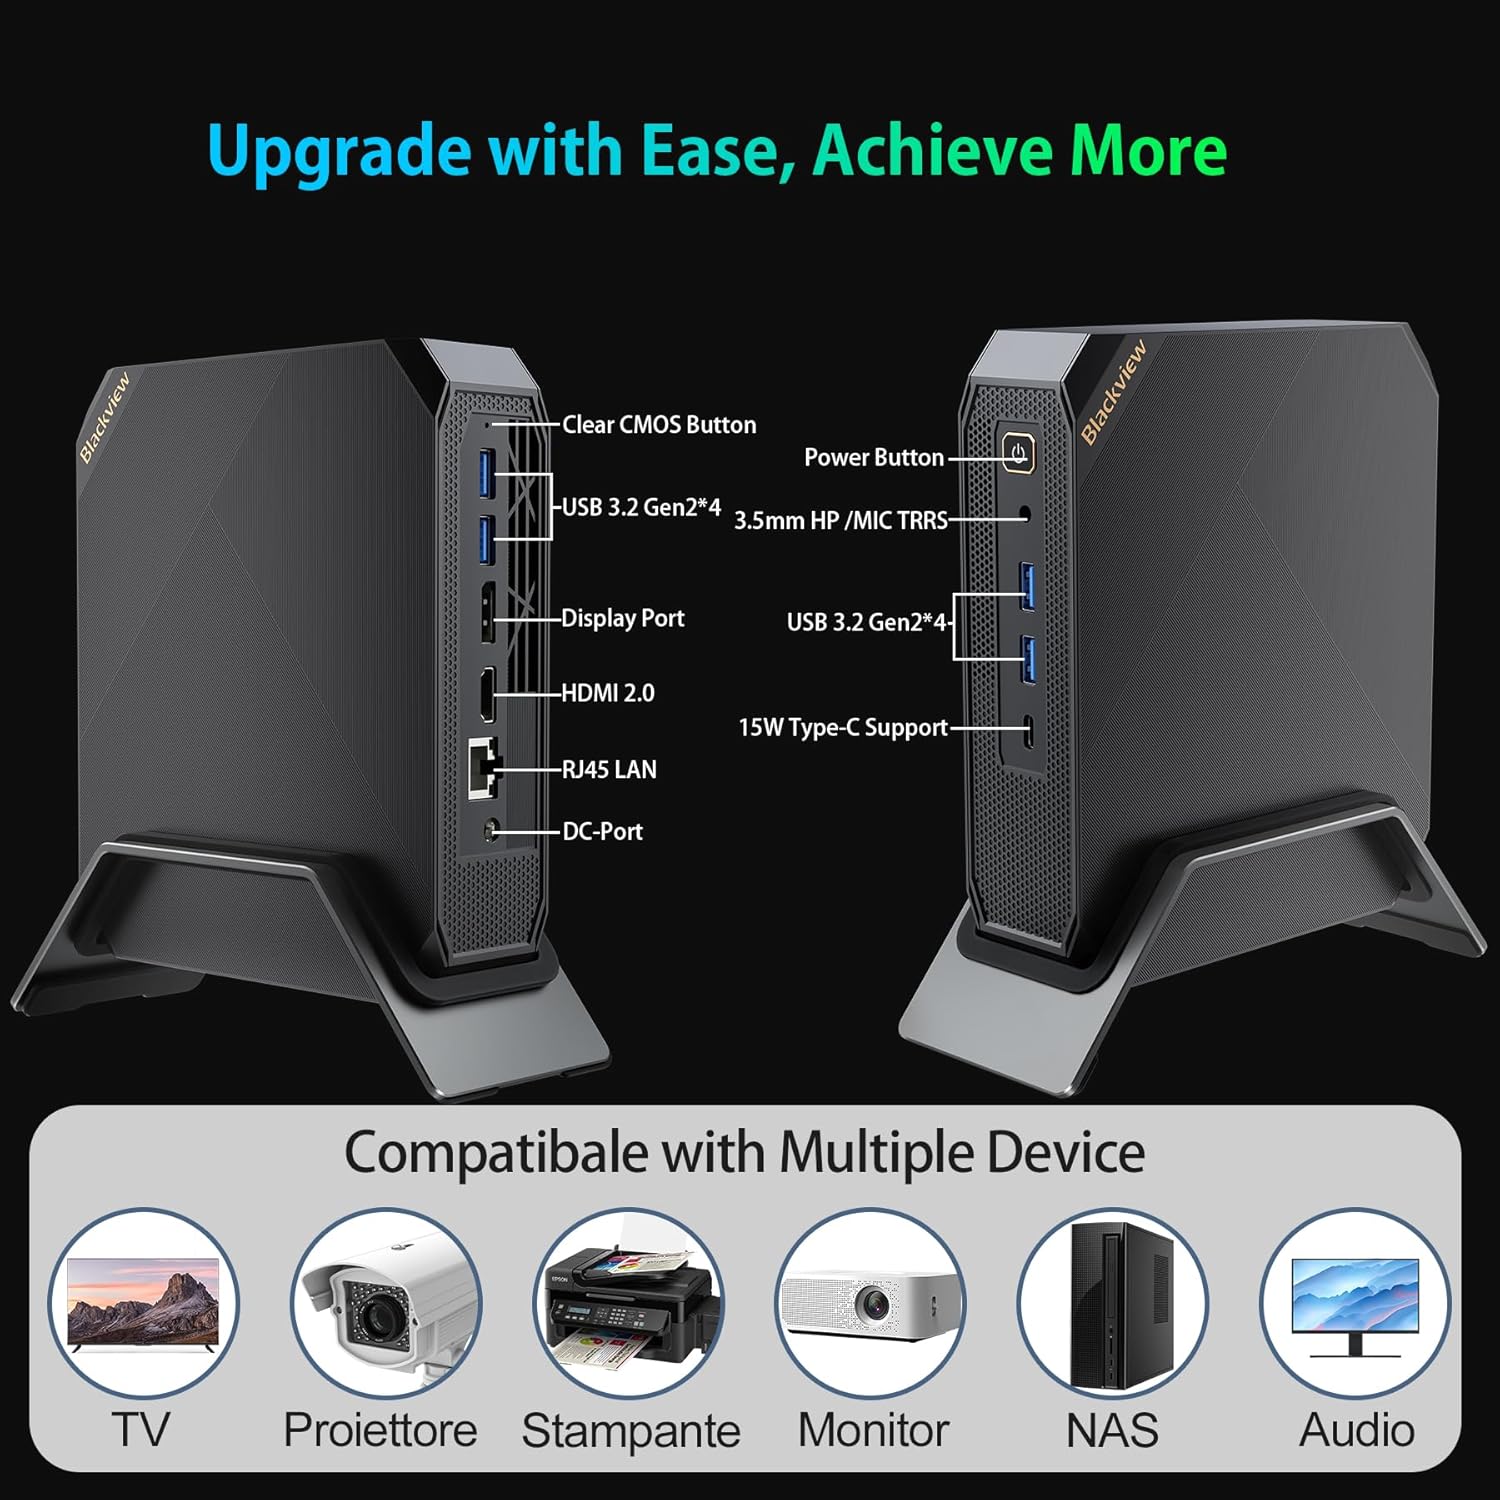
Detailed view of the Blackview MP200 Mini PC's various ports, including USB, HDMI, DisplayPort, Ethernet, and power input.
Front Panel:
- Power Button: Press to turn on/off the device.
- USB 3.2 Gen2 Ports (x2): For connecting high-speed USB devices.
- USB Type-C Port (15W Support): For data transfer and power delivery to compatible devices.
- 3.5mm Audio Combo Jack: For headphones or microphone.
Rear Panel:
- DC-IN Port: Connect the power adapter here.
- HDMI 2.0b Port: Connect to a display for up to 4K@60Hz resolution.
- DisplayPort: Connect to a display for up to 8K@60Hz resolution.
- RJ45 LAN Port: For wired Gigabit Ethernet connection.
- USB 3.2 Gen2 Ports (x2): For connecting high-speed USB devices.
- Clear CMOS Button: Used to reset BIOS settings (refer to troubleshooting for use).
4. Setup Instructions
4.1 Initial Connection
- Connect Display: Use the provided HDMI cable or a DisplayPort cable to connect your monitor(s) to the corresponding ports on the Mini PC.
- Connect Peripherals: Plug in your USB keyboard and mouse into the available USB ports.
- Connect Power: Connect the power adapter to the DC-IN port on the Mini PC, then plug the adapter into a power outlet.
4.2 Powering On
Press the Power Button on the front panel of the Mini PC. The power indicator light will illuminate, and the system will begin to boot.
4.3 Windows 11 Pro Setup
Upon first boot, you will be guided through the Windows 11 Pro initial setup process. Follow the on-screen instructions to configure your language, region, network, and user account settings.
4.4 Network Connection
- Wi-Fi: During Windows setup or via the Windows Settings, select your Wi-Fi network and enter the password. The MP200 supports Wi-Fi 6 for fast wireless connectivity.
- Ethernet: For a wired connection, connect an Ethernet cable from your router or modem to the RJ45 LAN port on the Mini PC.
5. Operating Instructions
5.1 Basic Operation
- Power On: Press the power button.
- Shut Down: Click the Start button in Windows, then select Power > Shut down.
- Restart: Click the Start button in Windows, then select Power > Restart.
- Sleep: Click the Start button in Windows, then select Power > Sleep.
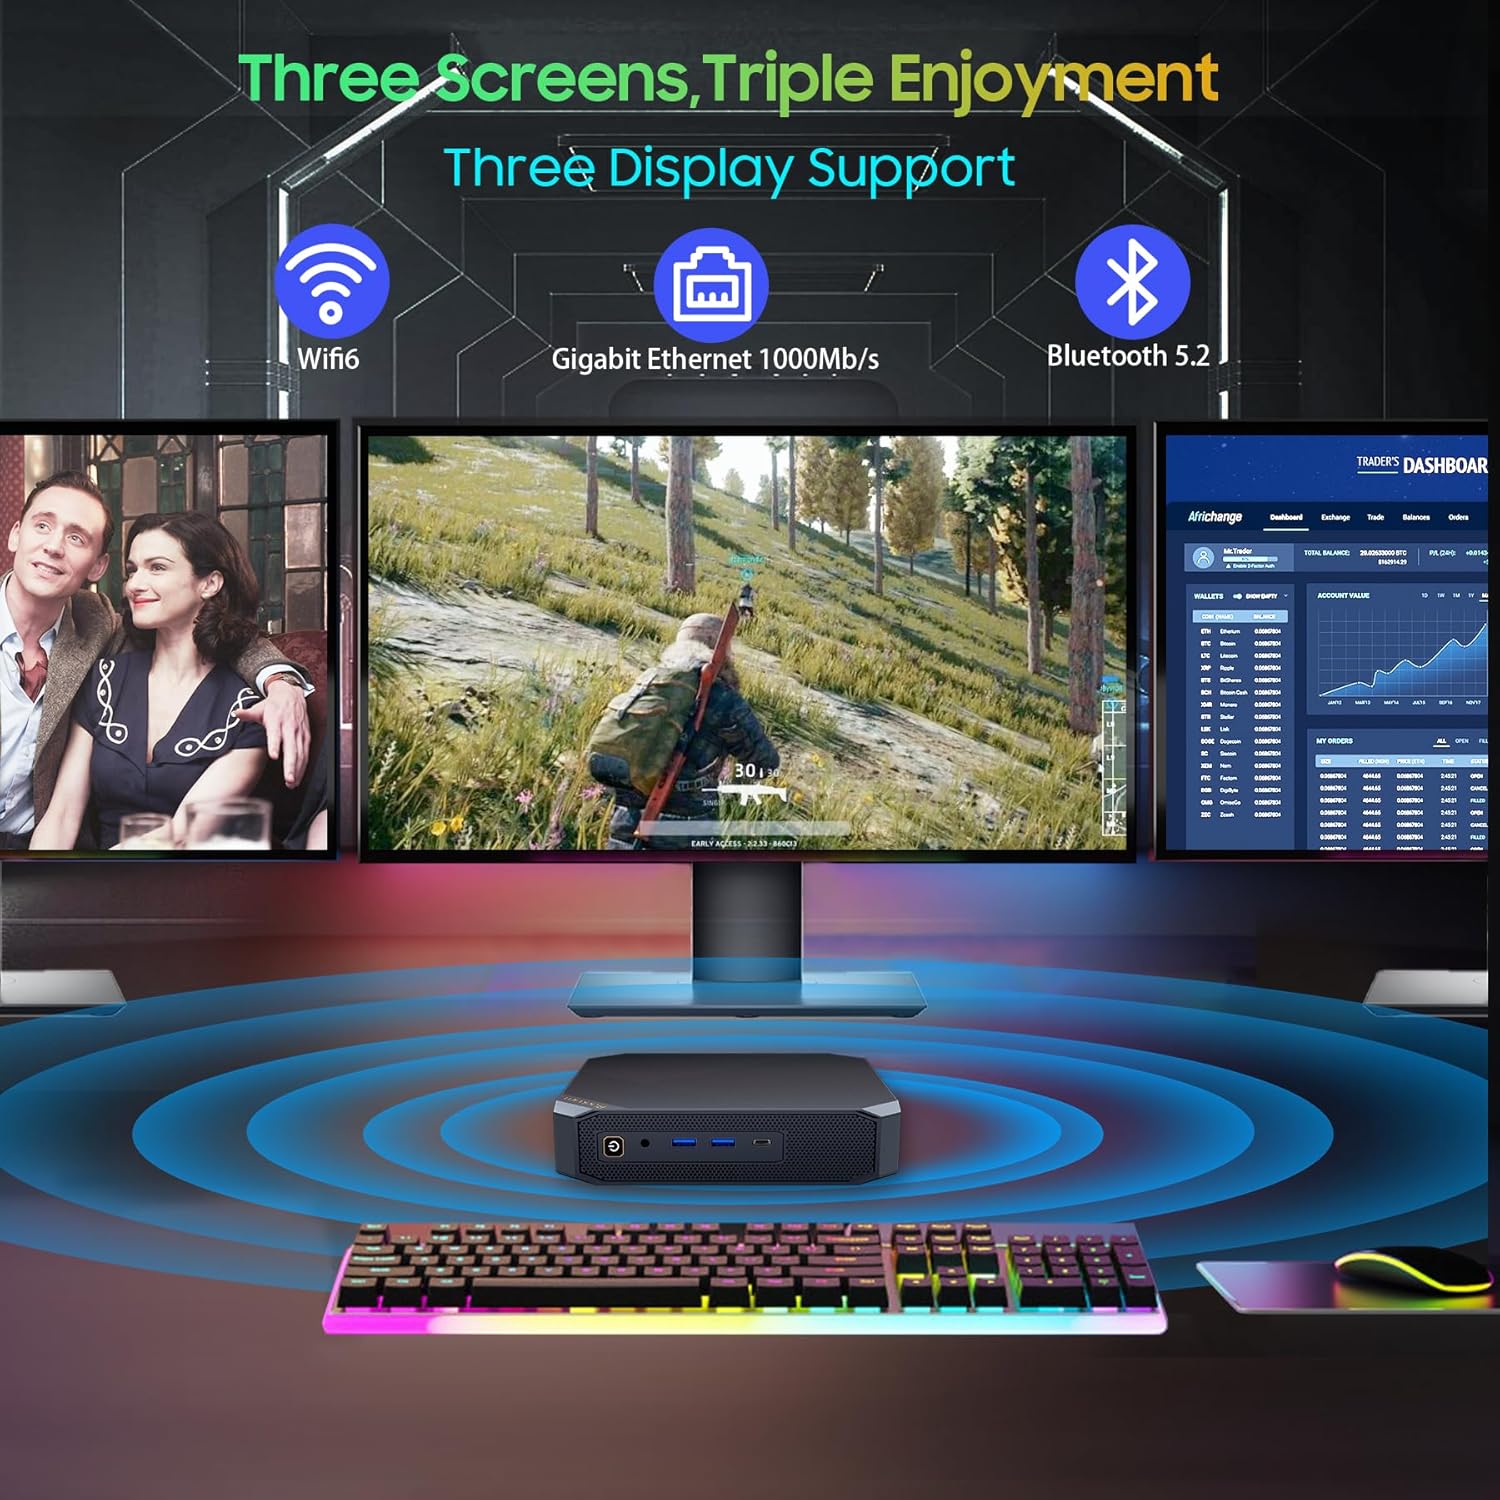
5.2 Triple Display Setup
The Blackview MP200 supports connecting up to three displays simultaneously for an extended desktop experience. Use a combination of the HDMI, DisplayPort, and USB Type-C ports.
- Connect your primary monitor to the HDMI port.
- Connect a second monitor to the DisplayPort.
- Connect a third compatible monitor to the USB Type-C port.
- In Windows, right-click on the desktop and select 'Display settings' to configure display arrangement, resolution, and orientation.
A visual representation of the Blackview MP200 Mini PC supporting a triple monitor setup for enhanced productivity or entertainment.
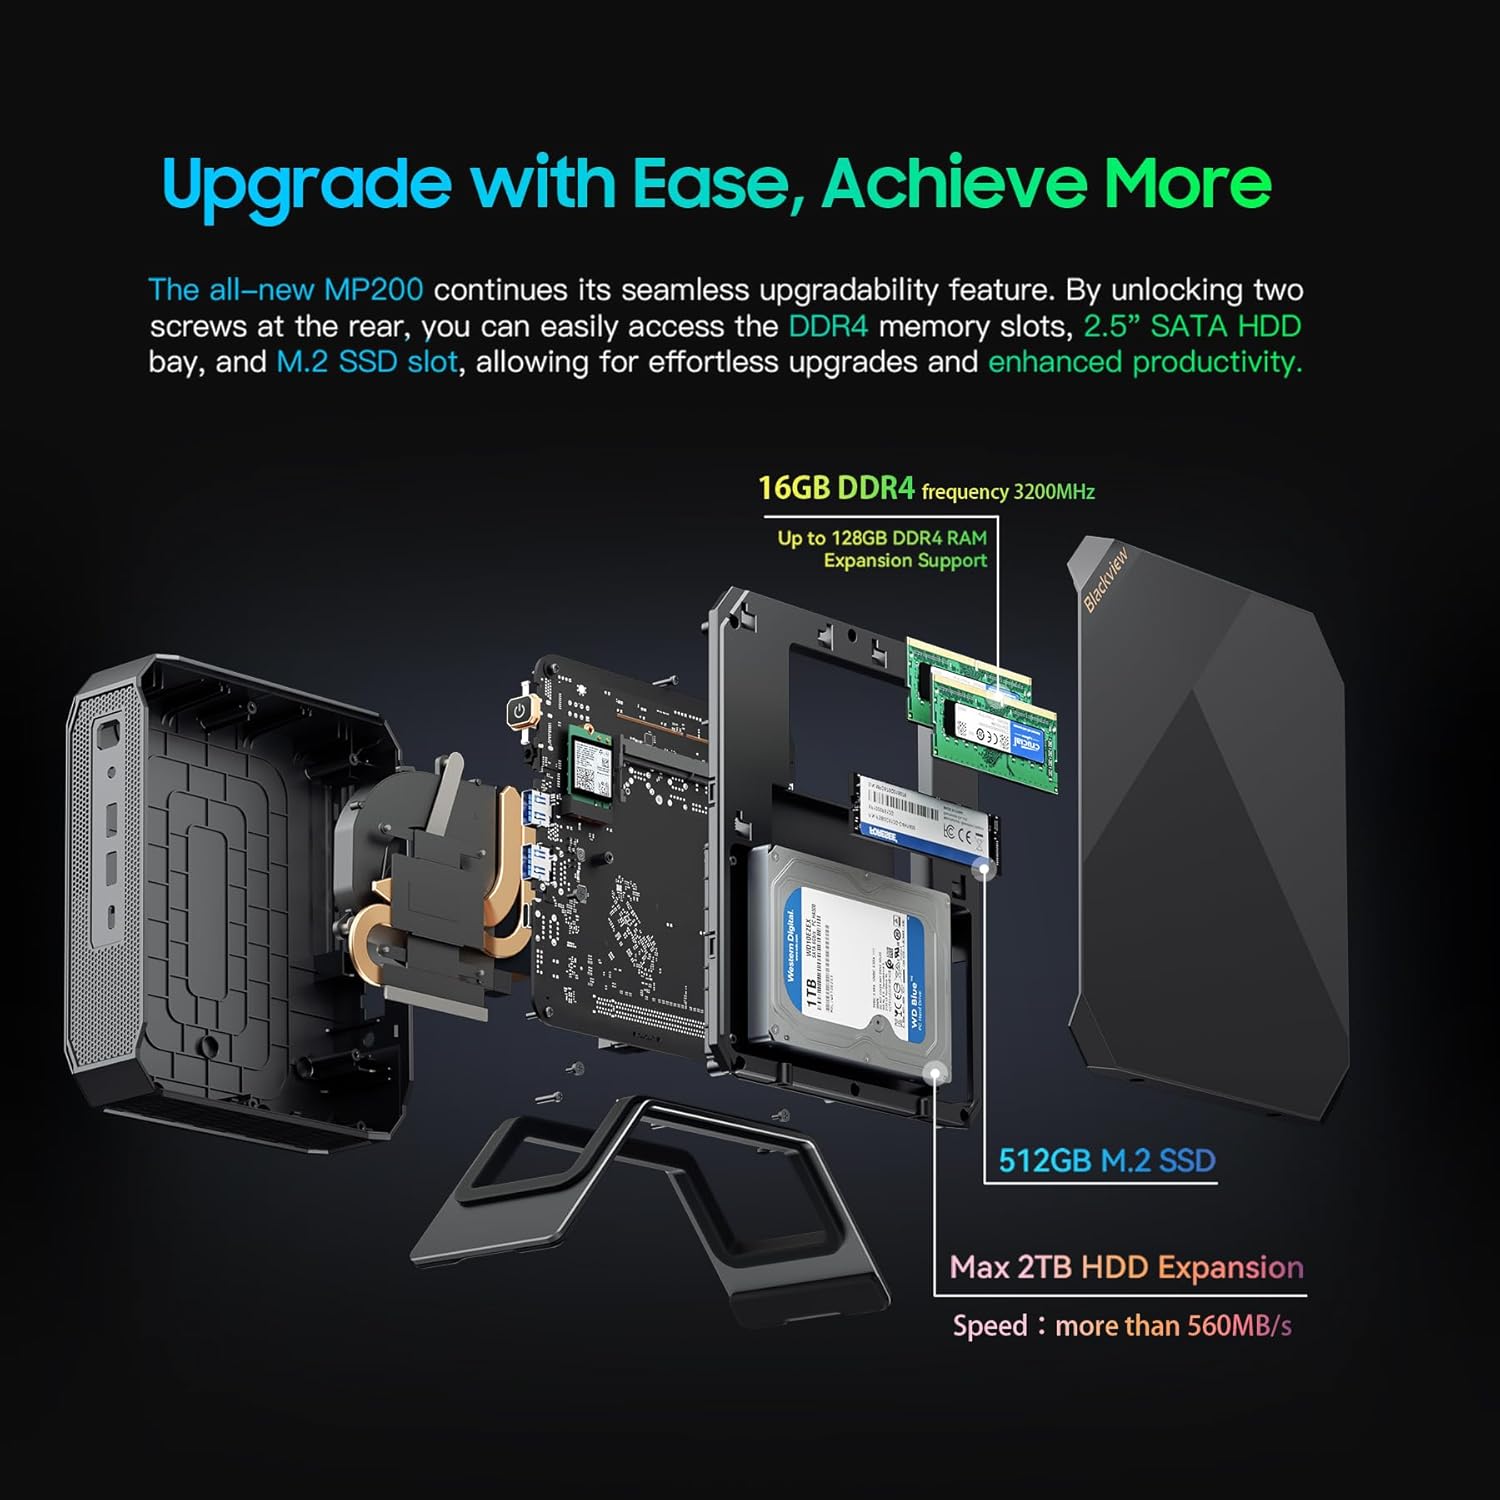
5.3 Storage Expansion
The Blackview MP200 includes a 512GB M.2 NVMe SSD and supports additional storage expansion via a 2.5-inch SATA bay (up to 2TB SSD/HDD).
- Power off the Mini PC and disconnect all cables.
- Locate the screws on the bottom or side panel that secure the chassis. Remove these screws.
- Carefully open the chassis to access the internal components.
- Install your 2.5-inch SATA SSD/HDD into the designated bay and connect the SATA data and power cables.
- Secure the drive with screws if necessary.
- Close the chassis and re-secure the screws.
- Power on the PC. The new drive may need to be initialized and formatted in Windows Disk Management before use.

An exploded view of the Blackview MP200 Mini PC, demonstrating the M.2 NVMe SSD and the 2.5-inch SATA bay for storage expansion.
5.4 RAM Upgrade
The MP200 comes with 16GB LPDDR4 RAM. It may support further RAM upgrades depending on the specific configuration and available slots. Consult the product specifications for maximum supported RAM.
Close-up of the Blackview MP200 Mini PC's internal layout, indicating the DDR4 RAM slots for memory upgrades.
6. Maintenance
6.1 Cleaning
- Regularly clean the exterior of the Mini PC with a soft, dry cloth.
- Use compressed air to clear dust from the ventilation grilles and ports to ensure proper airflow and prevent overheating. Do this with the device powered off.
- Avoid using liquid cleaners directly on the device.
6.2 Software Updates
Keep your Windows operating system and device drivers updated to ensure optimal performance and security.
- Windows Updates: Go to Settings > Windows Update and check for available updates.
- Driver Updates: Visit the Blackview official website for the latest drivers for your MP200 Mini PC.
6.3 Thermal Management
The MP200 features an advanced cooling system with copper heat pipes and a precision-engineered fan. To maintain optimal thermal performance:
- Ensure the Mini PC is placed in a well-ventilated area.
- Do not block the air vents.
- Avoid operating the device in excessively hot environments.

Diagram illustrating the efficient heat dissipation system of the Blackview MP200 Mini PC, featuring a cooling fan and heat pipes.
7. Troubleshooting
If you encounter issues with your Blackview MP200 Mini PC, refer to the following common problems and solutions:
7.1 No Power
- Ensure the power adapter is securely connected to both the Mini PC and a working power outlet.
- Verify the power outlet is functional by plugging in another device.
- Check the power adapter for any visible damage.
7.2 No Display Output
- Confirm that the monitor is powered on and the correct input source is selected.
- Check that the HDMI, DisplayPort, or USB-C cable is securely connected to both the Mini PC and the monitor.
- Try using a different cable or monitor to isolate the issue.
7.3 Network Connectivity Issues
- Wi-Fi: Ensure Wi-Fi is enabled in Windows settings. Restart your router/modem. Verify the Wi-Fi password.
- Ethernet: Check if the Ethernet cable is properly connected. Verify that your router/modem is working correctly.
7.4 Slow Performance
- Close unnecessary applications running in the background.
- Check for and install any pending Windows updates or driver updates.
- Ensure there is sufficient free space on your primary drive.
- Monitor CPU and RAM usage in Task Manager to identify resource-intensive processes.
7.5 Clear CMOS
If you experience persistent boot issues or incorrect BIOS settings, you can try clearing the CMOS. With the device powered off and disconnected from power, press and hold the 'Clear CMOS' button on the rear panel for 5-10 seconds. This will reset BIOS settings to their factory defaults.
8. Specifications
Detailed technical specifications for the Blackview MP200 Mini PC:
| Feature | Specification |
|---|---|
| Model | Blackview MP200 |
| Processor | Intel Core i5-11400H (6 Cores, 12 Threads, up to 4.5 GHz) |
| Graphics | Intel UHD Graphics (Integrated) |
| RAM | 16GB LPDDR4 (3200 MHz) |
| Storage | 512GB M.2 NVMe SSD |
| Storage Expansion | 1x 2.5-inch SATA Bay (up to 2TB SSD/HDD) |
| Operating System | Windows 11 Pro |
| Video Output | 1x HDMI 2.0b (4K@60Hz), 1x DisplayPort (8K@60Hz), 1x USB Type-C (4K@60Hz) |
| USB Ports | 4x USB 3.2 Gen2 |
| Network | Intel AX201 WiFi 6 (802.11ax), Gigabit Ethernet (RJ45) |
| Bluetooth | Bluetooth 5.2 |
| Audio | 3.5mm Audio Combo Jack |
| Dimensions | 7.2 × 5.9 × 3.0 inches (approx.) |
| Weight | 1.49 pounds (approx.) |
9. Warranty and Support
Your Blackview MP200 Mini PC comes with a 3-year warranty, ensuring peace of mind regarding manufacturing defects and hardware failures under normal use.
9.1 Warranty Coverage
The 3-year warranty covers defects in materials and workmanship from the date of purchase. It does not cover damage caused by misuse, accidents, unauthorized modifications, or natural disasters.
9.2 Customer Support
For technical assistance, warranty claims, or any questions regarding your Blackview MP200 Mini PC, please contact Blackview customer support through their official website or the contact information provided with your purchase documentation.