1. Introduction
This user manual provides comprehensive instructions for the ATOMRC Quick-Release Servo Gimbal V2. Designed for FPV RC models and fixed-wing aircraft, this high-precision, lightweight stabilizer enhances your aerial control and provides an immersive flight experience. Please read this manual thoroughly before installation and operation to ensure proper use and maximize performance.
2. Safety Information
Always prioritize safety when working with RC equipment. Failure to follow these guidelines may result in injury or damage to the product or other equipment.
- Power Disconnection: Always disconnect power from your aircraft and the gimbal before performing any installation, maintenance, or adjustments.
- Moving Parts: Keep fingers, loose clothing, and other objects clear of moving servo parts during operation to prevent injury.
- Environmental Conditions: Do not expose the gimbal to extreme temperatures, moisture, or corrosive substances.
- Proper Installation: Ensure all components are securely mounted and connections are firm to prevent dislodging during flight.
- Voltage Compatibility: Verify that the power supply voltage is compatible with the gimbal's specifications.
3. Package Contents
Verify that all items are present in your package:
- ATOMRC Quick-Release Servo Gimbal V2
- Mounting Hardware (screws, brackets, etc.)
- User Manual
4. Product Overview
The ATOMRC Quick-Release Servo Gimbal V2 is engineered for superior performance and ease of use in FPV applications. Its robust design and advanced features provide stable camera positioning and an enhanced flight experience.
- Quick-Release Design: Features tool-free installation and removal, simplifying field maintenance and adjustments.
- Head Tracking Capability: Integrated functionality for precise FPV control and immersive flight.
- Versatile Compatibility: Designed for fixed-wing aircraft and various FPV RC models with universal mounting options.
- Precision Control: High-accuracy servo mechanism ensures smooth, responsive camera movements.
- Durable Construction: Robust black aluminum construction provides stability and reliability while maintaining a lightweight profile.

Figure 4.1: The ATOMRC Quick-Release Servo Gimbal V2 integrated into an FPV aircraft's cockpit, showcasing its compact design and wiring connections.
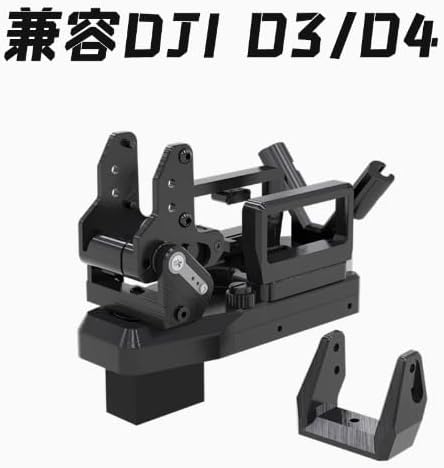
Figure 4.2: The ATOMRC Quick-Release Servo Gimbal V2, highlighting its compatibility with DJI D3/D4 systems. The image shows the gimbal's structure and mounting points.

Figure 4.3: The ATOMRC Quick-Release Servo Gimbal V2, illustrating its design for compatibility with DJI Air Unit systems. The image details the gimbal's components and quick-release mechanism.
5. Setup and Installation
Follow these steps to properly install your ATOMRC Quick-Release Servo Gimbal V2:
- Prepare Mounting Surface: Identify a suitable, flat surface on your FPV RC model or fixed-wing aircraft for gimbal installation. Ensure it is stable and free from obstructions.
- Attach Mounting Base: Secure the gimbal's mounting base to your aircraft using the provided screws or adhesive, if applicable. Ensure it is firmly attached to prevent vibration or movement during flight.
- Install Gimbal Body: Align the quick-release mechanism of the gimbal body with the installed mounting base. Gently push down until it clicks into place, indicating a secure connection. Verify that the gimbal is locked and cannot easily detach.
- Connect Servo Cables: Connect the servo cables from the gimbal to the appropriate channels on your flight controller or receiver. Refer to your flight controller's manual for specific servo input assignments for gimbal control (e.g., pitch and roll).
- Connect Head Tracking (Optional): If utilizing head tracking, connect the head tracking module's output to the designated input on your flight controller or FPV system. Configure your FPV goggles or head tracker according to their respective manuals.
- Power Connection: Connect the gimbal's power cable to a suitable power source on your aircraft, ensuring correct polarity and voltage compatibility.
- Initial Calibration: After installation and power-up, perform any necessary initial calibration steps as per your flight controller or FPV system's instructions to ensure the gimbal's neutral position and range of motion are correctly set.
6. Operating Instructions
Once installed, the ATOMRC Quick-Release Servo Gimbal V2 is ready for operation. Its primary function is to stabilize and control your FPV camera's orientation.
- Manual Control: If configured for manual control, use the assigned channels on your RC transmitter to adjust the pitch and roll of the gimbal. Smooth, gradual inputs are recommended for stable video.
- Head Tracking Operation: With head tracking enabled, the gimbal will automatically follow your head movements, providing an intuitive and immersive FPV experience. Ensure your head tracking system is calibrated and functioning correctly before flight.
- Pre-Flight Check: Before each flight, perform a quick check to ensure the gimbal moves freely and responds correctly to control inputs (manual or head tracking).
7. Maintenance
Regular maintenance ensures the longevity and optimal performance of your gimbal.
- Cleaning: Gently wipe the gimbal with a soft, dry cloth to remove dust and debris. Avoid using harsh chemicals or solvents.
- Inspection: Periodically inspect all moving parts, screws, and cable connections for any signs of wear, looseness, or damage. Tighten any loose screws.
- Storage: When not in use, store the gimbal in a clean, dry environment, away from direct sunlight and extreme temperatures.
8. Troubleshooting
If you encounter issues with your ATOMRC Quick-Release Servo Gimbal V2, refer to the following common problems and solutions:
| Problem | Possible Cause | Solution |
|---|---|---|
| Gimbal not responding to controls. | Incorrect wiring, loose connection, incorrect flight controller configuration, power issue. | Check all cable connections. Verify servo assignments in your flight controller software. Ensure adequate power supply. |
| Gimbal movement is jerky or erratic. | Mechanical obstruction, damaged servo, excessive vibration, incorrect PID tuning (if applicable). | Inspect for obstructions. Check for damaged servo gears. Ensure gimbal is securely mounted to minimize vibration. Adjust flight controller PID settings if necessary. |
| Head tracking not working. | Head tracking module not connected, incorrect calibration, incompatible settings. | Verify head tracking module connection. Recalibrate the head tracking system. Check compatibility and settings in your FPV goggles/system. |
| Gimbal is loose or wobbly. | Quick-release not fully engaged, loose mounting screws. | Ensure the quick-release mechanism is fully locked. Tighten all mounting screws. |
9. Specifications
| Attribute | Detail |
|---|---|
| Model | ATOMRC Quick-Release Servo Gimbal V2 |
| Brand | RunCam (Manufactured by Atomrc) |
| Color | Black |
| Material | Robust Black Aluminum Construction |
| Item Weight | 0.5 ounces (approx. 14.17 grams) |
| Package Dimensions | 1 x 1 x 0.1 inches |
| ASIN | B0F3C71H28 |
| Country of Origin | China |
10. Warranty Information
This product is covered by a manufacturer's warranty against defects in materials and workmanship. The specific terms and duration of the warranty may vary. Please retain your proof of purchase for warranty claims. For detailed warranty information, refer to the documentation provided with your purchase or contact the manufacturer directly.
11. Customer Support
For technical assistance, troubleshooting beyond this manual, or inquiries regarding your ATOMRC Quick-Release Servo Gimbal V2, please contact the manufacturer's customer support. Visit the official RunCam website or refer to your product packaging for contact details.
Note: Always provide your product model and ASIN (B0F3C71H28) when contacting support for faster service.


