
1. Introduction
This manual provides detailed instructions for the ZWP Replacement Remote Control, designed for use with the Walking Pad Q1 Treadmill. Please read this manual thoroughly before using the remote control to ensure proper operation and to maximize its lifespan.
2. Safety Information
- Keep the remote control away from water and excessive moisture.
- Avoid dropping the remote control or subjecting it to strong impacts.
- Do not expose the remote control to extreme temperatures or direct sunlight.
- Keep batteries out of reach of children.
- Dispose of used batteries according to local regulations.
3. Package Contents
Ensure all items are present in the package:
- 1 x ZWP Replacement Remote Control
Note: AAA batteries are not included and must be purchased separately.
4. Setup
4.1 Battery Installation
The remote control requires two AAA batteries (not included).
- Locate the battery compartment cover on the back of the remote control.
- Slide the cover downwards to open the compartment.
- Insert two AAA batteries, ensuring the correct polarity (+ and -) as indicated inside the compartment.
- Slide the cover back into place until it clicks securely.

Image: Battery installation for the ZWP remote control. The image shows the remote control with a green box indicating "Requires Two AAA batteries. (Batteries are not Included)" and a red box stating "Not included by default!".
4.2 Remote Pairing
To connect the remote control to your Walking Pad Q1 Treadmill, follow these steps:
- Ensure the remote control has fresh batteries installed.
- Turn on the power switch of your Walking Pad Q1 Treadmill.
- Within 10 seconds of powering on the treadmill, press and hold the Power button (ON/OFF) and the '+' button simultaneously on the remote control.
- Continue holding until you hear a long beep from the treadmill, indicating a successful connection.
- Release the buttons. The remote control is now paired and ready for use.
Note: If pairing fails, try a different combination of key presses. Due to variations across treadmill models, some devices may require holding a different button combination (e.g., Power and 'M' button, or Power and '-' button) during the pairing process. Always perform pairing within 10 seconds of the treadmill being powered on.
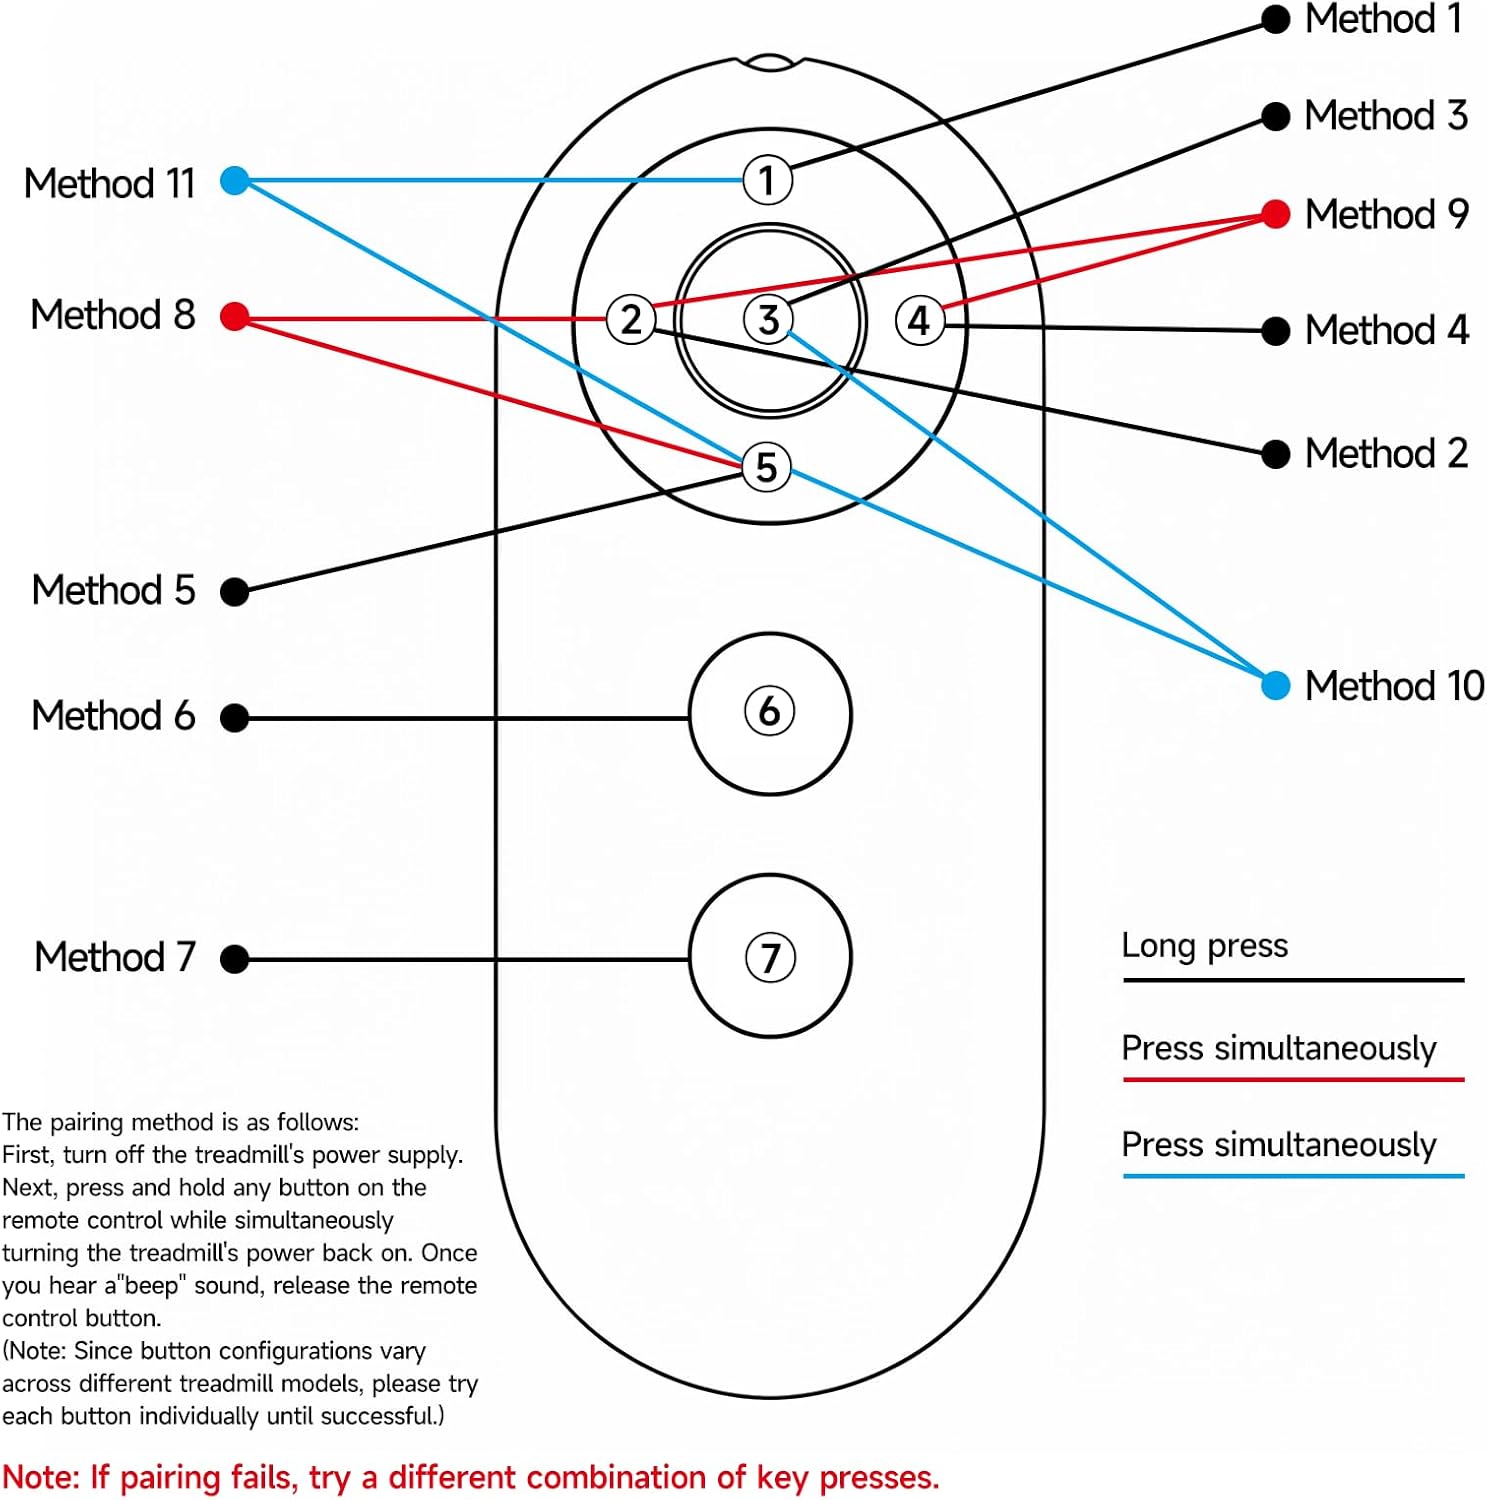
Image: Diagram illustrating various pairing methods for the remote control. It shows the remote's buttons labeled 1 through 7, with lines indicating different button combinations (Method 1-11) to press simultaneously for pairing. The primary method involves pressing the Power button (ON/OFF) and the '+' button.
5. Operating Instructions
Once paired, the remote control allows you to manage your Walking Pad Q1 Treadmill functions.
5.1 Button Functions
- + Button: Increases treadmill speed.
- - Button: Decreases treadmill speed.
- M Button: Changes modes or programs (refer to your treadmill's main manual for specific mode details).
- ON/OFF Button: Powers the treadmill on or off, or starts/stops the belt.

Image: The ZWP remote control being used with a walking pad treadmill. The image highlights features like "Stable Link," "0.2s Fast Response," "Easy Grip and Control," and "Save power."

Image: Close-up of the ZWP remote control, emphasizing its construction from "ABS Safety materials," "Quality assurance," "long lifespan," and an "Advanced chip."

Image: The ZWP remote control demonstrating its "Multi angle induction" capability, indicating a "360° Multi angle remote control" and a range of "33FT."
6. Maintenance
6.1 Cleaning
To clean the remote control, use a soft, dry cloth. Do not use liquid cleaners or abrasive materials, as these can damage the surface or internal components.
6.2 Battery Replacement
Replace batteries when the remote's response becomes sluggish or if the treadmill does not respond to commands. Refer to Section 4.1 for battery installation instructions.
6.3 Storage
When not in use for extended periods, store the remote control in a cool, dry place. Consider removing the batteries to prevent leakage, especially if storing for several months.
7. Troubleshooting
| Problem | Possible Cause | Solution |
|---|---|---|
| Remote not responding. | Dead or incorrectly installed batteries. | Check battery polarity and replace with fresh AAA batteries. |
| Remote not pairing with treadmill. | Incorrect pairing procedure or timing. | Ensure pairing is attempted within 10 seconds of treadmill power-on. Try alternative button combinations as described in Section 4.2. |
| Short operating range. | Weak batteries or obstruction. | Replace batteries. Ensure no objects are blocking the line of sight between the remote and the treadmill's receiver. |
| Treadmill not turning on/off. | Treadmill power issue or remote not paired. | Verify the treadmill's main power switch is on. Re-attempt pairing if necessary. |
8. Specifications
- Brand: ZWP
- Model Name: Q1 Compatible Remote Control
- Compatible Devices: Walking Pad Q1 Treadmill
- Connectivity Technology: Infrared
- Button Quantity: 4
- Controller Type: Button Control
- Maximum Range: 10 meters (approximately 33 feet)
- Power Source: 2 x AAA Batteries (not included)
- Material: High Quality ABS
- Color: Black
- Item Weight: 0.03 kg
- Dimensions (Approximate): 4.92in (Length) x 1.65in (Width) x 0.39in (Thickness)

Image: The ZWP remote control with its dimensions labeled: 4.92 inches in length, 1.65 inches in width, and 0.39 inches in thickness, highlighting its ergonomic design.
9. Warranty and Support
ZWP provides a 1-year warranty for this replacement remote control. This warranty covers manufacturing defects and ensures return service.
For any questions regarding your product, order, or for warranty claims, please contact ZWP customer support directly. Our team aims to respond within 12 hours.
Contact information can typically be found on the seller's page or through your purchase platform.