
Sourcefy SP-KFA1026
Sourcefy SP-KFA1026 Nozzle Kit Instruction Manual
For Dura-Heat DFA45, DFA50, DFA170T and Dyna-Glo KFA120, KFA170 Heating Systems
1. Introduction
This manual provides detailed instructions for the installation, operation, and maintenance of the Sourcefy SP-KFA1026 Nozzle Kit. This kit is designed to replace essential components in compatible kerosene and diesel portable heaters, ensuring optimal performance and reliability.
The SP-KFA1026 Nozzle Kit is a complete low-pressure nozzle kit used in various portable kerosene heaters, including models from Dura-Heat and Dyna-Glo. It is manufactured with high-quality components and tested for consistent quality and unsurpassed reliability.
2. Product Components
The SP-KFA1026 Nozzle Kit includes the following parts:
- 1 Low Pressure Kerosene / Diesel Nozzle
- 1 Nozzle Seal Buna 70
- 1 Nozzle Tension Spring
- 2 Nozzle Spacer Washers

Image 1: Overview of the SP-KFA1026 Nozzle Kit components, including the brass nozzle, spring, and seal.
3. Compatible Heater Models
This nozzle kit is compatible with a range of portable kerosene heaters. Please verify your heater's model number before installation.
Dura-Heat Portable Heater Models:
- DFA45
- DFA50
- DFA170T
- DFA170C
- DFA170CV
Dyna-Glo and Workhorse Portable Heater Models:
- KFA120WH
- KFA170WH
- KFA120
- KFA170
- KFA120T-Pro
- KFA170T-Pro
- KFA50H
- RMC-KFA50DGD
- KFA50DGD
4. Setup and Installation
Safety First: Before attempting any installation or maintenance, ensure your heater is completely powered off, unplugged, and has cooled down. Refer to your heater's original instruction manual for specific safety precautions and disassembly procedures.
- Access the Nozzle Assembly: Carefully disassemble the heater components to gain access to the existing nozzle assembly. This typically involves removing covers and possibly fuel lines.
- Remove Old Nozzle: Unscrew and remove the old nozzle. Note the orientation and placement of all components, including any washers or seals.
- Inspect Components: Examine the area for any debris or damage. Clean as necessary.
- Assemble New Nozzle Kit:
- Place one nozzle spacer washer onto the nozzle stem.
- Slide the nozzle tension spring onto the stem, followed by the second nozzle spacer washer.
- Finally, place the nozzle seal (Buna 70) onto the end of the stem.

Image 2: Assembled nozzle kit, illustrating the correct order of the spring and seal on the nozzle stem.
- Install New Nozzle: Carefully screw the assembled new nozzle kit into its designated position. Ensure it is hand-tightened first, then gently snugged with an appropriate wrench. Do not overtighten.
- Reassemble Heater: Reassemble all heater components in reverse order of disassembly. Ensure all connections are secure and no parts are left loose.
- Leak Check: After reassembly, perform a leak check according to your heater's manual before operating.
5. Operation Considerations
The SP-KFA1026 Nozzle Kit is a critical component for the proper atomization and combustion of fuel in compatible kerosene and diesel heaters. Once correctly installed, it contributes to the heater's efficient operation.
- Fuel Type: Ensure you are using the correct type of kerosene or diesel fuel as specified by your heater's manufacturer. Using incorrect fuel can damage the nozzle and other heater components.
- Proper Combustion: A properly functioning nozzle ensures a consistent spray pattern, leading to efficient fuel combustion and minimizing soot or incomplete burning.
- Regular Checks: Periodically inspect the nozzle for signs of clogging or wear, especially if you notice changes in flame quality or heater performance.
6. Maintenance
Regular maintenance of the nozzle kit ensures the longevity and efficient operation of your heater.
- Cleaning: If the nozzle becomes clogged, carefully remove it and clean it using a soft brush and appropriate solvent recommended for fuel system components. Do not use abrasive tools that could damage the nozzle orifice.
- Inspection: Regularly inspect the nozzle for any signs of wear, corrosion, or damage. Check the seal (Buna 70) for cracks or hardening, and the spring for loss of tension. Replace components as needed.
- Storage: If the heater is to be stored for an extended period, it is advisable to drain the fuel tank and clean the nozzle to prevent fuel residue buildup.
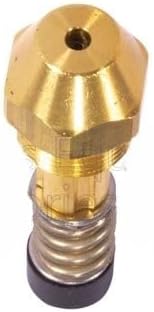
Image 3: Close-up of the nozzle tip, showing the precise orifice for fuel atomization.
7. Troubleshooting
If your heater experiences issues related to fuel delivery or combustion after installing the nozzle kit, consider the following:
| Symptom | Possible Cause | Solution |
|---|---|---|
| Poor flame quality or excessive smoke | Clogged nozzle, incorrect fuel, or improper air/fuel mixture. | Clean or replace nozzle. Ensure correct fuel type. Consult heater manual for air/fuel adjustment. |
| Heater fails to ignite | Nozzle blockage, faulty igniter, or fuel delivery issue. | Check nozzle for clogs. Verify igniter function. Ensure fuel is reaching the nozzle. |
| Fuel leaks around nozzle area | Improperly seated nozzle, damaged seal, or overtightened connection. | Re-seat nozzle, replace seal, or ensure proper torque. |
If issues persist, consult a qualified technician or refer to your heater's specific service manual.
8. Specifications
- Part Number: SP-KFA1026
- Material: Brass
- Item Weight: Approximately 4 ounces
- Compatibility: Dura-Heat DFA45, DFA50, DFA170T, DFA170C, DFA170CV; Dyna-Glo KFA120, KFA170, KFA120WH, KFA170WH, KFA120T-Pro, KFA170T-Pro, KFA50H, RMC-KFA50DGD, KFA50DGD
- Components: Low Pressure Kerosene / Diesel Nozzle, Nozzle Seal Buna 70, Nozzle Tension Spring, Nozzle Spacer Washers
9. Warranty Information
The Sourcefy SP-KFA1026 Nozzle Kit comes with a 6 Months Unlimited Warranty. This warranty covers defects in materials and workmanship under normal use. For warranty claims or further details, please contact Sourcefy customer support.
10. Customer Support
For additional assistance, technical support, or to inquire about other Sourcefy products, please visit the official Sourcefy Store:
Visit the Sourcefy Store on Amazon
You may also refer to the original heater manufacturer's documentation for specific heater model support.
Ask a question about this manual
Ask about setup, troubleshooting, compatibility, parts, safety, or missing instructions. Manuals+ will review the question and use this page’s manual context to help answer it.