
CUSHYBITE RY40HPST01B

RY40HPST01B 40V HP Brushless 16 in. Attachment Capable Cordless String Trimmer
User Manual
Model: RY40HPST01B | Brand: CUSHYBITE
1. Important Safety Information
Always read and understand all safety warnings and instructions before operating this product. Failure to follow the warnings and instructions may result in electric shock, fire, and/or serious injury.
- Wear appropriate personal protective equipment (PPE), including eye protection, hearing protection, and sturdy footwear.
- Keep children, bystanders, and pets at least 50 feet (15 meters) away from the operating area.
- Inspect the work area for objects that could be thrown or entangled in the cutting line.
- Do not operate the trimmer in wet conditions or in the presence of flammable liquids or gases.
- Always remove the battery pack before making any adjustments, changing accessories, or storing the tool.
2. Product Overview
The CUSHYBITE RY40HPST01B is a powerful 40V HP Brushless 16-inch attachment-capable cordless string trimmer designed for efficient and precise yard work. It offers performance comparable to a 27cc gas model without the need for maintenance or fuel.
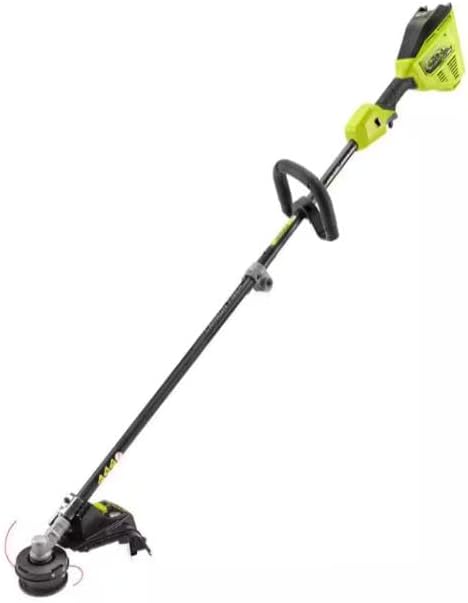
Image: The RY40HPST01B 40V HP Brushless 16 in. Attachment Capable Cordless String Trimmer.
Key Features:
- Powerful Brushless Motor: Delivers performance exceeding a 27cc gas model.
- Adjustable Cutting Swath: Easily switch between 14-inch and 16-inch cutting widths for optimal runtime or performance.
- Sliding Guard: Provides quick, tool-free adjustments.
- Lightweight Carbon Fiber Shaft: Enhances durability and reduces user fatigue.
- Variable Speed Trigger & 2-Speed Switch: Offers maximum control for various trimming needs.
- Attachment Capable: Compatible with EXPAND-IT and other universal attachments.
- REEL EASY+ 3-in-1 Bump-Feed Head: Allows for fast 60-second line reloading.
3. Setup and Assembly
3.1 Attaching the Guard
- Align the guard with the mounting slots on the trimmer head.
- Push the guard firmly until it clicks into place. Ensure it is securely fastened.

Image: Close-up of the sliding guard and adjustable cut swath mechanism.
3.2 Installing the Handle
- Loosen the handle clamp knob.
- Slide the handle onto the shaft to a comfortable operating position.
- Tighten the clamp knob securely.
3.3 Inserting the Battery Pack
- Ensure the battery pack is fully charged.
- Align the ribs on the battery pack with the grooves in the trimmer's battery port.
- Slide the battery pack into the trimmer until it latches securely.
4. Operating Instructions
4.1 Starting and Stopping
- To start: Press the safety lock-out button, then squeeze the variable speed trigger.
- To stop: Release the variable speed trigger.

Image: User's hand on the handle, demonstrating the variable speed trigger for maximum control.
4.2 Adjusting Speed
Use the 2-speed switch located on the handle to select between low speed for extended runtime or high speed for maximum power. The variable speed trigger allows for fine-tuning of the cutting speed.
4.3 Trimming Techniques
- Sweeping: Swing the trimmer from side to side, keeping the cutting head parallel to the ground.
- Edging: Tilt the trimmer to a vertical position to cut along sidewalks and driveways.
- Tapering: Hold the cutting head at an angle to create a clean, tapered edge.

Image: A person operating the string trimmer in a yard, demonstrating typical use.
4.4 Using Attachments
This trimmer is attachment-capable, allowing it to be used with EXPAND-IT and other universal attachments. Refer to the attachment's specific instructions for proper installation and use.
5. Maintenance
5.1 Cleaning the Trimmer
- Always remove the battery pack before cleaning.
- Use a clean, damp cloth to wipe down the exterior of the trimmer.
- Remove any grass clippings or debris from the guard and cutting head.
- Do not use harsh chemicals or abrasive cleaners.
5.2 Replacing the Cutting Line
The REEL EASY+ 3-in-1 bump-feed head allows for quick line reloading, typically within 60 seconds. Refer to the instructions provided with the cutting line or on the trimmer head for detailed reloading steps.
5.3 Storage
- Remove the battery pack before storing.
- Store the trimmer in a cool, dry, and well-ventilated area, away from direct sunlight and moisture.
- Keep out of reach of children.
6. Troubleshooting
| Problem | Possible Cause | Solution |
|---|---|---|
| Trimmer does not start | Battery not charged or not inserted correctly. Safety lock-out not engaged. | Ensure battery is fully charged and securely latched. Press safety lock-out button before squeezing trigger. |
| Cutting line not feeding | Line tangled or too short. Debris in head. | Tap the bump head firmly on the ground while operating. Replace cutting line if too short. Clear any debris from the head. |
| Reduced cutting performance | Dull or worn cutting line. Incorrect cutting swath setting. | Replace cutting line. Adjust cutting swath to 16 inches for maximum performance. |
If the problem persists after attempting these solutions, please contact customer support.
7. Specifications
| Feature | Specification |
|---|---|
| Model Number | RY40HPST01B |
| Manufacturer | CUSHYBITE |
| Power Source | 40V Battery (Battery and charger sold separately) |
| Motor Type | HP Brushless |
| Cutting Swath | Adjustable 14 in. - 16 in. |
| Shaft Type | Carbon Fiber |
| Head Type | REEL EASY+ 3-in-1 Bump-Feed |
| Attachment Capable | Yes (EXPAND-IT and universal attachments) |
8. Warranty and Support
8.1 Warranty Information
This CUSHYBITE product is covered by a manufacturer's warranty. For detailed information regarding warranty terms, conditions, and registration, please refer to the warranty card included with your product or visit the official CUSHYBITE website.
8.2 Customer Support
For technical assistance, replacement parts, or any questions regarding the operation or maintenance of your RY40HPST01B string trimmer, please contact CUSHYBITE customer support:
- Website: www.cushybite.com/support (Example Link)
- Phone: 1-800-XXX-XXXX (Example Number)
- Email: support@cushybite.com (Example Email)
Please have your model number (RY40HPST01B) and date of purchase ready when contacting support.
Ask a question about this manual
Ask about setup, troubleshooting, compatibility, parts, safety, or missing instructions. Manuals+ will review the question and use this page’s manual context to help answer it.