
1. Introduction
This manual provides essential instructions for the safe and efficient operation, maintenance, and troubleshooting of your Ajgvq ZCM-02 Commercial 1000W Cotton Candy Machine. Please read this manual thoroughly before initial use and retain it for future reference.

Figure 1: Ajgvq ZCM-02 Commercial Cotton Candy Machine
The Ajgvq ZCM-02 is a high-performance cotton candy machine designed for commercial and home use. It features 1000W of heating power and a high-speed spinning head (3500 RPM) for efficient cotton candy production. The machine is constructed with food-grade stainless steel for durability and hygiene.
2. Safety Instructions
- Read all instructions before operating the appliance.
- Do not touch hot surfaces. Use handles or knobs.
- To protect against electrical shock, do not immerse cord, plugs, or appliance in water or other liquid.
- Close supervision is necessary when any appliance is used by or near children.
- Unplug from outlet when not in use and before cleaning. Allow to cool before putting on or taking off parts, and before cleaning the appliance.
- Do not operate any appliance with a damaged cord or plug or after the appliance malfunctions or has been damaged in any manner.
- The use of accessory attachments not recommended by the appliance manufacturer may cause injuries.
- Do not use outdoors.
- Do not let cord hang over edge of table or counter, or touch hot surfaces.
- Do not place on or near a hot gas or electric burner, or in a heated oven.
- Extreme caution must be used when moving an appliance containing hot oil or other hot liquids.
- Do not use appliance for other than intended use.
- Ensure the machine is placed on a stable, level surface during operation.
- Keep hands and foreign objects away from the spinning head during operation.
3. Package Contents
Verify that all items are present in your package:
- 1 x Cotton Candy Machine Base
- 1 x Stainless Steel Bowl
- 1 x Bowl Cover
- 1 x Stainless Steel Sugar Scoop
- Extra Fuses
- User Manual
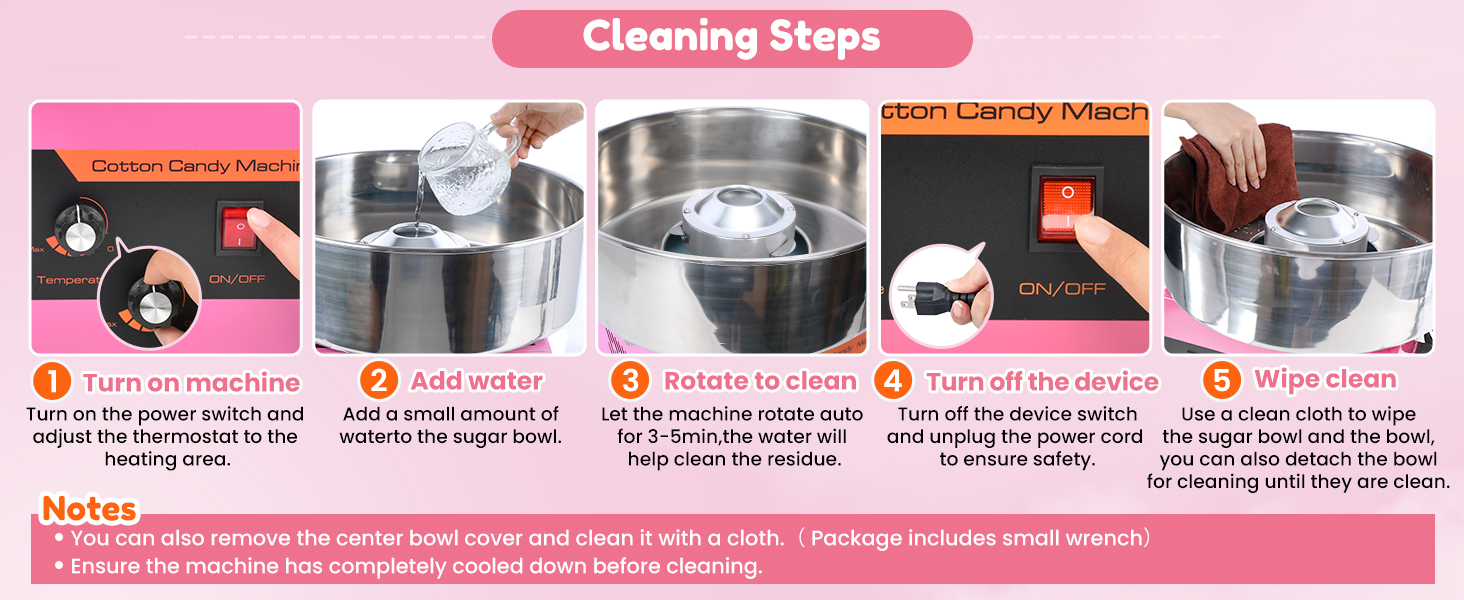
Figure 2: Exploded View of Components
4. Setup
- Unpack: Carefully remove all components from the packaging.
- Place the Machine: Position the cotton candy machine base on a stable, dry, and level surface. Ensure adequate ventilation around the machine.
- Assemble the Bowl: Place the large stainless steel bowl onto the machine base. Align the clips on the bowl with the corresponding latches on the base. Secure the bowl by lifting and engaging the two locking clips on either side of the base.
- Install the Spinning Head: Ensure the spinning head is properly seated in the center of the machine.
- Initial Cleaning: Before first use, wipe down the stainless steel bowl and spinning head with a damp cloth and mild detergent. Rinse thoroughly and dry completely.

Figure 3: Assembly Steps
5. Operation
5.1 Controls Overview
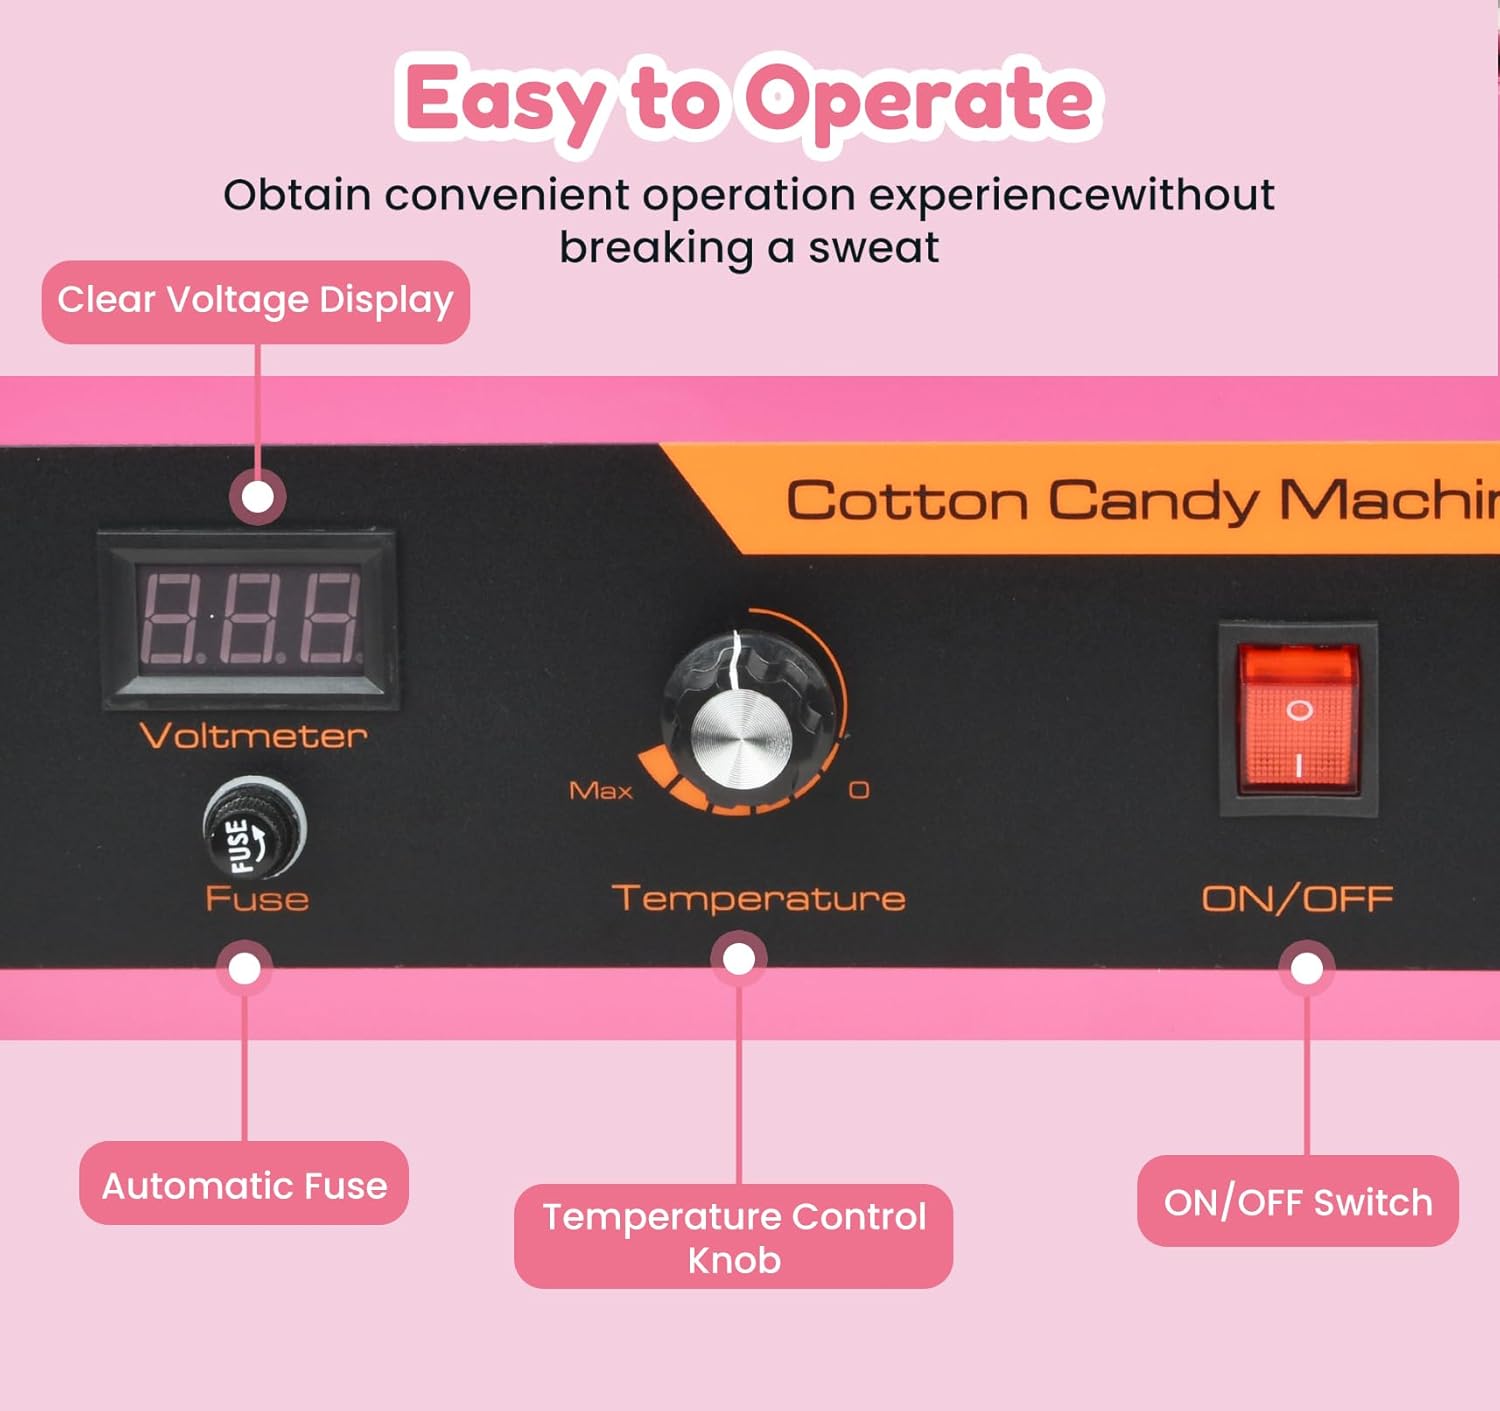
Figure 4: Control Panel
- Voltmeter: Displays the current voltage.
- Temperature Control Knob: Adjusts the heating temperature. Turn to 'Max' for preheating and adjust as needed during operation.
- ON/OFF Switch: Powers the machine on or off.
5.2 Making Cotton Candy
- Power On: Ensure the temperature control knob is set to 'Min' or 'Off'. Plug the machine into a suitable electrical outlet. Flip the ON/OFF switch to the 'ON' position.
- Preheat: Turn the temperature control knob to the 'Max' setting. Allow the machine to preheat for 3-4 minutes. The spinning head will begin to rotate and heat up.
- Add Sugar: Once preheated, carefully pour one scoop of cotton candy sugar (floss sugar, regular granulated sugar, or crushed hard candies) directly into the center of the spinning head. Do not overfill.
- Collect Cotton Candy: As the sugar melts and spins, fine strands of cotton candy will begin to emerge from the spinning head. Take a cotton candy cone or stick and hold it horizontally above the bowl, just above the spinning head. Rotate the stick to collect the cotton candy floss. Move the stick around the rim of the bowl to gather more floss.
- Adjust Temperature: If the sugar is burning or not spinning properly, adjust the temperature knob slightly lower. If production is too slow, increase the temperature slightly.
- Repeat: To make more cotton candy, add another scoop of sugar to the spinning head and repeat the collection process.
- Power Off: When finished, turn the temperature control knob to 'Min' or 'Off', then flip the ON/OFF switch to 'OFF'. Unplug the machine and allow it to cool completely before cleaning.
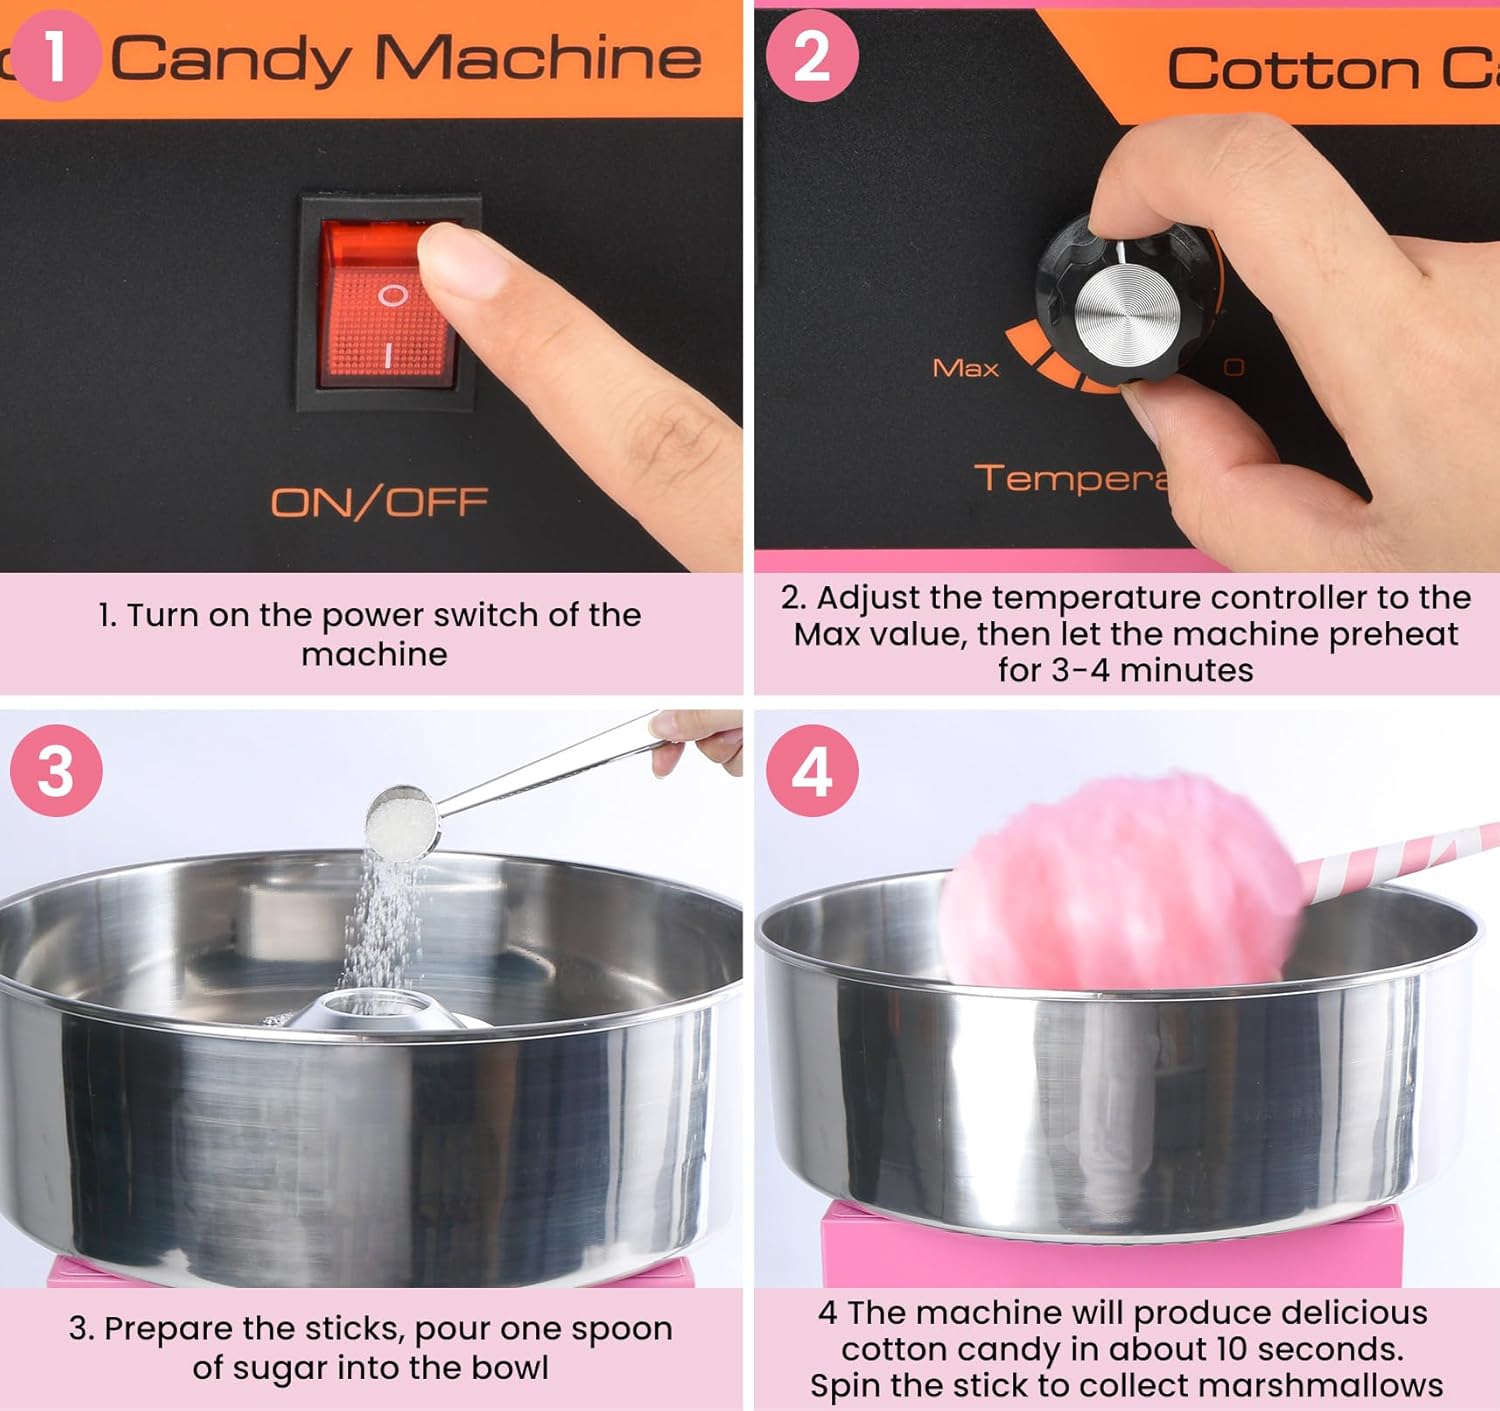
Figure 5: Cotton Candy Making Process
5.3 Instructional Videos
Video 1: Official video demonstrating the setup and operation of the Ajgvq Commercial Cotton Candy Machine, including adding sugar and collecting cotton candy.
Video 2: Official video showcasing the Ajgvq Commercial Cotton Candy Machine in use, highlighting its ease of operation.
6. Maintenance
Regular cleaning ensures optimal performance and extends the lifespan of your cotton candy machine.
- Cool Down: Always ensure the machine is completely cool before attempting any cleaning.
- Remove Bowl: Unlatch the clips and carefully remove the stainless steel bowl.
- Clean Spinning Head: For light residue, turn the machine on and pour a small amount of water into the spinning head. Let it spin for 3-5 minutes to help clean the residue. For stubborn residue, allow the machine to cool, then carefully remove the spinning head (if detachable) and clean with a damp cloth.
- Clean Bowl and Cover: Wash the stainless steel bowl and cover with warm, soapy water. Rinse thoroughly and dry completely.
- Wipe Base: Wipe the exterior of the machine base with a damp cloth. Do not immerse the base in water.
- Storage: Store the machine in a clean, dry place.
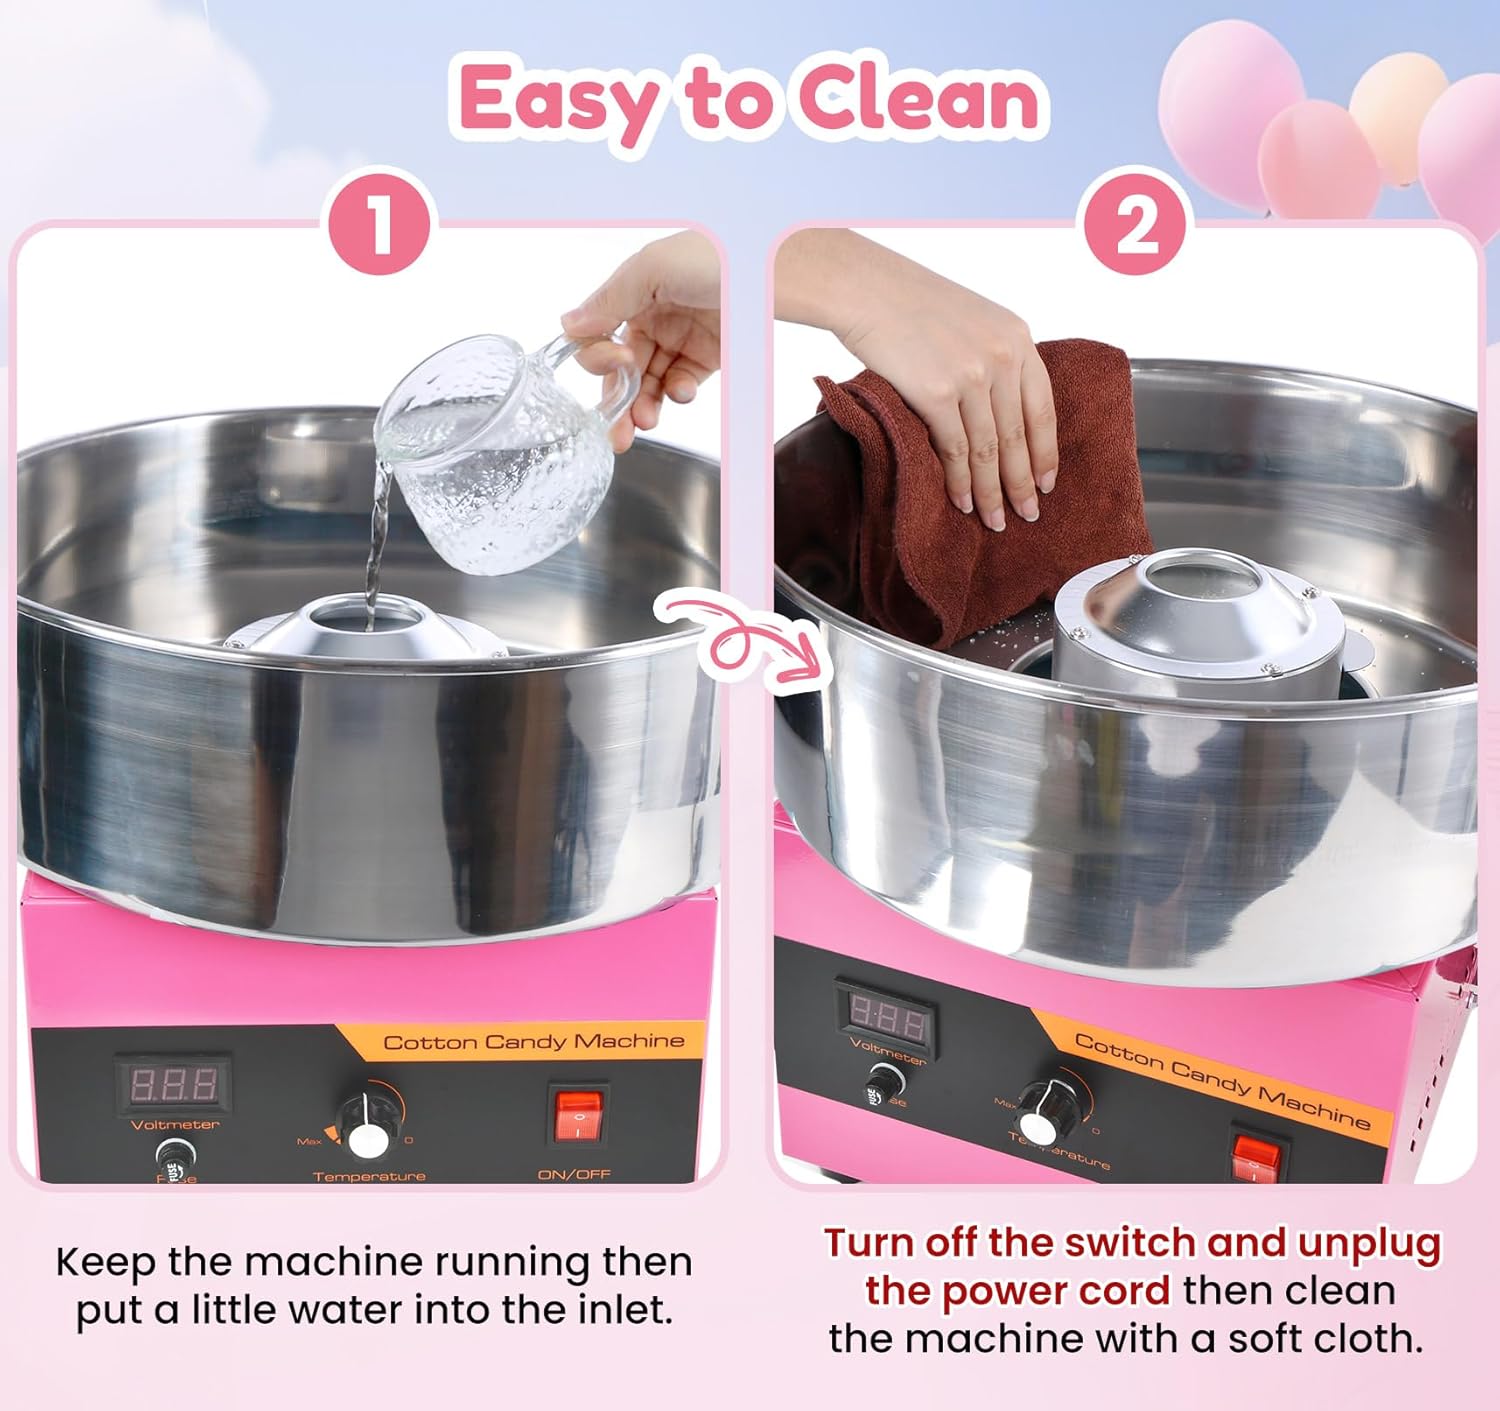
Figure 6: Cleaning the Machine

Figure 7: Detailed Cleaning Steps
7. Troubleshooting
If you encounter issues with your cotton candy machine, refer to the following common problems and solutions:
| Problem | Possible Cause | Solution |
|---|---|---|
| Machine does not turn on. | Not plugged in; power switch off; blown fuse. | Ensure power cord is securely plugged in. Check ON/OFF switch. Replace fuse if necessary (extra fuses included). |
| No cotton candy floss produced. | Insufficient preheating time; incorrect temperature setting; too much sugar added. | Allow machine to preheat for 3-4 minutes on 'Max' setting. Adjust temperature knob. Add only one scoop of sugar at a time. |
| Sugar is burning or smoking. | Temperature setting is too high. | Reduce the temperature setting using the control knob. |
| Cotton candy is hard or crystalline. | Temperature too low; insufficient preheating. | Increase temperature slightly. Ensure adequate preheating time. |
| Excessive sugar mess around the bowl. | Bowl cover not used; too much sugar added; improper collection technique. | Always use the bowl cover. Add only one scoop of sugar. Practice collecting floss by rotating the stick smoothly. |
8. Specifications
| Feature | Detail |
|---|---|
| Model Number | ZCM-02 |
| Power | 1000W |
| Motor Rotation Speed | 3500 RPM |
| Output | Up to 5 pieces/minute |
| Bowl Material | Food-grade Stainless Steel |
| Product Dimensions | 15 x 15 x 13 inches (38 x 38 x 33 cm) |
| Item Weight | 15.22 pounds (5.5 kg) |
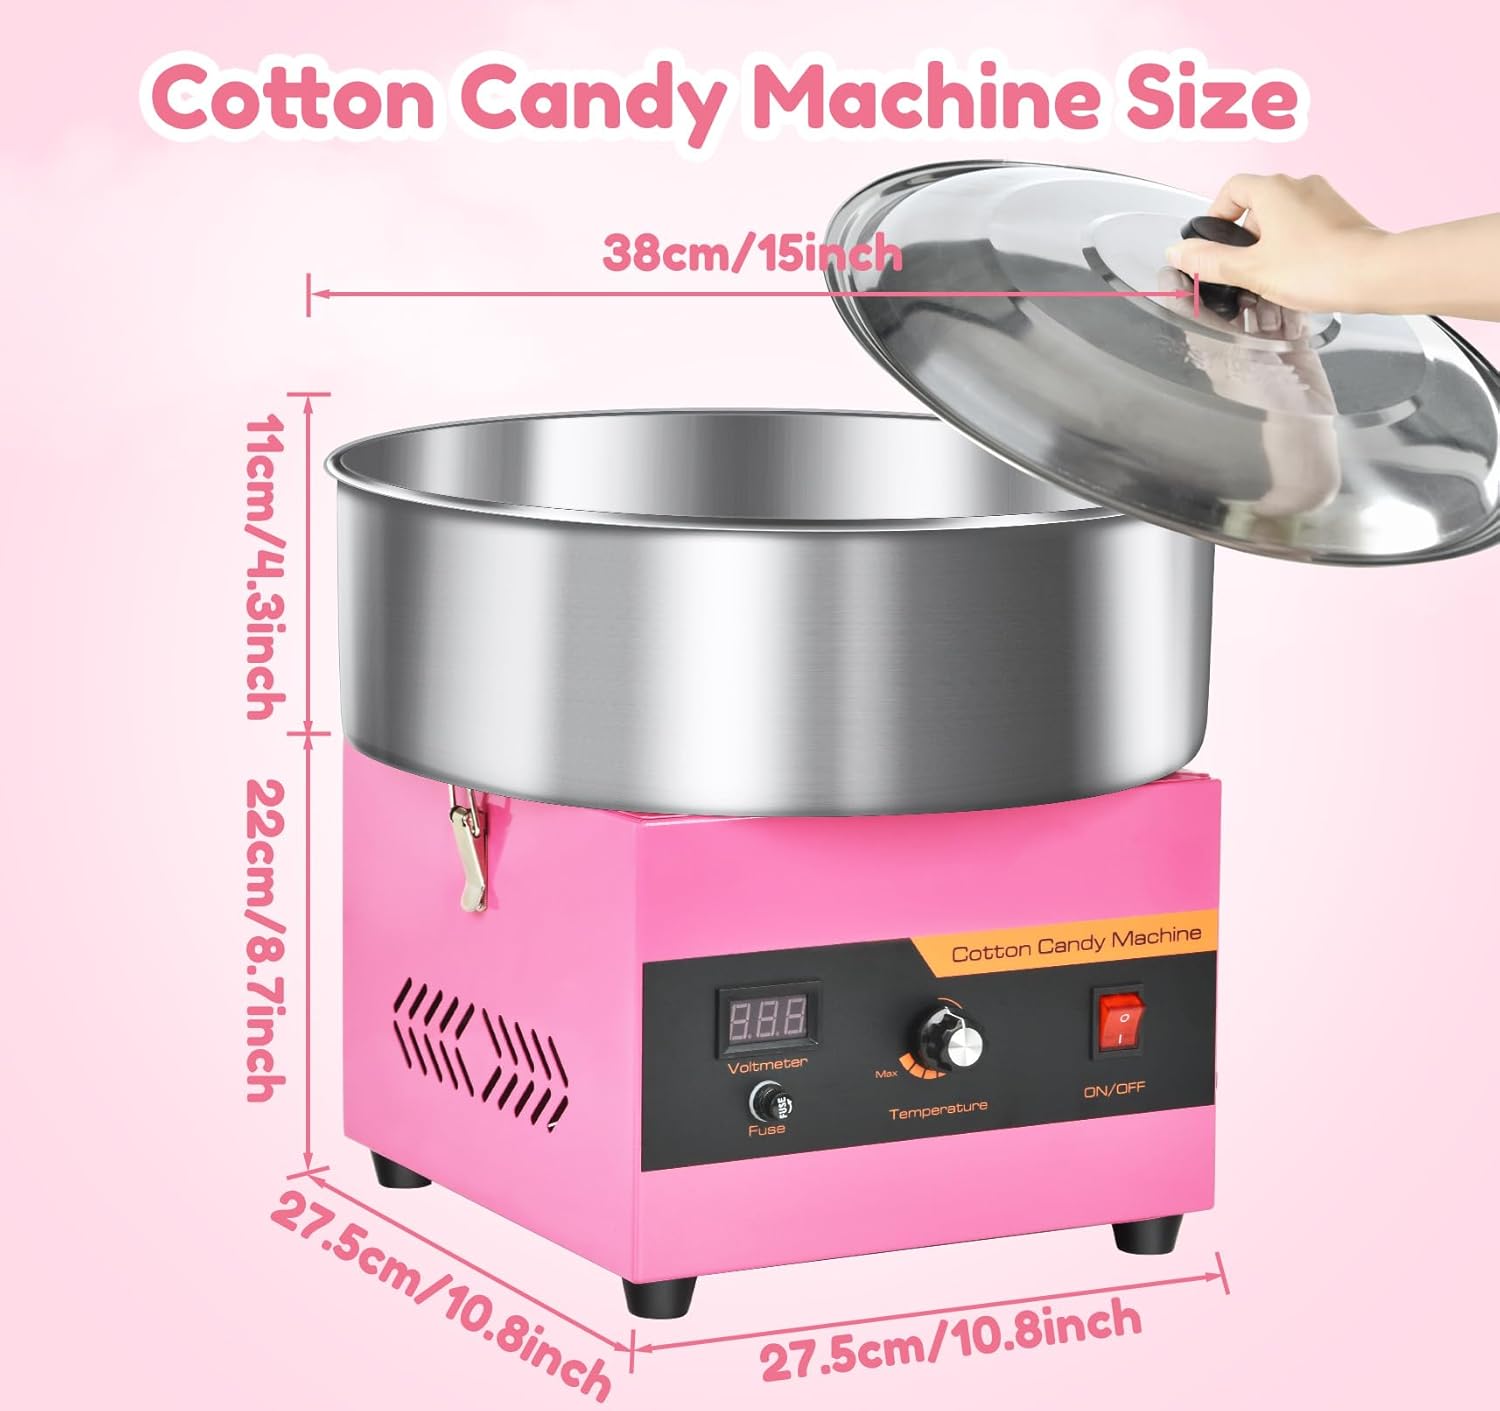
Figure 8: Product Dimensions
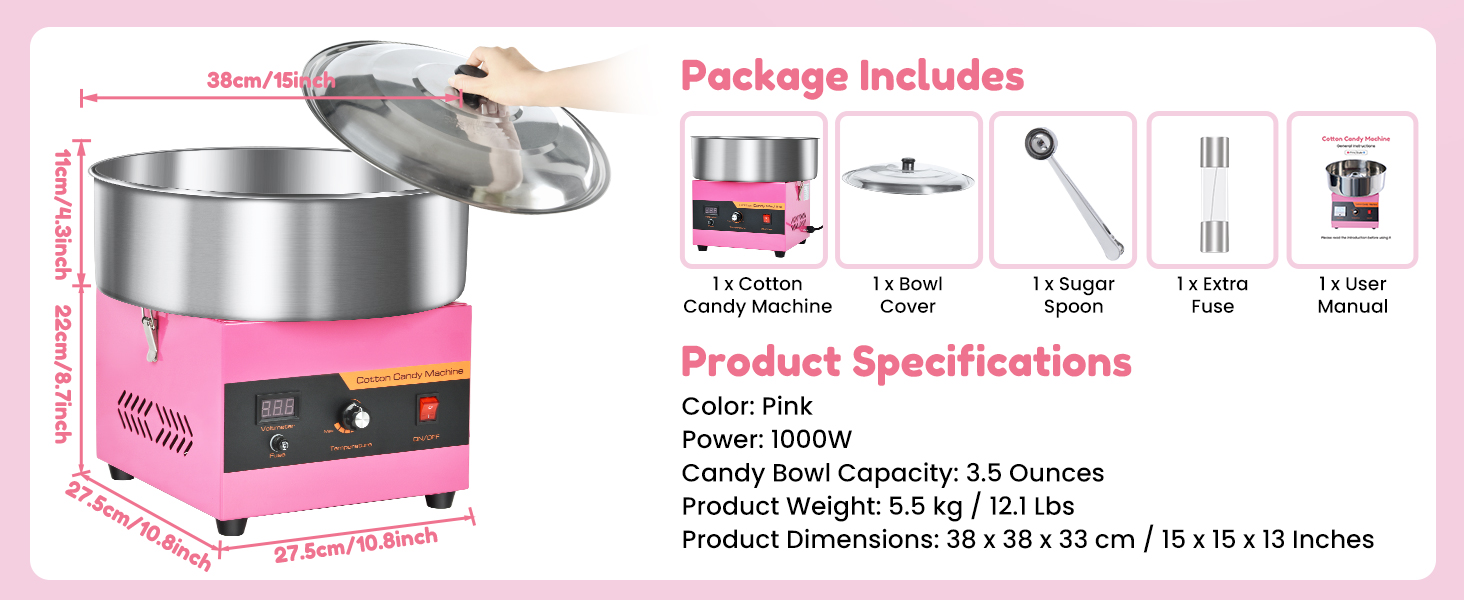
Figure 9: Specifications Overview
9. Warranty & Support
For warranty information, please refer to the documentation included with your product or contact Ajgvq customer support directly. If you encounter any issues not covered in this manual, please reach out to the manufacturer for assistance.