1. Introduction
This manual provides essential information for the safe and efficient operation of your Hisense 40E41QT 40-inch Full HD Smart TV. Please read it thoroughly before using the product and retain it for future reference.
The Hisense 40E41QT is a 40-inch Full HD LED Smart TV with a 1920x1080 resolution and a 60Hz LED panel. It features a slim design, VIDAA U8 Smart OS with integrated Wi-Fi, and a remote control providing direct access to various streaming services. It also includes a DVB-T2/S2 HEVC 10 digital terrestrial tuner and Game Mode for an enhanced viewing experience.
2. What's in the Box
Upon unpacking, please ensure all the following items are present:
- Hisense 40E41QT Television
- Power Cable
- Remote Control
- User Manual

Image: The Hisense 40E41QT 40-inch Full HD Smart TV with its stand, showcasing the display and branding.
3. Setup Guide
3.1 Physical Installation
Carefully remove the TV from its packaging. You can either place it on a flat surface using the provided stand or mount it on a wall (wall mount sold separately). Ensure proper ventilation around the TV.
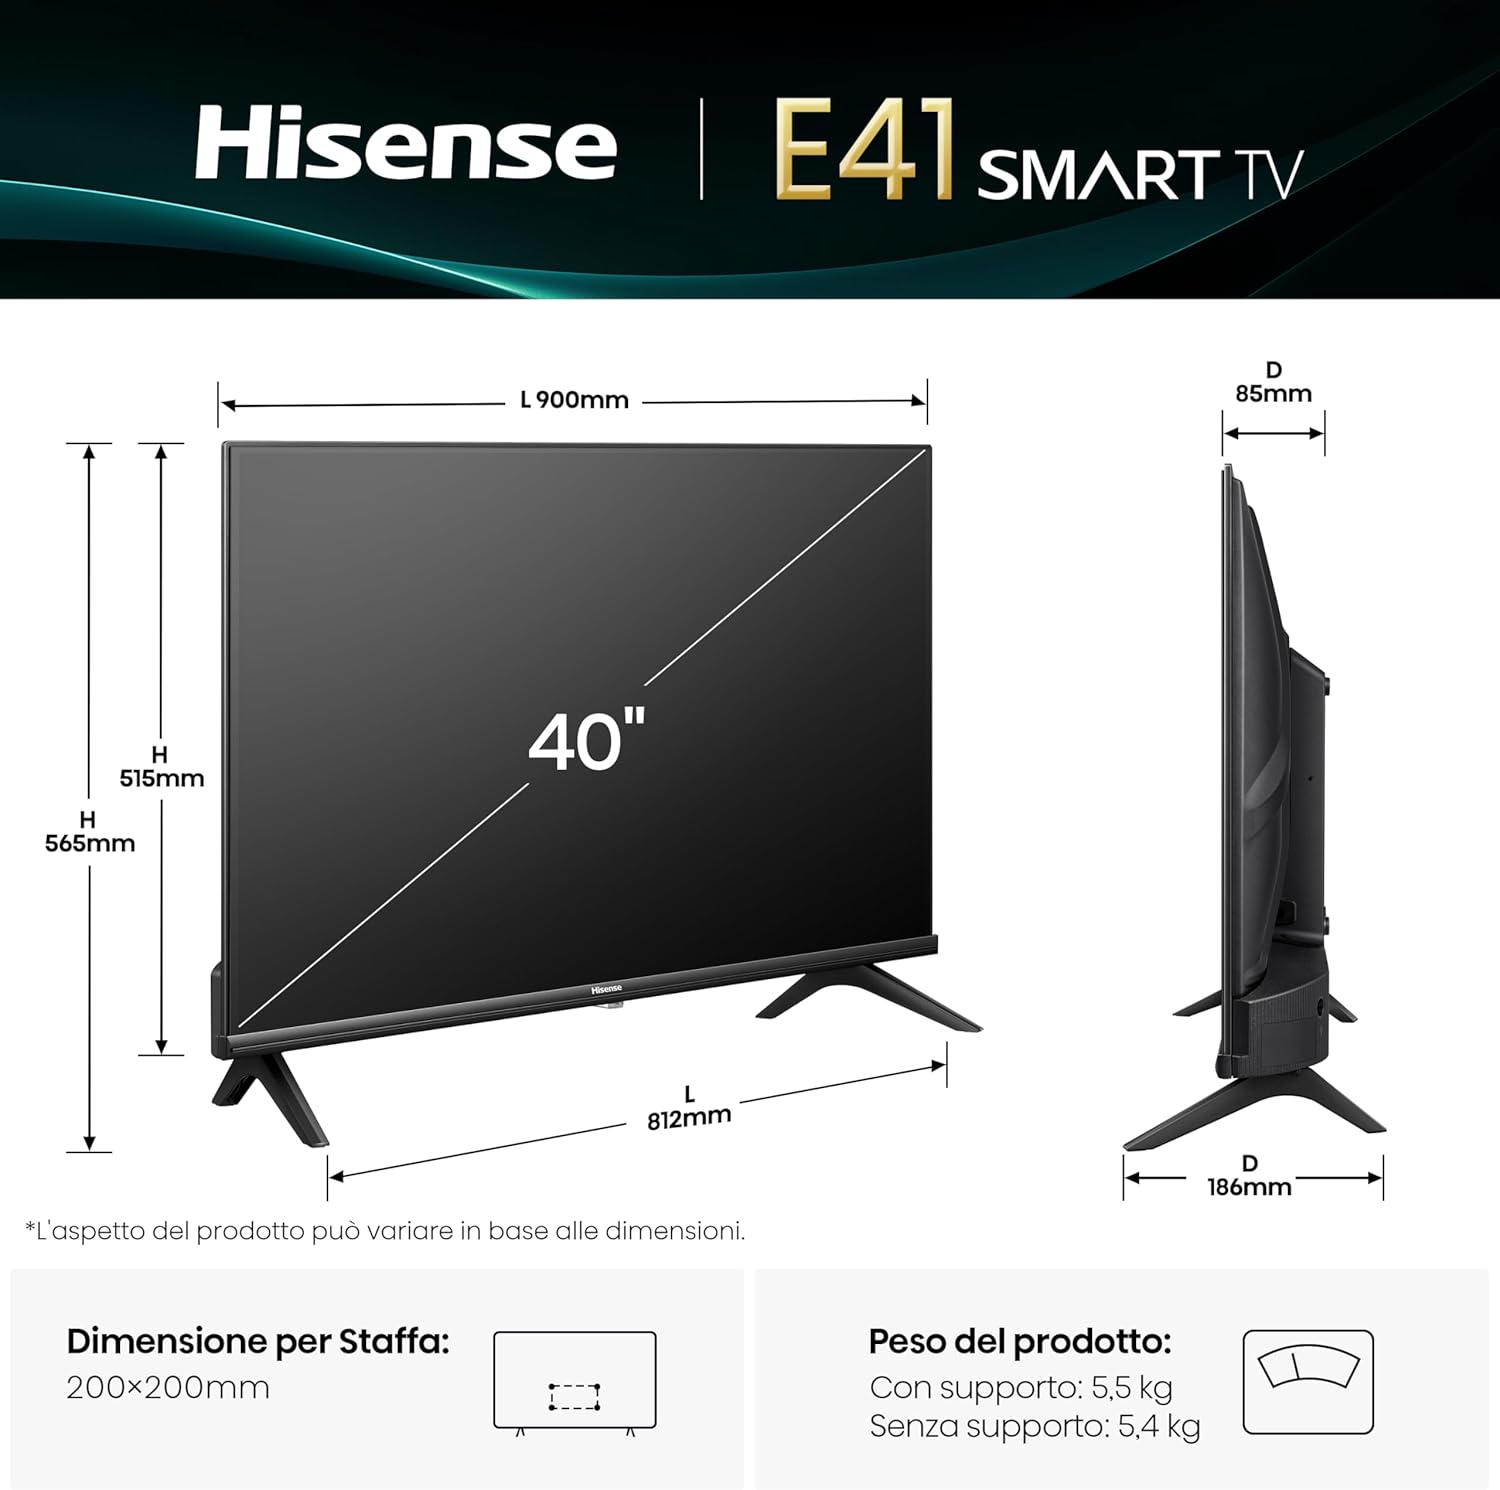
Image: Technical drawing showing the dimensions of the Hisense 40E41QT TV (900mm width, 565mm height with stand, 186mm depth with stand) and its weight (5.5 kg with stand, 5.4 kg without stand). VESA mount compatibility is 200x200mm.
3.2 Connecting Peripherals
Connect your devices to the appropriate ports on the back of the TV. Refer to the diagram below for port identification.

Image: Close-up view of the Hisense 40E41QT TV's rear connection panel, detailing ports such as USB (x2), Digital Audio Out, Headphone, ANT (x2), HDMI 2.1 (eARC), HDMI 2, and Ethernet for internet router connection.
- Power Cable: Connect the power cable to the TV and then to a wall outlet.
- Antenna/Cable: Connect your antenna or cable TV source to the ANT (x2) input.
- HDMI Devices: Use HDMI 1 (eARC) or HDMI 2 for devices like Blu-ray players, game consoles, or set-top boxes.
- USB Devices: Two USB ports are available for flash drives or other compatible USB devices.
- Ethernet: For a stable internet connection, connect an Ethernet cable from your router to the TV's Ethernet port.
- Digital Audio Out: Connect to an external sound system using an optical cable.
- Headphone: Connect headphones for private listening.
3.3 Initial Power On and Network Connection
After connecting all necessary cables, plug the TV into a power source. Press the power button on the remote control or the TV itself. Follow the on-screen instructions to complete the initial setup, including language selection, channel scanning, and connecting to your Wi-Fi network.
4. Operating Your TV
4.1 Remote Control Functions
The remote control provides access to all TV functions. Familiarize yourself with the button layout for easy navigation.

Image: The Hisense TV remote control, highlighting dedicated buttons for popular streaming services like Disney+, YouTube, Prime Video, YouTube Kids, Apple TV+, Netflix, and others, allowing for one-click access.
- Power Button: Turns the TV on or off.
- Navigation Buttons (Up/Down/Left/Right/OK): Used to navigate menus and select options.
- Volume Up/Down: Adjusts the volume level.
- Channel Up/Down: Changes TV channels.
- Home Button: Accesses the VIDAA Smart OS home screen.
- App Shortcut Buttons: Direct access to popular streaming applications (e.g., Netflix, Prime Video, YouTube).
4.2 Smart TV Features (VIDAA U8)
Your Hisense TV runs on the VIDAA U8 Smart OS, offering a wide range of applications and features.

Image: The Hisense VIDAA Smart OS home screen, displaying various streaming app icons such as Netflix, Disney+, Prime Video, YouTube, and others, indicating a user-friendly interface.
- App Store: Download and install additional applications.
- Streaming Services: Access pre-installed apps like Netflix, Prime Video, Disney+, and YouTube.
- Airplay2: Stream content directly from your Apple devices.
- Works with Alexa: Integrate with your Alexa-enabled devices for voice control.
4.3 Picture and Sound Settings
Adjust picture and sound settings to your preference via the TV's menu. The TV features:
- Natural Colour Enhancer: Optimizes color reproduction for a more vibrant image.
- Noise Reduction: Reduces visual noise for clearer images.
- Dolby Audio & DTS HD: Provides enhanced audio quality.
- Game Mode: Reduces input lag for a smoother gaming experience.

Image: A split image demonstrating the effect of Natural Colour Enhancer, showing a duller image on the left and a vibrant, enhanced image on the right, highlighting improved color saturation.

Image: A split image illustrating the Noise Reduction feature, with a grainy image on the left and a smoother, clearer image on the right, demonstrating the reduction of visual noise.

Image: A visual representation of Dolby Audio and DTS HD sound technologies, showing a drum being played with vibrant sound waves emanating, indicating immersive audio experience.

Image: A dynamic image depicting a motorcycle racer, illustrating the Game Mode feature which optimizes the TV for gaming by reducing input lag.
5. Maintenance
Proper maintenance ensures the longevity of your TV.
- Cleaning the Screen: Gently wipe the screen with a soft, dry, lint-free cloth. For stubborn marks, slightly dampen the cloth with water or a specialized screen cleaner (do not spray directly onto the screen).
- Cleaning the Cabinet: Use a soft, dry cloth to clean the TV cabinet. Avoid using abrasive cleaners or solvents.
- Ventilation: Ensure the ventilation openings on the back of the TV are not blocked to prevent overheating.
- Power Off: Always unplug the TV from the power outlet before cleaning or when it will not be used for an extended period.
6. Troubleshooting
If you encounter issues with your TV, refer to the following common problems and solutions:
| Problem | Possible Cause | Solution |
|---|---|---|
| No power | Power cable disconnected; no power from outlet. | Check power cable connection; test outlet with another device. |
| No picture, but sound is present | Incorrect input source; faulty cable. | Press the "Source" button on the remote to select the correct input; check HDMI/AV cables. |
| No sound, but picture is present | Volume muted or too low; external audio system issue. | Unmute or increase volume; check connections to external audio devices. |
| Remote control not working | Dead batteries; obstruction; remote not paired. | Replace batteries; remove obstructions; re-pair remote if necessary (refer to remote manual). |
| Cannot connect to Wi-Fi | Incorrect password; router issue; TV too far from router. | Verify Wi-Fi password; restart router; move TV closer to router or use Ethernet. |
If the problem persists after trying these solutions, please contact customer support.
7. Specifications
Key technical specifications for the Hisense 40E41QT TV:
- Model Number: 40E41QT
- Screen Size: 40 inches
- Display Technology: LED
- Resolution: 1920x1080 (Full HD)
- Refresh Rate: 60 Hz
- Aspect Ratio: 16:9
- Connectivity: Ethernet, HDMI (x2, one with eARC), USB (x2), Wi-Fi
- Special Features: Parental Controls, Frameless Design, Game Mode
- Audio Technology: Dolby Audio, DTS HD
- Smart TV Platform: VIDAA U8
- Tuner: DVB-T2/S2 HEVC 10
- Product Dimensions (with stand): 90 cm (W) x 56.5 cm (H) x 18.6 cm (D)
- Product Weight (with stand): 7.35 kg
- VESA Mount Compatibility: 200x200mm
- Energy Efficiency Class: F (SDR: 39 kWh/1000h, HDR: 50 kWh/1000h)
- Country of Origin: China
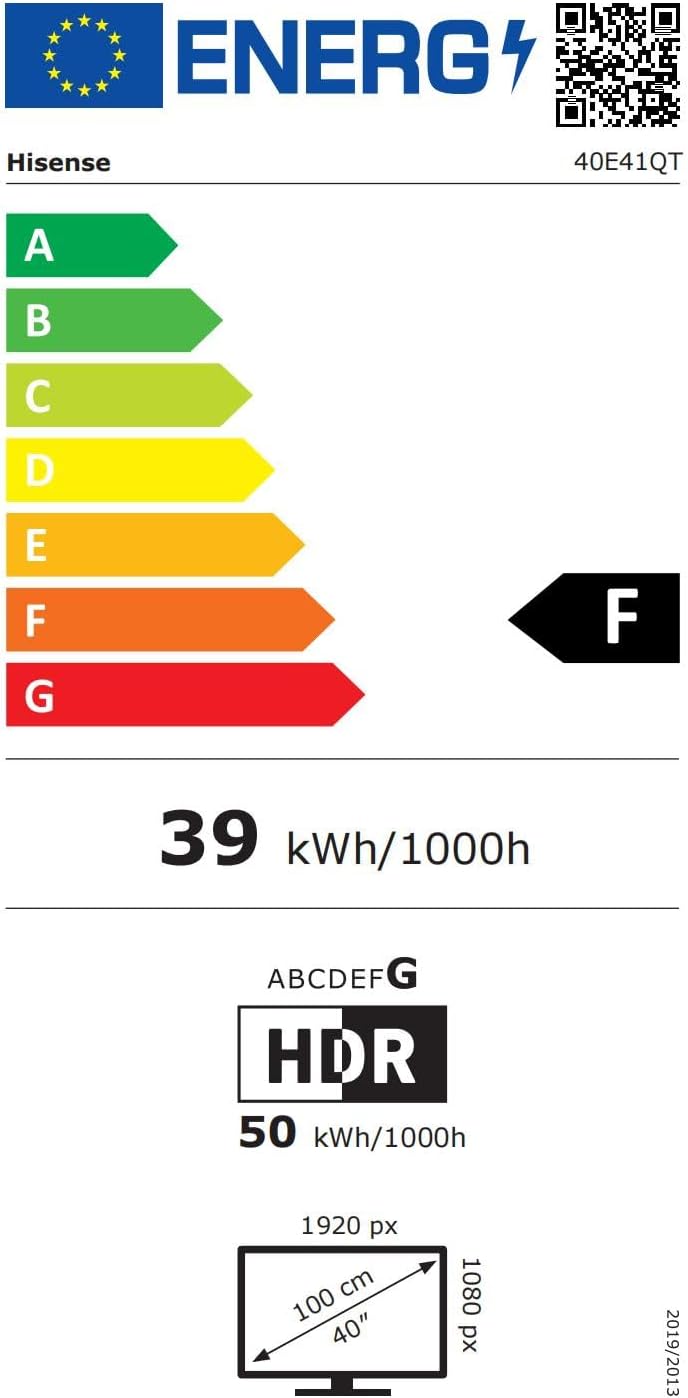
Image: The EU Energy Label for the Hisense 40E41QT TV, showing an energy efficiency class of F, with energy consumption of 39 kWh/1000h for SDR and 50 kWh/1000h for HDR.

Image: A detailed product data sheet for the Hisense 40E41QT, listing various technical parameters and compliance information.
For more detailed information, refer to the official EPREL database: https://eprel.ec.europa.eu/qr/2235691
8. Warranty and Support
Your Hisense 40E41QT TV comes with a standard warranty. Please refer to the warranty card included in the packaging for specific terms and conditions.
- Warranty Period: Typically 2 years from the date of purchase.
- Returns Policy: If you wish to return a product within 30 days of receipt because you have changed your mind, please consult the retailer's help page. For defective or damaged products, consult the retailer's help page on returns.
- Customer Service: For technical assistance or warranty claims, please contact Hisense customer support. Contact details can usually be found on the Hisense official website or in the included documentation.