
1. Introduction
This manual provides essential instructions for the assembly, operation, and maintenance of your Bellemave Metal Twin XL Loft Bed Frame. This loft bed is designed to maximize space, featuring an integrated desk with a power outlet and customizable LED lighting. Please read this manual thoroughly before assembly and use to ensure safe and correct operation.

Figure 1.1: Bellemave Metal Twin XL Loft Bed Frame with desk and LED lighting.
2. Safety Information
Adherence to these safety guidelines is crucial for preventing injury and ensuring the longevity of your loft bed.
- Weight Capacity: The upper bed has a maximum weight capacity of 350 LBS. Do not exceed this limit.
- Mattress Thickness: Use a mattress with a maximum thickness of 6 inches for the upper bed to ensure proper guardrail height.
- Guardrails: Ensure all guardrails are securely fastened before use. Guardrails are designed to prevent falls.
- Assembly: Assembly should be performed by at least two adults. Ensure all parts are correctly installed and tightened.
- Climbing: Only use the provided ladder for accessing the upper bunk. Do not use other furniture or objects to climb onto the bed.
- Regular Checks: Periodically check all bolts and connections to ensure they remain tight. Retighten as necessary.
- Children's Product Certificate (CPC): This loft bed has passed CPC testing to ensure safety for children.
3. Package Contents
Verify that all components are present before beginning assembly. Refer to the detailed parts list and hardware pack included in your product packaging. If any parts are missing or damaged, contact customer support immediately.
- Metal Bed Frame Components
- Integrated Desk Surface
- Power Outlet Unit (with 2 AC outlets and 2 USB ports)
- LED Light Strip and Remote Control
- Assembly Hardware (bolts, nuts, washers, etc.)
- Assembly Tools (e.g., Allen wrench)
- Instruction Manual
4. Setup and Assembly
Assembly is required for this product. Follow the step-by-step instructions provided in the separate assembly manual included in your package. It is recommended that two adults perform the assembly.
- Unpack: Carefully unpack all components and lay them out on a clean, soft surface to prevent scratches.
- Identify Parts: Match all parts against the included parts list.
- Assemble Frame: Begin by assembling the main metal frame structure according to the diagrams. Do not fully tighten bolts until all components are in place.
- Install Desk: Attach the desk surface to the designated frame sections.
- Install Power Outlet: Secure the power outlet unit into the pre-drilled slot on the desk. Ensure the power cord is routed safely.
- Install LED Lights: Adhere the LED light strip to the desired location, typically under the upper bunk or along the desk area, and connect it to its power source.
- Final Tightening: Once all components are assembled, systematically tighten all bolts and screws.
- Placement: Position the assembled loft bed in its desired location, ensuring it is stable and level.
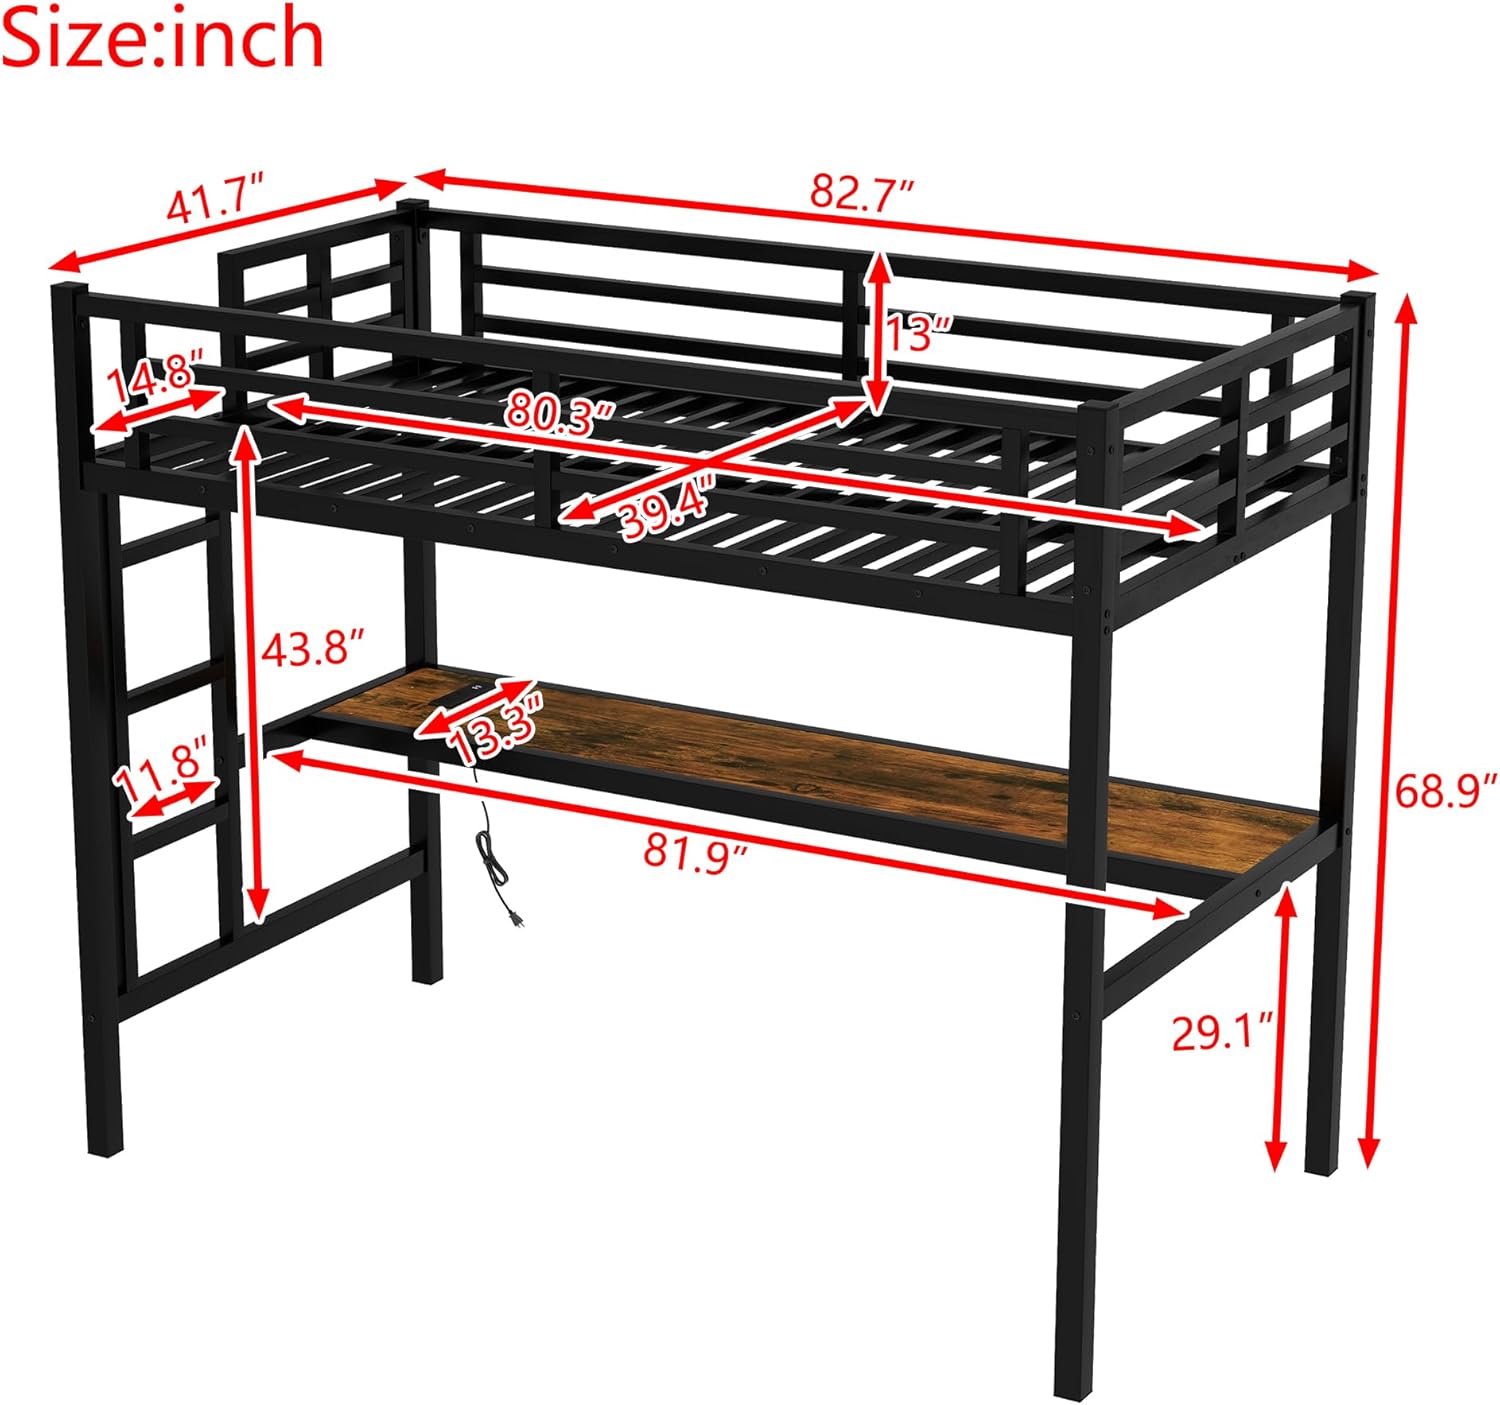
Figure 4.1: Product dimensions for planning placement.

Figure 4.2: Assembled loft bed with desk area.
5. Operating Instructions
5.1. Integrated Power Outlet
The desk features a built-in power outlet with two standard AC outlets and two USB charging ports.
- To Use: Plug the loft bed's main power cord into a wall outlet. You can then plug your electronic devices into the AC outlets or use USB cables to charge devices via the USB ports.
- Safety: Do not overload the power outlet. Ensure devices are compatible with the provided voltage and current.

Figure 5.1: Integrated power outlet with AC and USB ports.
5.2. LED Lighting System
The DIY smart light system allows for customizable lighting effects.
- Power On/Off: Use the provided remote control to turn the LED lights on or off.
- Mode Selection: The remote control allows you to cycle through various light modes, colors, and brightness levels. Refer to the LED light system's specific instructions for detailed remote functions.
- Customization: Experiment with different settings to create your preferred ambiance.

Figure 5.2: Loft bed with LED lighting in operation.
6. Maintenance
Regular maintenance helps preserve the condition and safety of your loft bed.
- Cleaning: Wipe down metal surfaces with a soft, damp cloth. Avoid abrasive cleaners or harsh chemicals that could damage the finish.
- Hardware Check: Periodically inspect all bolts, screws, and connections. Tighten any that have become loose to maintain structural integrity.
- Electrical Components: Ensure the power outlet and LED light wiring are not pinched or damaged. If any damage is observed, discontinue use and contact support.
7. Troubleshooting
This section addresses common issues you might encounter.
- Bed feels wobbly: Ensure all assembly bolts are fully tightened. Check that the bed is placed on a level surface.
- Power outlet not working: Verify that the bed's main power cord is securely plugged into a functional wall outlet. Check if the wall outlet itself is working by plugging in another device.
- LED lights not turning on: Check the connection of the LED light strip to its power source. Ensure the remote control has working batteries and is pointed directly at the receiver.
- Missing parts during assembly: Refer to Section 3. Package Contents. Contact customer support for replacement parts.
8. Specifications
| Product Type | Metal Loft Bed |
| Size | Twin XL |
| Product Material | Metal |
| Color | Black |
| Overall Product Dimension | 82.7"L x 41.7"W x 68.9"H |
| Overall Product Weight | 83.78 LBS |
| Weight Capacity | 350 LBS |
| Recommended Mattress Thickness | 6 inches |
| Assembly Required | Yes |
| Country of Origin | China |
| Special Feature | Easy Assemble |
| Item Model Number | bed-frames |
9. Warranty and Support
For any questions, concerns, or issues encountered during assembly or use of your Bellemave Metal Twin XL Loft Bed Frame, please contact Bellemave customer support. We are dedicated to serving you and will respond within 24 hours to assist with any problems.
Please retain your purchase receipt for warranty purposes. Specific warranty details may be provided with your product packaging.


