
Introduction
Thank you for choosing the Hunter Pacific Next Creation V2 DC Ceiling Fan. This manual provides essential information for the safe installation, operation, and maintenance of your new ceiling fan. Please read this manual thoroughly before installation and keep it for future reference.
The Next Creation V2 DC fan features a slim, modern design with 4 ABS polymer UV stabilised blades, an energy-efficient and quiet DC motor, and a 9-speed remote control with Summer/Winter reversible function.
Safety Information
WARNING: To reduce the risk of fire, electric shock, or personal injury, always follow these important safety instructions:
- Installation must be performed by a qualified electrician in accordance with all local and national electrical codes.
- Ensure the power is disconnected at the main circuit breaker before installation or servicing.
- The mounting structure must be capable of supporting a minimum of 15 kg (33 lbs).
- Ensure the fan blades are at least 2.3 meters (7.5 feet) from the floor and have adequate clearance from walls or other obstructions.
- Do not insert objects into the path of the rotating blades.
- Do not attempt to repair or modify the fan yourself. Contact qualified service personnel for repairs.
- This appliance is not intended for use by persons (including children) with reduced physical, sensory or mental capabilities, or lack of experience and knowledge, unless they have been given supervision or instruction concerning use of the appliance by a person responsible for their safety.
Package Contents
Carefully unpack your ceiling fan and ensure all items are present. If any parts are missing or damaged, contact your retailer immediately.
- Ceiling Fan Motor Assembly
- Fan Blades (4x ABS polymer UV stabilised)
- Downrod and Canopy
- Mounting Bracket
- 9-Speed Remote Control with Wall Mount
- Hardware Pack (screws, washers, etc.)
- User Manual (this document)

Image: Hunter Pacific Next Creation V2 DC Ceiling Fan in white, showing the main fan unit with four blades and the accompanying 9-speed remote control.
Setup and Installation
Note: Installation should only be carried out by a licensed electrician.
- Pre-Installation Check:
- Ensure the power supply is switched off at the circuit breaker.
- Verify that the mounting location can support the fan's weight and that there is sufficient clearance for the blades.
- Mounting Bracket Installation:
- Secure the mounting bracket to the ceiling joist or a suitable fan-rated outlet box using the provided screws and washers. Ensure it is firmly attached.
- Downrod and Fan Assembly:
- Feed the electrical wires from the fan motor through the downrod.
- Attach the downrod to the fan motor assembly, securing it with the pin and clevis pin.
- Carefully lift the fan assembly and hang it on the mounting bracket hook.
- Wiring Connections:
- Connect the fan's electrical wires to the household wiring according to the wiring diagram provided in the separate installation guide (typically included with the fan). Ensure all connections are secure and insulated with wire nuts.
- Canopy Installation:
- Slide the canopy up to the ceiling, covering the mounting bracket and wiring connections. Secure it with the canopy screws.
- Blade Attachment:
- Attach each fan blade to the blade arms (if separate) and then to the motor housing using the provided screws. Ensure all blades are securely fastened.

Image: Hunter Pacific Next Creation V2 DC Ceiling Fan, showing the main fan unit with four white blades and the central motor housing.
Operating Instructions
Your Hunter Pacific Next Creation V2 DC fan is operated by a 9-speed remote control.
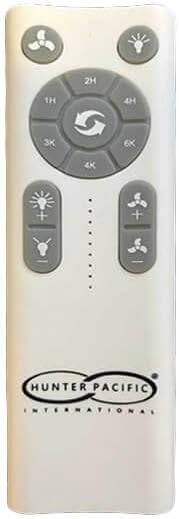
Image: The white 9-speed remote control for the Hunter Pacific ceiling fan, showing various buttons for fan speed, light control, and timer functions.
Remote Control Functions:
- Power Button: Turns the fan ON or OFF.
- Fan Speed Buttons: Adjusts the fan speed from 1 (lowest) to 9 (highest).
- Summer/Winter Mode (Reverse Function): Press this button to change the direction of the fan blades.
- Summer Mode (Counter-clockwise): Creates a downward airflow, providing a cooling effect.
- Winter Mode (Clockwise): Creates an upward airflow, circulating warm air trapped near the ceiling.
- Light Control Buttons (if applicable): Turns the fan light ON/OFF and adjusts brightness (if fan model includes a light kit).
- Timer Buttons: Sets the fan to turn off automatically after a specified duration (e.g., 1H, 2H, 4H, 6H).
Ensure the remote control has fresh batteries installed (typically 2x AAA, not included) and is within range of the fan's receiver.
Maintenance
Regular maintenance will ensure the longevity and optimal performance of your ceiling fan.
- Cleaning:
- Before cleaning, ensure the power to the fan is turned off at the circuit breaker.
- Use a soft, damp cloth to wipe down the fan blades and motor housing. Do not use abrasive cleaners or solvents, as these may damage the finish.
- Dust the blades regularly to prevent buildup, which can cause wobbling.
- Tightening Fasteners:
- Periodically check all screws and fasteners on the fan and mounting bracket to ensure they are secure. Loose connections can cause noise or wobbling.
- Blade Balance:
- If the fan wobbles excessively, check that all blades are securely attached and that they are not bent or damaged. A blade balancing kit (sold separately) can be used to correct minor wobbles.
Troubleshooting
Before contacting customer support, please refer to the following troubleshooting guide:
| Problem | Possible Cause | Solution |
|---|---|---|
| Fan does not start | No power to the fan; Loose wire connections; Remote control battery low or not paired. | Check circuit breaker; Ensure all wiring connections are secure (consult electrician); Replace remote batteries or re-pair remote (refer to remote pairing instructions). |
| Fan wobbles excessively | Loose blade screws; Unbalanced blades; Loose mounting bracket. | Tighten all blade screws; Use a blade balancing kit; Ensure mounting bracket is securely fastened to the ceiling. |
| Noisy operation | Loose screws; Motor hum; Blades hitting an obstruction. | Check and tighten all screws; Ensure fan is properly installed and balanced; Check for any obstructions near the blades. |
| Remote control not working | Low or dead batteries; Remote not paired with fan; Obstruction between remote and receiver. | Replace batteries; Follow remote pairing instructions (if applicable); Ensure clear line of sight to fan receiver. |
Specifications
| Feature | Detail |
|---|---|
| Model Name | NEXT CREATION V2 DC (NC2151) |
| Brand | HUNTER PACIFIC |
| Colour | WHITE |
| Electric Fan Design | Ceiling Fan |
| Product Dimensions | 35D x 35W x 12H centimetres (approximate, for main body) |
| Blade Span | 132 cm (52 inches) |
| Number of Blades | 4 |
| Blade Material | ABS Polymer UV Stabilised |
| Motor Type | DC Motor (Energy Efficient and Quiet) |
| Speed Settings | 9 Speed Remote Control |
| Reversible Function | Summer/Winter Mode via Remote |
| Mounting Type | Ceiling Mount |
| Item Weight | 6 Kilograms |
| Included Components | 9 Speed Remote |
Warranty and Support
For warranty information, please refer to the warranty card included with your product or visit the official Hunter Pacific website. For technical support, troubleshooting assistance beyond this manual, or to inquire about replacement parts, please contact your retailer or Hunter Pacific customer service directly.
Keep your proof of purchase for warranty claims.


