1. Introduction
This manual provides detailed instructions for the setup, operation, maintenance, and troubleshooting of your Gpxhbcb 13.3-Inch AI Smart Facial Skin Analyzer Machine. This device is designed for professional skin analysis, utilizing advanced imaging and AI technologies to detect and analyze various skin conditions. Please read this manual thoroughly before operating the machine to ensure proper use and optimal performance.
2. Safety Information
Observe the following safety precautions to prevent damage to the device or injury to users.
- Ensure the device is placed on a stable, level surface to prevent tipping.
- Connect the power cord to a grounded electrical outlet with the correct voltage (100/240V, 50/60Hz).
- Do not expose the device to water or excessive moisture.
- Avoid direct exposure to sunlight or extreme temperatures.
- Do not attempt to open or repair the device yourself. Refer all servicing to qualified personnel.
- Keep the device out of reach of children.
- Clean the device regularly as instructed in the Maintenance section.
3. Package Contents
Verify that all items are present in the package:
- 1 x Gpxhbcb 13.3-Inch AI Smart Facial Skin Analyzer Machine
- 1 x Power Adapter
- 1 x USB 3.0 High-speed Information Transmission Cable
- User Manual (this document)
4. Product Features
The Gpxhbcb AI Smart Facial Skin Analyzer Machine incorporates advanced technologies for comprehensive skin assessment:
- High-Definition Imaging: Features 38 million high-definition pixels for detailed facial skin image acquisition.
- 8-Spectrum Imaging Technology: Utilizes eight distinct light sources for in-depth analysis of various skin layers and conditions.
- AI Deep Learning Technology: Employs artificial intelligence and deep learning for accurate identification and analysis of skin problems.
- 3D Simulation Technology: Provides a three-dimensional view of skin conditions for enhanced visualization.
- Cloud Computing & Storage: Supports unlimited customer file management and cloud database uploads, allowing remote access and data backup.
- AI High-Speed Face Recognition: Enables quick and efficient client identification.
- Multi-Language Support: Offers twelve language options for diverse user preferences.
- Comprehensive Data Analysis: Provides objective and accurate data analysis across 14 key indicators in approximately 20 seconds.
- Concealed Light Shield: Effectively blocks external light sources to improve image quality and reduce analysis errors.

Figure 4.1: Overview of the machine's core features, including high-definition imaging, cloud capabilities, and AI integration.

Figure 4.2: Detailed view of the 38 million pixel camera, 2K HD display, concealed light shield, and high-speed data cable.
5. Setup
5.1 Unpacking and Placement
- Carefully remove all components from the packaging.
- Place the main unit on a stable, flat surface in a well-ventilated area, away from direct sunlight or heat sources.
- Ensure there is sufficient space around the device for proper operation and air circulation.
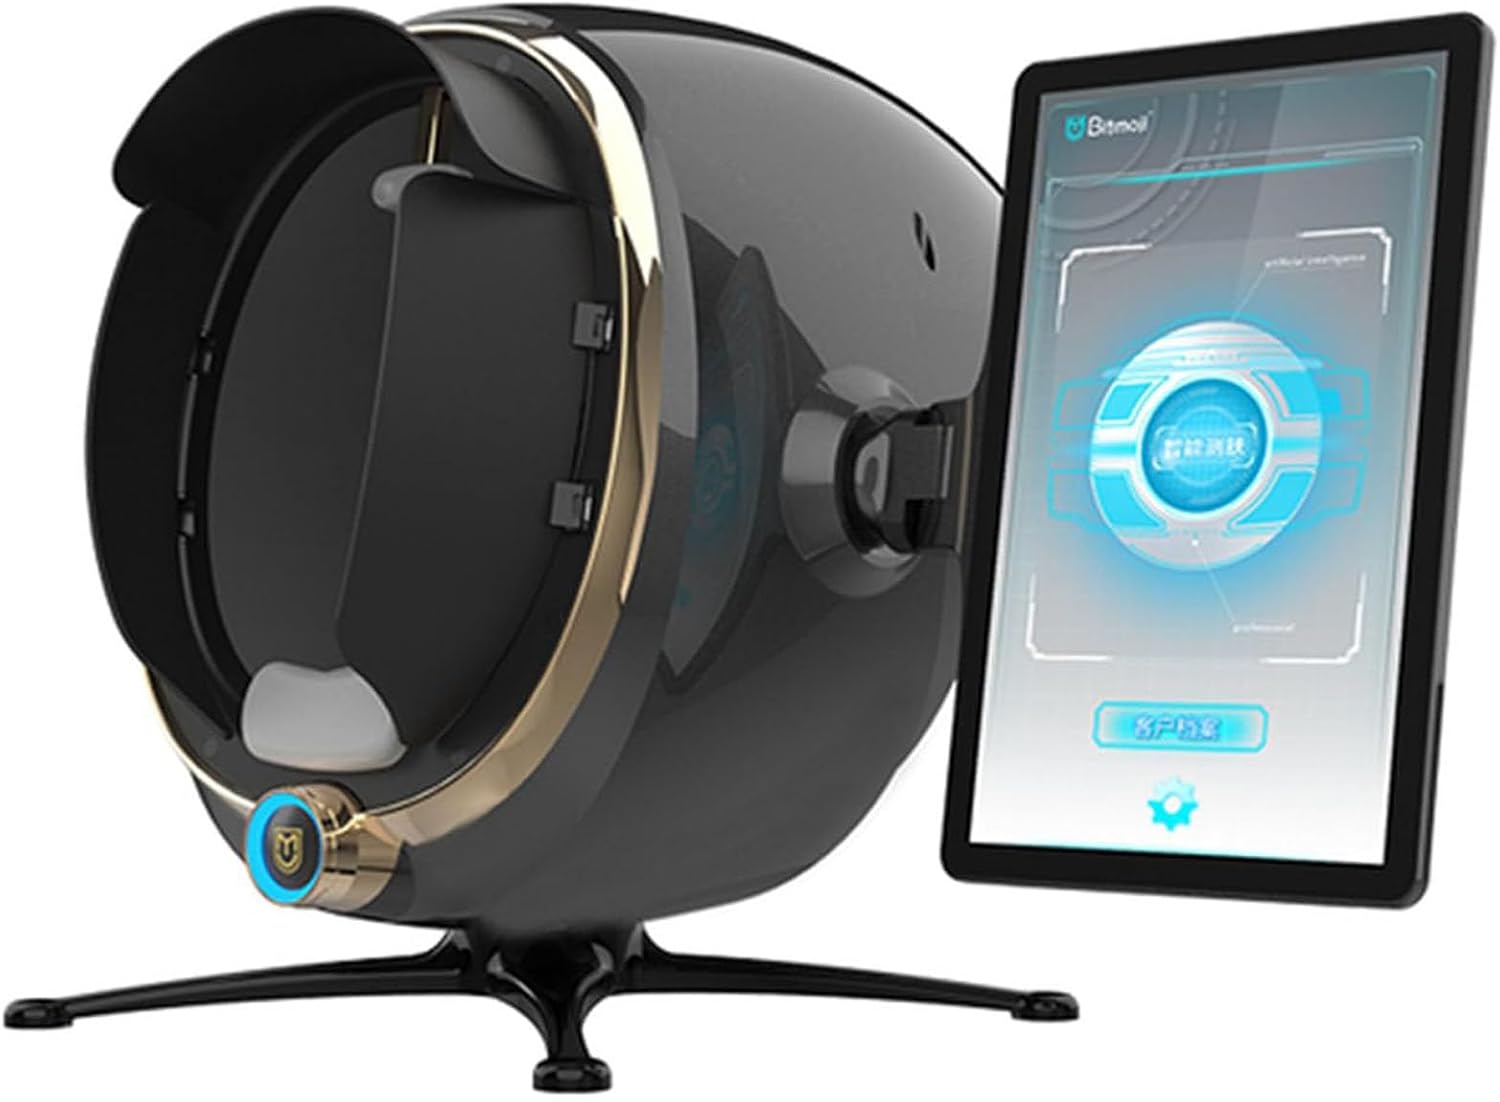
Figure 5.1: The Gpxhbcb Skin Analyzer Machine, illustrating its compact design and integrated display.
5.2 Power Connection
- Connect the power adapter to the power input port on the back of the machine.
- Plug the power adapter into a suitable grounded electrical outlet.
5.3 Initial Power On
- Press the power button, usually located on the front or side of the main unit.
- The display screen will illuminate, and the system will begin its startup sequence.
- Follow any on-screen prompts for initial setup, such as language selection or network configuration.
6. Operating Instructions
6.1 User Interface Navigation
The machine features a 13.3-inch display with a user-friendly interface. Navigate through menus and options using the touchscreen or any provided physical controls.
6.2 Performing a Skin Analysis
- Client Preparation: Ensure the client's face is clean and free of makeup or heavy creams for accurate results.
- Positioning: Guide the client to place their face comfortably into the analysis chamber, ensuring proper alignment with the camera.
- Start Analysis: Select the 'Start Analysis' option on the display. The machine will automatically capture images using its 8-spectrum technology.
- Data Processing: The AI system will process the captured images, performing a comprehensive analysis of 14 key skin indicators within approximately 20 seconds.

Figure 6.1: Illustration of the 8-spectrum imaging technology, showing how different light sources reveal various skin conditions.
6.3 Interpreting Analysis Results
The machine provides detailed reports on 14 indicators, including:
- Moisture
- Pigment
- Sensitivity
- Dark Circles
- Sebum Membrane
- UV Spots
- Collagen Fibers
- Color
- Pigmentation
- Wrinkle
- Acne
- Pores
- Sebum
The 3D simulation technology allows for a clear visualization of skin texture and conditions on the surface and deeper layers.

Figure 6.2: The 14 key skin indicators analyzed by the device for a comprehensive assessment.

Figure 6.3: Examples of skin conditions detected and analyzed by the machine.
6.4 Managing Data and Reports
The machine supports unlimited customer file management and cloud storage. Analysis reports can be uploaded to the cloud database, allowing clients to view their reports by scanning a QR code, providing a comprehensive understanding of their skin conditions over time.

Figure 6.4: Examples of AI-powered precise analysis reports, including moisture, surface, depth, and 3D simulations.
6.5 Language Selection
To change the display language, navigate to the settings menu on the touchscreen. The machine supports twelve languages, allowing you to select the preferred language for operation.

Figure 6.5: The machine's multi-language support and comprehensive analysis capabilities.
7. Maintenance
7.1 Cleaning the Device
- Exterior: Wipe the exterior surfaces of the machine with a soft, dry cloth. For stubborn marks, use a slightly damp cloth with a mild, non-abrasive cleaner.
- Display Screen: Use a microfiber cloth specifically designed for electronic screens to clean the display. Avoid harsh chemicals or abrasive materials.
- Analysis Chamber: Gently clean the interior of the analysis chamber and camera lens with a soft, lint-free cloth. Ensure no dust or debris obstructs the camera.
- Always ensure the device is powered off and unplugged before cleaning.
7.2 Software Updates
Periodically check for software updates to ensure optimal performance and access to the latest features. Updates may be available through the device's network connection or via a USB drive, as instructed by the manufacturer.
7.3 Storage
When not in use for extended periods, store the machine in a cool, dry place, protected from dust and direct sunlight. It is recommended to cover the device to prevent dust accumulation.
8. Troubleshooting
This section addresses common issues you might encounter. If the problem persists, contact customer support.
- Machine does not power on:
- Check if the power cord is securely connected to both the machine and the electrical outlet.
- Verify that the electrical outlet is functioning correctly.
- Display screen is blank or unresponsive:
- Restart the machine.
- Ensure the power connection is stable.
- Analysis results are inaccurate or inconsistent:
- Ensure the client's face is clean and properly positioned within the analysis chamber.
- Check for any obstructions on the camera lens or within the chamber.
- Verify that the room lighting is consistent and not interfering with the analysis.
- Cannot connect to cloud storage or network:
- Check your internet connection.
- Verify network settings on the machine.
9. Specifications
| Feature | Specification |
|---|---|
| Product Name | Smart Skin Analyzer |
| Voltage | 100/240V, 50/60Hz |
| Display Size | 13.3 inches |
| Display Resolution | 1920*1080 |
| Camera Pixels | 38 million |
| Internal Storage | 64GB |
| Weight | 9.4 kg (20.7 lbs) |
| Packing Size | 54 x 55 x 66 cm (21.3 x 21.7 x 26 inches) |
| Functions | Skin wrinkle analysis, pigmentation analysis, acne analysis, skin moisture detection, etc. |
| Item Weight (Shipping) | 22 pounds |
| Package Dimensions (Shipping) | 3.94 x 3.94 x 3.94 inches |
10. Warranty and Support
For warranty information and technical support, please refer to the documentation provided with your purchase or contact your vendor. Keep your purchase receipt as proof of purchase.


