
1. Product Overview
The Temank 6500W Split-Phase Solar Inverter is a versatile power solution designed for off-grid backup and self-use applications. It features a built-in 140A MPPT controller and supports both split-phase and single-phase pure sine wave output. This inverter can deliver 120V and 240V simultaneously and offers parallel operation capabilities, allowing expansion up to 39kW with up to 6 units. It is compatible with various battery types, including AGM, Gel, Lead-acid, Lithium-ion, and LiFePO4, and supports batteryless operation.

Image 1.1: Front view of the Temank 6500W Split-Phase Solar Inverter, showcasing its display and robust casing.
Key Features:
- Split-Phase and Single-Phase Output: Supports 120V/240V output from a single unit.
- Parallel Operation: Expandable up to 6 units for a total of 39kW.
- Integrated MPPT Controller: Dual 140A (70*2) MPPT controller with 99.9% efficiency.
- Wide PV Input Range: Max. PV Input Power 10kW (5000W*2), Max. PV Input Voltage 550Vdc.
- Battery Compatibility: Compatible with AGM, Gel, Lead-acid, Lithium-ion, and LiFePO4 batteries, including batteryless operation.
- Multiple Charging Modes: Offers PV only, Mains first, PV first, and Mains + PV charging modes.
- Comprehensive Protection: Includes short circuit, over-current, over-under voltage, overload, backfill, and over-temperature protection.
- Smart Monitoring: Supports CAN, USB, and RS485 communication, with optional Wi-Fi/GPRS module for app monitoring.
2. Specifications
This section details the technical specifications of the 6500W Split-Phase Solar Inverter.

Image 2.1: Detailed solar panel specifications and wiring diagram for the inverter.
| Feature | Detail |
|---|---|
| Rated Output Power | 6500W (continuous), 13000W (surge) |
| Rated Output Voltage | 120/240Vac (split phase/single phase) |
| Switch Time | 10ms |
| Max. PV Input Power | 10KW (5000W*2) |
| Max. PV Input Voltage | 550Vdc |
| Max. PV Input Current | 18A per MPPT (Dual MPPT) |
| PV Starting Voltage | > 150V |
| PV Wire Size | 12~10AWG |
| Battery Nominal DC Voltage | 48V DC |
| Maximum Charging Current | 140A |
| Communication Interfaces | CAN, USB, RS485 |
| Package Dimensions | 23.23 x 16.54 x 5.51 inches |
| Item Weight | 41.6 pounds |
3. Setup and Installation
3.1 Safety Precautions
- Ensure all power sources are disconnected before installation or maintenance.
- Only qualified personnel should perform electrical installations.
- Do not connect the positive or negative terminal of the solar panel to the ground.
- This inverter is compatible only with PV module types of single crystalline and polycrystalline.
3.2 Connection Diagrams
The inverter supports both split-phase and single-phase configurations. Refer to the diagrams below for proper wiring.
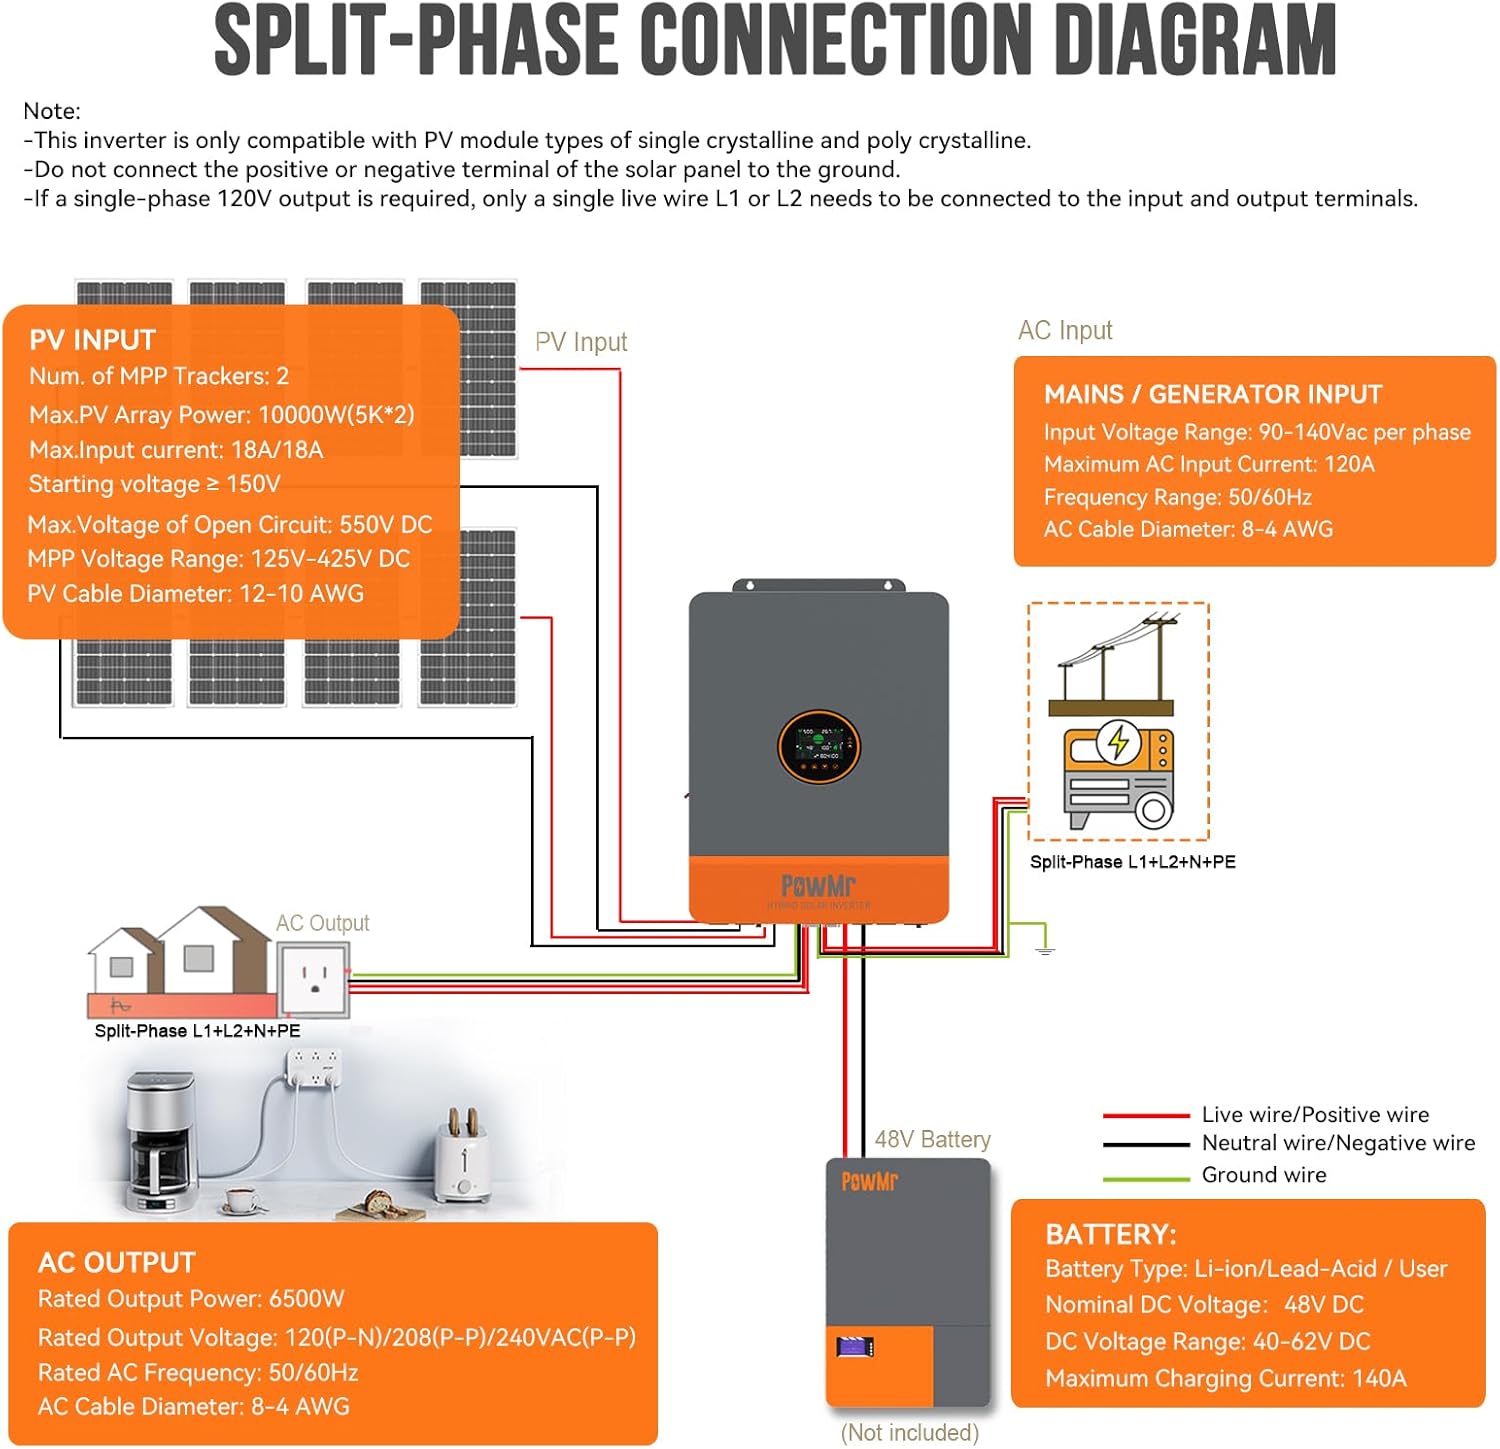
Image 3.1: Wiring diagram for split-phase operation (L1+L2+N+PE) showing PV input, AC input, AC output, and battery connections.

Image 3.2: Wiring diagram for single-phase operation (L1+N+PE) showing PV input, AC input, AC output, and battery connections.
For single-phase 120V output, only a single live wire (L1 or L2) needs to be connected to the input and output terminals.
3.3 Parallel Operation
The inverter supports parallel operation for increased power output, allowing up to 6 units to be connected for a maximum of 39kW. This configuration enables flexible system expansion.

Image 3.3: Various parallel configurations for the inverter, including two, three, and six units.
3.4 Battery Connection and Compatibility
The inverter is compatible with a range of 48V batteries and supports batteryless operation, where loads can be powered directly from PV or AC without a battery connected.

Image 3.4: Illustration of the inverter's compatibility with various 48V battery types and its batteryless operation capability.
For Lithium-ion batteries, the inverter includes a dual activation function. If the Li-ion battery is dormant, access to mains or photovoltaic power supply can trigger its activation.
4. Operating Instructions
4.1 LCD Display and Monitoring
The inverter features an LCD HD display screen for real-time monitoring of photovoltaic system operating data. This allows users to view critical information such as power input, output, battery status, and operational modes.

Image 4.1: Examples of data displayed on the inverter's LCD screen, including PV input, AC output, and battery charge levels.
4.2 Charging Modes
The inverter offers four selectable charging modes to optimize power management:

Image 4.2: Visual representation of the four charging modes and their priorities.
- Solar First: Priority is given to charging by PV. Mains charging will start only when PV has failed.
- Mains First: Priority is given to charging by Mains Power. Charging with PV power will start only when the Mains has failed.
- Hybrid Charging: Hybrid charging of PV and Mains Power. Priority is given to MPPT charging, and supplementary Mains Power is used if PV energy is insufficient. If PV energy is sufficient, Mains Power charging will stop.
- Only Solar: Only PV charging is initiated; no mains charging occurs.
4.3 Load Output Modes
The inverter provides four output modes to manage power delivery to loads:

Image 4.3: Visual representation of the four load output modes and their priorities.
- Solar First: PV and battery will power the load. Switches to Mains Power when PV fails.
- Mains First: Switches to inverter power supply only when Mains Power has failed.
- Inverter First: Switches to Mains Power supply only when the battery is under-voltage.
- Hybrid Output: In utility bypass state, when no battery is connected or when the battery is full, the load power is supplied by the PV and the utility together if the hybrid function is enabled, and surplus PV energy is fed back to the grid if the grid connection function is enabled.
4.4 ECO Mode and High-Wattage Output
The inverter features an ECO mode for power saving, which reduces no-load loss. When enabled, if the load is below 50W, the inverter output is delayed for 5 minutes and then turned off. To resume output, press the "ON" button after the hull switch is in the "OFF" state.

Image 4.4: Illustration of high-wattage output for demanding appliances and the functionality of ECO mode.
4.5 Sectional Charging/Discharge Function (Peak-Valley Electricity Tariff)
With time slot control, you can set the priority of using mains and battery power according to the time slot, in conjunction with local peak and valley electricity tariffs.

Image 4.5: Explanation of sectional charging and discharge functions, allowing users to set priorities based on electricity tariffs.
- Sectional Charging Function: When enabled, the power supply mode changes to BT1ST, enabling mains power charging only during the set charging period or when the battery is discharged. Users can freely set three definable periods for mains charging within 00:00 to 23:59.
- Sectional Discharge Function: When enabled, the power supply mode changes to AC1ST, and the system switches to battery inverter power supply only during the set discharge period or when mains power is off. Users can freely set three definable periods for battery discharge within 00:00 to 23:59.
5. Maintenance
Regular maintenance ensures optimal performance and longevity of your solar inverter.
- Cleaning: Periodically clean the inverter's exterior and ventilation openings to prevent dust buildup, which can affect cooling. Use a dry, soft cloth.
- Connection Checks: Regularly inspect all electrical connections (PV, battery, AC input/output) for tightness and signs of corrosion. Loose connections can lead to overheating or system malfunction.
- Environmental Conditions: Ensure the inverter is operating within its specified temperature and humidity ranges. Avoid exposing it to direct sunlight, rain, or excessive moisture.
- Firmware Updates: Check the manufacturer's website or SmartESS app for any available firmware updates to ensure your inverter has the latest features and bug fixes.
6. Troubleshooting
This section provides guidance on common issues you might encounter with your inverter.
6.1 Error Codes and Indicators
Refer to the inverter's LCD display for any error codes or warning indicators. Consult the full product manual (if available from the manufacturer) for a comprehensive list of codes and their meanings.
6.2 Common Issues and Solutions
- No Power Output:
- Check if the AC input breaker is tripped.
- Verify battery connections and charge level.
- Ensure PV input voltage is above the starting voltage (>150V).
- Check for any overload conditions on the output.
- Inverter Not Charging Batteries:
- Confirm PV panels are receiving sufficient sunlight and are connected correctly.
- Check the selected charging mode (e.g., 'Only Solar' requires PV).
- Verify battery voltage and health.
- Overload Protection Triggered:
- Reduce the total load connected to the inverter.
- Check for short circuits in the load wiring.
- Communication Issues (SmartESS App):
- Ensure the optional Wi-Fi/GPRS module is correctly installed and powered.
- Verify network connectivity for the module and your smartphone.
- Confirm the app is updated to the latest version.
If issues persist after attempting these solutions, please contact customer support.
7. Monitoring and Control (SmartESS App)
The Temank 6500W Solar Inverter can be monitored and controlled remotely via the SmartESS App. This requires an optional Wi-Fi/GPRS data acquisition module, which needs to be purchased separately.

Image 7.1: Screenshot showing the SmartESS App interface for monitoring solar energy data and inverter status.
7.1 App Download
The SmartESS App is available for download on both the App Store (for iOS devices) and Google Play (for Android devices).
- For iOS: Search for "SmartESS" in the Apple App Store.
- For Android: Search for "SmartESS" in the Google Play Store.
The Wi-Fi/GPRS data acquisition module typically includes a QR code (e.g., Q2721100111238) for easy setup and connection with the app.
8. Warranty and Support
8.1 Product Warranty
Please refer to the warranty card included with your product or contact Temank customer service for detailed warranty information. Standard warranty terms typically cover manufacturing defects for a specified period from the date of purchase.
8.2 Customer Support
For technical assistance, troubleshooting, or warranty claims, please contact Temank customer support through their official website or the contact information provided in your product packaging. When contacting support, please have your product model number (POW-SunSmart 6.5KP-1) and purchase details readily available.