
1. Introduction
This manual provides essential instructions for the safe and efficient operation of your ACMER P1 S Pro 6W Laser Engraver Machine. Please read this manual thoroughly before assembly, operation, or maintenance to ensure proper usage and to prevent damage or injury.

Image 1.1: The ACMER P1 S Pro 6W Laser Engraver Machine with example engravings on wood and metal.
2. Safety Information
Operating a laser engraver requires strict adherence to safety protocols. This device is a Class 4 laser product and can cause serious injury if not handled correctly.
- Eye Protection: Always wear the provided protective laser glasses (97% UV filtering) during operation. Never look directly at the laser beam.
- Ventilation: Operate the machine in a well-ventilated area to dissipate fumes and smoke produced during engraving and cutting.
- Movement Protection: The machine features movement protection that automatically shuts down the laser if unexpected movement is detected.
- Emergency Stop: Familiarize yourself with the power on/off button for quick shutdown in emergencies.
- Material Safety: Ensure materials being processed are safe for laser engraving/cutting and do not produce toxic fumes or ignite easily.
- Supervision: Never leave the machine unattended during operation.
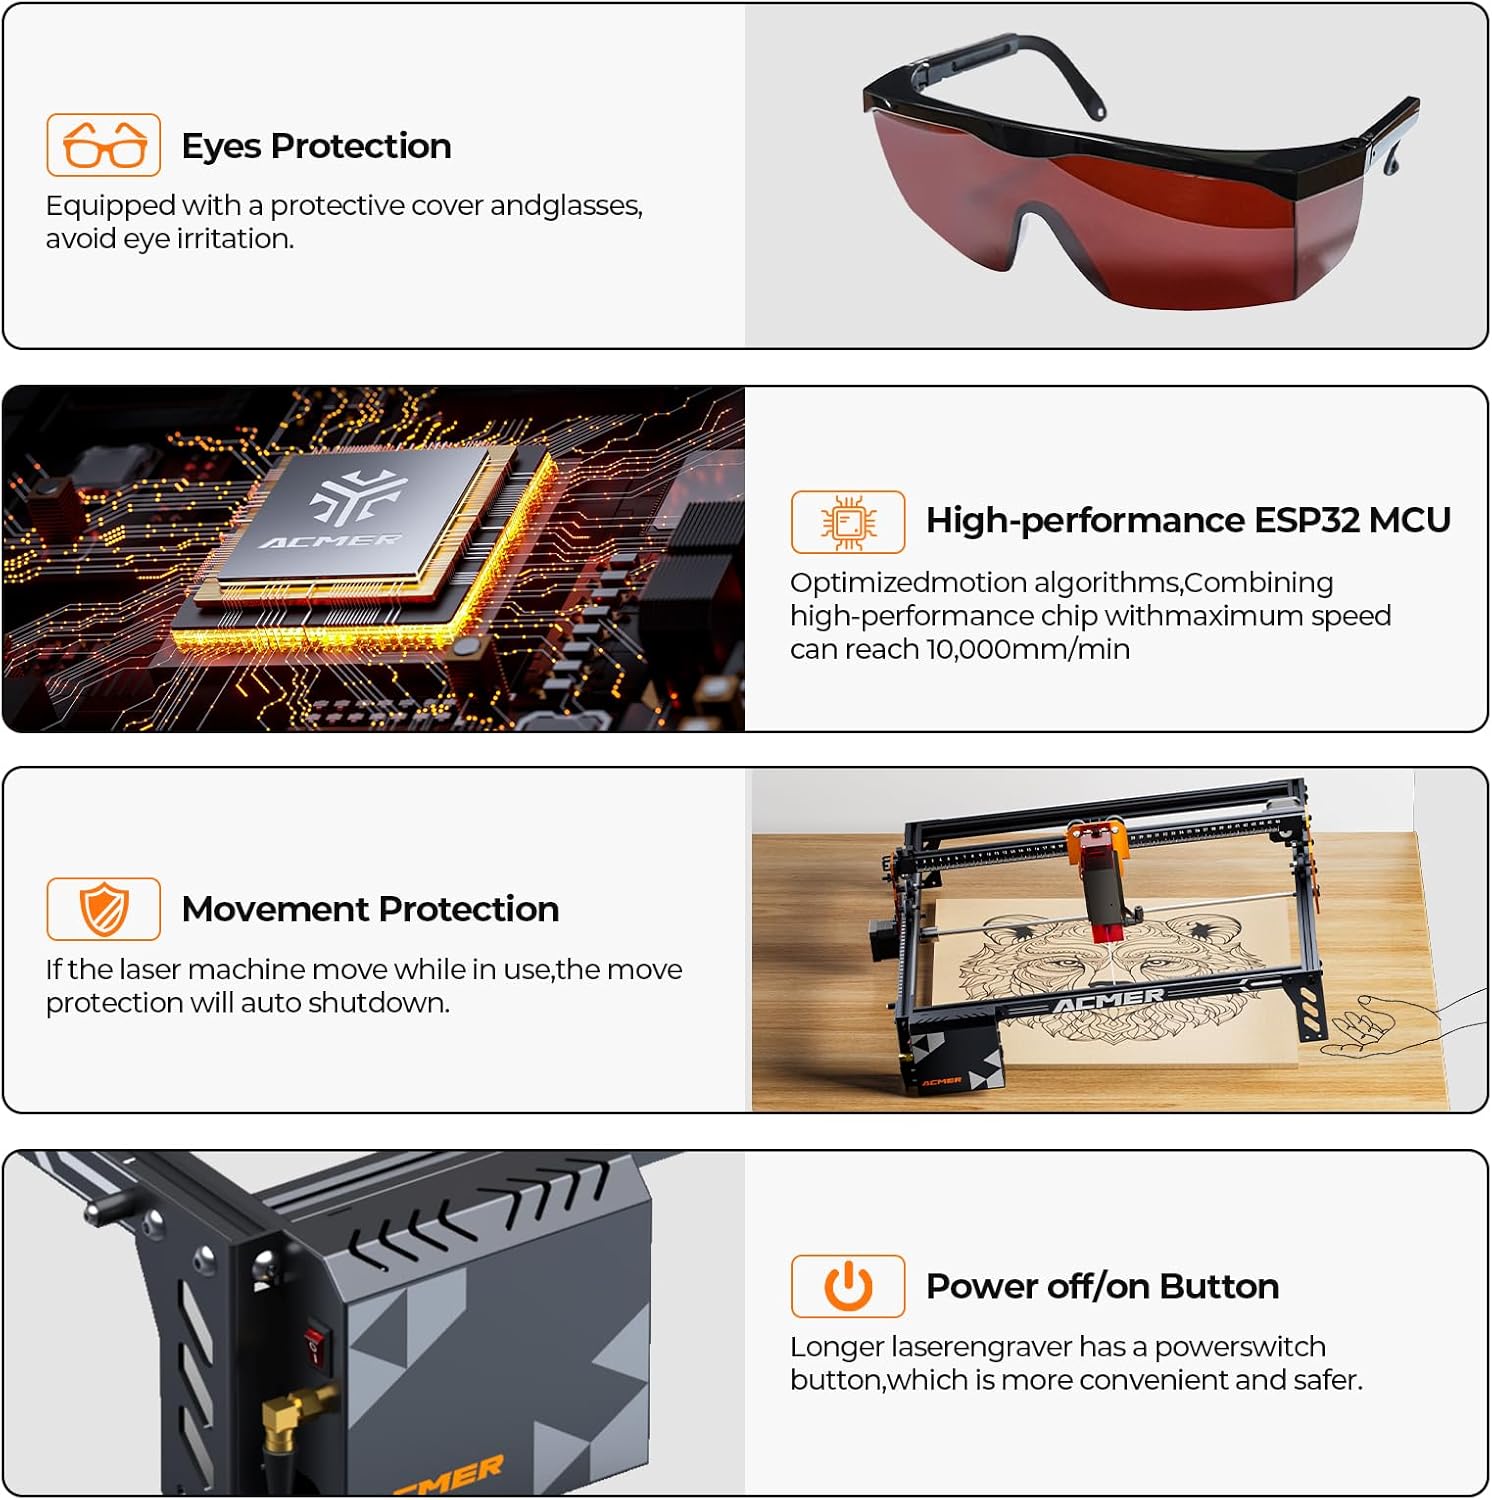
Image 2.1: Overview of the ACMER P1 S Pro's safety features, including eye protection and movement sensors.
3. Package Contents
Verify that all components listed below are present in your package. If any items are missing or damaged, please contact customer support.

Image 3.1: Visual representation of the package contents.
- Front Profile x 1
- Back Profile x 1
- X-Axis Module x 1
- Optical Axis Module x 1
- Left Profile x 1
- Right Profile x 1
- Motherboard Socket x 1
- Motor x 1
- Slider x 1
- Corner Bracket x 3
- Measuring Aluminum Column x 1
- Laser Module x 1
- Wire Bracket x 1
- Card reader + TF card x 1
- Tool Kit x 1
- User Manual x 1
- Wood Board x 2
- USB Cable x 1
- Adapter x 1
- Protective Eyewear x 1
- Screw Pack x 1
4. Setup Guide
The ACMER P1 S Pro features a modular frame design for quick and straightforward assembly. The estimated assembly time is approximately 25 minutes.
4.1 Assembly Steps
Refer to the detailed instructions and diagrams in the included User Manual (item 16 in Package Contents) for step-by-step assembly. Ensure all connections are secure before proceeding.

Image 4.1: The ACMER P1 S Pro is designed for simple assembly.
4.2 Initial Power-Up
- Connect the power adapter to the machine and a suitable power outlet.
- Press the power on/off button to turn on the machine.
- Observe the indicator lights for proper function.
5. Operating Instructions
The ACMER P1 S Pro offers versatile engraving and cutting capabilities across a wide range of materials.
5.1 Connectivity and Software
The machine supports flexible data transfer and control options:
- Connectivity: WiFi, USB, and TF card.
- Software Compatibility: Works seamlessly with PC software like LightBurn and LaserGRBL.
- Mobile Apps: Compatible with ACMER APP (Android) and MKS APP (iOS) for mobile operation.

Image 5.1: The machine offers broad compatibility with various software and mobile applications.
5.2 Engraving and Cutting Process
- Design Preparation: Create or import your design using compatible software.
- Material Placement: Place the material securely within the 380 x 370 mm working area.
- Focus Adjustment: Adjust the laser focus for optimal precision. The machine features a fine 0.06 mm spot size for detailed work.
- Parameter Settings: Set appropriate power and speed parameters based on the material type and desired outcome. The machine supports speeds up to 10,000 mm/min.
- Start Operation: Initiate the engraving or cutting process through your chosen software or app.

Image 5.2: The P1 S Pro's ultra-fine laser spot ensures high precision and detail.
5.3 Supported Materials
The ACMER P1 S Pro can engrave over 100 materials and offers robust cutting capabilities.
- Engraving: Wood, bamboo, acrylic, leather, coated metals, anodized aluminum, glass, paper, and more.
- Cutting: Capable of cutting 12 mm wood and 8 mm acrylic in a single pass.
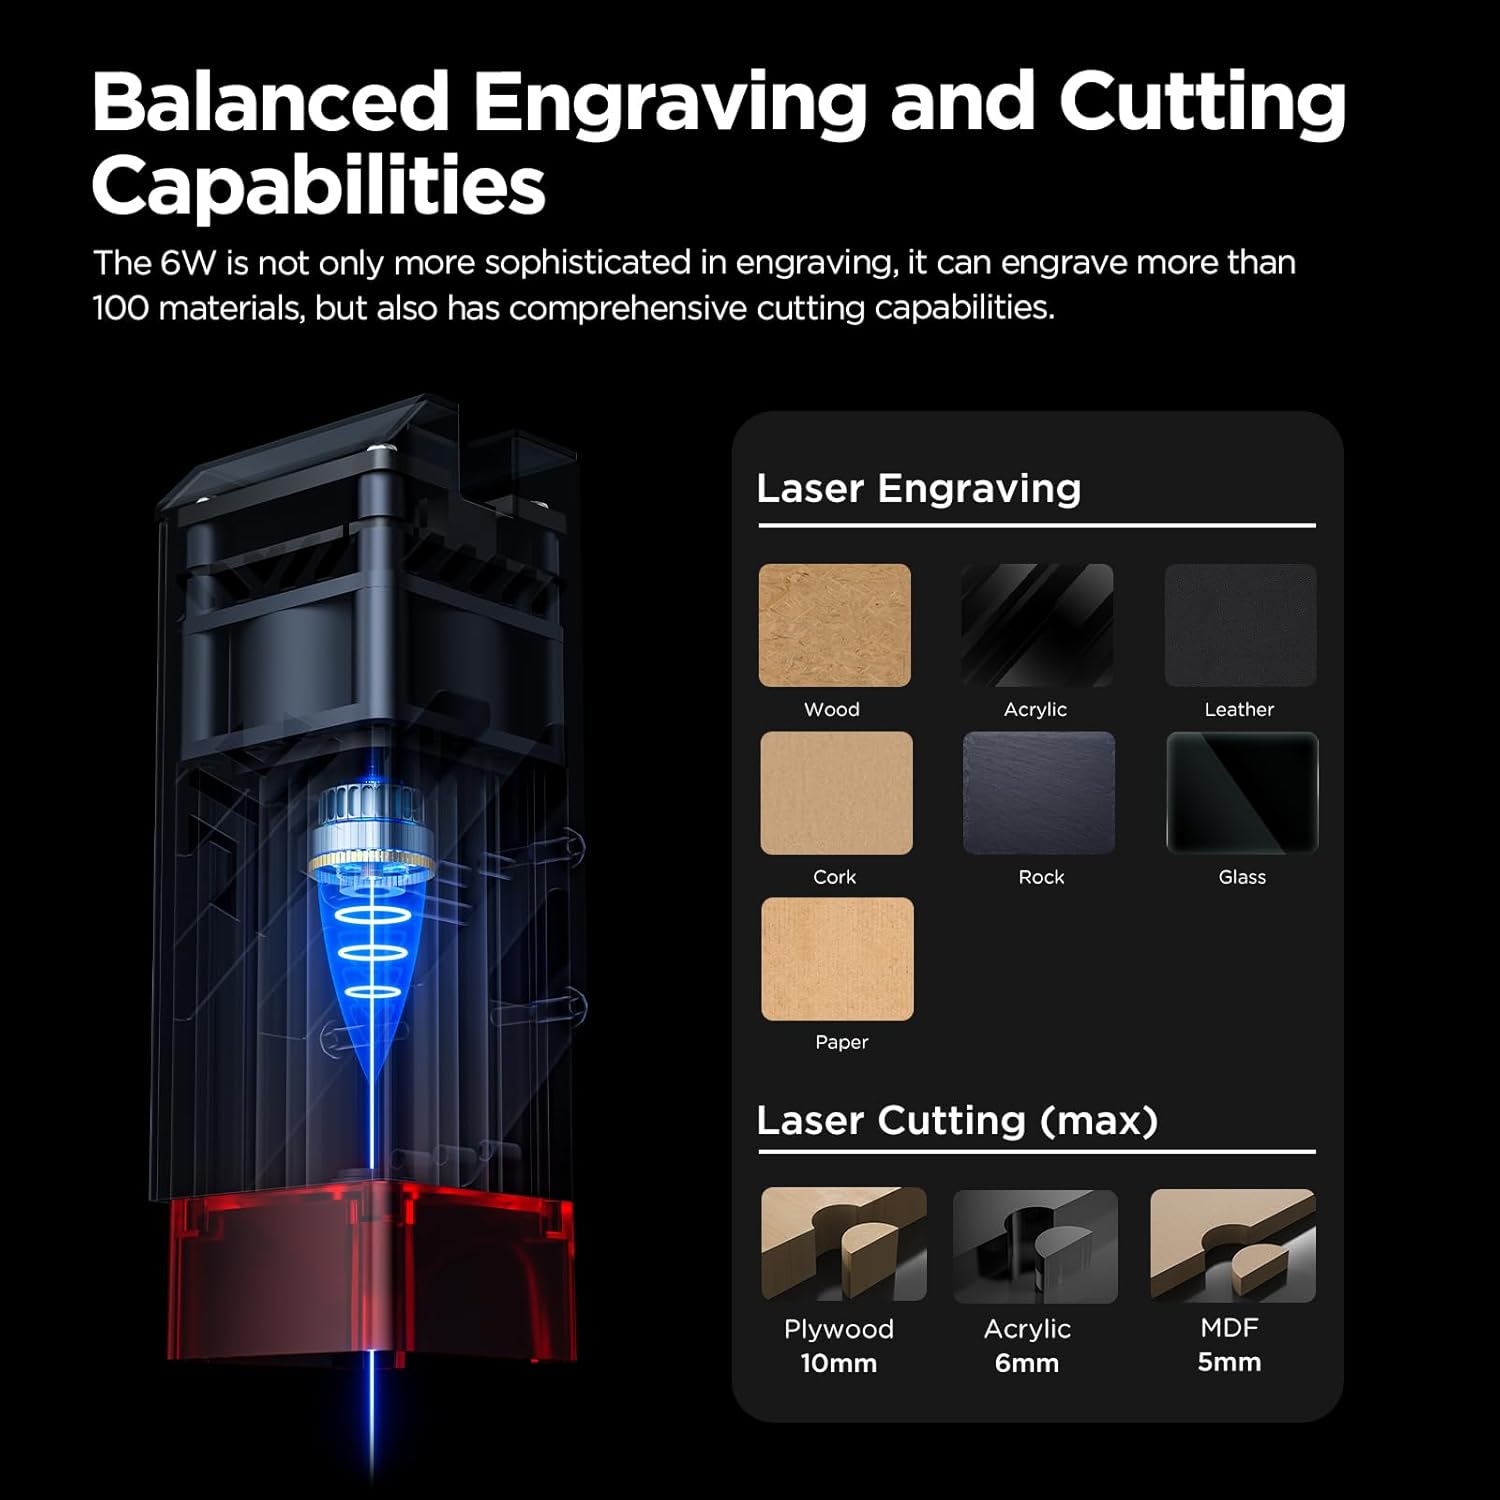
Image 5.3: The machine's versatility in engraving and cutting different materials.
5.4 Optional Rotary Attachment
For engraving curved objects such as tumblers, bottles, and mugs, an optional rotary attachment can be used. Refer to the rotary attachment's specific manual for installation and operation details.
6. Maintenance
Regular maintenance ensures the longevity and optimal performance of your laser engraver.
- Cleaning: Regularly clean the laser lens and the machine's rails to prevent dust and debris buildup, which can affect performance and accuracy. Use a soft, lint-free cloth and appropriate cleaning solutions.
- Lubrication: Periodically lubricate moving parts as recommended in the detailed user manual to ensure smooth operation.
- Laser Module Replacement: The laser module is interchangeable. If replacement is needed, ensure the machine is powered off and follow the specific instructions for module removal and installation.

Image 6.1: The laser module can be interchanged for different power outputs.
7. Troubleshooting
This section addresses common issues you might encounter. For more complex problems, refer to the full user manual or contact customer support.
| Problem | Possible Cause | Solution |
|---|---|---|
| Laser not firing | Power cable loose; Laser module not properly connected; Software settings incorrect; Emergency stop engaged. | Check all cable connections; Re-seat the laser module; Verify software power settings; Disengage emergency stop. |
| Poor engraving quality | Incorrect focus; Material not flat; Speed/power settings unsuitable; Dirty lens. | Adjust laser focus; Ensure material is flat and secure; Optimize speed and power settings for the material; Clean the laser lens. |
| Machine not connecting to software/app | WiFi/USB connection issues; Driver not installed; App/software outdated. | Verify WiFi connection or USB cable; Install necessary drivers; Update software/app to the latest version. |
| Machine stops unexpectedly | Movement protection triggered; Overheating; Power interruption. | Check for obstructions or accidental bumps; Allow machine to cool down; Ensure stable power supply. |
8. Specifications
Key technical specifications for the ACMER P1 S Pro 6W Laser Engraver Machine:
| Feature | Specification |
|---|---|
| Brand | ACMER |
| Model | P1 S Pro-6W |
| Laser Output Power | 6W (6000mW) |
| Laser Spot Size | 0.06 x 0.08 mm |
| Engraving Precision | 0.01 mm |
| Engraving Speed | Up to 10,000 mm/min |
| Working Area | 380 x 370 mm |
| Material | Metal frame |
| Connectivity | WiFi, USB, TF Card |
| Supported OS | Windows, Mac, Android, iOS |
| Item Weight | 3.6 Kilograms (7.92 pounds) |
| Product Dimensions | 1"D x 1"W x 1"H (Note: This dimension seems generic, refer to working area for actual engraving space) |
| Certifications | IEC 60825-1 (Class 4 laser) |

Image 8.1: Key performance and assembly specifications.
9. Warranty and Support
ACMER is committed to providing high-quality products and customer satisfaction.
9.1 Warranty Information
Please refer to the warranty card included with your product or visit the official ACMER website for detailed warranty terms and conditions.
9.2 Customer Support
For technical assistance, troubleshooting, or any inquiries, ACMER offers 24/7 online support.
- Online Support: Access 24/7 online support for immediate assistance.
- Brand Store: Visit the ACMER Brand Store for product information, accessories, and support resources.

Image 9.1: ACMER provides 24/7 online customer support.


