Introduction
Thank you for choosing the VEVOR 52" TV Stand with Mount. This instruction manual provides essential information for the safe assembly, operation, and maintenance of your new TV stand. Please read this manual thoroughly before assembly and retain it for future reference.
Safety Information
Important Safety Instructions:
- Ensure the TV stand is placed on a flat, stable surface to prevent tipping.
- Do not exceed the weight limits: 110 lbs (49.9 kg) for the stand and 200 lbs (90.7 kg) for the TV mount.
- Follow the included instructions for proper assembly and installation. Incorrect assembly can lead to product failure or injury.
- Keep children and pets away from the assembly area.
- Do not use power tools for assembly unless specifically instructed, as overtightening screws can cause damage.
- Regularly check all connections and fasteners to ensure they remain tight and secure.
Product Features
- Integrated TV Mount: Compatible with VESA patterns up to 600x400 mm, supporting 32-75 inch TVs. Eliminates the need for wall drilling.
- Smart Ambient Lighting: Features magnetic light tubes and an LED strip. Control via remote or app with adjustable brightness, speed, timer, and music sync functions.
- Rotation & Height Adjustment: Manual rotation up to 34° left or right and 3 height levels for optimal viewing angles.
- Spacious Storage: Designed to hold up to 110 lbs (49.9 kg) on the tabletop and in compartments, including three drawers for organized storage of media, books, and decor.
- Built-In Charging Station: Includes a power board with 4 outlets and 2 USB ports, plus a 6.6 ft (2 m) power cord. Integrated cable management keeps wires tidy.
Setup and Assembly
Assembly of the VEVOR TV Stand requires careful attention to detail. It is recommended to have two people for assembly, especially when mounting the TV.
Required Tools (Not Included)
- Phillips Head Screwdriver
- Allen Wrench (often included with hardware)
- Measuring Tape
Assembly Steps Overview
- Unpack and Identify Components: Carefully unpack all parts and hardware. Refer to the parts list (usually found in the physical manual) to ensure all components are present and undamaged.
- Assemble the Base Frame: Connect the metal frame components using the provided screws and fasteners. Ensure all connections are secure but do not overtighten until the frame is fully assembled.
- Attach Wood Panels: Secure the engineered wood panels for the tabletop, shelves, and drawer sections to the assembled frame.
- Install Drawers: Assemble the three drawers and insert them into their designated compartments.
- Attach TV Mount Column: Secure the central TV mount column to the back of the TV stand base.
- Install TV Mounting Brackets: Attach the VESA-compatible mounting brackets to the back of your television, ensuring they align with your TV's VESA pattern.
- Mount TV to Stand: With assistance, carefully lift your TV and hook the mounting brackets onto the TV mount column. Secure the TV in place using the provided locking mechanisms.
- Connect Power Outlet and LED Lights: Install the built-in power outlet into its designated slot. Attach the magnetic RGB lights and LED strip as desired. Connect the power cord to a wall outlet.
- Cable Management: Utilize the integrated cable management features to route and conceal all power and media cables for a tidy setup.
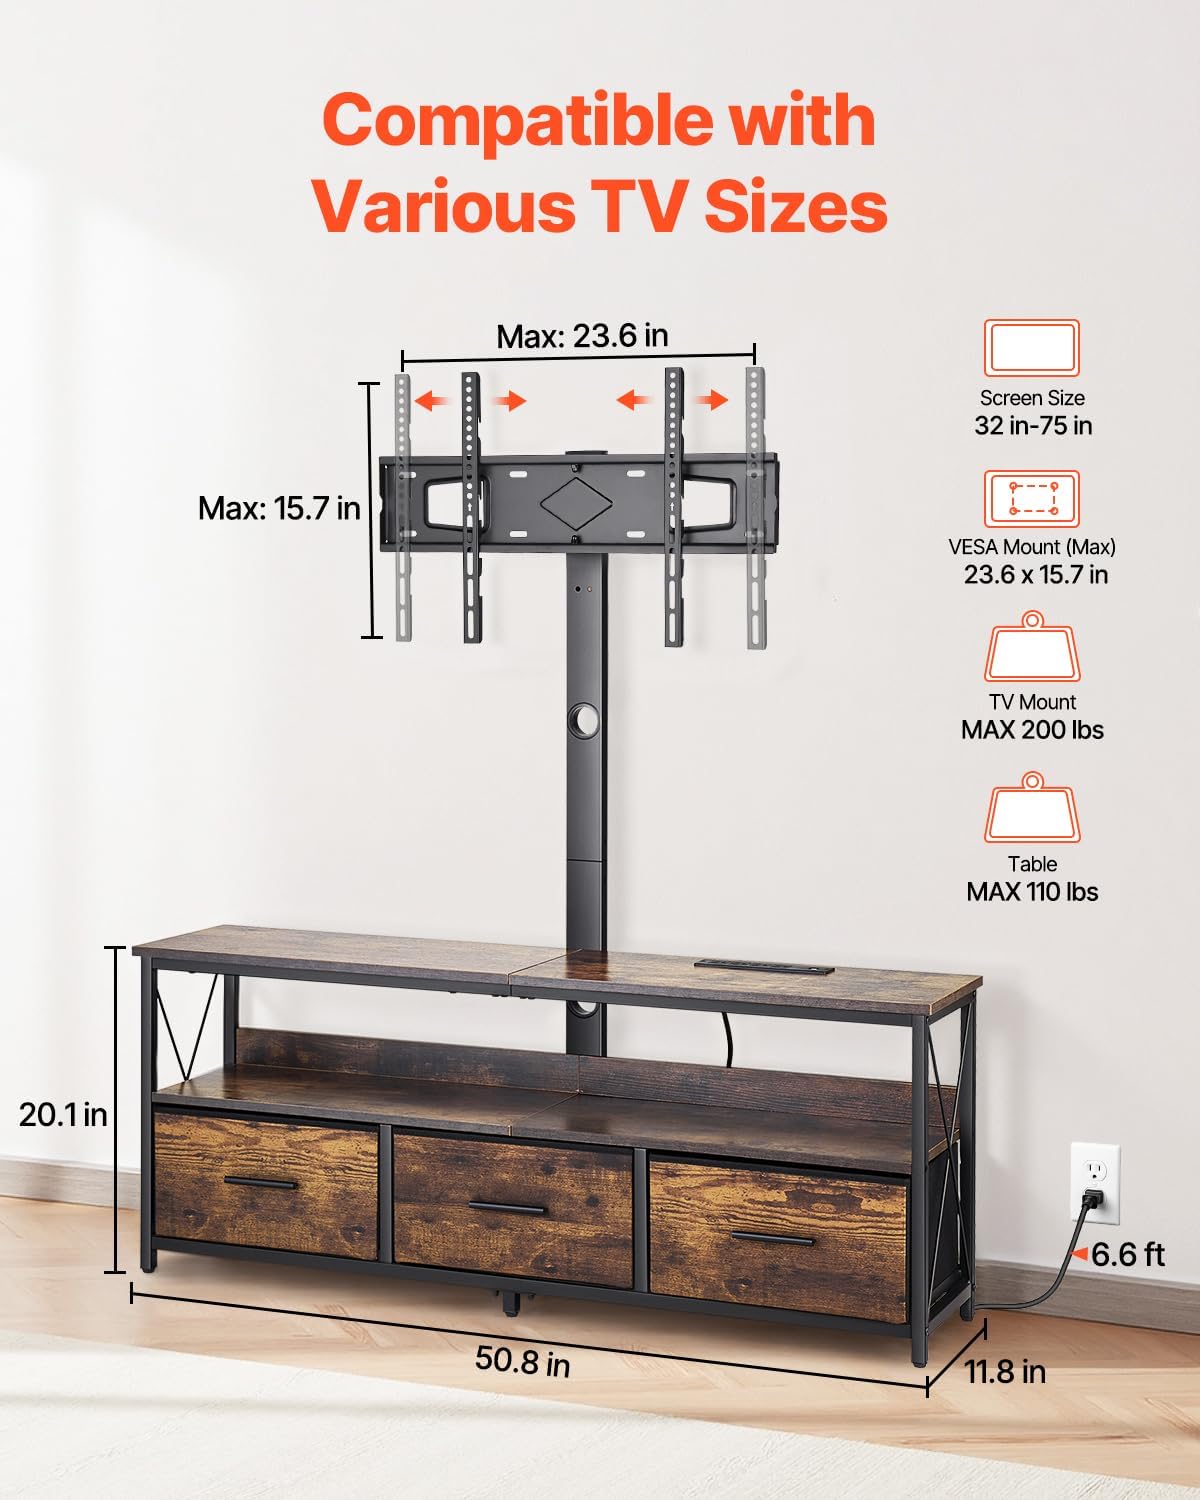
Image: Dimensions and TV compatibility for the VEVOR TV Stand. Max TV size 75 inches, VESA mount max 23.6 x 15.7 inches.

Image: Details of the stand's construction, including powder-coated steel, thickened particle board, and adjustable foot posts.
Operating Instructions
TV Mount Adjustment
- Height Adjustment: The TV mount column offers 3 height levels. To adjust, carefully lift the TV (with assistance) and reposition the mounting brackets to the desired height on the column. Ensure the TV is securely locked in place after adjustment.
- Swivel Function: The TV mount allows for manual rotation up to 34° to the left or right. Gently push the TV to achieve your preferred viewing angle.

Image: The TV mount offers 3 inches of adjustable height and a swivel range of ±40 degrees.
Smart Ambient Lighting
- Power On/Off: Use the included remote control or the dedicated mobile app to turn the LED lights on or off.
- Color and Mode Selection: Select from 16 colors and various lighting modes (e.g., static, fade, strobe) using the remote or app.
- Brightness and Speed: Adjust the brightness and speed of dynamic lighting effects via the remote or app.
- Timer Function: Set a timer for the lights to automatically turn off.
- Music Sync: Enable music sync mode through the app to make the lights change colors according to audio beats.

Image: Overview of the smart LED lighting system with remote and app control.
Built-In Charging Station
- Power Outlets: Plug your TV, media players, or other electronic devices into the 4 three-prong sockets.
- USB Ports: Use the 2 USB ports to charge smartphones, tablets, or other USB-powered devices.
- Cable Management: Route all cables through the integrated cable management system to maintain a clean and organized appearance.
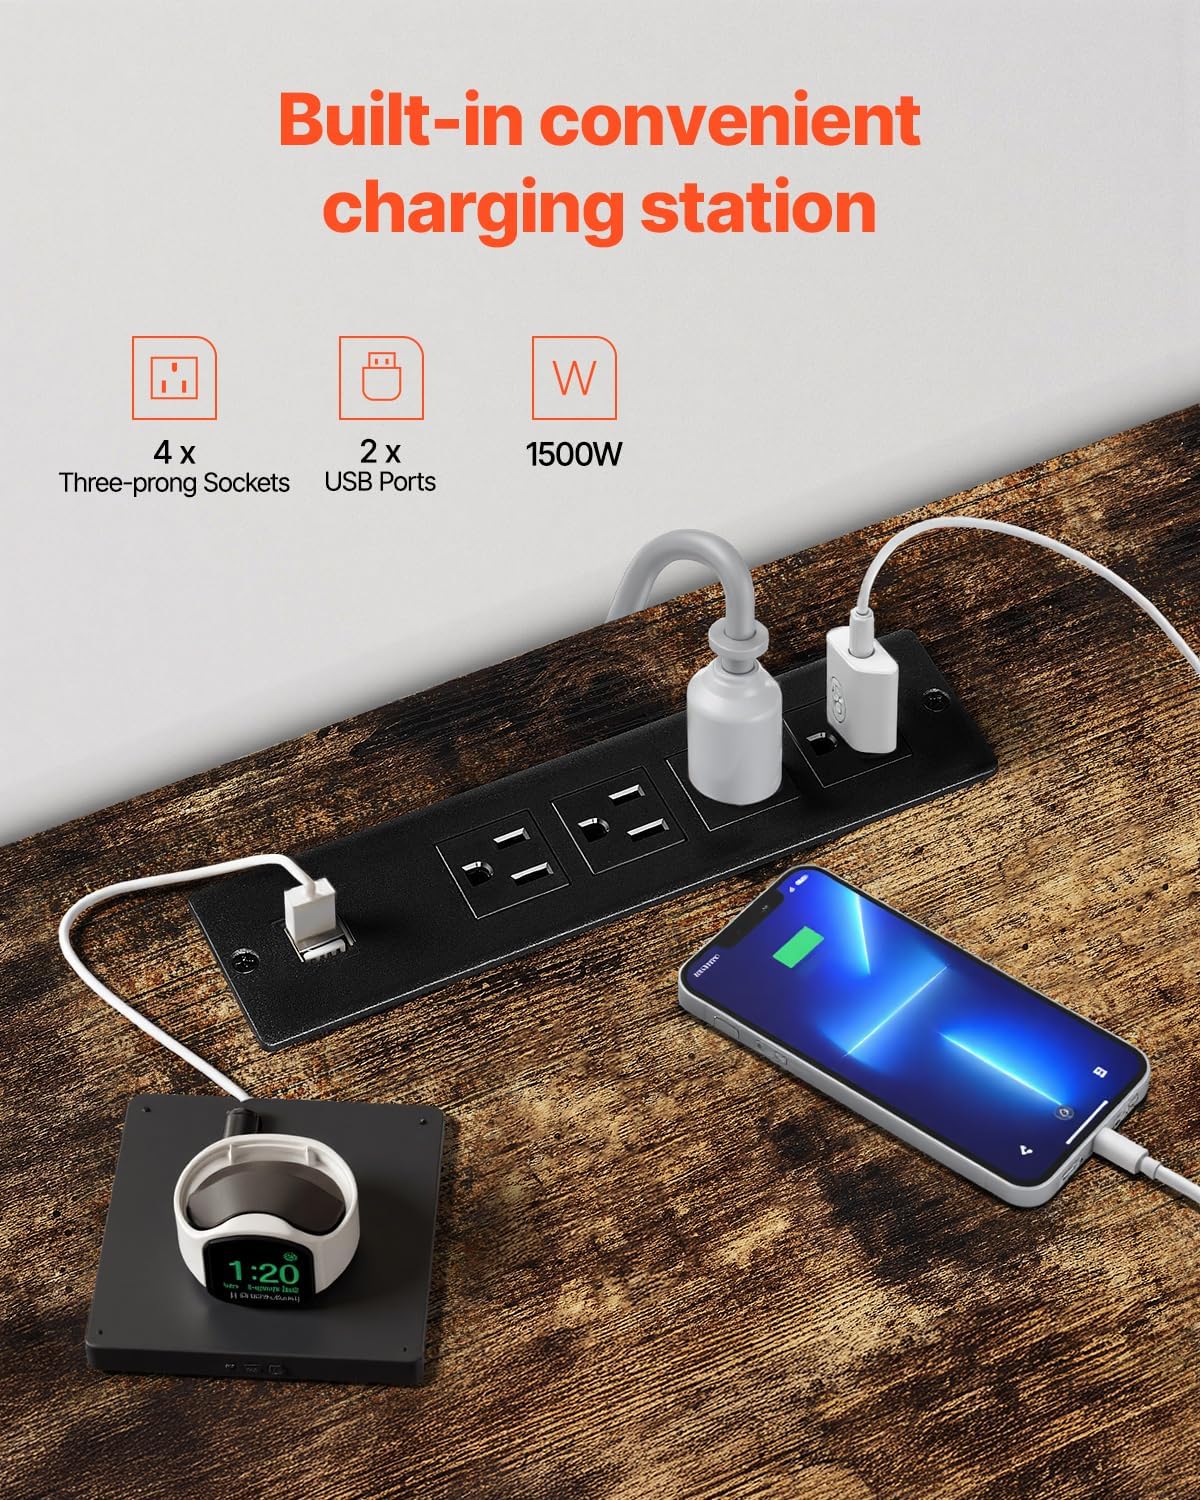
Image: The built-in charging station provides 4 three-prong sockets and 2 USB ports with a total wattage of 1500W.
Storage Compartments
- Utilize the open shelves and three drawers to store media devices, books, remote controls, and other household items.
- Ensure items are placed evenly and do not exceed the stand's weight capacity.

Image: Flexible categorized storage space with three drawers for electronics, books, and other items.
Maintenance
- Cleaning: Wipe the surfaces with a soft, damp cloth. Avoid using harsh chemicals or abrasive cleaners, as they may damage the finish.
- Dusting: Regularly dust the stand and TV mount to prevent buildup.
- Fastener Check: Periodically check all screws and fasteners to ensure they are tight. Retighten if necessary to maintain stability.
- Cable Inspection: Inspect power cords and LED light connections for any signs of wear or damage. Replace if necessary.
Troubleshooting
| Problem | Possible Cause | Solution |
|---|---|---|
| TV Stand is wobbly/unstable | Loose fasteners; uneven floor; overloaded | Tighten all screws. Adjust foot posts for level. Reduce weight on stand. |
| LED lights not working | Power connection issue; remote battery dead; app not connected | Check power cord and light strip connections. Replace remote battery. Ensure app is correctly paired. |
| Devices not charging via USB/outlets | Power strip not plugged in; faulty device cable; power strip malfunction | Ensure the stand's power cord is securely plugged into a working wall outlet. Test with different device cables. Contact support if power strip is faulty. |
| TV mount not swiveling smoothly | Tightened too much; obstruction | Check for any obstructions. Ensure mounting bolts are secure but not overly tight to restrict movement. |
Specifications

Image: Comprehensive specifications for the VEVOR TV Stand.
- Item Model Number: C240413S-01
- Product Dimensions (L x W x H): 50.79 x 20.08 x 11.81 inches (1290 x 300 x 510 mm)
- Material: Carbon Steel, Engineered Wood
- Color: Brown
- Compatible TV Size: 32-75 inches
- VESA Mount (Max): 23.6 x 15.7 inches (600 x 400 mm)
- TV Stand Weight Capacity: 110 lbs (49.9 kg)
- TV Mount Weight Capacity: 200 lbs (90.7 kg)
- Number of Drawers: 3
- Number of Shelves: 3 (3-tier storage)
- Power Strip: 4 three-prong outlets, 2 USB ports
- Power Strip Wattage: 1500W
- Power Cord Length: 6.6 ft (2 m)
- LED Lighting: 16 Colors LED Strip Light, 2 Magnetic Light Tubes
- Net Weight: 44.01 lbs (20 kg)
Product Video
Video: An overview of the VEVOR TV Stand with Mount, showcasing its features and functionality.
Warranty and Support
VEVOR products are designed for durability and performance. For warranty information, product support, or to report any issues, please refer to the contact information provided with your purchase or visit the official VEVOR website. Please have your model number (C240413S-01) and purchase details ready when contacting support.
VEVOR Official Website: www.vevor.com


