1. Introduction
Thank you for choosing the BUUBO WS-250 Electric Welding Machine. This dual-purpose inverter welder is designed for both TIG and Arc (MMA) welding, suitable for various materials including stainless steel, iron, carbon steel, and low alloy steel. Its portable design and user-friendly controls make it ideal for beginners and DIY enthusiasts. This manual provides essential information for safe operation, setup, maintenance, and troubleshooting to ensure optimal performance and longevity of your welding machine.
2. Important Safety Instructions
Always prioritize safety when operating welding equipment. Failure to follow these instructions can result in serious injury or death.
- Electric Shock Can Kill: Ensure proper grounding. Do not touch live electrical parts. Wear dry welding gloves and protective clothing.
- Fumes and Gases Can Be Hazardous: Keep your head out of the fumes. Use ventilation or exhaust to remove fumes from the breathing zone.
- Arc Rays Can Burn Eyes and Skin: Wear a welding helmet with a proper shade filter. Wear appropriate eye protection with side shields. Protect exposed skin with appropriate clothing.
- Fire and Explosion Hazard: Remove all flammable materials from the welding area. Have a fire extinguisher readily available. Do not weld on containers that have held flammable materials.
- Hot Parts Can Cause Severe Burns: Allow welded materials and equipment to cool before handling.
- Read the Entire Manual: Understand all instructions and warnings before operating the machine.
- Use Only Approved Parts: Do not modify the machine or use unapproved accessories.
3. Package Contents (Package C 7000w)
The 'Package C 7000w' variant of the WS-250 welding machine includes the following components:
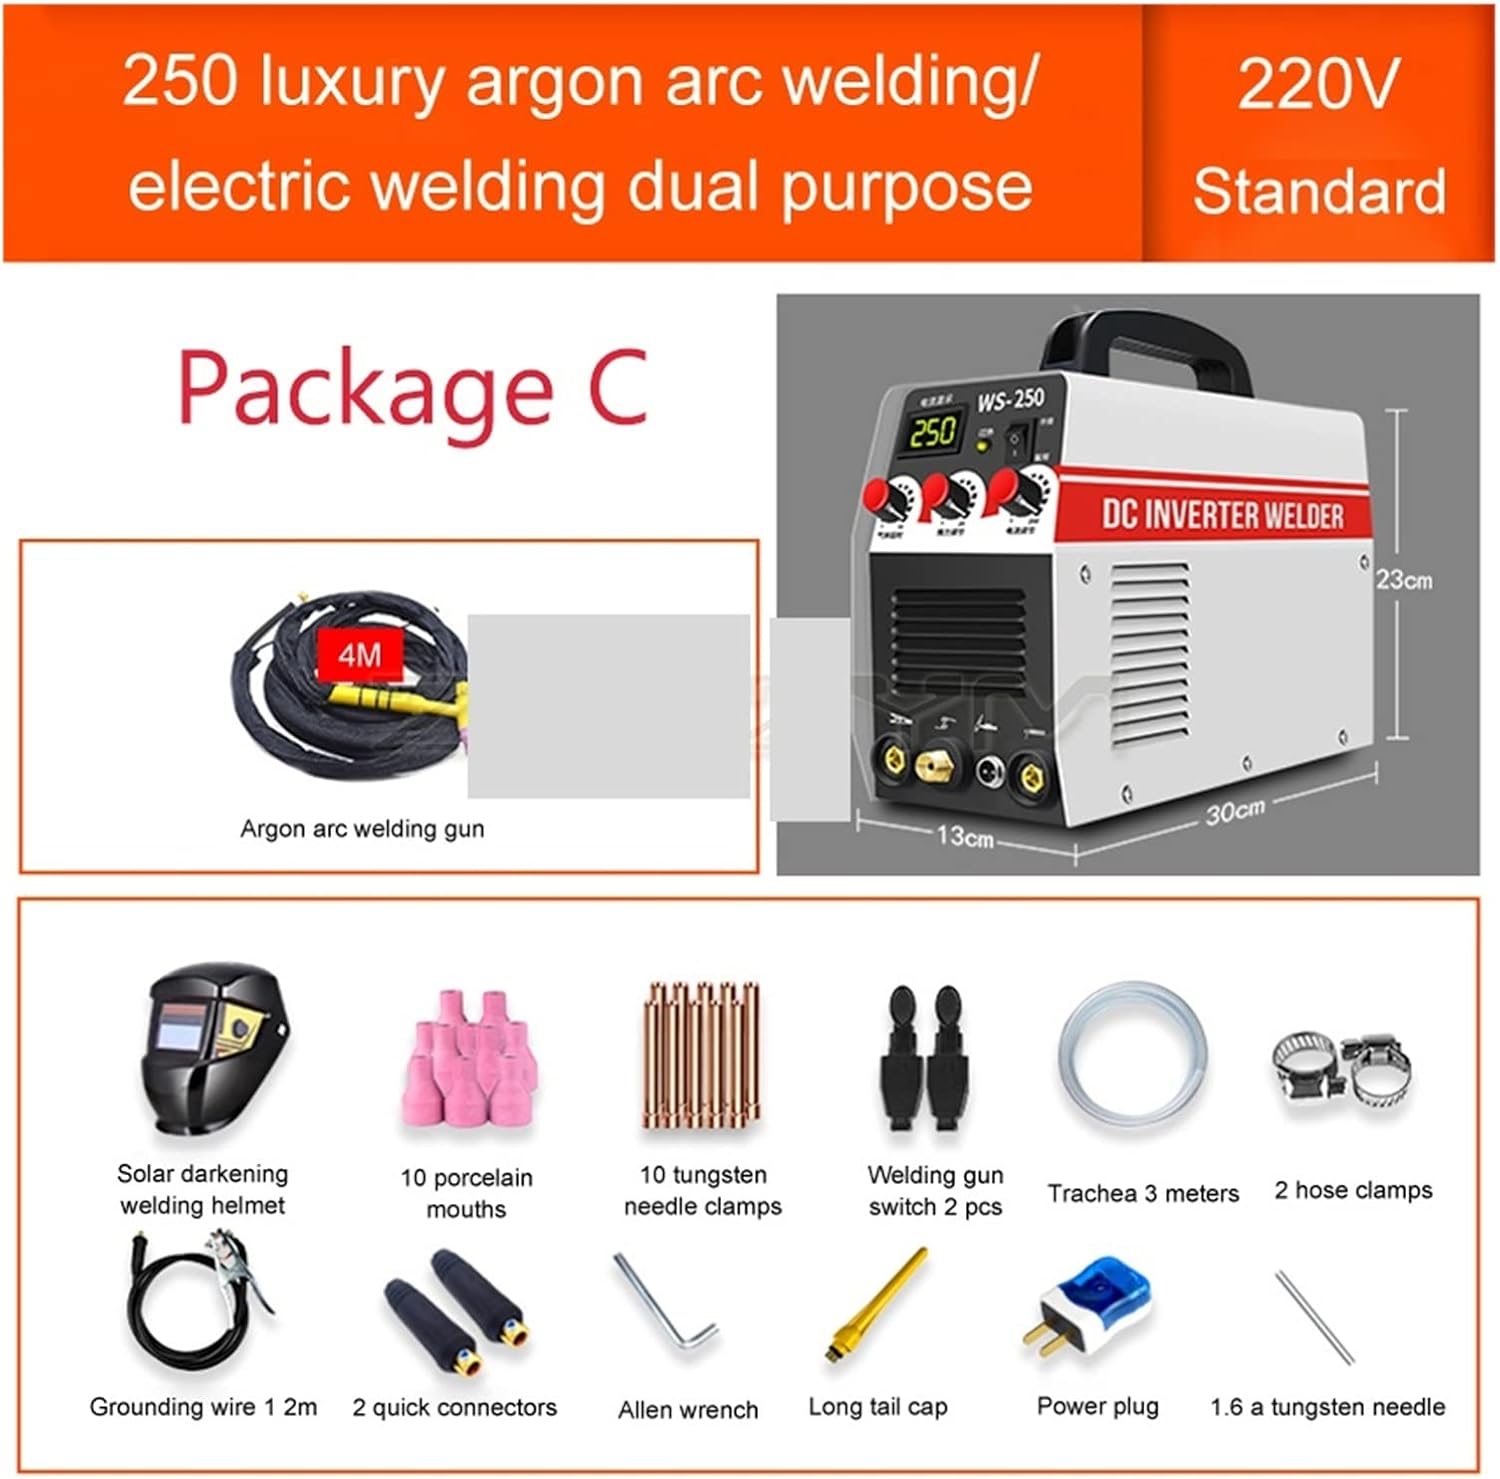
This image illustrates the comprehensive contents of Package C for the BUUBO WS-250 welding machine. It includes the main welding unit, a 4-meter argon arc welding gun, a solar darkening welding helmet for eye protection, 10 porcelain mouths, 10 tungsten needle clamps, 2 welding gun switches, 3 meters of trachea, 2 hose clamps, a 2-meter grounding wire, 2 quick connectors, an Allen wrench for assembly, a long tail cap, a power plug, and a 1.6mm tungsten needle.
- WS-250 Welding Machine Unit
- 4-meter Argon Arc Welding Gun
- Solar Darkening Welding Helmet
- 10 Porcelain Mouths
- 10 Tungsten Needle Clamps
- 2 Welding Gun Switches
- 3-meter Trachea
- 2 Hose Clamps
- 2-meter Grounding Wire
- 2 Quick Connectors
- Allen Wrench
- Long Tail Cap
- Power Plug
- 1.6mm Tungsten Needle
4. Product Features
The BUUBO WS-250 welding machine incorporates several features designed for efficiency and safety:
- Portable Design: Equipped with a handle for easy transport, making it convenient for various work environments.
- Versatile Welding: Suitable for welding stainless steel, alloy steel, carbon steel, copper, copper alloy, and other non-ferrous metals.
- Automatic Voltage Compensation: Maintains stable performance despite voltage fluctuations.
- Comprehensive Protection: Includes over-voltage, under-voltage, over-current, and overload protection mechanisms to ensure user safety and machine longevity.
- Adjustable Gas Saving Mode: Features a 0-6 second stepless delay adjustment for gas flow, optimizing gas usage in TIG welding.
5. Setup Guide
Before operating the WS-250, ensure it is properly set up according to these instructions.

The WS-250 welding machine features a compact design with a carrying handle, control knobs for current and gas delay, and clearly labeled input/output terminals for easy setup.
- Placement: Place the welding machine on a stable, level surface in a well-ventilated area, away from flammable materials.
- Power Connection: Connect the power plug to a suitable power outlet (220V standard for this model). Ensure the power supply matches the machine's requirements.
- Grounding: Connect the grounding clamp to a clean, bare metal section of the workpiece or welding table. Ensure a secure connection for safety.
- Welding Cable Connection (Arc Welding):
- Connect the electrode holder cable to the appropriate terminal (usually '+' for most electrodes).
- Connect the workpiece clamp cable to the other terminal (usually '-').
- TIG Welding Setup:
- Connect the TIG torch cable to the designated TIG terminal.
- Connect the gas hose from the TIG torch to the gas outlet on the machine.
- Connect the gas supply (argon cylinder) to the machine's gas inlet via a regulator and hose. Ensure all gas connections are tight to prevent leaks.
- Insert a tungsten electrode into the TIG torch collet and tighten.
- Initial Check: Before turning on, double-check all connections for security and correctness.
6. Operating Instructions
Familiarize yourself with the control panel and operating modes before beginning to weld.
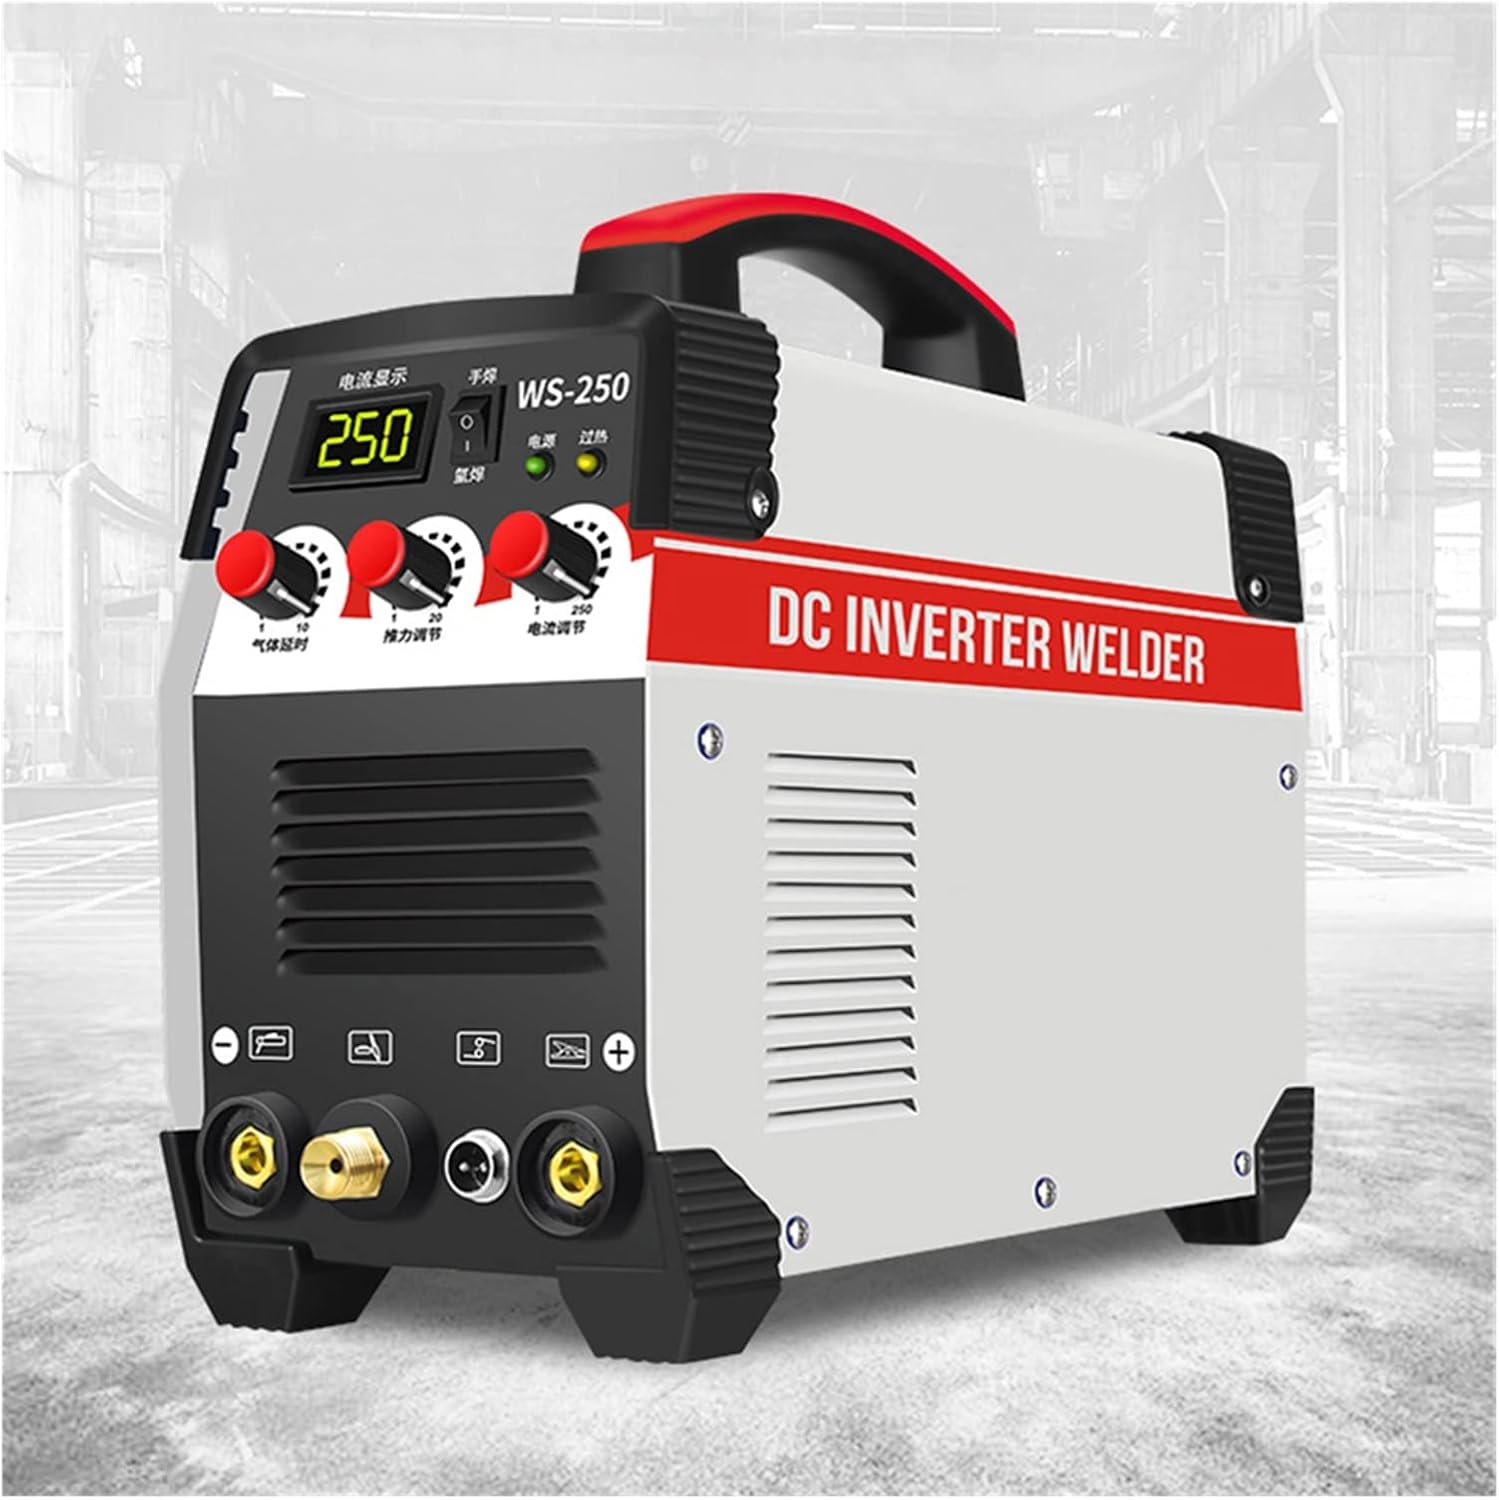
The control panel includes a digital display for current, indicator lights for power and overheat status, and rotary knobs for adjusting welding current (15-250A) and gas saving mode (0-6 seconds delay).
- Power On: Turn on the main power switch located on the front or rear panel of the machine. The power indicator light should illuminate.
- Select Welding Mode: Use the mode selection switch (if present) to choose between TIG or Arc (MMA) welding.
- Adjust Welding Current: Use the 'Current Adjustment' knob to set the desired welding amperage (15-250A). The digital display will show the selected current.
- Adjust Gas Saving Mode (TIG Only): For TIG welding, use the 'Gas Saving Mode' knob to set the post-flow gas delay (0-6 seconds). This ensures the weld pool and tungsten are protected as they cool.
- Begin Welding (Arc/MMA):
- Secure the workpiece clamp.
- Insert the appropriate electrode into the electrode holder.
- Strike an arc by lightly touching and quickly lifting the electrode from the workpiece. Maintain a consistent arc length and travel speed.
- Begin Welding (TIG):
- Open the gas cylinder valve and set the regulator to the recommended flow rate.
- Position the TIG torch over the workpiece.
- Initiate the arc (usually by pressing a button on the torch or using lift-arc/HF start).
- Maintain a short arc length and feed filler rod into the weld pool as needed.
- Monitor Overheat Indicator: If the overheat indicator light illuminates, stop welding immediately and allow the machine to cool down. Do not turn off the machine's power until the fan has run for a few minutes to aid cooling.
- Power Off: After welding, turn off the machine's power switch. For TIG, close the gas cylinder valve.
7. Maintenance
Regular maintenance ensures the longevity and safe operation of your welding machine.
- Cleaning: Periodically clean the machine's exterior with a dry, soft cloth. Use compressed air to blow out dust from the ventilation openings. Ensure the machine is unplugged before cleaning.
- Cable Inspection: Regularly inspect all welding cables, power cords, and gas hoses for cuts, cracks, or damage. Replace any damaged components immediately.
- Terminal Connections: Check that all electrical connections (electrode holder, workpiece clamp, TIG torch) are tight and free from corrosion.
- Tungsten Electrode (TIG): Sharpen or replace tungsten electrodes as needed to maintain arc stability and weld quality.
- Storage: Store the machine in a dry, clean environment when not in use.
8. Troubleshooting
Refer to this section for common issues and their potential solutions.
| Problem | Possible Cause | Solution |
|---|---|---|
| Machine does not power on | No power supply; Power switch off; Faulty power cord | Check power outlet and circuit breaker; Turn on power switch; Inspect and replace power cord if damaged. |
| No welding arc | Poor workpiece connection; Incorrect current setting; Faulty electrode/tungsten; Loose cable connections | Ensure clean, secure workpiece connection; Adjust current; Replace electrode/tungsten; Check all cable connections. |
| Overheat indicator on | Machine overloaded; Insufficient ventilation; Prolonged use | Reduce welding current or duty cycle; Ensure clear ventilation; Allow machine to cool down with power on. |
| Poor weld quality | Incorrect current/voltage; Improper travel speed; Contaminated workpiece; Incorrect gas flow (TIG) | Adjust settings; Practice technique; Clean workpiece thoroughly; Check gas flow and connections. |
9. Technical Specifications
Detailed specifications for the BUUBO WS-250 Electric Welding Machine:

The WS-250 welding machine has approximate dimensions of 30cm in length, 13cm in width, and 22cm in height, making it a compact and portable unit.
- Model: WS-250
- Current Range: 15-250A
- Welding Material Compatibility: Stainless steel, Iron, Carbon steel, Low alloy steel
- Gas Saving Mode: 0-6 seconds (stepless delay adjustment)
- Power: 7000W (for Package C)
- Input Voltage: 220V (Standard)
- Item Weight: Approximately 22 pounds (10 kg)
- Package Dimensions: Approximately 1.18 x 0.79 x 0.39 inches (30 x 20 x 10 mm) - Note: This dimension seems incorrect based on item weight and product images, likely refers to a small component. Actual unit dimensions are approximately 30cm x 13cm x 22cm.
- Manufacturer: BUUBO
- Item Model Number: 1005002717113518
10. Warranty and Customer Support
For warranty information, technical assistance, or customer support regarding your BUUBO WS-250 Electric Welding Machine, please refer to the documentation provided at the time of purchase or contact your retailer. Keep your purchase receipt as proof of purchase for any warranty claims.


