
Guide Sensmart TU651LRF-A
TU 651 LRF-A Thermal Riflescope User Manual
Model: TU651LRF-A | Brand: Guide Sensmart
Introduction
This manual provides comprehensive instructions for the safe and effective operation, maintenance, and troubleshooting of your Guide Sensmart TU 651 LRF-A Thermal Riflescope. Please read this manual thoroughly before using the device to ensure optimal performance and longevity.
Safety Information
- Do not look directly at strong light sources through the device.
- Keep the device away from extreme temperatures and direct sunlight.
- Handle with care to avoid dropping or impact.
- Do not attempt to disassemble or repair the device yourself. Contact authorized service for assistance.
- Ensure the device is securely mounted before use.
Product Overview
The Guide Sensmart TU 651 LRF-A is a high-performance thermal riflescope designed for precision and reliability in various conditions. It integrates advanced thermal imaging with a laser rangefinder and ballistic calculator.
Key Features
- High-Resolution Thermal Imaging: 640×512 12µm uncooled VOx infrared detector with NETD 20mK for enhanced thermal sensitivity.
- Long-Range Detection & Precision: Detects targets up to 2800 yards with the 50mm F1.0 objective lens and 3.0x to 23.6x magnification, ensuring superior accuracy for long-range shooting.
- Integrated Laser Rangefinder & Ballistic Calculator: Built-in 1500m/1630yd laser rangefinder and ballistic calculator for accurate distance measurement and precision shooting.
- 1440x1080 AMOLED Display & 8X Digital Zoom: 0.49-inch AMOLED display with six color palettes (White Hot, Black Hot, Red Hot, Green Hot, Iron Red, Blue Hot).
- Rugged & Weather-Resistant Design: IP67-rated waterproof construction, -22°F to +122°F operating temperature, and 800G shock resistance.
Components

Figure 1: Angled view of the TU 651 LRF-A Thermal Riflescope, showing the objective lens, main body, and eyepiece.

Figure 2: Top view of the riflescope, highlighting the integrated laser rangefinder module.

Figure 3: Front view of the riflescope, focusing on the objective lens and front controls.
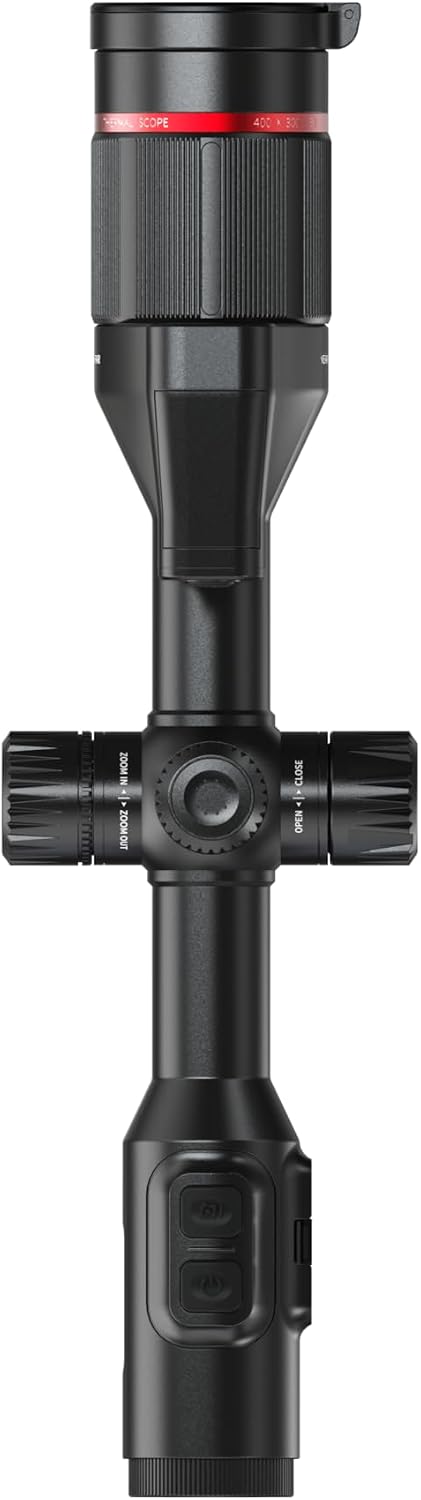
Figure 4: Side profile of the riflescope, illustrating the various adjustment turrets and mounting features.

Figure 5: Opposite side profile, detailing the battery compartment and additional controls.

Figure 6: Rear view of the riflescope, highlighting the eyepiece and control buttons for user interaction.
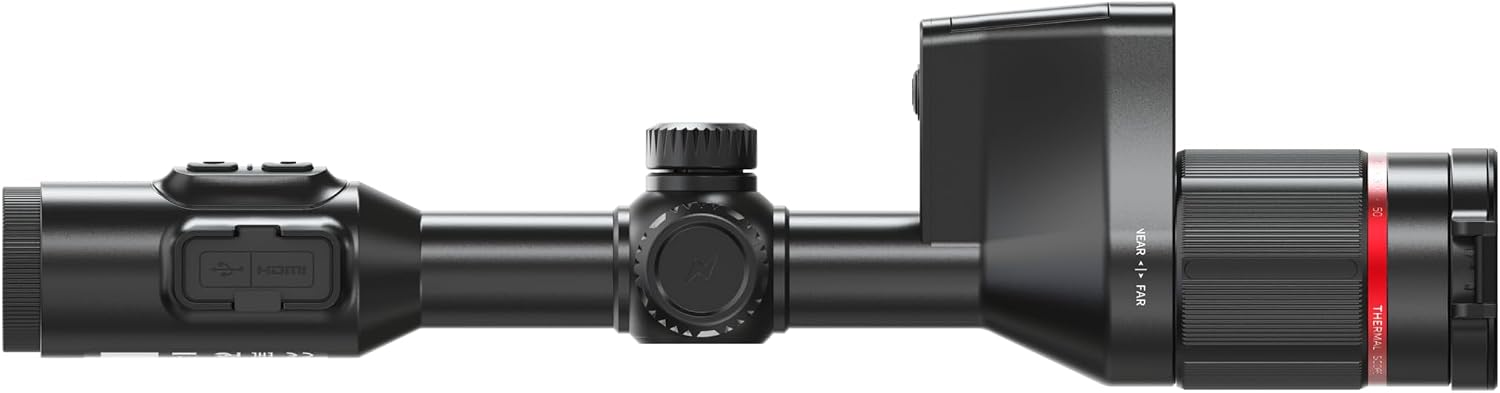
Figure 7: Close-up of the rear section, showing the USB Type-C charging port and other interfaces.

Figure 8: Angled view of the riflescope with the eyepiece cover in place, demonstrating its compact form.

Figure 9: The riflescope presented on a black background, showcasing its sleek design and proportions.
Setup
Battery Installation and Charging
- Locate the battery compartment on the riflescope.
- Insert the provided battery, ensuring correct polarity.
- Close the battery compartment securely.
- To charge, connect the USB Type-C cable to the charging port on the device and to a compatible power source. The charging indicator will illuminate.
- A full charge provides approximately 12 hours of operation.
Mounting the Riflescope
- Ensure your firearm is unloaded and safe.
- Attach appropriate mounting rings (not included) to your firearm's rail system.
- Place the TU 651 LRF-A into the mounting rings, ensuring proper eye relief and alignment.
- Securely tighten the mounting rings according to the ring manufacturer's instructions. Do not overtighten.
- Perform a bore-sighting procedure to get the riflescope roughly aligned with the barrel before live firing.
Operating Instructions
Power On/Off
- To power on, press and hold the power button until the display illuminates.
- To power off, press and hold the power button until the shutdown sequence completes.
Menu Navigation
The device features intuitive button controls for menu navigation. Refer to the on-screen prompts for specific functions.
- Use the directional buttons to navigate through menu options.
- Press the central button to select an option or confirm a setting.
- Press the menu button to exit a menu or return to the previous screen.
Thermal Imaging Modes
The TU 651 LRF-A offers six color palettes for various viewing conditions:
- White Hot: Hot objects appear white.
- Black Hot: Hot objects appear black.
- Red Hot: Displays heat signatures with a red gradient.
- Green Hot: Displays heat signatures with a green gradient.
- Iron Red: A common palette for general observation.
- Blue Hot: Displays heat signatures with a blue gradient.
Switch between modes via the quick menu or main settings.
Laser Rangefinder Operation
To activate the laser rangefinder:
- Aim the reticle at the target.
- Press the dedicated rangefinder button.
- The distance to the target will be displayed on the screen. The maximum range is 1500m (1630 yards).
Ballistic Calculator
The integrated ballistic calculator assists in precise shot placement. Configure your ammunition profiles within the device settings. Once configured, the calculator will provide holdover/holdunder adjustments based on the measured distance and environmental factors.
- Access the ballistic calculator settings from the main menu.
- Input bullet type, weight, muzzle velocity, and other relevant data.
- After ranging a target, the device will display the calculated aiming point.
Wi-Fi Connectivity (TargetIR App)
Connect your riflescope to the TargetIR app on your smartphone for real-time image/video capture and sharing.
- Download the TargetIR app from your device's app store.
- Enable Wi-Fi on the riflescope via the settings menu.
- Connect your smartphone to the riflescope's Wi-Fi network (SSID and password will be displayed on the riflescope screen).
- Open the TargetIR app to access live view, record video, capture photos, and manage settings.
Maintenance
Cleaning
- Lenses: Use a soft, lint-free cloth specifically designed for optics. Gently wipe the lens surfaces. For stubborn smudges, use a small amount of lens cleaning solution.
- Body: Wipe the riflescope body with a damp cloth. Do not use abrasive cleaners or solvents.
- Ensure all caps and covers are in place when not in use to protect the lenses and ports.
Storage
- Store the riflescope in a cool, dry place, away from direct sunlight and extreme temperatures.
- If storing for extended periods, remove the battery to prevent leakage.
- Use the provided protective case or a suitable padded case for transport and storage.
Troubleshooting
| Problem | Possible Cause | Solution |
|---|---|---|
| Device does not power on. | Battery is low or not installed correctly. | Charge the battery or re-install it with correct polarity. |
| Poor image quality. | Lens is dirty; focus is incorrect; environmental conditions. | Clean the lens; adjust the focus; wait for better conditions if fog/rain is severe. |
| Laser rangefinder not working. | Target is too far or too close; obstruction; battery low. | Ensure target is within range (1500m); clear obstructions; charge battery. |
| Wi-Fi connection issues. | Wi-Fi not enabled on device; incorrect password; app issues. | Enable Wi-Fi on riflescope; re-enter password; restart app/device. |
Specifications
| Feature | Detail |
|---|---|
| Model Name | TU651LRF-A |
| Brand | Guide Sensmart |
| Detector Resolution | 640×512, 12µm VOx uncooled |
| NETD | ≤20mK |
| Objective Lens | 50mm F1.0 |
| Detection Range | Up to 2800 yards |
| Magnification | 3.0x to 23.6x |
| Display Type | 0.49-inch AMOLED |
| Display Resolution | 1440×1080 |
| Digital Zoom | 8X |
| Color Palettes | White Hot, Black Hot, Red Hot, Green Hot, Iron Red, Blue Hot |
| Laser Rangefinder Range | 1500m / 1630 yards |
| Waterproof Rating | IP67 |
| Operating Temperature | -22°F to +122°F (-30°C to +50°C) |
| Shock Resistance | 800G |
| Battery Life | Approx. 12 hours |
| Charging Port | USB Type-C |
| Connectivity | Wi-Fi, Bluetooth |
| Dimensions | 4.17"L x 3.9"W x 15"H |
| Material | Metal |
Warranty and Support
Warranty Information
The Guide Sensmart TU 651 LRF-A Thermal Riflescope comes with a 10-Year Warranty as per manufacturer's terms. Please retain your proof of purchase for warranty claims.
Customer Support
For technical support, service, or warranty inquiries, please visit the official Guide Sensmart store or contact their customer service department.
Official Brand Store: Guide Sensmart Store on Amazon
Related documentsTU651LRF-A

Ask a question about this manual
Ask about setup, troubleshooting, compatibility, parts, safety, or missing instructions. Manuals+ will review the question and use this page’s manual context to help answer it.