
Introduction
Thank you for purchasing this Hyper-Tough wet/dry vacuum cleaner. This manual provides important information for the safe and efficient operation of your vacuum. Please read and understand all instructions before use.
This Hyper-Tough 1.5 Gallon 2 Peak HP Wet Dry Vacuum is designed for quick and efficient cleanup jobs in your home, garage, car, or workshop. It handles dry debris, liquid spills, and dust with powerful suction and also features a blower function.

A front view of the Hyper-Tough 1.5 Gallon Wet Dry Vacuum, showcasing its compact design, red and black color scheme, flexible hose, and two primary attachments: a utility nozzle and a crevice tool.
Important Safety Instructions
WARNING: To reduce the risk of fire, electric shock, or injury, read and understand all instructions before using this vacuum cleaner.
- Always disconnect the power cord from the electrical outlet before servicing or cleaning the unit.
- Do not use the vacuum to pick up flammable or combustible liquids, such as gasoline, or use in areas where they may be present.
- Do not pick up anything that is burning or smoking, such as cigarettes, matches, or hot ashes.
- Do not allow the vacuum to be used as a toy. Close attention is necessary when used by or near children.
- Use only as described in this manual. Use only manufacturer's recommended attachments.
- Do not use with damaged cord or plug. If vacuum is not working as it should, has been dropped, damaged, left outdoors, or dropped into water, return it to a service center.
- Do not pull or carry by cord, use cord as a handle, close a door on cord, or pull cord around sharp edges or corners. Do not run vacuum over cord. Keep cord away from heated surfaces.
- Do not unplug by pulling on cord. To unplug, grasp the plug, not the cord.
- Do not handle plug or vacuum with wet hands.
- Turn off all controls before unplugging.
- Use extra care when cleaning on stairs.
- Do not use without filters in place.
- If the supply cord is damaged, it must be replaced by the manufacturer or its service agent or a similarly qualified person in order to avoid a hazard.
Unpacking & Checking Carton Contents
Carefully remove all contents from the box. Remove the power head and take out any components inside the collection tank. Check each item against the carton contents list below.

A diagram illustrating the various components of the Hyper-Tough wet dry vacuum, including the main unit, hose, and accessories, along with a detailed list of items to verify upon unpacking.
Carton Contents List:
| Key | Description | Qty. |
|---|---|---|
| A | Vacuum Assembly | 1 |
| B | Hose | 1 |
| C | Crevice Tool | 1 |
| D | Utility Nozzle | 1 |
| E | Reusable Cloth Filter | 1 |
| F | Foam Wet Filter | 1 |
| G | Wall Mount Bracket | 1 |
| H | 2 Screws (Bag) | 1 |
| I | Operator's Manual | 1 |
NOTE: The hose and accessories for this vacuum are 1.25" (3.18 cm) diameter.

A comprehensive view of the Hyper-Tough wet dry vacuum along with all its included accessories, such as the flexible hose, crevice tool, utility nozzle, reusable cloth filter, and foam wet filter.
General Assembly Instructions
WARNING: DO NOT PLUG THE POWER CORD INTO A POWER OUTLET. MAKE SURE THE PLUG IS DISCONNECTED BEFORE ASSEMBLING THE WET/DRY VACUUM. TO REDUCE THE RISK OF ELECTRIC SHOCK, DO NOT EXPOSE TO RAIN.
Unpacking Your Wet/Dry Vacuum & General Assembly
- Verify that the power cord is disconnected from the outlet (Fig. 1).
- Undo the latches (Fig. 2).
- Lift the power head off the collection tank (Fig. 3).
- Remove the contents from inside the collection tank; make sure you have all contents as listed on page 7 (Fig. 4).
- Your vacuum comes ready for dry vacuum cleaning. If the reusable cloth filter is not installed, refer to page 14 for installation instructions (Fig. 5 & 6).
- For wet vacuum cleaning, remove the reusable cloth filter and install the supplied foam wet filter. See page 14 for the foam wet filter installation instructions (Fig. 7).
- Place the power head back on the collection tank aligning the top section with the latches, and snap into place (Fig. 8 & 9).
- Insert the larger end of the hose into the vacuum port on the power head (Fig. 10).
- Choose the desired attachment and insert onto the end of the hose (Fig. 11).
A visual guide with numbered steps demonstrating how to assemble the Hyper-Tough wet dry vacuum, including attaching the power head, hose, and accessories.
For your convenience this vacuum comes with a wall mount rack for storage.
IMPORTANT!
- Do not mount the rack over 5 ft / 1.5 m from the floor.
- Do not screw the wall mount rack to drywall only. Secure the screws to a stud.
- Do not hang from or sit on the vacuum when on wall mount rack.
- Do not use the vacuum while it is mounted on the wall mount rack.
- Empty the collection tank before mounting the vacuum on the wall.
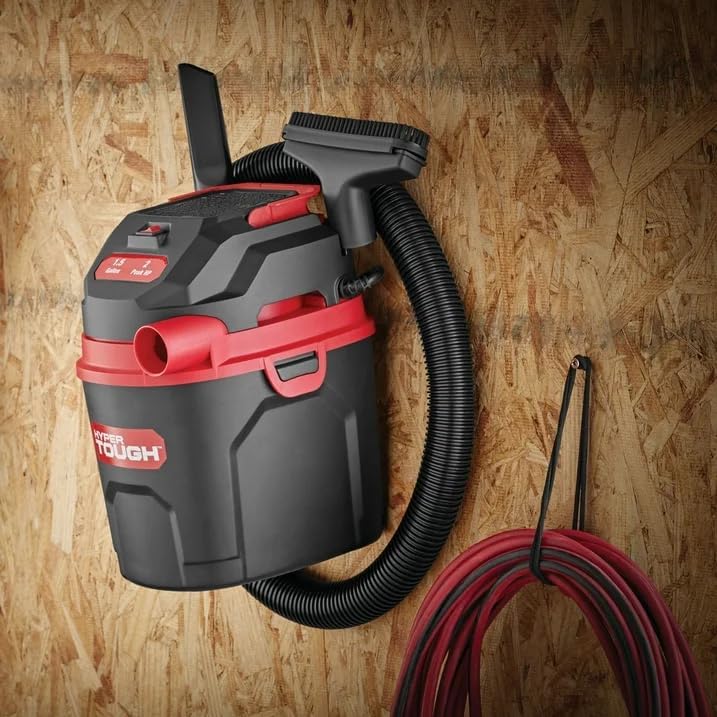
The Hyper-Tough wet dry vacuum is shown securely mounted on a wooden wall using its integrated wall mount bracket, demonstrating a convenient storage solution.
Operating Instructions
Dry Vacuum Operation
Ensure the reusable cloth filter is properly installed for dry vacuuming.
- Connect the desired attachment (utility nozzle or crevice tool) to the hose.
- Plug the power cord into a suitable electrical outlet.
- Turn the power switch to the "ON" position.
- Begin vacuuming dry debris.
- When finished, turn the power switch to "OFF" and unplug the unit.
Liquid Vacuum Operation
For wet vacuuming, remove the reusable cloth filter and install the foam wet filter.
- Ensure the foam wet filter is correctly installed.
- Connect the desired attachment to the hose.
- Plug the power cord into a suitable electrical outlet.
- Turn the power switch to the "ON" position.
- Begin vacuuming liquids. The vacuum will automatically shut off when the tank is full.
- When finished, turn the power switch to "OFF" and unplug the unit. Empty the collection tank immediately after wet vacuuming.
Blower Operation
The vacuum can also function as a powerful blower.
- Disconnect the hose from the vacuum port.
- Insert the larger end of the hose into the blower port located on the power head.
- Connect the desired attachment to the other end of the hose.
- Plug the power cord into a suitable electrical outlet.
- Turn the power switch to the "ON" position to activate the blower function.
- Use the blower to clear dust and debris from hard-to-reach areas.
- When finished, turn the power switch to "OFF" and unplug the unit.
Maintenance
Regular maintenance ensures optimal performance and extends the life of your Hyper-Tough wet dry vacuum.
Installing & Cleaning Reusable Cloth Filter
The reusable cloth filter is for dry vacuuming only.
- Ensure the vacuum is unplugged.
- Remove the power head.
- Place the cloth filter over the filter cage, ensuring it covers the entire cage.
- Secure the filter with the elastic band.
- To clean, remove the filter and shake off excess dust. For deeper cleaning, rinse with water and allow to air dry completely before reinstallation.
Installing & Cleaning Foam Wet Filter
The foam wet filter is for wet vacuuming only.
- Ensure the vacuum is unplugged.
- Remove the power head and any dry filters.
- Slide the foam filter over the filter cage.
- To clean, remove the filter and rinse thoroughly with water. Allow to air dry completely before reinstallation.
Emptying the Collection Tank
Empty the collection tank regularly to maintain suction power and prevent spills.
- Ensure the vacuum is unplugged.
- Undo the latches and lift off the power head.
- Carefully pour out the collected debris or liquid.
- Clean the inside of the tank with a damp cloth if necessary.
- Reattach the power head and secure the latches.
Troubleshooting
| Problem | Possible Cause | Solution |
|---|---|---|
| Vacuum does not turn on | No power to outlet; Power cord not plugged in; Power switch is off; Thermal cut-off activated. | Check outlet with another appliance; Plug in power cord securely; Turn power switch to ON; Unplug and allow unit to cool for 30 minutes. |
| Loss of suction | Tank is full; Filter is clogged; Hose or attachment is blocked; Power head not sealed properly. | Empty collection tank; Clean or replace filter; Clear obstruction from hose/attachment; Ensure latches are securely fastened. |
| Liquid spills from vacuum | Tank is overfilled; Foam wet filter not installed or damaged. | Empty collection tank; Install or replace foam wet filter. |
| Excessive noise | Obstruction in motor area; Damaged motor. | Check for and remove obstructions; Contact customer support if noise persists. |
Specifications
| Feature | Detail |
|---|---|
| Model Name | Hyper-Tough 1.5 Gallon Wet Dry Vacuum |
| Model Number | VH105 3502 |
| Capacity | 1.5 Gallons |
| Motor Horsepower | 2 Peak HP |
| Power Source | Corded |
| Special Features | Blower Function, Compact Design, Onboard Storage for Accessories, Secure Latches |
| Filter Type | Reusable Cloth Filter, Foam Wet Filter |
| Included Components | Flexible Hose, Crevice Tool, Utility Nozzle, Reusable Filter Bag |
| Product Dimensions | 7.91"L x 9.09"W x 11.47"H |
| Item Weight | 9.9 pounds |
| Color | Black & Red |
| Manufacturer | Hyper-Tough |
| Country of Origin | China |

A rear view of the Hyper-Tough wet dry vacuum, highlighting the power cord, the exhaust port, and the product label with model number (VH105 3502) and electrical specifications.
Warranty and Support
For warranty information or technical support, please refer to the contact details provided at the point of purchase or visit the official Hyper-Tough website. Keep your purchase receipt for warranty claims.
Manufacturer: Hyper-Tough
Model: VH105 3502
Customer Service: Please contact your retailer or the manufacturer's support line for assistance.
Online Resources: For additional information, FAQs, and replacement parts, visit the official Hyper-Tough website.