
Raddy WF-50V
Raddy WF-50T Wireless Weather Station User Manual
Model: WF-50V
Introduction
Thank you for choosing the Raddy WF-50T Indoor Outdoor Thermometer Hygrometer Wireless Weather Station. This device is designed to provide accurate, real-time environmental data for both indoor and outdoor conditions, including temperature, humidity, and weather forecasts. Its user-friendly display and stable wireless transmission make it an essential tool for monitoring your home environment.
Safety Information
- Do not expose the device to extreme temperatures, direct sunlight, or excessive moisture.
- Avoid dropping or subjecting the device to strong impacts.
- Do not attempt to disassemble or repair the device yourself. Refer all servicing to qualified personnel.
- Dispose of used batteries responsibly according to local regulations.
- Keep the device and its components out of reach of children.
Package Contents
- Raddy WF-50T Main Display Unit
- Wireless Remote Sensor
- USB-C Charging Cable
- User Manual (this document)
Product Overview
The Raddy WF-50T consists of a main display unit and a wireless remote sensor. The main unit displays all collected data, while the remote sensor transmits outdoor temperature and humidity readings.

Figure 1: Raddy WF-50T Main Display Unit (left) and Wireless Remote Sensor (right).
This image shows the primary components of the Raddy WF-50T weather station. The main unit features a large, clear display for indoor and outdoor readings, while the compact remote sensor is designed for outdoor placement.
Setup
1. Powering the Devices
The main display unit can be powered via USB-C or AAA batteries. The remote sensor requires AAA batteries.
- Main Display Unit:
- For continuous backlight and power, connect the included USB-C cable to the unit and a compatible USB power adapter (not included).
- For battery-only operation or as a backup during power outages, insert 2 x AAA batteries into the battery compartment on the back of the unit. In battery mode, the backlight will turn off after 10 seconds to conserve power.
- Wireless Remote Sensor:
- Open the battery compartment on the remote sensor and insert 2 x AAA batteries, observing the correct polarity (+/-).
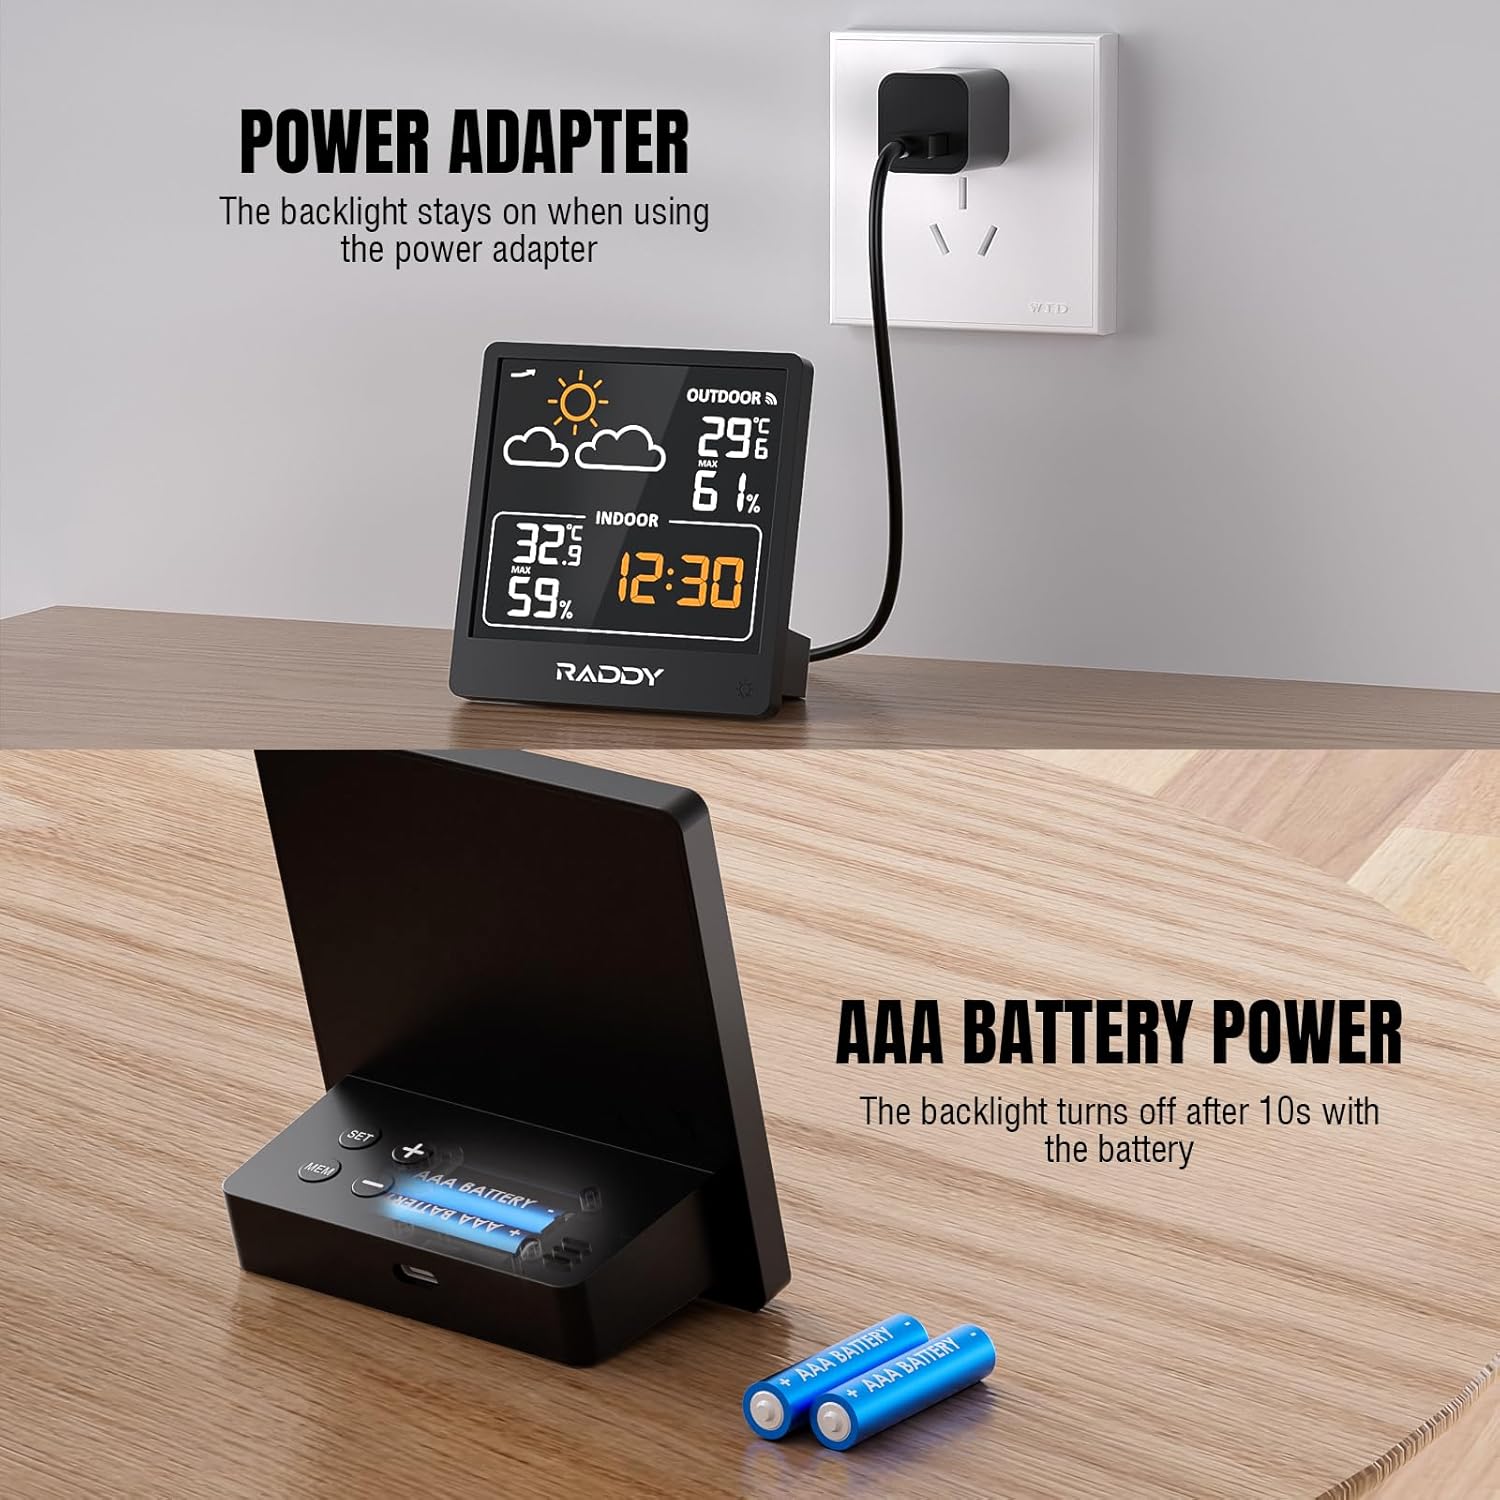
Figure 2: Powering the Raddy WF-50T. The image illustrates connecting the main unit via USB-C for continuous power and inserting AAA batteries for portable or backup power.
2. Sensor Placement
Place the wireless remote sensor in a location that provides accurate outdoor readings and is within the transmission range of the main unit (up to 330 feet / 100 meters).
- Choose a shaded area to avoid direct sunlight, which can cause inaccurate temperature readings.
- Protect the sensor from direct rain and snow.
- Ensure there are no major obstructions (e.g., thick walls, large metal objects) between the sensor and the main unit that could interfere with the wireless signal.

Figure 3: Wireless transmission range of the Raddy WF-50T. The image demonstrates the 330ft (100m) transmission capability, showing the main unit indoors and the remote sensor placed outdoors.
3. Initial Synchronization
Once both units are powered, they should automatically synchronize. The outdoor temperature and humidity readings will appear on the main display within a few minutes. If readings do not appear, try repositioning the sensor or pressing the 'RESET' button on both units (if available, refer to specific button layout on device).
Operating Instructions
1. Display Overview
The 5-inch LCD screen provides a clear overview of all essential information:
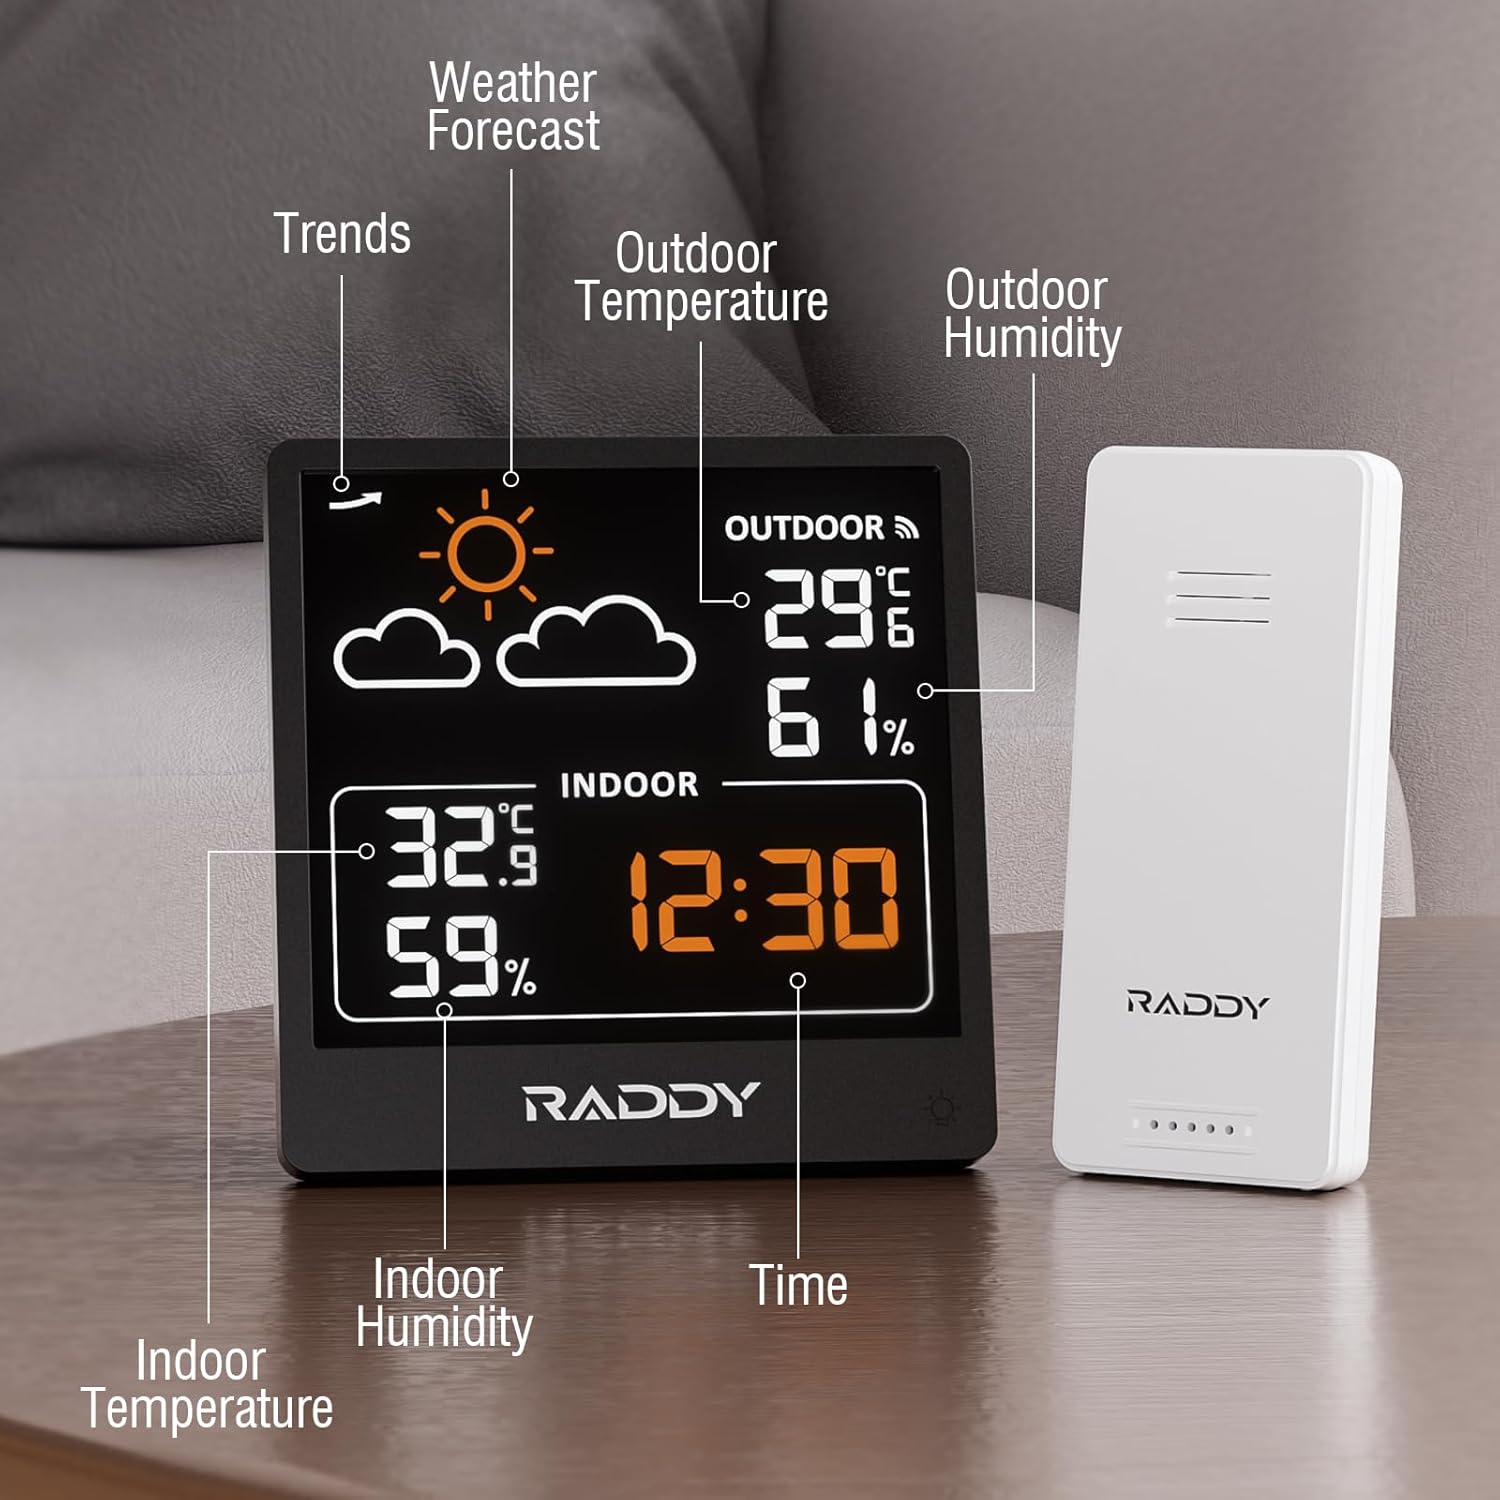
Figure 4: Detailed view of the Raddy WF-50T display. This image highlights various sections of the screen, including weather forecast icons, outdoor temperature and humidity, indoor temperature and humidity, and the current time.
- Weather Forecast: Icons indicating predicted weather conditions (sunny, cloudy, rainy, etc.).
- Outdoor Temperature & Humidity: Readings from the wireless remote sensor.
- Indoor Temperature & Humidity: Readings from the main unit's built-in sensors.
- Time: Current time display.
- Pressure Trends: (If applicable, based on product description) Indicates changes in atmospheric pressure.
2. Setting Time and Units
Refer to the buttons on the back or side of the main unit for specific controls. Typically:
- Press the "SET" button to enter time setting mode. Use "+" or "-" buttons to adjust values. Press "SET" again to confirm and move to the next setting (e.g., hour, minute, 12/24-hour format).
- Press the "°C/°F" button to switch between Celsius and Fahrenheit temperature units.
3. Backlight Control
The main unit features adjustable backlight levels:

Figure 5: Three adjustable backlight levels. This image demonstrates the display with backlight off, low brightness, and high brightness, illustrating the visual difference for each setting.
- When powered by USB-C, the backlight remains on. You can typically adjust its brightness using a dedicated button (often labeled with a light icon).
- When powered by batteries, the backlight will illuminate for approximately 10 seconds after pressing any button to conserve power.
4. Viewing MAX/MIN Records
The device tracks the maximum and minimum temperature and humidity readings over the past 24 hours.

Figure 6: 24-hour maximum and minimum temperature and humidity records. The image shows graphs illustrating the fluctuation of outdoor temperature and humidity over a 24-hour period, with peak and lowest values highlighted.
- Press the "MAX/MIN" button (or similar) to cycle through the maximum and minimum recorded values for indoor and outdoor temperature and humidity.
- To clear the records, typically press and hold the "MAX/MIN" button for a few seconds.
5. Weather Forecasting
The built-in pressure sensor predicts 12-24 hour weather trends. The forecast icons are based on atmospheric pressure changes and are not a guarantee of actual weather conditions.
- Sunny: Indicates rising pressure.
- Slightly Cloudy: Indicates stable pressure.
- Cloudy: Indicates falling pressure.
- Rainy: Indicates significant falling pressure.
- Heavy Rainy: Indicates rapid falling pressure.
- Snowy: Indicates very low temperatures with falling pressure.
Maintenance
- Cleaning: Wipe the display unit and sensor with a soft, damp cloth. Do not use abrasive cleaners or solvents.
- Battery Replacement: Replace batteries in both units when the low battery indicator appears on the display. Ensure correct polarity.
- Storage: If storing the device for an extended period, remove all batteries to prevent leakage. Store in a cool, dry place.
Troubleshooting
| Problem | Possible Cause | Solution |
|---|---|---|
| No display on main unit. | No power; batteries inserted incorrectly or depleted; USB-C cable not connected properly. | Check battery polarity and charge; replace batteries; ensure USB-C cable is securely connected to a working power source. |
| Outdoor readings not appearing or inaccurate. | Remote sensor batteries depleted; sensor out of range; interference; sensor not synchronized. | Replace sensor batteries; move sensor closer to main unit; reduce interference (e.g., large metal objects); re-synchronize by removing and reinserting batteries in both units. |
| Weather forecast seems incorrect. | Forecast is based on atmospheric pressure trends, not real-time weather. | Understand that the forecast is a prediction based on pressure changes and may not always match actual conditions perfectly. |
| Backlight not staying on. | Unit is running on battery power. | Connect the USB-C cable to keep the backlight continuously on. Battery mode is designed to conserve power. |
Specifications

Figure 7: Dimensions of the Raddy WF-50T main unit and remote sensor. The image provides measurements in both centimeters and inches for both components, along with the USB-C cable length.
- Model: WF-50V
- Indoor Temperature Range: +14.2℉ to +122℉ (-9.9℃ to 50℃)
- Outdoor Temperature Range: -40℉ to +158℉ (-40℃ to 70℃)
- Humidity Range: 20% to 95% RH
- Wireless Transmission Range: Up to 330 feet (100 meters) in open air
- Power Source (Main Unit): USB-C (cable included) or 2 x AAA batteries (not included)
- Power Source (Remote Sensor): 2 x AAA batteries (not included)
- Product Dimensions (Main Unit): 8.9 cm (3.5") width x 12.7 cm (5.0") height
- Product Dimensions (Remote Sensor): 3.9 cm (1.5") width x 9.3 cm (3.7") height
- Manufacturer: Raddy
- Country of Origin: China
Warranty and Support
For warranty information and technical support, please refer to the documentation provided with your purchase or visit the official Raddy website. Keep your proof of purchase for warranty claims.
Official Raddy Store: https://www.amazon.ca/stores/Raddy/page/04DBB4EB-56F8-4C26-A5D7-3758811F83CB
Related documentsWF-50V

Ask a question about this manual
Ask about setup, troubleshooting, compatibility, parts, safety, or missing instructions. Manuals+ will review the question and use this page’s manual context to help answer it.