
1. Introduction
This manual provides essential instructions for the installation, operation, and maintenance of your MSI Gaming RTX 5070 12G Shadow 3X OC Graphics Card. Please read this manual thoroughly before installation to ensure proper functionality and to prevent damage to the product or other components.
The MSI Gaming RTX 5070 12G Shadow 3X OC Graphics Card is designed for high-performance gaming and creative applications, featuring NVIDIA Blackwell architecture and advanced cooling solutions.
2. Safety Information
- Always disconnect power from your computer before installing or removing any components.
- Wear an anti-static wrist strap or frequently touch a grounded metal object to discharge static electricity, which can damage electronic components.
- Handle the graphics card by its edges to avoid touching sensitive components.
- Ensure proper ventilation within your computer case to prevent overheating.
- Keep the graphics card away from moisture and extreme temperatures.
- If you encounter any issues, refer to the troubleshooting section or contact MSI support.
3. Package Contents
Verify that all items are present in your product package:
- MSI Gaming RTX 5070 12G Shadow 3X OC Graphics Card
- Quick Setup Guide
- Power Adapter (if included, based on product reviews)
If any items are missing or damaged, please contact your retailer or MSI customer support.
4. Product Overview
The MSI Gaming RTX 5070 12G Shadow 3X OC Graphics Card is engineered for optimal performance and thermal efficiency. Key features include:
- NVIDIA Blackwell Architecture: Powers advanced graphics and AI capabilities.
- DLSS 4: Enhances gaming performance with AI-powered upscaling.
- TORX Fan 5.0: Designed with linked fan blades for stabilized, high-pressure airflow.
- Nickel-plated Copper Baseplate: Efficiently captures and transfers heat from the GPU and memory.
- Core Pipes: Square-shaped heat pipes maximize contact with the GPU baseplate for superior thermal management.
- Reinforcing Backplate: Features an airflow vent to facilitate direct exhaust of hot air.

Figure 4.1: The MSI Gaming RTX 5070 12G Shadow 3X OC Graphics Card alongside its packaging.

Figure 4.2: Front view of the graphics card, highlighting the triple fan cooling system.
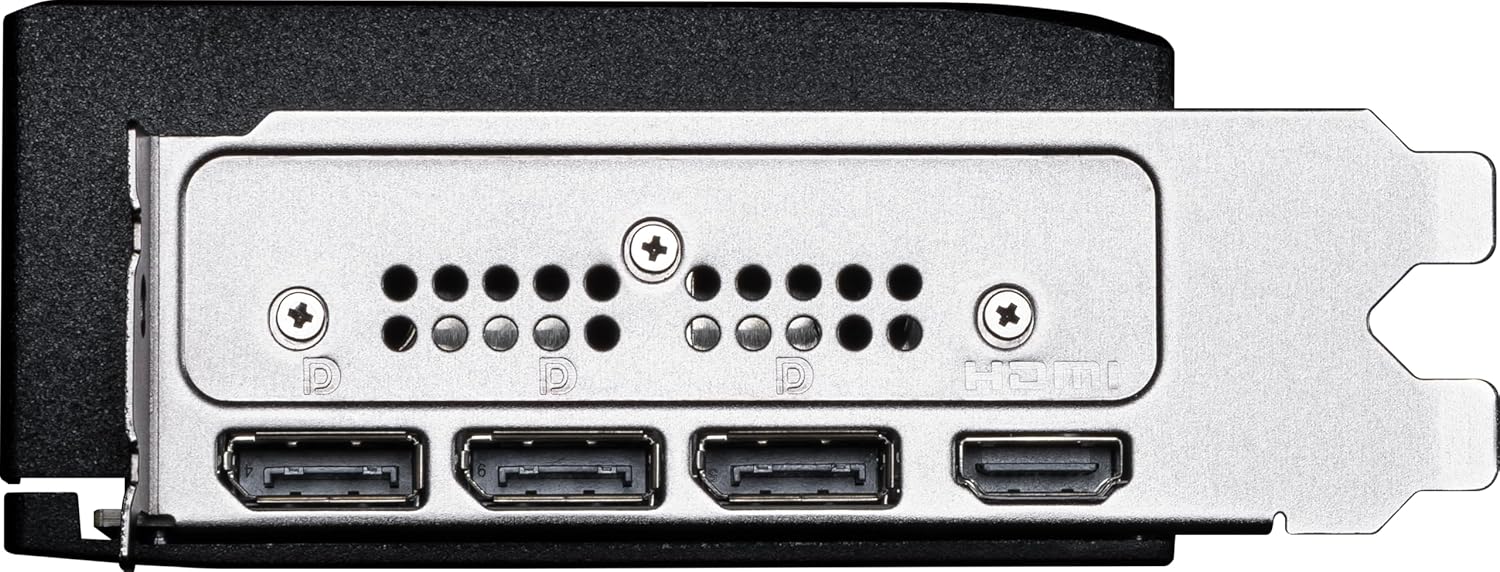
Figure 4.3: Rear input/output panel showing DisplayPort and HDMI connections.

Figure 4.4: Illustration of the TORX Fan 5.0 design, featuring linked fan blades for enhanced airflow.

Figure 4.5: Diagram illustrating the nickel-plated copper baseplate for efficient heat transfer.

Figure 4.6: Visual representation of the square-shaped Core Pipes designed to maximize contact with the GPU.

Figure 4.7: The reinforcing backplate, featuring an integrated airflow vent for improved heat dissipation.
5. Setup and Installation
5.1 System Requirements
Before installation, ensure your system meets the following minimum requirements:
- PCI Express-compliant motherboard with one x16 graphics slot.
- Sufficient power supply unit (PSU) with appropriate PCIe power connectors. Consult your PSU manufacturer for compatibility.
- Minimum 12GB system memory (RAM) recommended.
- Compatible operating system (e.g., Windows 10/11 64-bit).
- Internet connection for driver installation.
5.2 Hardware Installation
- Prepare Your System: Power off your computer and unplug all cables. Open the computer case.
- Locate PCIe Slot: Find an available PCI Express x16 slot on your motherboard. Remove any expansion slot covers that obstruct the slot.
- Install the Graphics Card: Carefully align the graphics card with the PCIe slot. Press down firmly and evenly until the card is securely seated in the slot. A click sound indicates it is locked.
- Secure the Card: Use screws to secure the graphics card to the computer case's expansion slot bracket.
- Connect Power Cables: Connect the required PCIe power cables from your power supply unit to the graphics card's power connectors. Ensure all connections are firm.
- Close Case and Connect Peripherals: Close your computer case, reconnect all cables (monitor, power, etc.), and power on your system.
6. Operating Instructions
6.1 Driver Installation
After hardware installation, you must install the latest graphics drivers for optimal performance.
- Initial Boot: Upon first boot, your operating system may install generic display drivers. This is normal.
- Download Drivers: Visit the official NVIDIA website (www.nvidia.com/drivers) or the MSI support page (www.msi.com/support).
- Select Product: Choose "GeForce RTX 50 Series" and then "RTX 5070" to find the correct drivers for your graphics card.
- Install Drivers: Download and run the driver installer. Follow the on-screen prompts. A system restart may be required.
6.2 Connecting Displays
Connect your monitor(s) to the DisplayPort or HDMI ports on the graphics card. The MSI Gaming RTX 5070 supports multiple displays. Refer to your operating system's display settings to configure multiple monitors (e.g., extend, duplicate).
7. Maintenance
- Keep Drivers Updated: Regularly check the NVIDIA website for the latest driver updates to ensure optimal performance and compatibility.
- Dust Removal: Periodically clean dust from the graphics card's fans and heatsink using compressed air. Ensure the computer is powered off and unplugged before cleaning.
- Monitor Temperatures: Use monitoring software to keep track of GPU temperatures, especially during heavy loads, to ensure it operates within safe limits.
8. Troubleshooting
8.1 No Display Output
- Check Cables: Ensure the monitor cable is securely connected to both the graphics card and the monitor.
- Power Connections: Verify that all PCIe power cables are correctly connected to the graphics card.
- Monitor Input: Confirm your monitor is set to the correct input source (e.g., DisplayPort, HDMI).
- Reseat Card: Power off, unplug, and reseat the graphics card in its PCIe slot.
8.2 Performance Issues or Crashes
- Update Drivers: Ensure you have the latest NVIDIA drivers installed.
- Monitor Temperatures: High temperatures can cause performance throttling or crashes. Check GPU temperatures and ensure adequate case airflow.
- Power Supply: Verify your power supply unit meets the recommended wattage for the graphics card and other system components.
- System Stability: Ensure other system components (CPU, RAM) are stable and not causing conflicts.
9. Specifications
| Feature | Detail |
|---|---|
| Model Number | G5070-12S3C |
| Graphics Processing Unit | NVIDIA GeForce RTX 5070 |
| Architecture | NVIDIA Blackwell |
| Video Memory | 12GB GDDR7 |
| Memory Interface | 192-bit |
| Boost Clock Speed | 2557 MHz |
| Memory Speed | 28 Gbps (effective) |
| Output Ports | 3x DisplayPort 2.1a, 1x HDMI 2.1b |
| Max Digital Resolution | 3840x2160 |
| Dimensions (LxWxH) | 3.4 x 12.2 x 0.04 inches (approximate) |
| Item Weight | 3.1 pounds |
10. Warranty and Support
MSI products come with a manufacturer's warranty. For detailed warranty information, please refer to the warranty card included with your product or visit the official MSI website.
For technical support, driver downloads, and further assistance, please visit the MSI support website: www.msi.com/support.


