
1. Important Safety Instructions
Please read all instructions carefully before using your bread maker. Keep this manual for future reference.
- Do not immerse the appliance, cord, or plug in water or other liquids.
- This appliance is not intended for use by persons (including children) with reduced physical, sensory or mental capabilities, or lack of experience and knowledge, unless they have been given supervision or instruction concerning use of the appliance by a person responsible for their safety.
- Unplug from outlet when not in use, before putting on or taking off parts, and before cleaning.
- Do not operate any appliance with a damaged cord or plug or after the appliance malfunctions or has been damaged in any manner.
- The use of accessory attachments not recommended by the appliance manufacturer may cause injuries.
- Do not use outdoors.
- Do not let cord hang over edge of table or counter or touch hot surfaces.
- Do not place on or near a hot gas or electric burner, or in a heated oven.
- Extreme caution must be used when moving an appliance containing hot oil or other hot liquids.
- Do not use the appliance for other than intended use.
- Avoid contact with moving parts.
- Do not touch hot surfaces. Use handles or knobs.
2. Product Overview
Familiarize yourself with the components of your Generic R.208 Bread Maker.
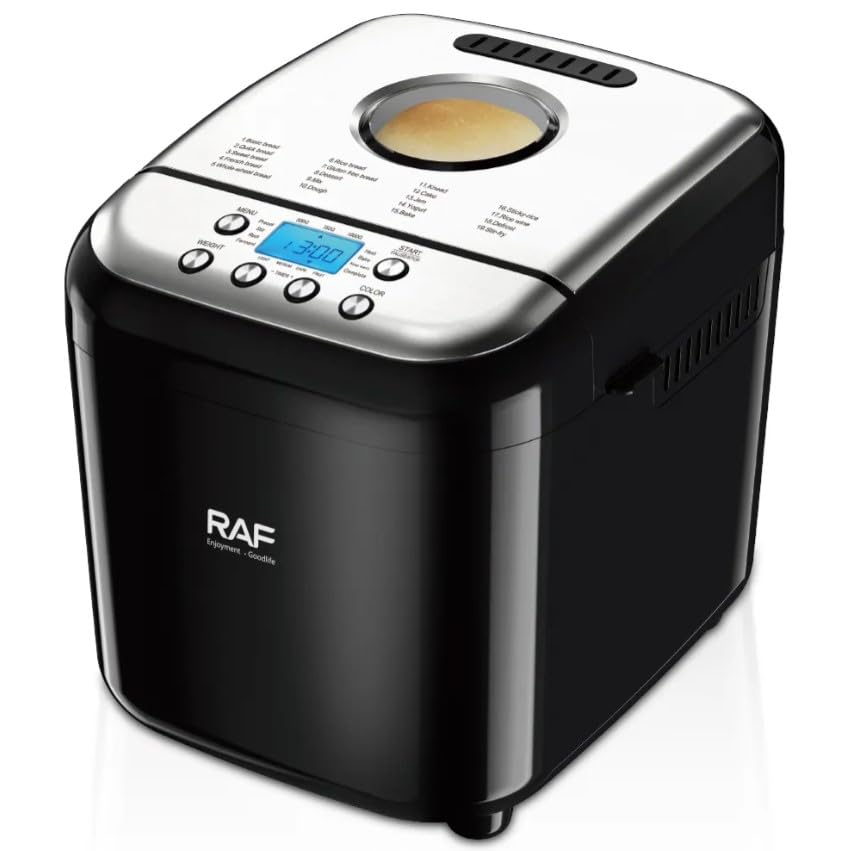
Image 1: Front view of the Generic R.208 600W Bread Maker. The image displays the appliance in black, featuring a control panel with buttons and a digital display, a viewing window on the lid, and a handle for opening. The overall design is compact and modern, suitable for kitchen countertops.
2.1 Components
- Main Unit: The primary housing of the bread maker.
- Baking Pan: Removable non-stick pan for baking bread.
- Kneading Paddle: Detachable paddle located inside the baking pan for mixing ingredients.
- Measuring Cup: For accurate measurement of liquids.
- Measuring Spoon: For accurate measurement of smaller ingredients like yeast or salt.
- Control Panel: Buttons and display for program selection and operation.
- Viewing Window: Allows monitoring of the baking process without opening the lid.
- Lid: Top cover of the bread maker.
3. Setup
3.1 Before First Use
- Unpack the bread maker and all accessories.
- Wipe the exterior of the bread maker with a damp cloth.
- Wash the baking pan and kneading paddle with warm, soapy water. Rinse thoroughly and dry completely.
- Ensure all parts are dry before assembly.
- Place the bread maker on a stable, flat, heat-resistant surface, away from direct sunlight and heat sources. Ensure adequate ventilation around the appliance.
3.2 Assembling the Baking Pan
- Insert the kneading paddle onto the shaft inside the baking pan. Ensure it is securely seated.
- Place the assembled baking pan into the main unit, pressing down firmly until it clicks into place.
4. Operating Instructions
4.1 Adding Ingredients
Always add ingredients in the order specified by your recipe. Typically, this order is liquids, then dry ingredients, and finally yeast.
- Add all liquid ingredients (water, milk, eggs, oil) to the baking pan first.
- Add dry ingredients (flour, sugar, salt, powdered milk). Ensure the dry ingredients cover the liquids.
- Create a small indentation in the center of the dry ingredients (do not reach the liquid) and add the yeast into this indentation. This prevents the yeast from activating prematurely.
- Close the lid of the bread maker.
4.2 Basic Operation
- Plug the bread maker into a grounded electrical outlet. The display will show the default program.
- Select Program: Press the "MENU" button repeatedly to cycle through the available programs until your desired program is displayed.
- Select Loaf Size/Crust Color: If applicable to your chosen program, use the "LOAF SIZE" and "CRUST COLOR" buttons to adjust these settings according to your preference.
- Start Baking: Press the "START/STOP" button to begin the selected program. The bread maker will automatically perform kneading, rising, and baking cycles.
- End of Cycle: A series of beeps will indicate the completion of the program. The bread maker may enter a "Keep Warm" cycle for a certain period.
- Remove Bread: Unplug the appliance. Using oven mitts, carefully remove the baking pan by twisting it counter-clockwise and lifting it out. Invert the pan to release the bread onto a wire rack to cool. Remove the kneading paddle from the bread if it remains embedded.
4.3 Program Guide (Example Programs)
| Program | Description | Typical Use |
|---|---|---|
| Basic | For white and mixed breads, mainly consisting of basic bread flour. | Everyday white bread, sandwich bread. |
| French | For light breads made from fine flour. Requires longer rising and baking times. | Crusty French bread. |
| Whole Wheat | For breads with a high percentage of whole wheat flour. | Nutritious whole wheat loaves. |
| Sweet | For breads with high sugar, fats, and proteins. | Brioche, sweet rolls. |
| Dough | Prepares dough without baking. | Pizza dough, rolls, pastries. |
| Bake | Only bakes, no kneading or rising. | Baking pre-made dough, additional browning. |
Note: Refer to your specific recipe book for detailed program recommendations and ingredient quantities.
5. Maintenance and Cleaning
Regular cleaning ensures optimal performance and extends the life of your bread maker.
5.1 Cleaning the Baking Pan and Kneading Paddle
- After use, allow the baking pan and kneading paddle to cool completely.
- Remove the kneading paddle from the pan. If it is stuck, fill the pan with warm water and let it soak for about 30 minutes to loosen it.
- Wash the pan and paddle with warm, soapy water using a soft sponge or cloth. Do not use abrasive cleaners or metal scouring pads, as these can damage the non-stick coating.
- Rinse thoroughly and dry completely before storing or next use.
- Do not wash the baking pan or kneading paddle in a dishwasher.
5.2 Cleaning the Main Unit
- Unplug the bread maker and ensure it is completely cool.
- Wipe the exterior surfaces of the main unit with a soft, damp cloth.
- Clean the interior of the baking chamber with a damp cloth to remove any crumbs or spills.
- Never immerse the main unit in water or any other liquid.
- Ensure all surfaces are dry before plugging in or storing.
6. Troubleshooting
If you encounter issues with your bread maker, refer to the following common problems and solutions:
| Problem | Possible Cause | Solution |
|---|---|---|
| Bread does not rise | Expired or inactive yeast; too much salt; too little sugar; water too hot or too cold. | Check yeast expiration date; reduce salt; increase sugar; use lukewarm water (approx. 40°C/105°F). |
| Bread is too dense | Too much flour; too little liquid; incorrect program selected. | Measure ingredients accurately; ensure correct liquid-to-flour ratio; select appropriate program. |
| Bread collapses in the middle | Too much liquid; too much yeast; high humidity; opening lid during rising. | Reduce liquid slightly; reduce yeast; avoid opening lid during rising cycles. |
| Kneading paddle stuck in bread | Common occurrence. | Allow bread to cool slightly, then carefully remove the paddle using a non-metallic utensil. |
| Bread sticks to pan | Damaged non-stick coating; pan not properly cleaned. | Ensure pan is clean and coating is intact. Do not use metal utensils in the pan. |
7. Specifications
- Model Number: R.208
- Brand: Generic
- Wattage: 600W
- Material: Plastic, Stainless Steel
- Color: Black
- Product Dimensions (D x W x H): 26 cm x 26 cm x 28 cm
- Country of Origin: China
- Included Components: Main Unit, Baking Pan, Kneading Paddle, Measuring Cup, Measuring Spoon
8. Warranty and Support
This product comes with a standard manufacturer's warranty. For specific warranty terms and conditions, please refer to the documentation provided at the time of purchase or contact your retailer.
For technical support, troubleshooting assistance beyond this manual, or to inquire about replacement parts, please contact the retailer or manufacturer's customer service department. Keep your purchase receipt as proof of purchase for warranty claims.


