
JingHao JH-A490
JINGHAO Rechargeable Sound Amplifiers User Manual
Model: JH-A490
Introduction
Thank you for choosing JINGHAO Rechargeable Sound Amplifiers. This manual provides detailed instructions for the proper use, care, and maintenance of your new devices. Designed for ease of use and enhanced sound clarity, these amplifiers come with a portable charging case for convenience. Please read this manual thoroughly before using the product to ensure optimal performance and longevity.
Product Overview
Components
Familiarize yourself with the main components of your sound amplifiers:
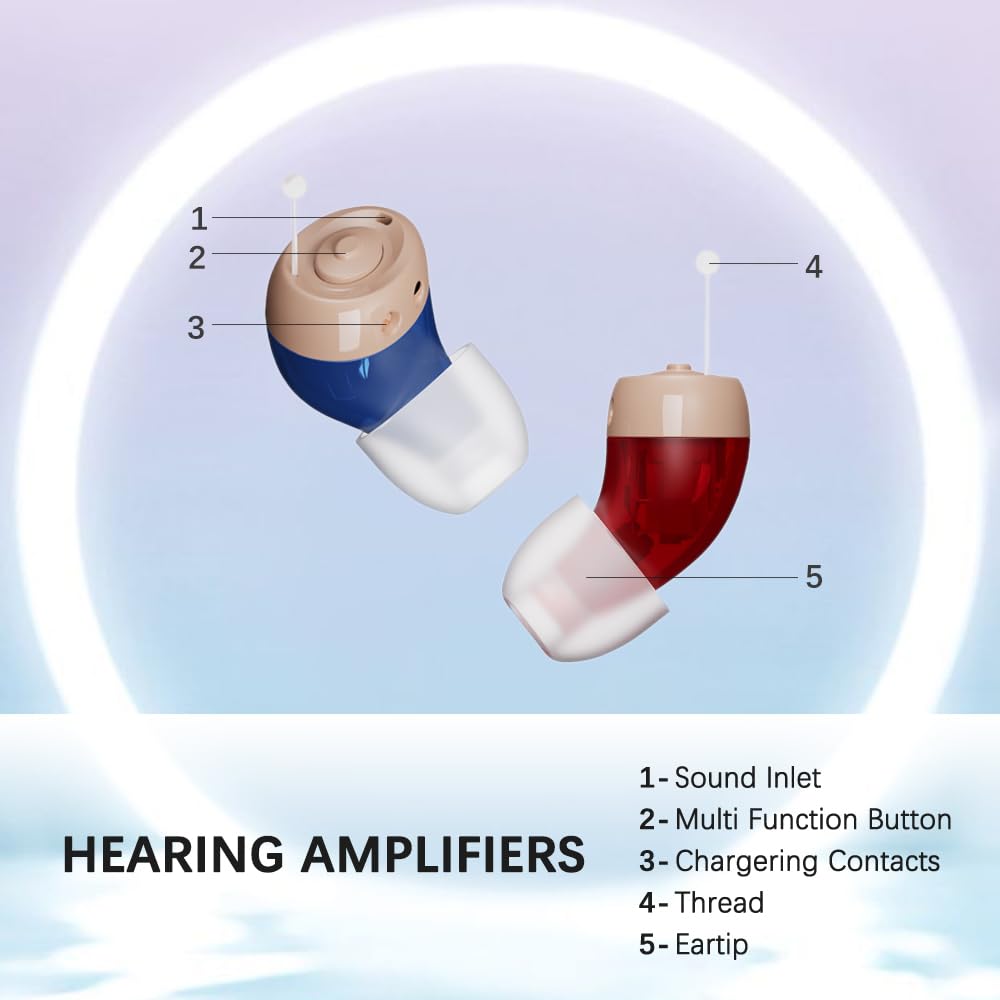
Image Description: A detailed diagram showing the individual components of the JINGHAO Sound Amplifier. Key parts are numbered: 1- Sound Inlet, 2- Multi Function Button, 3- Chargering Contacts, 4- Thread, 5- Eartip.
- Sound Inlet: Where sound enters the device.
- Multi-Function Button: Used for power control and volume adjustment.
- Charging Contacts: Connects to the charging case for power.
- Thread: For attaching and securing the eartip.
- Eartip: Soft silicone tip that fits into the ear canal.
Dimensions

Image Description: An image displaying the compact dimensions of the JINGHAO Sound Amplifiers and their charging case. The charging case measures approximately 6.5cm x 4.5cm x 3cm. Each amplifier is about 1.2cm x 0.9cm.
What's in the Box

Image Description: An organized display of all items included in the product package. This includes the product box, charging case, two hearing devices, multiple eartips, a charging cable, a cleaning tool, an after-service card, a user guide, and a quick guide.
- Product Box
- Charging Case
- Hearing Device x 2 (Left & Right)
- Eartip x 12 (various sizes and shapes)
- Charging Cable
- Cleaning Tool
- After Service Card
- User Guide (this manual)
- Quick Guide
Setup
Initial Charging
Before first use, fully charge the sound amplifiers and the charging case.

Image Description: An illustration highlighting the charging features. It shows the charging case with the amplifiers inside, indicating a 2-hour charging time for up to 2 days of usage, and a dual charging dock with overcharging protection.
- Connect the charging cable to the charging case and a power source.
- Place the sound amplifiers into their respective slots in the charging case. Ensure the charging contacts align.
- The indicator lights on the case will show charging status. A full charge typically takes approximately 2 hours.
- The charging case provides up to three full recharges for the amplifiers.
Identifying Left and Right
The amplifiers are color-coded for easy identification:

Image Description: This image shows the two sound amplifiers, one with a blue marking for the left ear (L) and one with a red marking for the right ear (R). The charging case also has corresponding L and R markings to ensure correct placement for charging.
- Blue (L): For the Left ear.
- Red (R): For the Right ear.
Selecting Eartips
Choose the eartip size and shape that provides the most comfortable fit and best sound quality, minimizing feedback.

Image Description: An image illustrating two different ear tip shapes (Standard and Upgraded) available in three sizes (S, M, L) to ensure a comfortable and effective fit for the user.
- Experiment with the different eartips provided.
- Select an eartip that fits snugly in your ear canal without causing discomfort. A good fit is crucial for sound quality and to prevent whistling (feedback).
- Gently attach the chosen eartip to the sound amplifier.
Inserting the Device
Carefully insert the amplifier into your ear.
- Hold the amplifier by its body.
- Gently push the eartip into your ear canal until it feels secure and comfortable.
- Avoid forcing the device into your ear.
Operating Instructions
Power On/Off

Image Description: This image illustrates the automatic power-on and power-off functions. The device automatically powers on 10 seconds after being removed from the charging case and turns off upon insertion back into the charging case.
- Power On: The device will automatically power on approximately 10 seconds after being removed from the charging case.
- Power Off: The device will automatically power off when returned to the charging case.
Volume Adjustment
Adjust the volume using the multi-function button on the device.

Image Description: An image showing the ease of volume adjustment with a single button. A graphic equalizer-like representation indicates volume levels from 15dB to 40dB.
- Press the multi-function button briefly to cycle through volume levels.
- The volume will increase with each press until it reaches the maximum level, then it will cycle back to the lowest level.
- Find a comfortable listening level that suits your environment.
Recommended Usage Scenarios
These sound amplifiers are designed to enhance hearing in various situations:
- In noisy environments
- While watching television
- During outdoor activities
- Social gatherings and parties
Maintenance
Cleaning Instructions
Regular cleaning ensures optimal performance and hygiene.
- Use the provided cleaning tool or a soft, dry cloth to gently wipe the surface of the amplifiers daily.
- Remove any earwax or debris from the eartips and sound inlet.
- If necessary, remove the eartip and clean it separately with mild soap and water, then dry thoroughly before reattaching.
- Do not use alcohol, solvents, or abrasive cleaners.
- Keep the charging contacts clean and dry.
Storage
- When not in use, store the amplifiers in their charging case to protect them and keep them charged.
- Store in a cool, dry place away from direct sunlight and extreme temperatures.
Battery Care
- Charge the devices regularly, even if not used daily, to maintain battery health.
- Avoid completely draining the battery frequently.
Troubleshooting
If you encounter any issues, please refer to the following common problems and solutions:
| Problem | Possible Cause | Solution |
|---|---|---|
| No sound or weak sound | Low battery; blocked sound inlet/eartip; incorrect volume setting. | Charge the device; clean the sound inlet and eartip; increase volume. |
| Whistling or feedback sound | Improper eartip fit; device not inserted correctly; volume too high. | Try a different eartip size; reinsert the device snugly; lower the volume. |
| Device not charging | Poor contact with charging pins; faulty cable/adapter; dirty charging contacts. | Ensure proper placement in case; check cable/adapter; clean charging contacts. |
| Sound is distorted or unclear | Earwax buildup in ear; damaged eartip; device malfunction. | Clean your ears; replace eartip; contact customer support if problem persists. |
If the problem persists after trying these solutions, please contact customer support.
Specifications
| Feature | Detail |
|---|---|
| Brand | JingHao |
| Model Name | RM |
| Manufacturer Reference | JH-A490 |
| Power Source | Rechargeable Battery |
| Battery Type | 1 Lithium-ion (included) |
| Material | Silicone |
| Color | Beige |
| Style | In-the-ear |
| Recommended Uses | Noisy environments, watching TV, outdoor activities |
| Compatible Devices | Smartphone, Tablet, Television |
| Package Dimensions | 12.6 x 10.3 x 5.6 cm; 180 grams |
Warranty and Support
Your JINGHAO Sound Amplifiers are designed for durability and performance. For information regarding warranty coverage and return policies, please refer to the purchase documentation or the retailer's website where the product was acquired. Typically, products are covered by a standard return policy, such as a 30-day refund/replacement period.
For technical support, troubleshooting assistance beyond this manual, or inquiries about replacement parts, please contact JINGHAO customer service through the contact information provided on the product packaging or the official brand website. Please have your model number (JH-A490) and purchase details ready when contacting support.
Related documentsJH-A490


Ask a question about this manual
Ask about setup, troubleshooting, compatibility, parts, safety, or missing instructions. Manuals+ will review the question and use this page’s manual context to help answer it.