
bokman 16A EV Charger (B0DY7TCS4X)
bokman Level 1&2 EV Charger 16A User Manual
Model: 16A EV Charger (B0DY7TCS4X) | Brand: bokman
1. Introduction
Thank you for choosing the bokman Level 1&2 EV Charger. This manual provides essential information for the safe and efficient operation of your EV charger. Please read it thoroughly before use and retain it for future reference.

Image: The bokman Level 1&2 EV Charger, showing the main unit, charging cable, NEMA 6-20 plug, and NEMA 5-15 adapter, along with mounting accessories and a storage bag.
Product Features:
- Fast Charging: 16A EV Charger designed for efficient and convenient EV charging.
- Dual Level Charging: Supports Level 2 charging with NEMA 6-20 plug (240V input) and Level 1 charging with included NEMA 5-15 adapter (120V input).
- Universal Compatibility: Compatible with all SAE-J1772 electric vehicles and plug-in hybrid vehicles.
- Enhanced Safety: Features LED indicator for charging status, Leakage Protection, Overcharge Protection, and Under Voltage Protection.
- Smart Control: Adjustable current function (6A to 16A) and delay charging function for off-peak hour charging.
- Durable Design: IP65 waterproof, resistant to extreme temperatures (-22°F to 130°F), and built with sturdy materials to withstand significant pressure.
2. Safety Information
Always adhere to the following safety guidelines to prevent injury or damage to the charger and your vehicle.
- Do not use the charger if the cable or plug is damaged.
- Ensure the charging port on your vehicle is clean and dry before connecting.
- Do not attempt to disassemble or modify the charger. Contact qualified personnel for repairs.
- Keep the charger away from flammable materials, water, and extreme heat sources.
- Always plug the charger into a properly grounded outlet.
- Do not force the plug into the vehicle's charging port.
- Disconnect the charger from the power outlet before performing any maintenance or cleaning.
- The control box buttons are disabled when connected to the car to prevent accidental changes during charging.

Image: The charger's control box displaying a lock icon, indicating that buttons are disabled when connected to the vehicle to prevent accidental adjustments.
3. Package Contents
Verify that all items are present in the package:

Image: A visual representation of the package contents, including the control box, charger holder, EV charger, box holder, storage bag, NEMA 5-15 adapter, user manual, and double-sided microfiber towel.
- 1 * Control Box
- 1 * Charger Holder
- 1 * EV Charger (with 25ft cable and NEMA 6-20 plug)
- 1 * Box Holder
- 1 * Storage Bag
- 1 * NEMA 5-15 Adapter
- 1 * User Manual (this document)
- 1 * Double Sided Microfiber Towel
4. Setup and Installation
Mounting the Charger:
The charger comes with a charger holder and a box holder for convenient wall mounting. Choose a suitable location near a power outlet, ensuring it is protected from direct weather exposure if possible, even though the unit is waterproof.
- Select a sturdy wall surface.
- Use appropriate screws and anchors (not included) to securely mount the charger holder and box holder.
- Place the control box into the box holder and hang the charging connector on the charger holder.
Connecting to Power:
The charger supports both Level 1 (120V) and Level 2 (240V) charging.

Image: Illustration of dual charging modes, showing connection to a NEMA 6-20 outlet for Level 2 charging and a NEMA 5-15 adapter for Level 1 charging from a standard home outlet.
- For Level 2 Charging (240V): Plug the NEMA 6-20 plug directly into a compatible 240V NEMA 6-20 outlet.
- For Level 1 Charging (120V): Attach the included NEMA 5-15 adapter to the NEMA 6-20 plug, then plug it into a standard 120V NEMA 5-15 household outlet.
Ensure the power outlet is properly installed and rated for the selected charging level.
5. Operating Instructions
Control Box Overview:
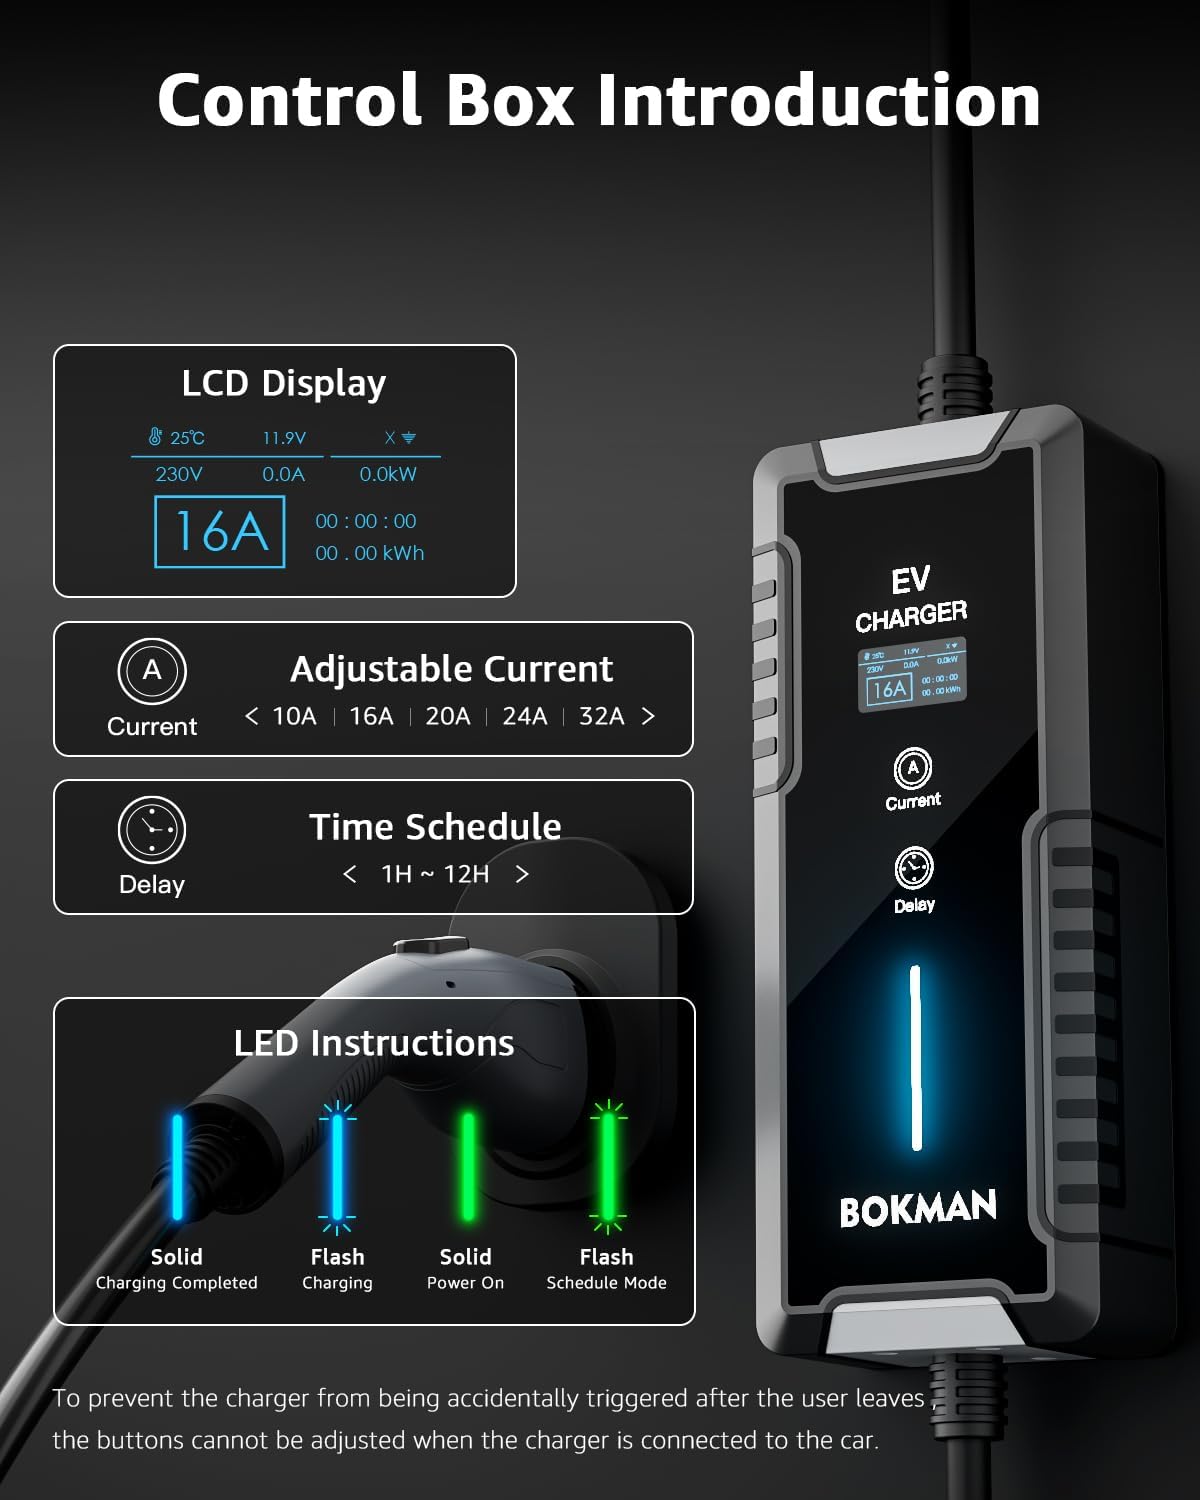
Image: Detailed view of the control box, highlighting the LCD display, adjustable current button, time schedule (delay) button, and LED indicator instructions.
- LCD Display: Shows charging status, voltage, current, power, and accumulated energy.
- Current Button: Adjusts the charging current.
- Delay Button: Sets a delayed charging start time.
- LED Indicator: Provides visual feedback on charging status (Solid Blue: Charging Completed, Flash Blue: Charging, Solid Green: Power On, Flash Green: Schedule Mode).
Starting a Charge:
- Connect to Power: Ensure the charger is properly plugged into a suitable power outlet (NEMA 6-20 or NEMA 5-15 with adapter). The LED indicator will show solid green (Power On).
- Adjust Current (Optional): Before connecting to the vehicle, press the "Current" button to cycle through available amperage settings (6A to 16A). Select the desired current based on your vehicle's requirements and outlet capacity. The buttons are disabled once connected to the car.
- Set Delay (Optional): Before connecting to the vehicle, press the "Delay" button to set a delayed start time (1H to 12H). This allows for charging during off-peak hours. The LED will flash green in schedule mode.
- Connect to Vehicle: Insert the SAE-J1772 charging connector firmly into your EV's charging port. The charger will automatically begin charging (or start after the set delay). The LED indicator will flash blue (Charging).

Image: A visual guide showing the three steps for charging: 1. Insert the plug into the socket, 2. Click to select the charging current, 3. Plug the charger into your vehicle and start charging.
Stopping a Charge:
- From Vehicle: Most EVs allow you to stop charging from the vehicle's infotainment system or mobile app.
- From Charger: If the vehicle does not stop charging automatically, or if you need to manually stop it, press and hold the "Current" button on the control box for several seconds until the display prompts "stop charging?". Confirm by pressing and holding "Current" again.
- Disconnect: Once charging has stopped, disconnect the charging connector from your vehicle, then unplug the charger from the power outlet.

Image: A graph illustrating the benefit of smart charging schedules, showing higher costs during peak hours and lower costs during off-peak hours, encouraging users to utilize the delay function.
6. Maintenance and Care
- Cleaning: Use the provided microfiber towel or a soft, dry cloth to clean the charger and cable. Do not use abrasive cleaners or solvents.
- Storage: When not in use, store the charger in its storage bag in a dry, cool place. Avoid coiling the cable too tightly.
- Cable Inspection: Regularly inspect the charging cable and connectors for any signs of wear, damage, or corrosion. If damage is found, discontinue use immediately and contact customer support.
- Environmental Protection: Although the charger is IP65 waterproof and resistant to extreme temperatures, prolonged exposure to harsh conditions can reduce its lifespan.

Image: The charger shown in a rainy environment, highlighting its IP65 waterproof rating, indicating protection against water jets.

Image: The charger shown in a snowy, cold environment, emphasizing its ability to operate effectively in temperatures as low as -22°F.

Image: The charger shown in a desert-like, hot environment, illustrating its high temperature resistance up to 130°F.

Image: A close-up of the charging cable, demonstrating its sturdy construction and ability to withstand a car crushing weight of 2.5 tons.

Image: The charging cable shown on rough ground, illustrating its durable outer cover designed to prevent damage when dragged.

Image: The charging cable shown in a snowy environment, demonstrating its excellent anti-freeze performance and ability to remain flexible in freezing weather.
7. Troubleshooting
| Problem | Possible Cause | Solution |
|---|---|---|
| Charger not powering on. | No power from outlet; charger not fully plugged in. | Check the power outlet and ensure the charger is securely plugged in. Test the outlet with another device. |
| Charging not starting. | Vehicle not ready to charge; charging connector not fully inserted; current setting too high/low for vehicle/outlet; delay timer active. | Ensure your EV is ready to accept a charge. Re-insert the charging connector firmly. Adjust the current setting before connecting to the car. Check if a delay timer is set. |
| Charging stops unexpectedly. | Overcharge protection activated; under voltage protection activated; leakage protection activated; vehicle battery full. | Check the LCD display for error codes. Disconnect and reconnect the charger. If issues persist, consult a qualified electrician or contact customer support. |
| Buttons on control box unresponsive during charging. | This is a safety feature. | Buttons are intentionally disabled when the charger is connected to the vehicle to prevent accidental changes. Disconnect from the vehicle to adjust settings. |
8. Specifications
| Feature | Detail |
|---|---|
| Model | 16A EV Charger (B0DY7TCS4X) |
| Input Voltage | 120V (Level 1 with adapter), 240V (Level 2) |
| Output Voltage | 240 Volts |
| Adjustable Current | 6A, 8A, 10A, 13A, 16A |
| Max Power Output | 3.84kW (16A @ 240V) |
| Charging Cable Length | 25ft |
| Plug Type | NEMA 6-20 (NEMA 5-15 adapter included) |
| Vehicle Connector | SAE-J1772 |
| Operating Temperature | -22°F to 130°F (-30°C to 55°C) |
| Waterproof Rating | IP65 |
| Product Dimensions | 1.65"D x 3.5"W x 7.5"H (Control Box) |
| Item Weight | 9.75 pounds |

Image: A graphic illustrating the charging speed: Level 2 (NEMA 6-20) at 3.5kW max (approx. 13 miles per hour) and Level 1 (NEMA 5-15) at 1.43kW max (approx. 5.3 miles per hour).
9. Warranty and Support
For warranty information and customer support, please refer to the contact details provided on the product packaging or the official bokman website. Keep your purchase receipt as proof of purchase.
For technical assistance or troubleshooting beyond this manual, please contact bokman customer service.
- Manufacturer: Zhongshan Auxus Electronic Technology Co., LTD
- Brand Store: bokman Amazon Store
Ask a question about this manual
Ask about setup, troubleshooting, compatibility, parts, safety, or missing instructions. Manuals+ will review the question and use this page’s manual context to help answer it.