1. Introduction
Thank you for choosing the Euhomy WC003-X3BS-USZX Bottom Loading Water Dispenser. This manual provides essential information for the safe and efficient operation of your new appliance. Please read these instructions thoroughly before installation and use, and retain them for future reference.
This water dispenser is designed to provide instant access to cold, warm, and hot water, accommodating 3 or 5-gallon water bottles with a convenient bottom-loading design.
2. Safety Information
To reduce the risk of injury or property damage, always follow basic safety precautions when using electrical appliances. This includes, but is not limited to, the following:
- Read all instructions before using the appliance.
- Ensure the power supply matches the voltage specified on the appliance's rating label.
- Do not operate any appliance with a damaged cord or plug, or after the appliance malfunctions or has been damaged in any manner.
- Keep the power cord away from heated surfaces.
- Do not immerse the appliance, cord, or plug in water or other liquids.
- Hot Water Safety: The hot water dispenser reaches temperatures up to 203°F (95°C). Exercise extreme caution. This unit features a child safety lock on the hot water button to prevent accidental scalding. Always engage the child lock when not dispensing hot water, especially in households with children.
- Place the dispenser on a firm, level surface. Do not place it in direct sunlight or near heat sources.
- Allow adequate ventilation around the unit. Maintain at least 4 inches (10 cm) of space from walls.
- Only use bottled drinking water with this appliance.
- Unplug the dispenser before cleaning or performing any maintenance.
3. Product Overview
The Euhomy WC003-X3BS-USZX water dispenser offers convenient access to water at three different temperatures. Its bottom-loading design eliminates the need for heavy lifting of water bottles.
Key Features:
- Bottom Load Design: Accommodates 3 or 5-gallon water bottles, reducing physical strain during bottle replacement.
- Three Temperature Modes: Provides cold (41-51°F), warm (room temperature), and hot (185-194°F) water.
- Child Safety Lock: A two-step operation for hot water dispensing ensures safety, preventing accidental burns.
- Indicator Lights: Clearly displays operational status for hot water, cold water, warm water, and low water level.
- Removable Drip Tray: Easy to clean and maintain.
Components:
Refer to the image below for a visual representation of the water dispenser's main components.

Figure 3.1: Front view of the Euhomy Bottom Loading Water Dispenser, showing the dispensing area, control panel, and the lower cabinet for the water bottle.
4. Setup Instructions
Follow these steps to set up your water dispenser for the first time.
4.1 Unpacking
- Carefully remove the water dispenser from its packaging.
- Remove all packing materials, including any tape or protective film.
- Inspect the unit for any signs of damage. If damaged, do not use and contact customer support.
4.2 Placement
- Place the dispenser on a flat, stable, and level surface capable of supporting its weight when full.
- Ensure the dispenser is placed in a cool, dry area, away from direct sunlight and heat sources (e.g., ovens, dishwashers).
- Allow at least 4 inches (10 cm) of clearance from walls and other objects to ensure proper ventilation.
4.3 Water Bottle Installation
This dispenser features a bottom-loading design for easy water bottle replacement.

Figure 4.1: Illustration of a 5-gallon water bottle being inserted into the bottom compartment of the dispenser.
- Open the lower cabinet door of the dispenser.
- Remove the cap from a new 3 or 5-gallon water bottle.
- Insert the probe from the dispenser into the opening of the water bottle. Ensure the probe is fully inserted.
- Slide the water bottle into the cabinet and close the door securely.
4.4 Initial Priming and Power Connection
- Before plugging in the unit, allow water to fill the internal tanks. Press each dispensing button (cold, warm, hot) until water flows steadily from each spout. This ensures the tanks are full and prevents damage to heating elements.
- Once water flows from all spouts, plug the power cord into a grounded electrical outlet.
- The indicator lights on the control panel will illuminate, signaling that the dispenser is powered on and beginning to cool and heat the water.
5. Operating Instructions
Your Euhomy water dispenser is designed for simple operation.
5.1 Dispensing Water
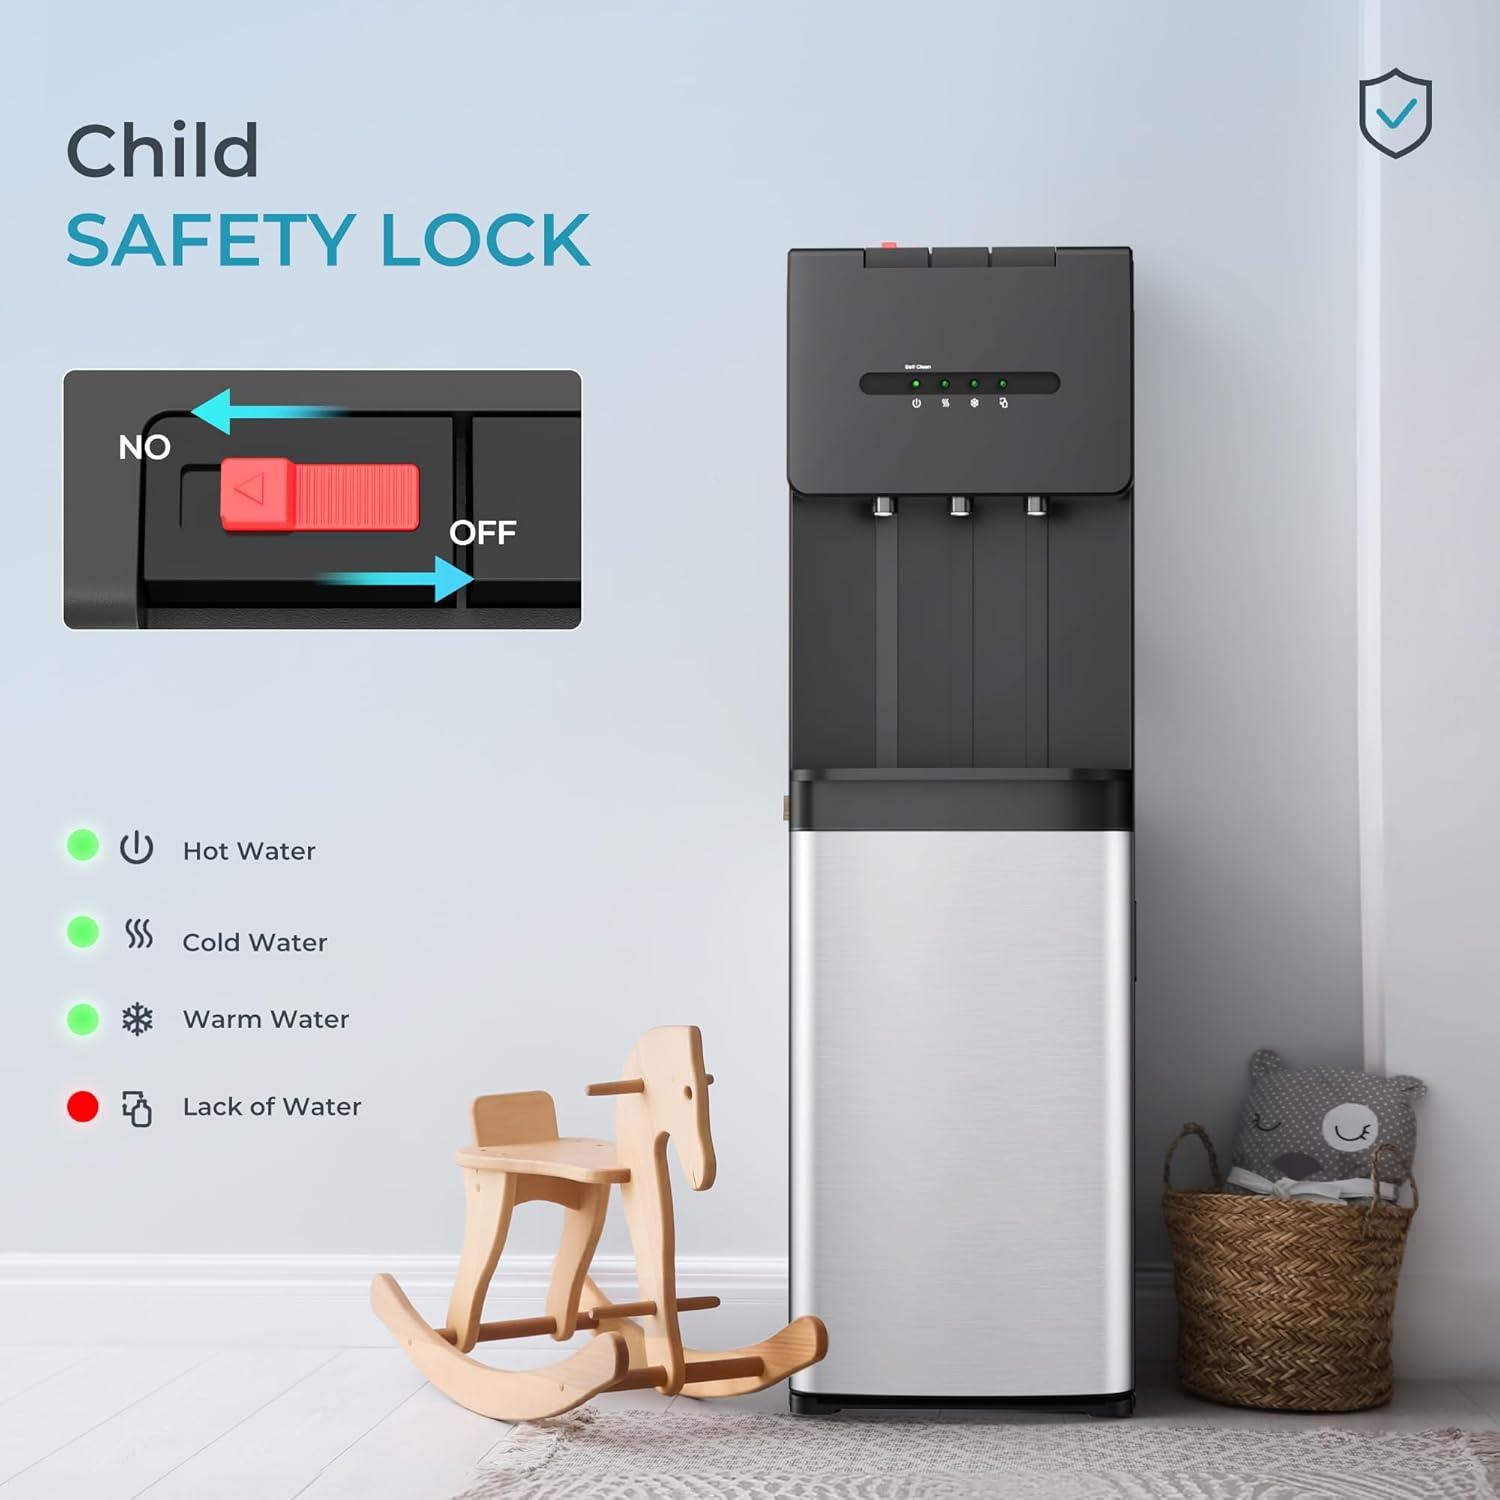
Figure 5.1: Detail of the dispensing area, highlighting the three temperature options: Hot, Warm, and Cold.
- Place a cup or container under the desired water spout.
- For Cold Water: Press the blue button.
- For Warm Water: Press the green button.
- For Hot Water: Slide the child safety lock (red switch) to the 'ON' position, then press the red button. Release the button to stop dispensing.
5.2 Child Safety Lock
The child safety lock is a crucial feature for preventing accidental hot water dispensing.

Figure 5.2: Detailed view of the child safety lock mechanism, showing the 'NO' and 'OFF' positions.
- To dispense hot water, slide the red safety lock switch to the 'ON' position (or away from 'NO').
- While holding the safety switch, press the red hot water button.
- Release the button to stop the flow of hot water.
- Always ensure the child safety lock is in the 'OFF' position when hot water is not being dispensed.
5.3 Indicator Lights
- Green Light (Hot Water): Illuminates when the hot water tank is heating and turns off when the desired temperature is reached.
- Blue Light (Cold Water): Illuminates when the cold water tank is cooling and turns off when the desired temperature is reached.
- Green Light (Warm Water): Indicates the warm water function is active.
- Red Light (Lack of Water): Illuminates when the water bottle is empty or nearly empty, signaling it's time for a replacement.
6. Maintenance
Regular cleaning and maintenance will ensure the longevity and optimal performance of your water dispenser.
6.1 Cleaning the Drip Tray

Figure 6.1: Steps for removing and cleaning the removable drip tray.
- The drip tray should be emptied and cleaned regularly to prevent overflow and bacterial growth.
- Gently lift the drip tray from its position below the spouts.
- Empty any collected water and wash the tray with mild soap and warm water.
- Rinse thoroughly and dry before replacing it.
6.2 Exterior Cleaning
- Unplug the dispenser from the power outlet before cleaning.
- Wipe the exterior surfaces with a soft, damp cloth. Do not use abrasive cleaners or solvents.
- Ensure no water enters the ventilation openings or electrical components.
6.3 Descaling (Recommended Annually)
Over time, mineral deposits can build up inside the hot water tank. Descaling helps maintain efficiency.
- Unplug the dispenser and drain all water from the hot and cold tanks.
- Prepare a descaling solution (e.g., a mixture of white vinegar and water, or a commercial descaling agent designed for water dispensers).
- Pour the solution into the hot water tank (refer to specific instructions for accessing the tank, usually via a cap on top or back).
- Allow the solution to sit for 30 minutes to an hour.
- Drain the solution completely.
- Rinse the tanks thoroughly with clean water several times to remove any residual descaling solution.
- Refill with fresh water and perform initial priming before plugging back in.
7. Troubleshooting
If you encounter issues with your water dispenser, refer to the table below for common problems and solutions.
| Problem | Possible Cause | Solution |
|---|---|---|
| No water dispenses | Water bottle empty; Probe not fully inserted; Airlock in system; Power off | Replace water bottle; Ensure probe is fully inserted; Perform initial priming; Check power connection |
| Water not cold/hot enough | Cooling/heating function off; Insufficient time to reach temperature; Poor ventilation | Ensure cooling/heating switches are on; Allow 15-30 minutes for temperature stabilization; Ensure adequate clearance around unit |
| Water leaking | Water bottle cracked; Drip tray overflowing; Loose connections | Replace water bottle; Empty and clean drip tray; Check all connections for tightness |
| Unusual noise | Compressor cycling (normal); Unit not level | This is normal operation; Ensure unit is on a level surface |
If the problem persists after attempting these solutions, please contact customer support.
8. Specifications
Detailed technical specifications for the Euhomy WC003-X3BS-USZX Water Dispenser.

Figure 8.1: Dimensions of the Euhomy Water Dispenser.
| Specification | Value |
|---|---|
| Model Number | WC003-X3BS-USZX |
| Color | Black |
| Material | Plastic |
| Capacity | 5 Gallons (compatible with 3 or 5-gallon bottles) |
| Product Dimensions (D x W x H) | 12"D x 14"W x 41"H |
| Item Weight | 39.7 pounds |
| Installation Type | Freestanding |
| Access Location | Bottom |
| Upper Temperature Rating (Hot) | 203 Degrees Fahrenheit (approx. 185-194°F dispensing) |
| Lower Temperature Rating (Cold) | 41 Degrees Fahrenheit (approx. 41-51°F dispensing) |
| Power Source | Corded Electric |
| UPC | 850071871340 |
| Manufacturer | EUHOMY |
9. Warranty and Support
9.1 Warranty Information
Euhomy provides a one-year warranty service for this bottom loading water cooler. This warranty covers defects in materials and workmanship under normal use.
9.2 Customer Support
If you have any questions, require assistance with setup, operation, or troubleshooting, or need to make a warranty claim, please contact Euhomy customer service. Refer to your purchase documentation or the official Euhomy website for the most current contact information.


