1. Introduction
The AOMOSUR Wireless RV Leveling System (Model AM350-A) is designed to provide precise and real-time leveling information for your RV or trailer. This system features a dedicated portable screen and a second-generation transmitter, allowing for wireless monitoring from your driver's seat without the need for a smartphone application. Its robust signal ensures reliable readings, making the leveling process quick and efficient.
2. Product Components
The AOMOSUR Wireless RV Leveling System consists of two primary components:
- Wireless Leveling Transmitter (TX): This unit is mounted on your RV and sends leveling data wirelessly.
- Dedicated Portable Display (Receiver): This handheld unit receives data from the transmitter and displays the RV's roll and pitch angles.

Figure 2.1: The AOMOSUR Wireless RV Leveling System, showing the transmitter (left) and the portable display (right).
3. Setup and Installation
Follow these steps for quick and stable installation of your leveling system.
3.1. Prepare the RV
Park your RV or trailer on a relatively flat and level ground before beginning the installation and calibration process. This ensures accurate initial readings.

Figure 3.1: Ensure your RV is parked on a flat surface for initial setup.
3.2. Install the Transmitter
The transmitter unit must be mounted on a vertical surface with the arrows pointing upwards. It features a magnetic mount for easy attachment.
- Choose a suitable vertical surface on your RV or trailer for mounting the transmitter. Ensure the surface is clean and dry.
- Attach the mounting bracket (if using) or directly place the transmitter onto a magnetic surface. The arrows on the transmitter must point upwards.

Figure 3.2: The transmitter unit showing the correct orientation for mounting.
3.3. Install the Display
The portable display can be placed in a convenient location within your vehicle, such as on the dashboard or a console.
- Place the display unit in a location where it is easily visible from the driver's seat.
- Ensure the display is stable and will not move during vehicle operation.

Figure 3.3: The portable display unit positioned on a vehicle dashboard.
3.4. Power On and Calibration
After installation, power on both units and perform the calibration.
- Press the power button on the transmitter to turn it on. The "AT WORK" indicator light should illuminate.
- Press the power button on the portable display to turn it on. The display should automatically connect to the transmitter.
- Once both units are powered on and connected, ensure your RV is as level as possible using traditional methods if necessary.
- Refer to the display's on-screen instructions or the quick start guide for specific calibration steps to zero out the readings. This typically involves pressing a calibration button when the RV is perfectly level.

Figure 3.4: Overview of the 3-step installation process including parking the RV, installing the transmitter, installing the display, and calibration.
4. Operating Instructions
Once installed and calibrated, the AOMOSUR Wireless RV Leveling System provides real-time leveling data to assist you in setting up your RV.
4.1. Understanding the Display
The portable display shows two key measurements:
- Roll: Indicates the side-to-side tilt of your RV. A reading of 0.0° means the RV is level from left to right.
- Pitch: Indicates the front-to-back tilt of your RV. A reading of 0.0° means the RV is level from front to back.
The display provides visual indicators and numerical values to guide you in achieving a perfectly level position.

Figure 4.1: The portable display showing current roll and pitch angles.
4.2. Leveling Your RV
With the system active, you can level your RV from the driver's seat:
- Observe the Roll and Pitch readings on the display.
- Adjust your RV's position or use leveling blocks/jacks as needed, monitoring the display for real-time feedback.
- Continue adjustments until both Roll and Pitch readings are at or near 0.0°, indicating a level RV.

Figure 4.2: Leveling your RV becomes a one-person job with real-time angle display.
4.3. Wireless Range and Signal
The system offers a strong wireless signal with up to 150 feet of coverage, designed to transmit through various materials common in RV construction.

Figure 4.3: The system provides 150 feet radius coverage and signal penetration through materials like plywood, metal, and plastic.
4.4. Battery Life and Charging
Both the transmitter and display units are equipped with rechargeable lithium batteries.
- Transmitter: Up to 100 hours runtime on a full charge.
- Display: Up to 8 hours runtime on a full charge.
Charge the units using the provided USB cable. A full charge typically takes about 1 hour for the transmitter.

Figure 4.4: Both units can be charged via USB, ensuring long battery life.
5. Maintenance
Proper maintenance ensures the longevity and accuracy of your AOMOSUR Wireless RV Leveling System.
- Cleaning: Wipe both the transmitter and display units with a soft, dry cloth. Avoid using abrasive cleaners or solvents.
- Battery Care: For optimal battery life, avoid fully discharging the units frequently. Recharge them when the battery indicator is low. If storing for extended periods, charge the batteries to about 50% and store in a cool, dry place.
- Storage: When not in use, store the system in a protective case or a safe location to prevent physical damage.
6. Troubleshooting
If you encounter issues with your leveling system, refer to the following common problems and solutions:
| Problem | Possible Cause | Solution |
|---|---|---|
| Display shows "No Signal" or "Disconnected" | Transmitter is off or out of range; interference. | Ensure transmitter is powered on. Move display closer to transmitter. Check for strong sources of interference. |
| Inaccurate leveling readings | System not properly calibrated; transmitter not mounted vertically. | Re-calibrate the system on a known level surface. Verify the transmitter is mounted with arrows pointing up. |
| Display or transmitter not turning on | Low battery; power button not pressed correctly. | Charge the unit fully. Press and hold the power button for a few seconds. |
| Short battery life | Frequent use; aging battery. | Ensure full charge before use. Consider battery replacement if significantly degraded (contact support). |
7. Specifications
| Feature | Detail |
|---|---|
| Model Number | AM350-A |
| Brand | AOMOSUR |
| Item Weight | 1.06 pounds |
| Package Dimensions | 7.44 x 5.63 x 2.32 inches |
| Batteries | 1 Lithium Ion batteries required (included) |
| Wireless Range | Up to 150 feet |
| Transmitter Runtime | Up to 100 hours |
| Display Runtime | Up to 8 hours |
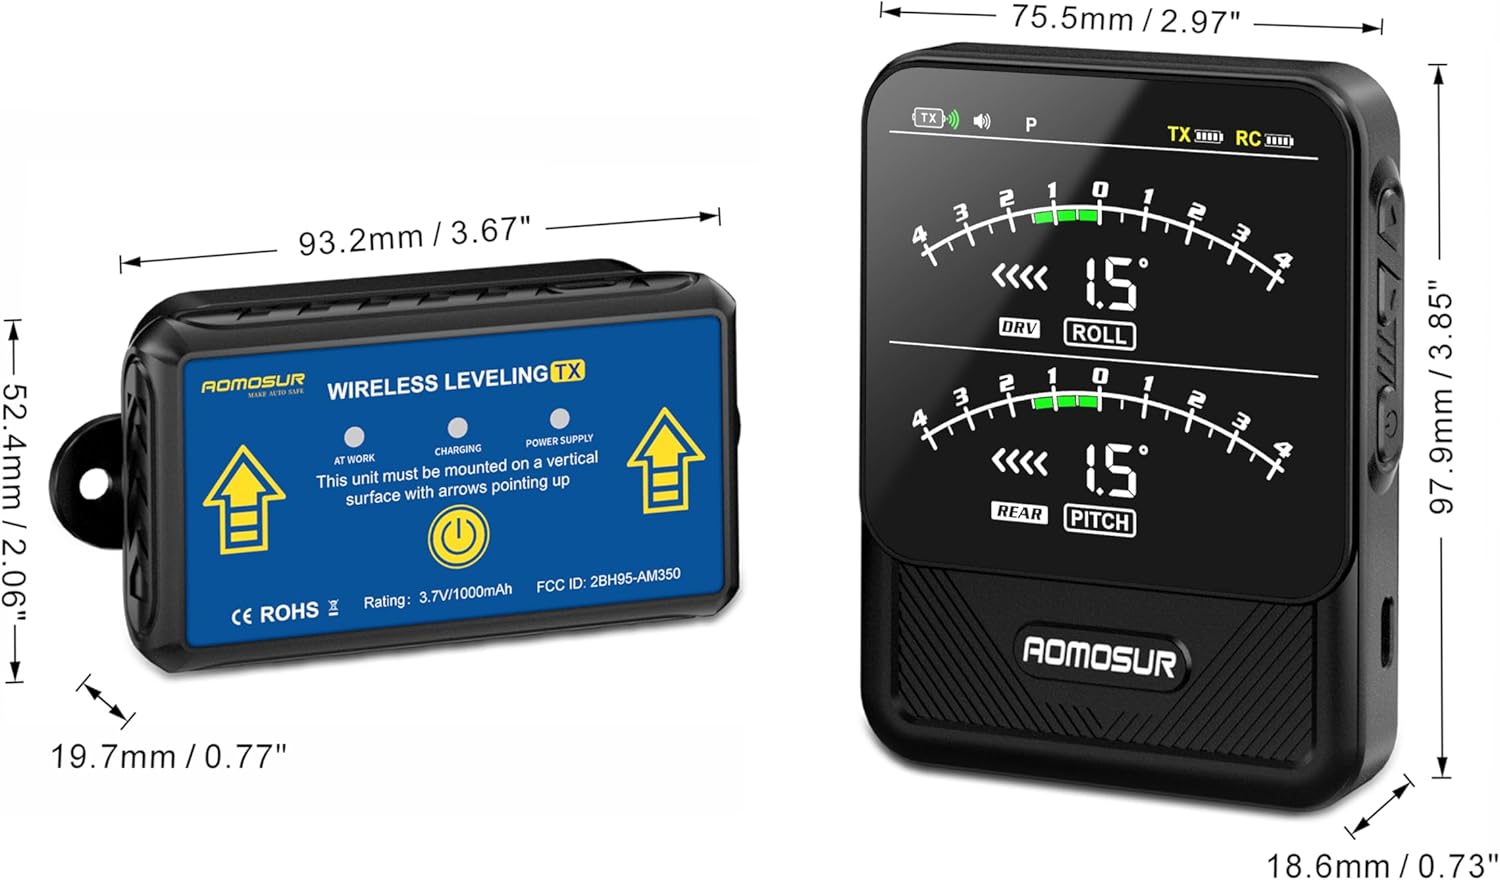
Figure 7.1: Physical dimensions of the AOMOSUR Wireless RV Leveling System components.
8. Warranty and Support
Specific warranty details and customer support contact information are typically provided with the product packaging or on the manufacturer's official website. Please refer to these resources for the most accurate and up-to-date information regarding your product's warranty coverage and how to obtain technical support.
For general inquiries or to find more information, you may visit the AOMOSUR store on Amazon: AOMOSUR Store.


