
NTG2.5
NTG2.5 DVD Navigation System Buttons Controller User Manual
Comprehensive guide for installation, operation, and maintenance of the NTG2.5 Navigation System Buttons Controller for Mercedes vehicles.
1. Setup and Installation
This section provides detailed instructions for the proper setup and installation of your NTG2.5 DVD Navigation System Buttons Controller.
1.1 Before You Begin
- Ensure the vehicle's ignition is off and the battery is disconnected before beginning any installation work to prevent electrical damage or injury.
- Gather all necessary tools, which may include screwdrivers, trim removal tools, and a multimeter.
- Familiarize yourself with the vehicle's existing navigation system and dashboard layout.
- Handle the controller board with care, avoiding static discharge.
1.2 Component Overview

Figure 1: Top view of the NTG2.5 Navigation System Buttons Controller. This image shows the circular control knob with directional arrows and a central button, along with the silver trim and the ribbon cable connector extending from the side.
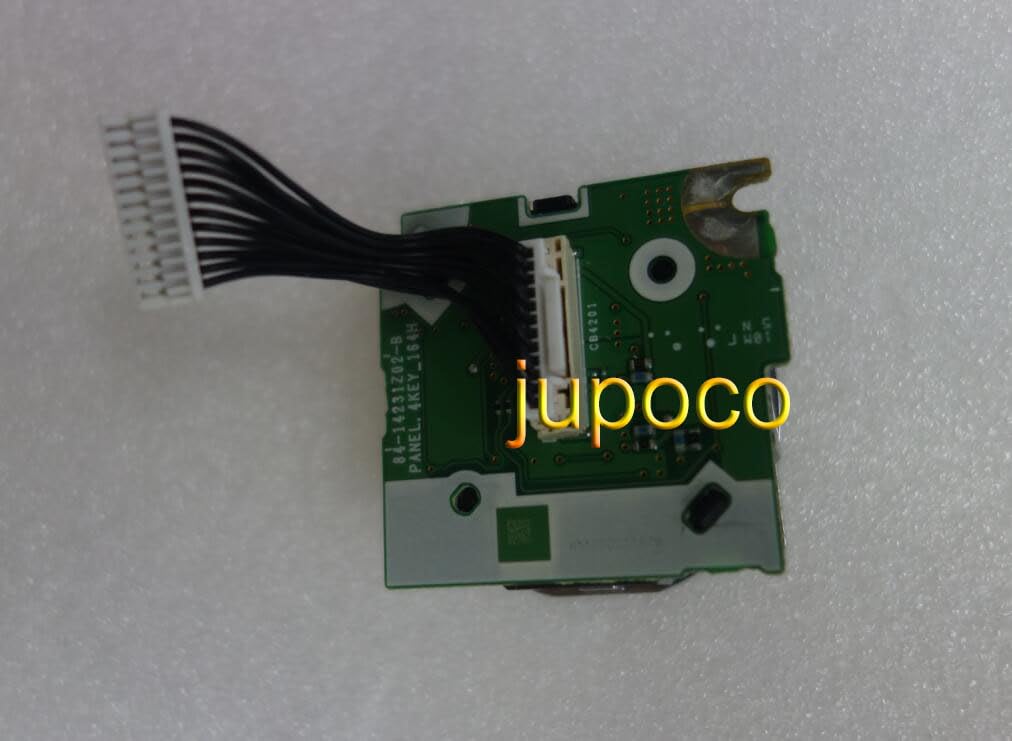
Figure 2: Bottom view of the NTG2.5 Navigation System Buttons Controller's Printed Circuit Board (PCB). This image displays the green circuit board with various electronic components and the white multi-pin connector for the ribbon cable.
1.3 Installation Steps
- Access the Existing Controller: Carefully remove the trim panels surrounding the existing navigation controller in your Mercedes vehicle. Refer to your vehicle's service manual for specific trim removal procedures.
- Disconnect Old Controller: Once the existing controller is accessible, carefully disconnect any electrical connectors and ribbon cables attached to it. Note the orientation of all connections.
- Remove Old Controller: Unfasten any screws or clips securing the old controller in place and remove it from the dashboard assembly.
- Install New Controller: Position the new NTG2.5 controller in the designated slot. Ensure it aligns correctly with mounting points.
- Connect New Controller: Carefully connect the electrical connectors and ribbon cables to the new controller. Ensure all connections are secure and properly seated. Refer to Figure 2 for the PCB connection point.
- Secure Controller: Fasten any screws or clips to secure the new controller in place.
- Test Functionality: Before reassembling the trim, reconnect the vehicle's battery and turn on the ignition. Test the functionality of the new controller, ensuring all buttons and the rotary knob respond correctly with the navigation system.
- Reassemble Trim: Once functionality is confirmed, carefully reassemble all removed trim panels, ensuring they snap or screw back into place securely.
2. Operation Guide
This section outlines the basic operation of the NTG2.5 DVD Navigation System Buttons Controller.
2.1 Basic Functions
- Rotary Knob: Rotate the central knob clockwise or counter-clockwise to scroll through menu options, adjust volume, or zoom in/out on maps.
- Directional Arrows: Use the arrow buttons (Up, Down, Left, Right) surrounding the central knob to navigate through menus, move the cursor, or pan the map.
- Central Button: Press the central button to select an option, confirm an action, or enter a menu.
- Back/Return Button: (If present on your specific model) Use this button to go back to the previous screen or menu.
- Menu/Home Button: (If present on your specific model) Use this button to access the main menu or return to the home screen of the navigation system.
The specific functions of each button may vary slightly depending on the Mercedes vehicle model and the software version of the NTG2.5 system. Refer to your vehicle's owner's manual for detailed navigation system operation.
3. Maintenance
Proper care and maintenance will ensure the longevity and optimal performance of your controller.
- Cleaning: Use a soft, dry, lint-free cloth to gently wipe the surface of the controller. For stubborn smudges, slightly dampen the cloth with water or a mild, non-abrasive electronic cleaner. Avoid using harsh chemicals, solvents, or abrasive materials.
- Avoid Liquids: Do not spill liquids on the controller. If liquid does come into contact, immediately power off the vehicle and disconnect the battery if safe to do so, then allow the unit to dry completely before reconnecting power.
- Environmental Conditions: Avoid exposing the controller to extreme temperatures, direct sunlight for prolonged periods, or excessive humidity.
- Physical Damage: Protect the controller from physical impact or excessive force, which can damage internal components or the external casing.
4. Troubleshooting
This section provides solutions to common issues you might encounter with the NTG2.5 controller.
| Problem | Possible Cause | Solution |
|---|---|---|
| Controller is unresponsive. | Loose connection, power issue, or faulty unit. | Check all cable connections (refer to Section 1.3). Ensure vehicle battery is properly connected. If issues persist, consult a professional. |
| Buttons do not register presses. | Debris under buttons, internal component failure. | Gently clean around the buttons. If the problem continues, the internal mechanism may be damaged, requiring replacement. |
| Rotary knob does not scroll correctly. | Obstruction, worn encoder. | Ensure no foreign objects are obstructing the knob's rotation. If the issue is intermittent or inconsistent, the internal encoder might be failing. |
| Intermittent functionality. | Loose or corroded connections, software glitch. | Verify all connections are secure and free of corrosion. Restart the vehicle's infotainment system. |
If you encounter problems not listed here or if the suggested solutions do not resolve the issue, it is recommended to seek assistance from a qualified automotive technician or the product seller.
5. Specifications
Key technical specifications for the NTG2.5 DVD Navigation System Buttons Controller.
- Material Type: PCB (Printed Circuit Board)
- Item Weight: 0.1 kg
- Item Size: 12 x 8 x 3 cm (approximate, based on product description)
- Model Name: For Mercedes (NTG2.5 compatible)
- Out Power: 45 (units not specified, typically Watts for audio systems, but this is a controller)
- Voltage: 12V
- Origin: Mainland China
- Item Type: Cables, Adapters & Sockets (component part)
- ASIN: B0DXPBRY85
- Manufacturer: HUNTAN
- First Available: February 19, 2025
6. Warranty and Support
Specific warranty details for this product are not provided in the available information. For warranty claims, technical support, or further assistance, please contact the seller directly through the platform where the product was purchased.
Please retain your proof of purchase for any warranty or support inquiries.
Related documentsNTG2.5


Ask a question about this manual
Ask about setup, troubleshooting, compatibility, parts, safety, or missing instructions. Manuals+ will review the question and use this page’s manual context to help answer it.