
Introduction
This manual provides comprehensive instructions for the assembly, operation, and maintenance of your KINKUNCO Vanity Dressing Table with LED Mirror and Charging Station, Model H01. This versatile furniture piece is designed to enhance your daily routine with its integrated LED lighting, convenient charging capabilities, and extensive storage solutions.
The vanity features an LED mirror with adjustable lighting modes, a built-in charging station with electrical outlets and USB ports, six spacious drawers, and ten specialized shelves, including two hidden compartments behind the mirror. Its design allows it to function both as a makeup vanity and an ergonomic desk.
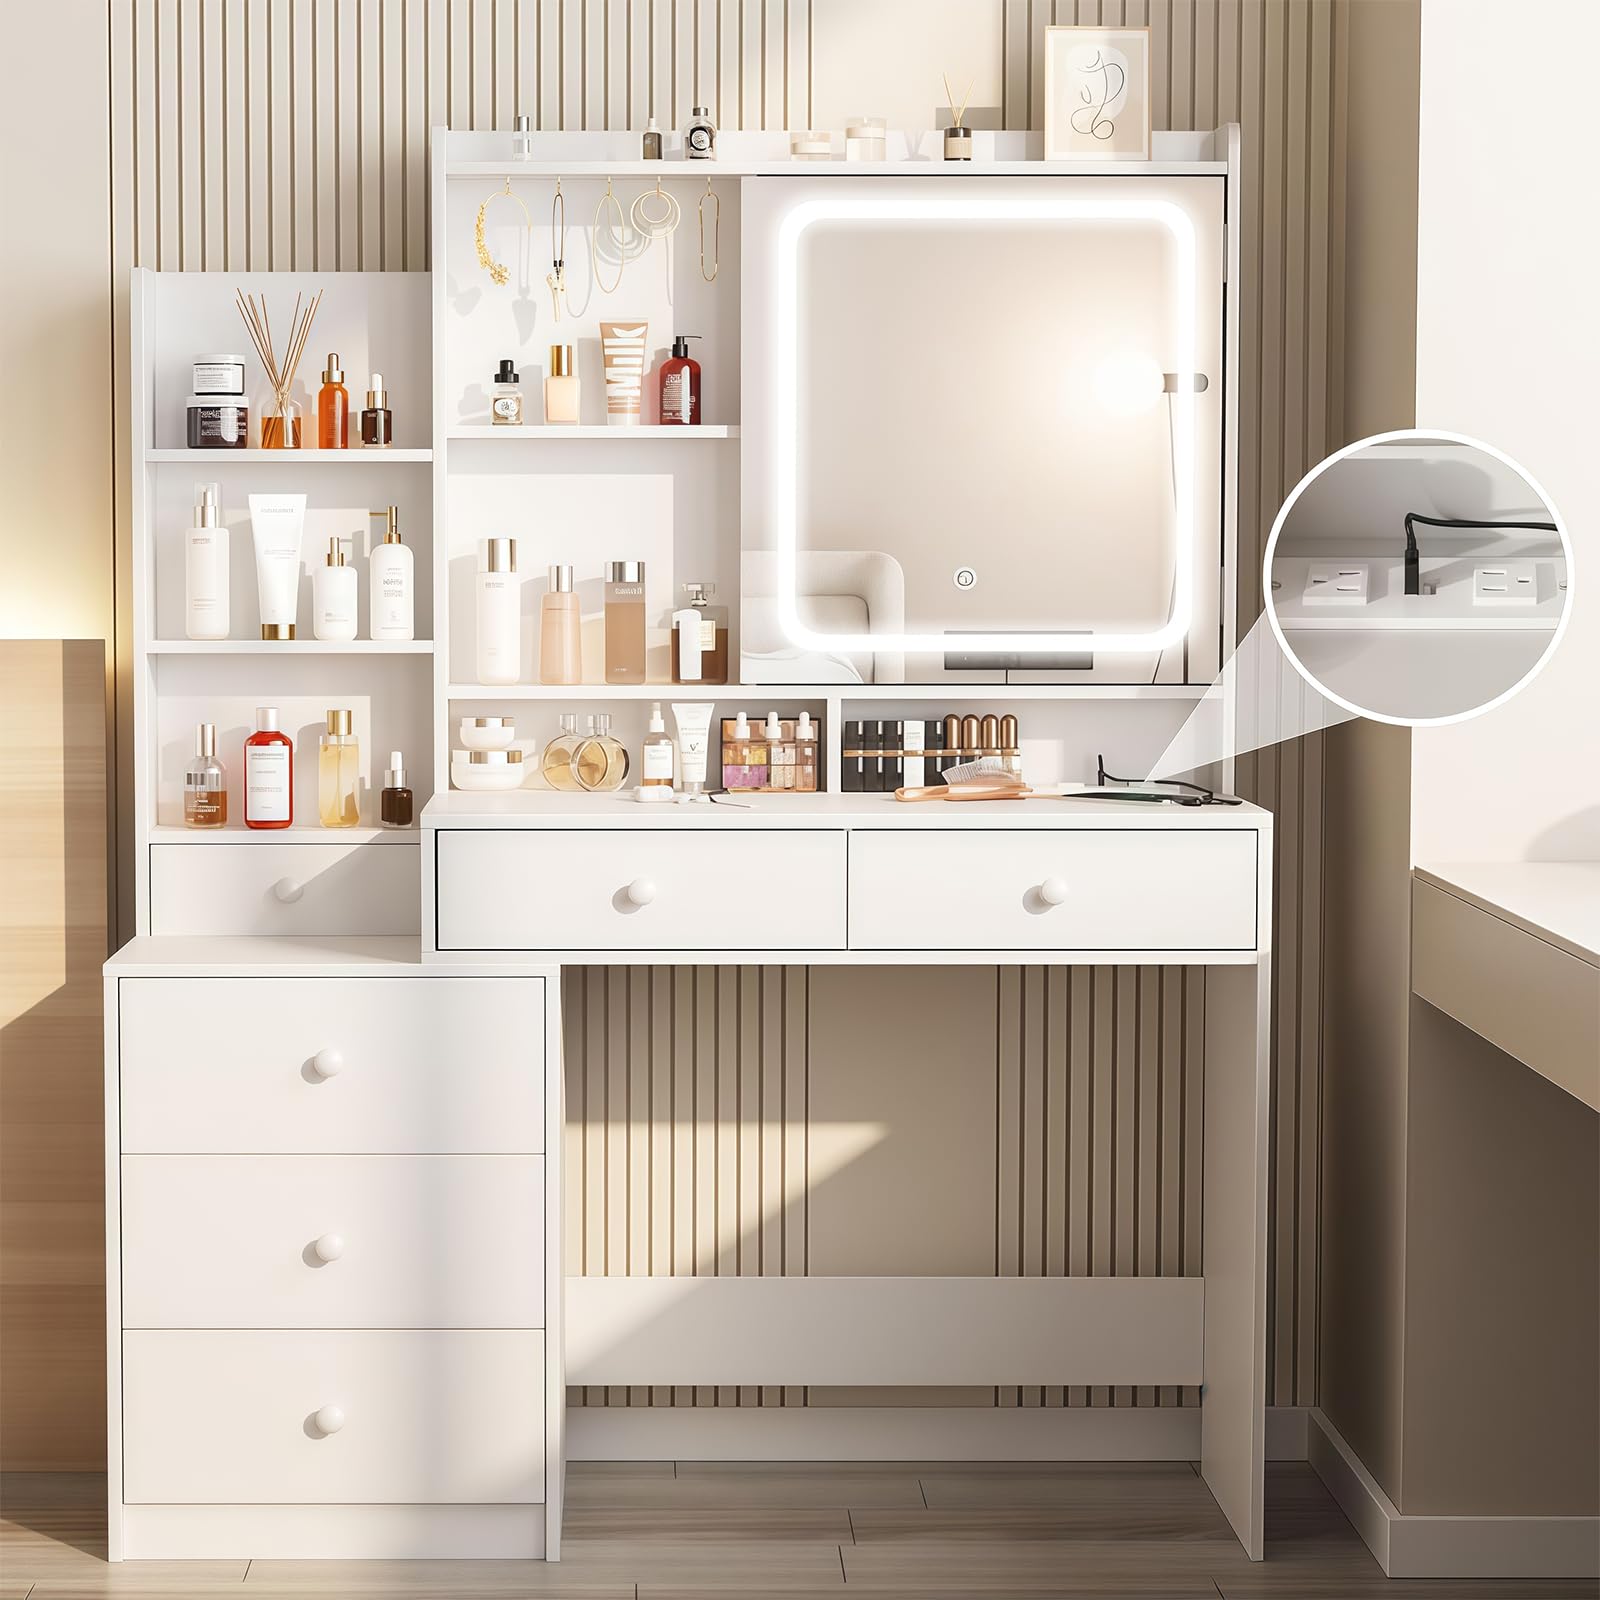
Figure 1: KINKUNCO Vanity Dressing Table, Model H01 (White, No Stool)
Safety Information
Please read all safety instructions carefully before assembly and use. Retain this manual for future reference.
- Ensure all components are securely fastened during assembly to prevent instability.
- Do not overload drawers or shelves. Distribute weight evenly.
- Keep electrical components (LED mirror, charging station) away from water or excessive moisture.
- Use only the provided power cord and ensure it is properly connected to a suitable electrical outlet.
- Avoid placing hot items directly on the surface without protection.
- This product is intended for indoor use only.
- Keep small parts and packaging materials away from children to prevent choking hazards.
Package Contents
Before beginning assembly, verify that all parts are present and undamaged. If any parts are missing or damaged, please contact customer support.
- Vanity Dressing Table components (engineered wood panels)
- LED Mirror unit
- Charging Station unit (pre-installed or separate)
- Hardware kit (screws, dowels, cam locks, etc.)
- Drawer slides and handles
- Power adapter/cord for LED mirror and charging station
- Illustrated Installation Instruction Manual
Setup & Assembly
Assembly is required for this product. An illustrated manual with numbered components is included to facilitate quick and straightforward setup. Follow the steps precisely as outlined in the provided manual.
- Unpack: Carefully remove all components from the packaging. Lay them out on a clean, soft surface to prevent scratches.
- Identify Parts: Refer to the parts list in the included manual and identify each component. All parts are numbered for easy identification.
- Assemble Frame: Begin by assembling the main frame of the vanity according to the step-by-step instructions.
- Install Drawers and Shelves: Attach drawer slides and assemble the drawers. Insert shelves into their designated slots.
- Mount LED Mirror: Securely attach the LED mirror unit to the vanity top.
- Connect Electrical: Connect the power cord for the LED mirror and charging station. Ensure all connections are firm.
- Final Placement: Position the assembled vanity in its desired location. Ensure it is stable and level.
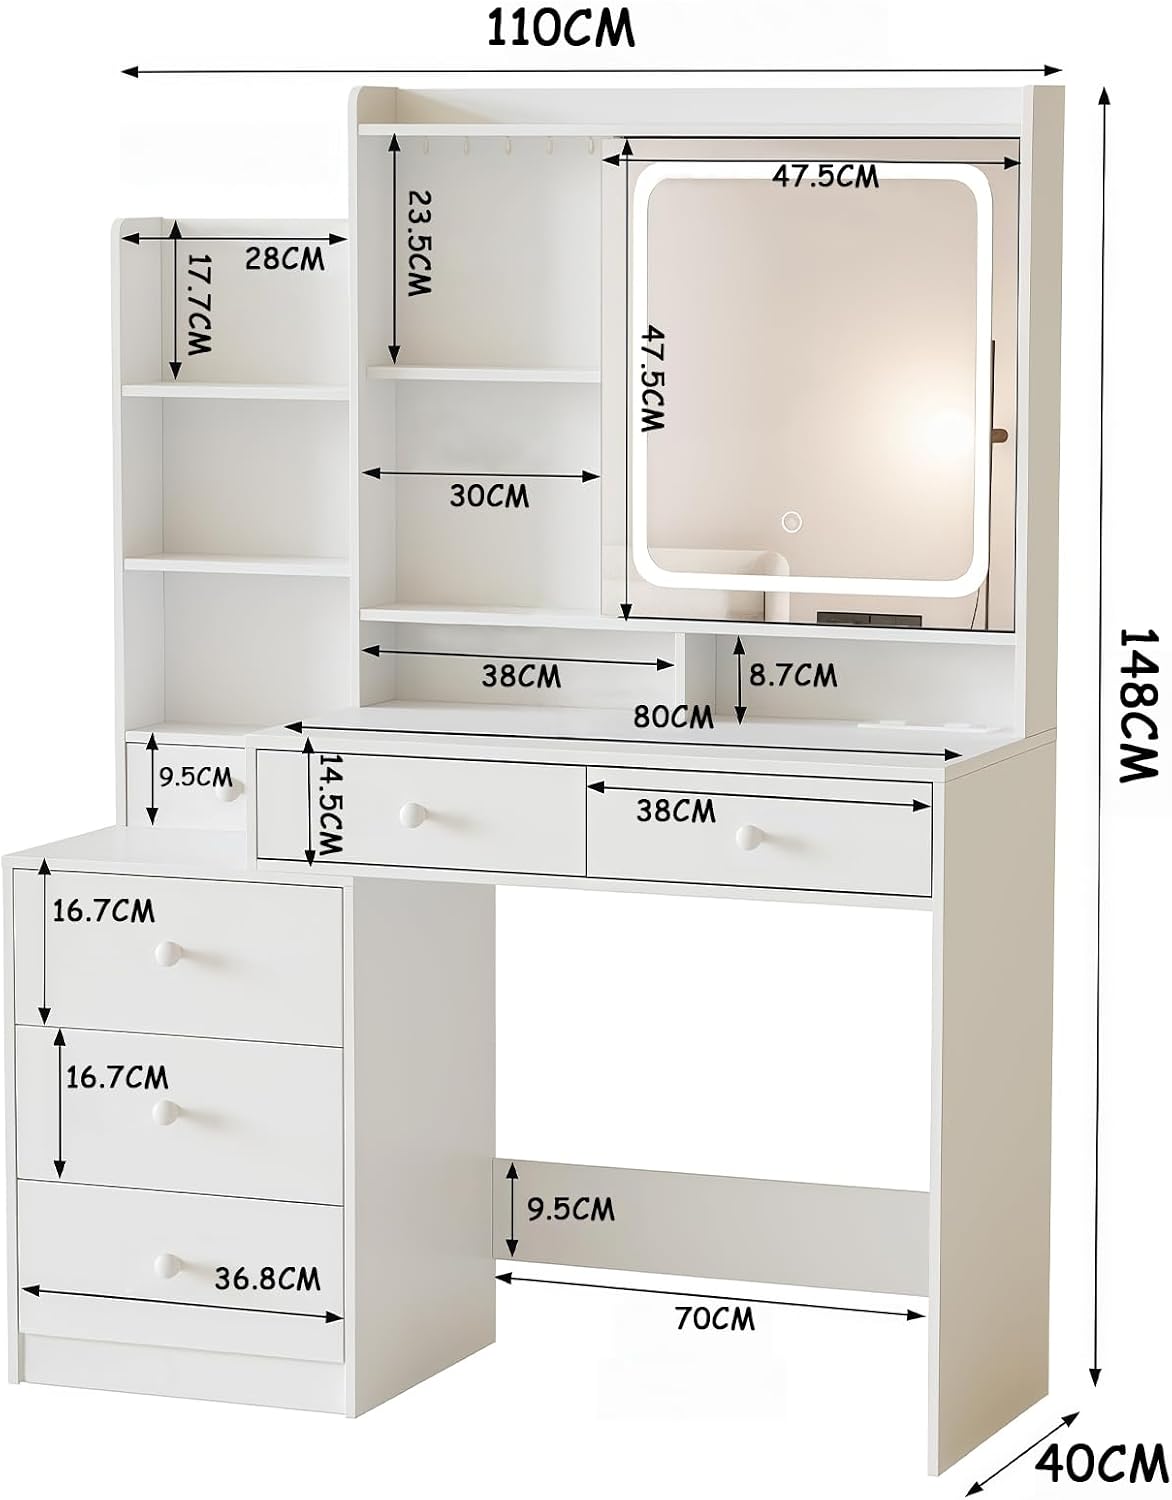
Figure 2: Product Dimensions (110cm W x 40cm D x 148cm H)
Operating Instructions
LED Mirror Operation
The integrated LED mirror provides three adjustable lighting levels to suit various makeup needs and ambient conditions.
- Power On/Off: Touch the power icon on the mirror surface to turn the LED light on or off.
- Adjust Color Temperature: Short press the touch button to cycle through the three lighting modes: Cool White, Natural Light, and Warm Yellow.
- Adjust Brightness: Long press the touch button to adjust the brightness level within the selected color temperature.

Figure 3: LED Mirror with Three Adjustable Lighting Modes
Charging Station Usage
The vanity includes a built-in charging station for convenience.
- Electrical Outlets: Two standard electrical outlets (125V/12A) are provided for beauty tools such as hair dryers, curling irons, or other small appliances.
- USB Ports: Two USB ports (5V/2.1A) are available for charging mobile phones, tablets, or other USB-powered devices.
- Ensure devices are compatible with the provided voltage and current.

Figure 4: Integrated Charging Station and Necklace Hooks
Storage Features
The vanity offers extensive storage options to keep your cosmetics and accessories organized.
- Drawers: Six spacious drawers provide ample storage for various items.
- Open Shelves: Multiple open shelves are available for displaying frequently used items or decorative pieces.
- Hidden Compartments: Two hidden compartments are located behind the mirror, ideal for storing valuable or less frequently used items discreetly.
- Necklace Hooks: Five small hooks are integrated for hanging necklaces or earrings.

Figure 5: Vanity with Drawers and Shelves Open

Figure 6: Hidden Storage Behind the Mirror

Figure 7: Vanity with All Storage Closed
Maintenance
Proper care will ensure the longevity and appearance of your vanity.
- Cleaning: Clean the surfaces with a soft, damp cloth. Avoid abrasive cleaners or harsh chemicals that may damage the finish.
- Mirror Care: Use a glass cleaner specifically designed for mirrors. Spray cleaner onto a cloth, not directly onto the mirror, to prevent liquid from seeping into the edges.
- Dusting: Regularly dust all surfaces to prevent buildup.
- Spills: Wipe up spills immediately to prevent staining or damage to the engineered wood.
- Hardware: Periodically check and tighten any loose screws or hardware to maintain stability.
Troubleshooting
If you encounter any issues with your vanity, refer to the following common troubleshooting tips:
- LED Mirror Not Lighting Up:
- Ensure the power cord is securely plugged into both the vanity and a working electrical outlet.
- Check if the outlet is receiving power by testing it with another device.
- Confirm the touch sensor on the mirror is clean and unobstructed.
- Charging Station Not Working:
- Verify the main power connection for the vanity.
- Ensure the device you are trying to charge is properly connected and functional.
- Check if the device requires more power than the station provides (e.g., high-wattage appliances).
- Drawers Sticking or Not Closing Smoothly:
- Check for any obstructions inside the drawer or along the slides.
- Ensure the drawer slides are properly aligned and securely attached.
- Verify that the drawer is not overloaded or unevenly weighted.
- Vanity Feels Unstable:
- Re-check all assembly hardware to ensure screws and fasteners are tightened.
- Ensure the vanity is placed on a flat, level surface.
If problems persist, please contact KINKUNCO customer support for assistance.
Specifications
| Feature | Detail |
|---|---|
| Model | H01 |
| Brand | KINKUNCO |
| Color | White |
| Material | Engineered Wood |
| Dimensions (L x W x H) | 110 cm x 40 cm x 145 cm (43.3 x 15.7 x 57.1 inches) |
| Item Weight | 10 Kilograms (22 lbs) |
| Number of Drawers | 6 |
| LED Mirror | 3 Adjustable Lighting Modes (Cool, Natural, Warm), Dimmable |
| Charging Station | 2 Electrical Outlets (125V/12A), 2 USB Ports (5V/2.1A) |
| Assembly Required | Yes |
| Care Instructions | Clean with a damp cloth |
Warranty & Support
KINKUNCO is committed to providing quality products and customer satisfaction.
- Returns: This product is eligible for a 30-day free return period from the date of purchase. Please refer to your retailer's return policy for detailed instructions.
- Technical Support: For any inquiries regarding assembly, operation, or troubleshooting, specialized technical service is available. We guarantee a response to inquiries within 24 hours.
- Contact Information: Please refer to your purchase documentation or the KINKUNCO official website for specific contact details for customer support.