1. Important Safety Information
Please read all instructions carefully before using this appliance. Failure to follow these instructions may result in electric shock, fire, or serious personal injury.
- Electrical Safety: Ensure the power supply matches the fan's voltage (120V AC). Do not operate the fan with a damaged cord or plug. Avoid using extension cords unless absolutely necessary and ensure they are rated for the fan's power. Disconnect power before servicing or cleaning.
- Placement and Mounting: Mount the fan securely to a sturdy wall or ceiling structure capable of supporting its weight. Ensure proper clearance around the fan for optimal airflow and safety. Keep hands, hair, clothing, and loose objects away from the fan blades during operation.
- Usage Environment: This fan is designed for both indoor and outdoor use, featuring a water-resistant and rust-resistant design. However, avoid direct exposure to heavy rain or extreme weather conditions. Do not use in areas where flammable liquids or gases are stored.
- Children and Pets: Keep children and pets away from the fan, especially during operation. The fan is equipped with a protective guard, but supervision is always recommended.
- UL Listed: This product is UL Listed, indicating compliance with safety standards.
2. Product Overview
The ROVSUN 30-inch Wall Mounted Industrial Fan is a high-velocity fan designed for powerful air circulation in various environments such as garages, shops, greenhouses, and gyms. It features a robust construction and flexible controls to meet diverse ventilation needs.

Image 2.1: Front view of the ROVSUN 30-inch Wall Mounted Industrial Fan.
Key Features:
- Powerful Airflow: Delivers a maximum air volume output of 10,600 CFM for effective air circulation.
- 3-Speed Adjustment: Offers Low, Medium, and High-speed settings to control airflow intensity.
- Wide-Angle Oscillation: Features a 75° oscillation angle to cover a broad area.
- Adjustable Tilt: Fan head can be tilted from 75° to 105° for precise airflow direction.
- Durable Construction: Equipped with a fully-enclosed waterproof motor, rust-resistant powder-coated body, and aluminum fan blades for long-lasting performance.
- Dual-Ball Bearings: Ensures stable, powerful, and long-lasting operation.

Image 2.2: Detailed view of the fan's dual-ball bearing motor, highlighting its robust design.
Package Contents:
- ROVSUN 30-inch Industrial Wall Fan
- Instruction Manual
- Wall Mount Tool Set
3. Installation Instructions
Follow these steps to properly install your wall-mounted fan. Ensure you have the necessary tools and a suitable mounting location.
Tools Required (Not Included):
- Drill
- Drill bits appropriate for mounting surface
- Level
- Measuring tape
- Pencil or marker
- Wrench or socket set
Mounting Steps:
- Select Location: Choose a sturdy wall or ceiling beam that can safely support the fan's weight. Ensure the location allows for optimal airflow and access to a power outlet. Consider the fan's dimensions (refer to Image 3.1) and oscillation range.
- Mark Drilling Points: Use the provided wall mount bracket as a template. Hold the bracket against the desired mounting surface and use a pencil to mark the drilling points. Use a level to ensure the bracket is straight.
- Drill Pilot Holes: Drill pilot holes at the marked points using an appropriate drill bit for your mounting surface (e.g., wood studs, concrete, brick).
- Attach Mounting Bracket: Secure the wall mount bracket to the surface using the screws and anchors provided in the wall mount tool set. Ensure it is firmly attached.
- Mount the Fan: Carefully lift the fan and align its mounting points with the bracket. Secure the fan to the bracket using the provided hardware. Double-check all connections to ensure the fan is stable and secure.
- Adjust Angle: Once mounted, adjust the fan's tilt angle to your desired position.
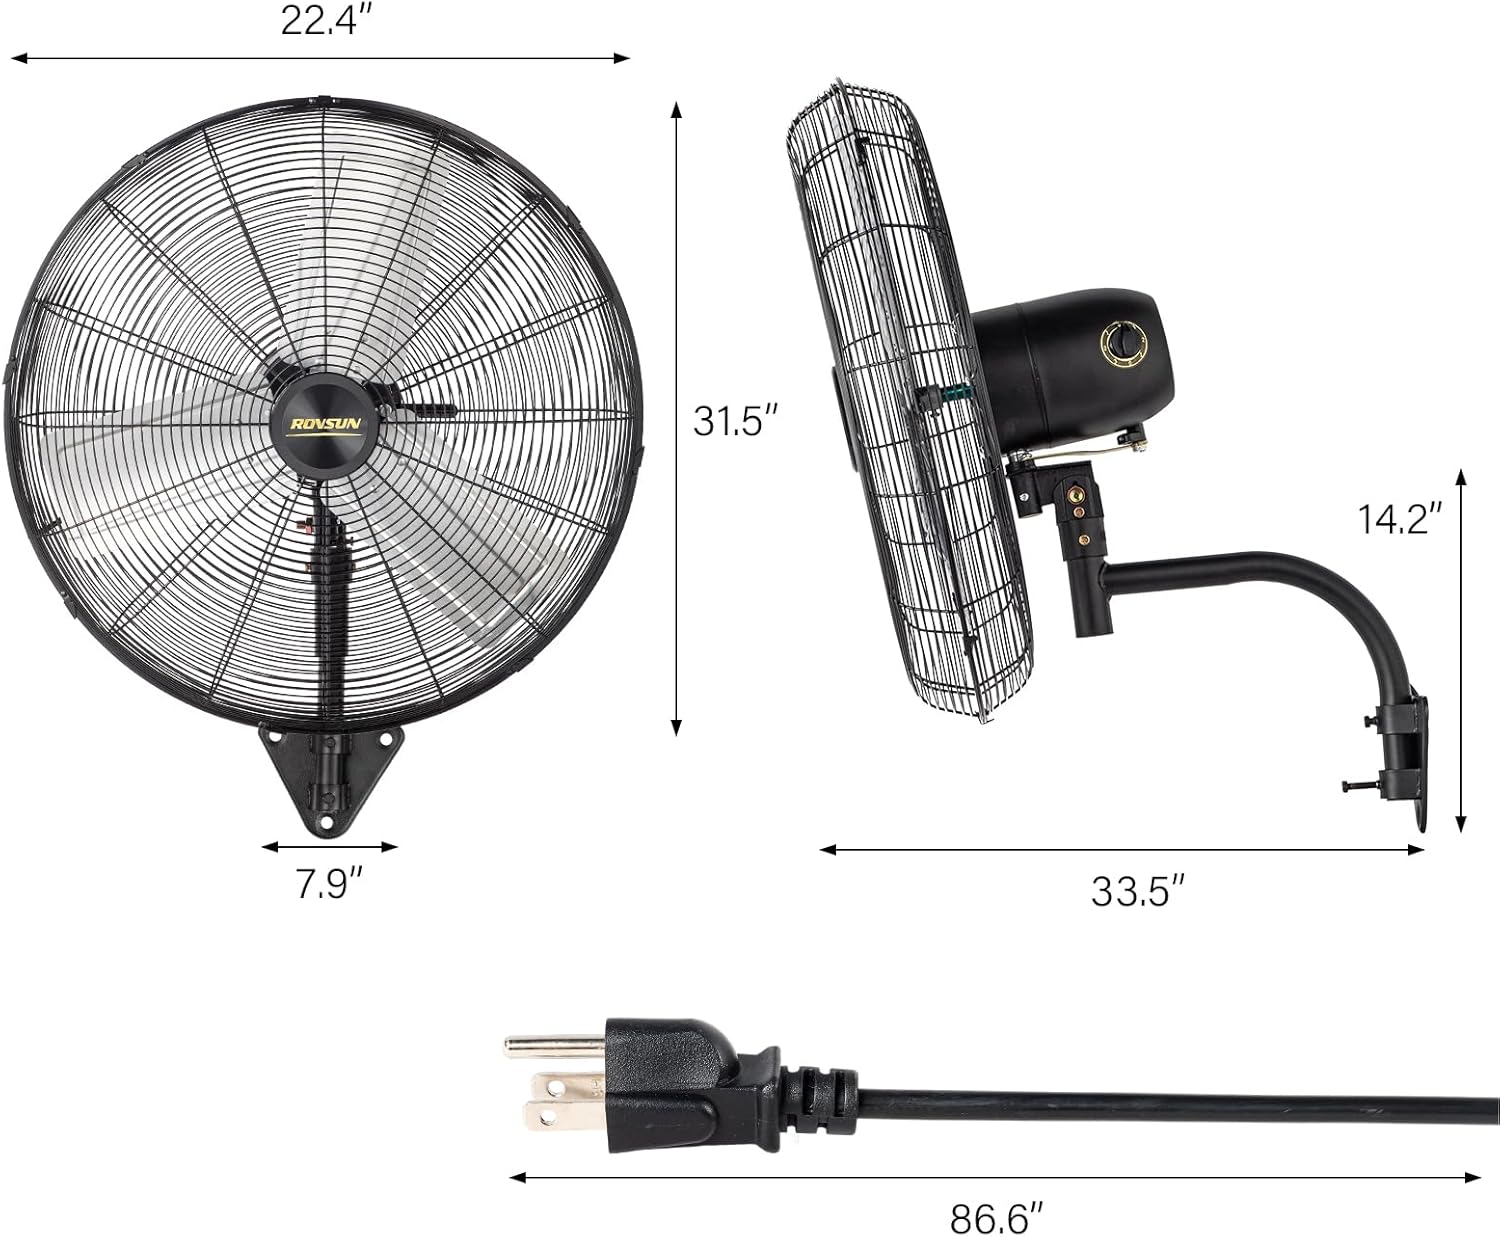
Image 3.1: Product dimensions for installation planning.

Image 3.2: Examples of fan installation in different environments.
4. Operating Instructions
Operating your ROVSUN industrial fan is straightforward. Follow these steps to control its functions.
Power On/Off:
- Plug the fan into a standard 120V AC electrical outlet.
- Locate the control knob on the fan motor housing.
- Turn the knob to the 'OFF' position to power off the fan.
Speed Adjustment:
The fan offers three speed settings: Low, Medium, and High.
- Rotate the control knob to select your desired speed setting.
- Start with 'Low' for a gentle breeze, 'Medium' for moderate airflow, or 'High' for maximum air velocity (10,600 CFM).

Image 4.1: Visual representation of the three-speed settings.
Oscillation Control:
The fan features a 75° wide oscillation function to distribute air across a larger area.
- To activate oscillation, locate the oscillation pin or button (if present, typically on the motor housing) and engage it.
- To stop oscillation, disengage the pin or button.

Image 4.2: Illustration of the fan's wide-angle oscillation and vertical tilt capabilities.
Angle Adjustment:
The fan head can be manually tilted up or down within a range of 75° to 105°.
- Loosen the adjustment knob(s) on the side of the fan head.
- Tilt the fan head to the desired vertical angle.
- Tighten the adjustment knob(s) firmly to secure the fan head in place.
5. Maintenance
Regular maintenance ensures optimal performance and extends the lifespan of your fan. Always disconnect the fan from the power source before performing any maintenance.
Cleaning:
- Exterior: Wipe the exterior surfaces of the fan with a soft, damp cloth. Do not use abrasive cleaners or solvents, as they may damage the finish.
- Fan Blades and Guards: Dust and debris can accumulate on the fan blades and guards, reducing efficiency. Periodically remove the front guard (if detachable) and carefully wipe the blades with a soft cloth. Use a vacuum cleaner with a brush attachment to remove dust from the guards. Ensure all parts are dry before reassembling and operating.
Storage:
If storing the fan for an extended period, clean it thoroughly and store it in a dry, cool place, protected from dust and moisture.
6. Troubleshooting
If you encounter issues with your ROVSUN industrial fan, refer to the following common problems and solutions.
| Problem | Possible Cause | Solution |
|---|---|---|
| Fan does not turn on. | No power supply. Fan not plugged in. Control knob in 'OFF' position. | Check power outlet and circuit breaker. Ensure fan is securely plugged in. Turn control knob to a speed setting (Low, Medium, High). |
| Reduced airflow. | Fan blades or guards are dirty. Obstruction near the fan. | Clean fan blades and guards as per maintenance instructions. Remove any objects blocking airflow. |
| Unusual noise during operation. | Loose parts. Debris in fan blades. Fan not mounted securely. | Inspect for and tighten any loose screws or components. Disconnect power and carefully remove any debris. Ensure the fan is securely mounted to the wall bracket. |
| Oscillation not working. | Oscillation mechanism disengaged. | Ensure the oscillation pin/button is properly engaged. |
If the problem persists after attempting these solutions, please contact ROVSUN customer support.
7. Specifications
Detailed technical specifications for the ROVSUN 30-inch Wall Mounted Industrial Fan.
| Feature | Specification |
|---|---|
| Brand | ROVSUN |
| Model Name | 794e2f8c-b8d8-4441-91b5-7a2fb093dd06 |
| Style | 30'' |
| Color | Black |
| Power Source | AC |
| Voltage | 120 Volts (AC) |
| Product Dimensions | 22.4"D x 33.5"W x 31.5"H |
| Air Flow Capacity | 10600 Cubic Feet Per Minute |
| Speed Settings | 3 RPM (3 Power Levels) |
| Control Method | Push Button (Control Knob) |
| Special Feature | Manual Control, Oscillating, Wall Mounted |
| Finish Type | Powder Coated |
| Indoor/Outdoor Usage | Indoor/Outdoor |
| Included Components | Industrial wall fan, Instruction manual, Wall mount tool set |
8. Warranty and Support
ROVSUN is committed to providing high-quality products. This product comes with a standard manufacturer's warranty against defects in materials and workmanship under normal use.
Warranty Information:
Specific warranty details, including duration and coverage, may vary. Please refer to the warranty card included with your product or visit the official ROVSUN website for the most current information.
Customer Support:
For technical assistance, troubleshooting, or warranty claims, please contact ROVSUN customer service. Have your model number and purchase date ready when contacting support.
- Online Support: Visit the ROVSUN Store on Amazon for product information and support resources.
- Contact Information: Refer to the contact details provided in your product packaging or on the official ROVSUN website.


