1. Introduction
This manual provides detailed instructions for the Aideepen ESP32 S3 DevKitC-1 N16R8 Development Board. This board integrates 2.4 GHz Wi-Fi (802.11 b/g/n) and Bluetooth 5 (LE) capabilities, making it suitable for a wide range of IoT and embedded projects. It features an Xtensa 32-bit LX7 dual-core processor, extensive I/O interfaces, and multiple low-power modes for efficient operation.
2. Product Overview
The ESP32 S3 DevKitC-1 N16R8 is a versatile development board designed for rapid prototyping and deployment of Wi-Fi and Bluetooth-enabled applications. Below is a detailed look at its hardware components and layout.

Figure 2.1: ESP32-S3 Hardware Introduction. This diagram highlights key components including the ESP32-S3-WROOM-1 module, RST and BOOT buttons, PWR/TX/RX LED lights, integrated RGB-LED module, USB to Serial Port Chip CH343P, and dual Type-C USB ports for pass-through and OTG functions.
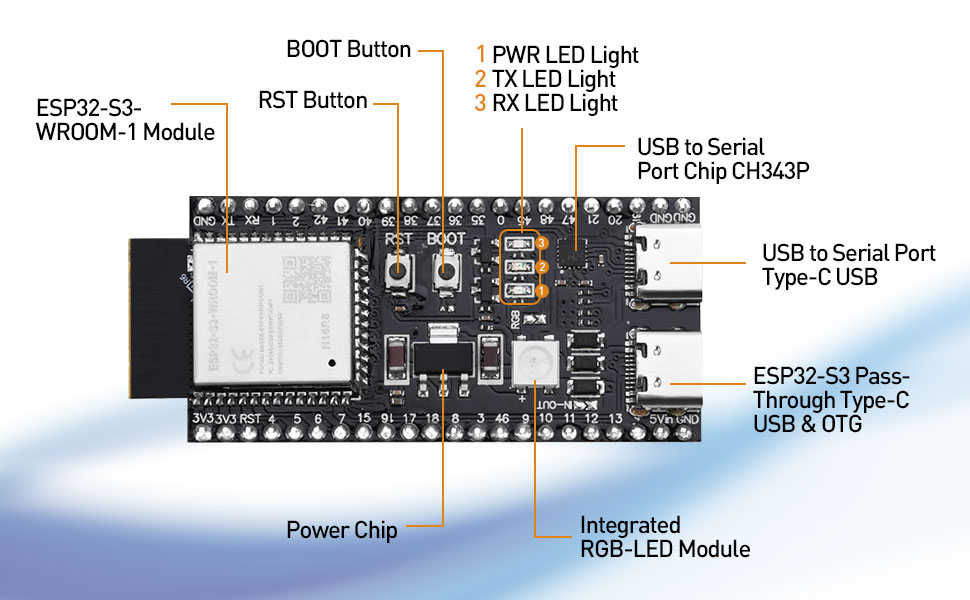
Figure 2.2: ESP32-S3 Detailed Components. A closer view of the board, emphasizing the Type-C USB ports, power supply chip, and the ESP32-S3-WROOM-1 module.
2.1 Pinout Diagram
Understanding the pinout is crucial for connecting peripherals and programming the board. The ESP32-S3 offers 45 programmable GPIOs and various peripheral interfaces.

Figure 2.3: ESP32-S3 Pinout. This diagram illustrates the arrangement and functions of the GPIO pins, including UART, USB, ADC, TOUCH, SPI, I2S, I2C, PWM, RMT, and other interfaces.
2.2 Board Dimensions
The physical dimensions of the ESP32 S3 DevKitC-1 N16R8 board are provided for integration into projects and enclosures.

Figure 2.4: ESP32-S3 Size. The board measures approximately 63.5mm in length and 28mm in width, with detailed measurements for pin spacing and module placement.
3. Setup and Programming
To begin using your ESP32 S3 DevKitC-1 N16R8, you will need to download and flash firmware or programs onto the board. The ESP32-S3 supports two primary methods for this process: direct USB interface and USB to serial port (UART) mode.
3.1 Firmware Download Process
Program files can be downloaded via either of the two Type-C USB ports on the board. In a Windows environment, you can use the official flash download software. The two port modes are referred to as USB mode and UART mode.

Figure 3.1: How to Download ESP32-S3 Firmware. This image illustrates the software interface for selecting download modes (USB or UART) for flashing firmware onto the ESP32-S3 board.
- Install Drivers: Ensure necessary USB-to-serial drivers (e.g., for CH343P chip) are installed on your operating system (Windows, Mac, Linux).
- Connect Board: Connect the ESP32-S3 board to your computer using a Type-C USB cable.
- Open Flash Tool: Launch the appropriate flash download tool for ESP32-S3.
- Select Chip Type: In the tool, select "ESP32S3" as the chip type.
- Choose Work Mode: Select "develop" for typical development scenarios.
- Select Load Mode: Choose either "usb" for direct USB programming or "uart" for serial port programming, depending on your setup and the specific port used.
- Configure and Flash: Follow the tool's instructions to select your firmware file and initiate the flashing process.
4. Operation
The ESP32 S3 DevKitC-1 N16R8 is designed for flexible operation across various applications. Its powerful features enable diverse functionalities.
4.1 Core Features
- WLAN + Bluetooth 5 (LE): The board integrates 2.4 GHz WLAN (802.11 b/g/n) supporting 40 MHz bandwidth and a Bluetooth Low Energy (BT 5 LE) system, including BT mesh. This allows for robust wireless communication in various network configurations, such as infrastructure network station mode, SoftAP mode, and hybrid station+SoftAP mode.
- IO Interfaces: It provides 45 programmable GPIOs and general-purpose peripheral interfaces including SPI, I2S, I2C, PWM, RMT, ADC, UART, SD/MMC host controller, and TWAIM controller. These interfaces facilitate connection to a wide array of sensors, actuators, and other external components.
- Performance: Powered by an Xtensa 32-bit LX7 dual-core processor operating up to 240 MHz, the board includes 512 KB SRAM and 384 KB ROM storage. It supports multiple external SPI, dual SPI, quad SPI, eight SPI, QPI, and OPI flash memory, as well as off-chip RAM for expanded memory needs.
- Low-Power Modes: Equipped with an ultra-low power (ULP) co-processor, the ESP32-S3 supports multiple low-power modes, making it suitable for battery-powered applications and scenarios requiring energy efficiency.
4.2 Buttons and Indicators
- RST Button: Used to reset the board, initiating a fresh boot sequence.
- BOOT Button: Typically used in conjunction with the RST button to enter download mode for flashing new firmware.
- PWR LED Light: Indicates that the board is receiving power.
- TX LED Light: Illuminates when data is being transmitted.
- RX LED Light: Illuminates when data is being received.
- Integrated RGB-LED Module: A programmable multi-color LED for status indication or user feedback in applications.
5. Specifications
Key technical specifications for the Aideepen ESP32 S3 DevKitC-1 N16R8 Development Board:
| Feature | Detail |
|---|---|
| Brand | Aideepen |
| Model Name | ESP32 S3 DevKitC1 N16R8 |
| Memory Storage Capacity | 512 KB SRAM |
| CPU Speed | 240 MHz |
| Connectivity Technology | Bluetooth, I2C, USB, Wi-Fi |
| Processor Speed | 240 MHz |
| Operating System Compatibility | Windows, Mac, Linux |
| Processor Brand | Espressif |
| Wireless Compatibility | 802.11bgn |
| RAM Memory Technology | SRAM |
| Processor Count | 2 (Dual-core) |
| Total USB Ports | 2 (Type-C) |
6. Troubleshooting
This section addresses common issues you might encounter with your ESP32 S3 DevKitC-1 N16R8 board.
- Board Not Detected by Computer:
- Ensure USB-to-serial drivers (e.g., for CH343P) are correctly installed.
- Try a different USB cable or port on your computer.
- Verify the board is properly connected.
- Firmware Upload Failure:
- Confirm the correct COM port is selected in your flashing software.
- Ensure the board is in download mode (often by holding the BOOT button while pressing and releasing RST, then releasing BOOT).
- Check that the correct chip type (ESP32S3) and load mode (USB/UART) are selected.
- Verify the integrity of your firmware file.
- Unstable 5V Bus Output:
- Some users have reported issues with the 5V bus output providing lower than expected voltage (e.g., 1.5V). If consistent 5V output is critical for your application, consider verifying the output with a multimeter.
- Ensure the power supply connected to the board is stable and sufficient.
- Avoid drawing excessive current from the 5V pin, as this may lead to voltage drops.
- Wi-Fi/Bluetooth Connectivity Issues:
- Check your code for correct initialization and configuration of Wi-Fi or Bluetooth.
- Ensure proper antenna connection if an external antenna is used (though this board has an integrated antenna).
- Verify network credentials (SSID, password) are correct.
- Check for interference from other 2.4 GHz devices.
7. Maintenance
Proper care and maintenance will ensure the longevity and reliable operation of your ESP32 S3 DevKitC-1 N16R8 development board.
- Handling: Always handle the board by its edges to avoid touching sensitive components, which can be damaged by static electricity or oils from your skin.
- Storage: Store the board in an anti-static bag when not in use, in a dry environment away from extreme temperatures.
- Cleaning: If necessary, gently clean the board with a soft, dry brush or compressed air to remove dust. Avoid using liquids or harsh chemicals.
- Power Supply: Use a stable and appropriate power supply (typically 5V via USB) to prevent damage to the board.
- Firmware Updates: Regularly check for and apply firmware updates for the ESP32-S3 chip and development environment to benefit from bug fixes and new features.
8. Warranty and Support
Aideepen provides support and warranty information for its products.
- Warranty: The product comes with a 1-year warranty.
- Customer Service: For any quality issues or technical assistance, please contact Aideepen customer support. A new replacement may be provided for quality-related problems within 24 months of purchase.
- Online Resources: Refer to the official Espressif documentation and community forums for extensive resources on ESP32-S3 programming and development.


