
1. Introduction
This manual provides comprehensive instructions for the setup, operation, maintenance, and troubleshooting of your Radxa E20C Mini PC. Please read this manual thoroughly before using the device to ensure proper functionality and to maximize its lifespan.
The Radxa E20C is a compact and powerful single-board computer designed for various applications, from home computing projects to industrial use. It features a robust RK3528A quad-core CPU, dual Gigabit Ethernet ports, and 4K video decoding capabilities, all housed within a durable CNC-machined aluminum alloy case.
2. Product Overview
2.1 Key Features
- Processor: RK3528A Quad-Core CPU for efficient performance.
- Networking: Dual Gigabit Ethernet ports for flexible connectivity.
- Multimedia: Supports 4K video decoding for high-resolution output.
- Construction: CNC-machined aluminum alloy case with integrated heat dissipation.
- Compatibility: Supports multiple operating systems.
- Memory: 2GB LPDDR3 RAM.
- Storage: 16GB onboard storage.
2.2 Package Contents
- Radxa E20C Board Body
- (Additional accessories may be sold separately)
2.3 Device Layout
Familiarize yourself with the various ports and indicators on your Radxa E20C Mini PC.
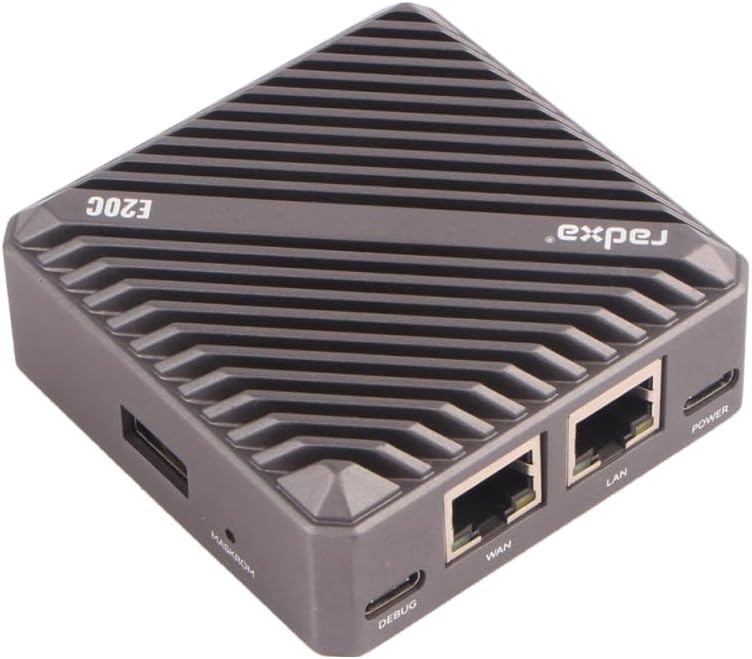
Figure 1: Top-down view of the Radxa E20C Mini PC, showcasing its compact design and ribbed aluminum casing for heat dissipation. The "radxa" logo and "E20C" model name are visible on the top surface.
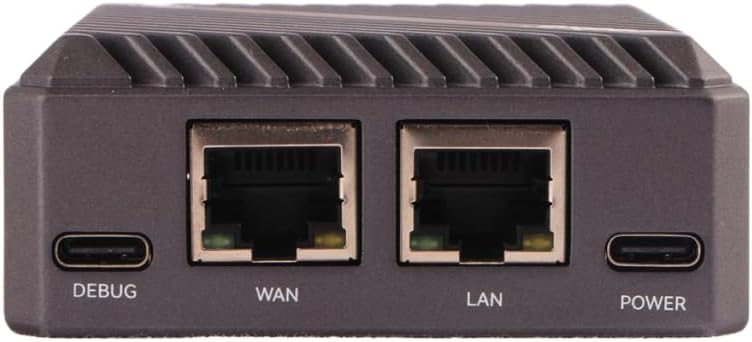
Figure 2: Rear panel of the Radxa E20C, featuring the DEBUG USB-C port, WAN Gigabit Ethernet port, LAN Gigabit Ethernet port, and POWER USB-C port. These ports provide essential connectivity for debugging, network access, and power supply.

Figure 3: Front panel of the Radxa E20C, showing three indicator LEDs labeled SYS, WAN, and LAN, along with a microSD card slot for expandable storage or operating system installation.
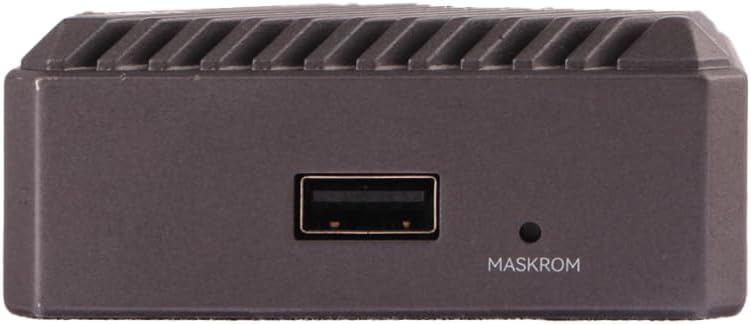
Figure 4: Side view of the Radxa E20C, featuring a standard USB-A port and a small button labeled MASKROM, used for system recovery or flashing firmware.
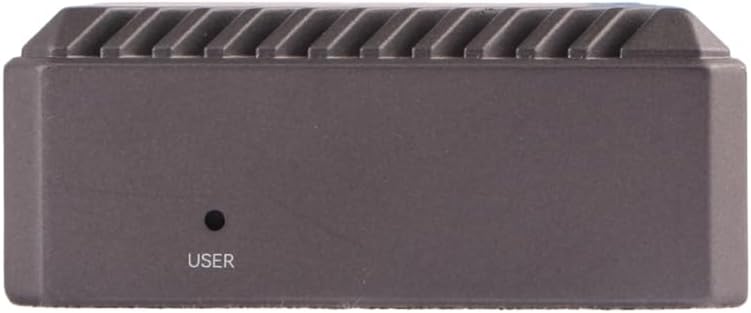
Figure 5: Opposite side view of the Radxa E20C, showing a single button labeled USER, which can be programmed for various functions depending on the operating system and application.
3. Setup Guide
3.1 Initial Power-Up
- Connect Power: Connect a compatible 5V USB-C power adapter to the "POWER" port on the rear of the device (refer to Figure 2).
- Network Connection: For wired network access, connect an Ethernet cable from your router or network switch to either the "WAN" or "LAN" Gigabit Ethernet port (refer to Figure 2).
- Peripheral Connection: If using a USB keyboard, mouse, or other peripherals, connect them to the available USB-A port (refer to Figure 4).
- Operating System: Ensure a compatible operating system is installed on the internal storage or a microSD card inserted into the front slot (refer to Figure 3). For first-time setup, you may need to flash an OS image. Refer to the official Radxa documentation for detailed OS installation instructions.
- Power On: The device should power on automatically once connected to power. Observe the SYS, WAN, and LAN indicator LEDs on the front panel (refer to Figure 3) for status.
For detailed operating system installation and configuration, please visit the official Radxa documentation website: wiki.radxa.com
3.2 Operating System Installation (Advanced)
The Radxa E20C supports various operating systems, including Debian. To install or re-install an operating system:
- Download the desired OS image from the official Radxa website.
- Use a suitable imaging tool (e.g., Etcher) to write the image to a microSD card or directly to the internal eMMC storage.
- Insert the prepared microSD card into the slot on the front panel.
- Follow the specific instructions provided with the OS image for first-boot configuration.
4. Operating Instructions
4.1 Basic Operation
- Power On/Off: The device powers on when connected to a power source. To safely shut down, use the operating system's shutdown function. Disconnecting power without proper shutdown may lead to data corruption.
- Network Usage: The dual Gigabit Ethernet ports allow for high-speed network connections. Configure network settings within your chosen operating system.
- USB Peripherals: Connect USB devices such as storage drives, keyboards, or mice to the USB-A port.
- System Status Indicators:
- SYS LED: Indicates system activity.
- WAN LED: Indicates activity on the WAN Ethernet port.
- LAN LED: Indicates activity on the LAN Ethernet port.
4.2 Advanced Functions
- MASKROM Button: This button (refer to Figure 4) is typically used for entering Maskrom mode, which is essential for low-level firmware flashing or recovery operations. Consult Radxa's developer documentation before using this feature.
- USER Button: The USER button (refer to Figure 5) is programmable and its function depends on the operating system and user configuration. It can be used for custom scripts or actions.
- Debugging: The DEBUG USB-C port (refer to Figure 2) provides a serial console interface for debugging purposes. A USB-to-serial adapter may be required.
5. Maintenance
- Cleaning: Use a soft, dry cloth to clean the exterior of the device. Avoid liquid cleaners or abrasive materials.
- Ventilation: Ensure the device is placed in a well-ventilated area. Do not block the heat dissipation fins on the aluminum case.
- Firmware Updates: Regularly check the official Radxa website for firmware and operating system updates to ensure optimal performance and security.
- Data Backup: Periodically back up important data stored on the device to prevent data loss.
- Environmental Conditions: Operate the device within recommended temperature and humidity ranges to prevent damage.
6. Troubleshooting
| Problem | Possible Cause | Solution |
|---|---|---|
| Device does not power on. | No power supply, faulty power adapter, or incorrect power port. | Ensure the USB-C power adapter is connected to the "POWER" port and is functioning correctly. Try a different power adapter if available. |
| No network connectivity. | Ethernet cable not connected, faulty cable, or incorrect network configuration. | Verify Ethernet cables are securely connected to the WAN/LAN ports. Check network settings within the operating system. Test with a different Ethernet cable. |
| Operating system fails to boot. | Corrupted OS image, improperly flashed microSD card, or incorrect boot order. | Re-flash the OS image to the microSD card or internal storage. Ensure the image is compatible with the Radxa E20C. Consult Radxa's documentation for boot troubleshooting. |
| Device becomes unresponsive. | Software issue, overheating, or power instability. | Perform a hard reboot by disconnecting and reconnecting power (as a last resort). Ensure adequate ventilation. Check for OS updates. |
If problems persist, please refer to the official Radxa support resources or community forums for further assistance.
7. Specifications
| Feature | Detail |
|---|---|
| Processor | Rockchip RK3528A Quad-Core ARM Cortex-A53 (2 GHz) |
| RAM | 2GB LPDDR3 |
| Storage | 16GB eMMC (onboard), MicroSD card slot |
| Networking | 2x Gigabit Ethernet ports (WAN, LAN) |
| Video Output | 4K video decoding support (specific output port not detailed in input, assuming internal processing) |
| USB Ports | 1x USB-A, 1x USB-C (DEBUG), 1x USB-C (POWER) |
| Operating System Support | Debian, multiple other OS options |
| Dimensions (LxWxH) | 3.5 x 3.5 x 0.5 inches (8.9 x 8.9 x 1.3 cm) |
| Weight | 12 ounces (340 grams) |
| Case Material | CNC Aluminum Alloy |
8. Warranty and Support
8.1 Warranty Information
Specific warranty terms for the Radxa E20C Mini PC are provided by the manufacturer, Radxa. Please refer to the warranty card included with your product or visit the official Radxa website for detailed warranty policies and registration information.
Protection plans may be available for purchase separately. Check with your retailer for options such as 2-Year or 3-Year Protection Plans.
8.2 Technical Support
For technical assistance, software downloads, and community support, please visit the official Radxa resources:
- Official Website: www.radxa.com
- Wiki/Documentation: wiki.radxa.com
- Community Forum: Check the official website for links to community forums where you can find peer support and additional resources.
When contacting support, please have your product model (Radxa E20C) and any relevant error messages or symptoms ready.

