
Introduction
The GODOX FT433 N TTL Wireless Flash Trigger is designed for Nikon cameras, offering advanced wireless control over compatible Godox flash units. Utilizing the 433MHz frequency band, this transmitter ensures stable signal transmission for reliable flash synchronization. It supports various flash modes including TTL auto flash, manual flash, and multi-flash, along with high-speed sync up to 1/8000s, front curtain sync, and rear curtain sync. The FT433 N also features Bluetooth control via the Godox Flash App, a TCM (TTL Convert Manual) function, and a single-contact mode for rapid-fire photography.

Figure 1: The Godox FT433N trigger mounted on a Nikon camera, alongside a compatible Godox AD200ProII flash unit, highlighting its wireless capabilities and key features like 1/8000s High Speed Sync, TTL/M/Multi Flash modes, Zoom, and a large LCD panel.
Setup
1. Battery Installation
The FT433 N transmitter requires two AA batteries (sold separately). Open the battery compartment, insert the batteries according to the polarity indicators, and close the compartment securely.
2. Mounting on Camera
Slide the FT433 N onto your Nikon camera's hot shoe. Secure it in place using the quick-release hot shoe lock. This design allows for fast and effortless mounting and dismounting.
3. Connecting the FR433 Receiver
For compatible Godox outdoor flash units (such as AD200Pro II, AD600Pro II, AD400Pro II, AD600BM II, AD800Pro, AD300Pro II, and AD100Pro II), plug the FR433 receiver into the flash unit's Type C port. Ensure the flash unit is powered off before connecting the receiver.

Figure 2: Demonstrates the quick and effortless mounting of the FT433N onto a camera's hot shoe and the simple plug-and-play connection of the FR433 receiver into the USB-C port of a compatible Godox flash unit.
4. Initial Power-On and Sync
Power on both your camera and the FT433 N trigger. Ensure the flash unit with the FR433 receiver is also powered on. The devices should automatically establish a connection. You can verify the connection and adjust settings on the FT433 N's high-definition LCD screen.
Operating Instructions
1. LCD Screen and Controls Overview
The FT433 N features a high-definition LCD screen for clear parameter settings. Use the 5 group buttons and 4 function buttons, along with the select dial, to navigate menus and adjust settings.
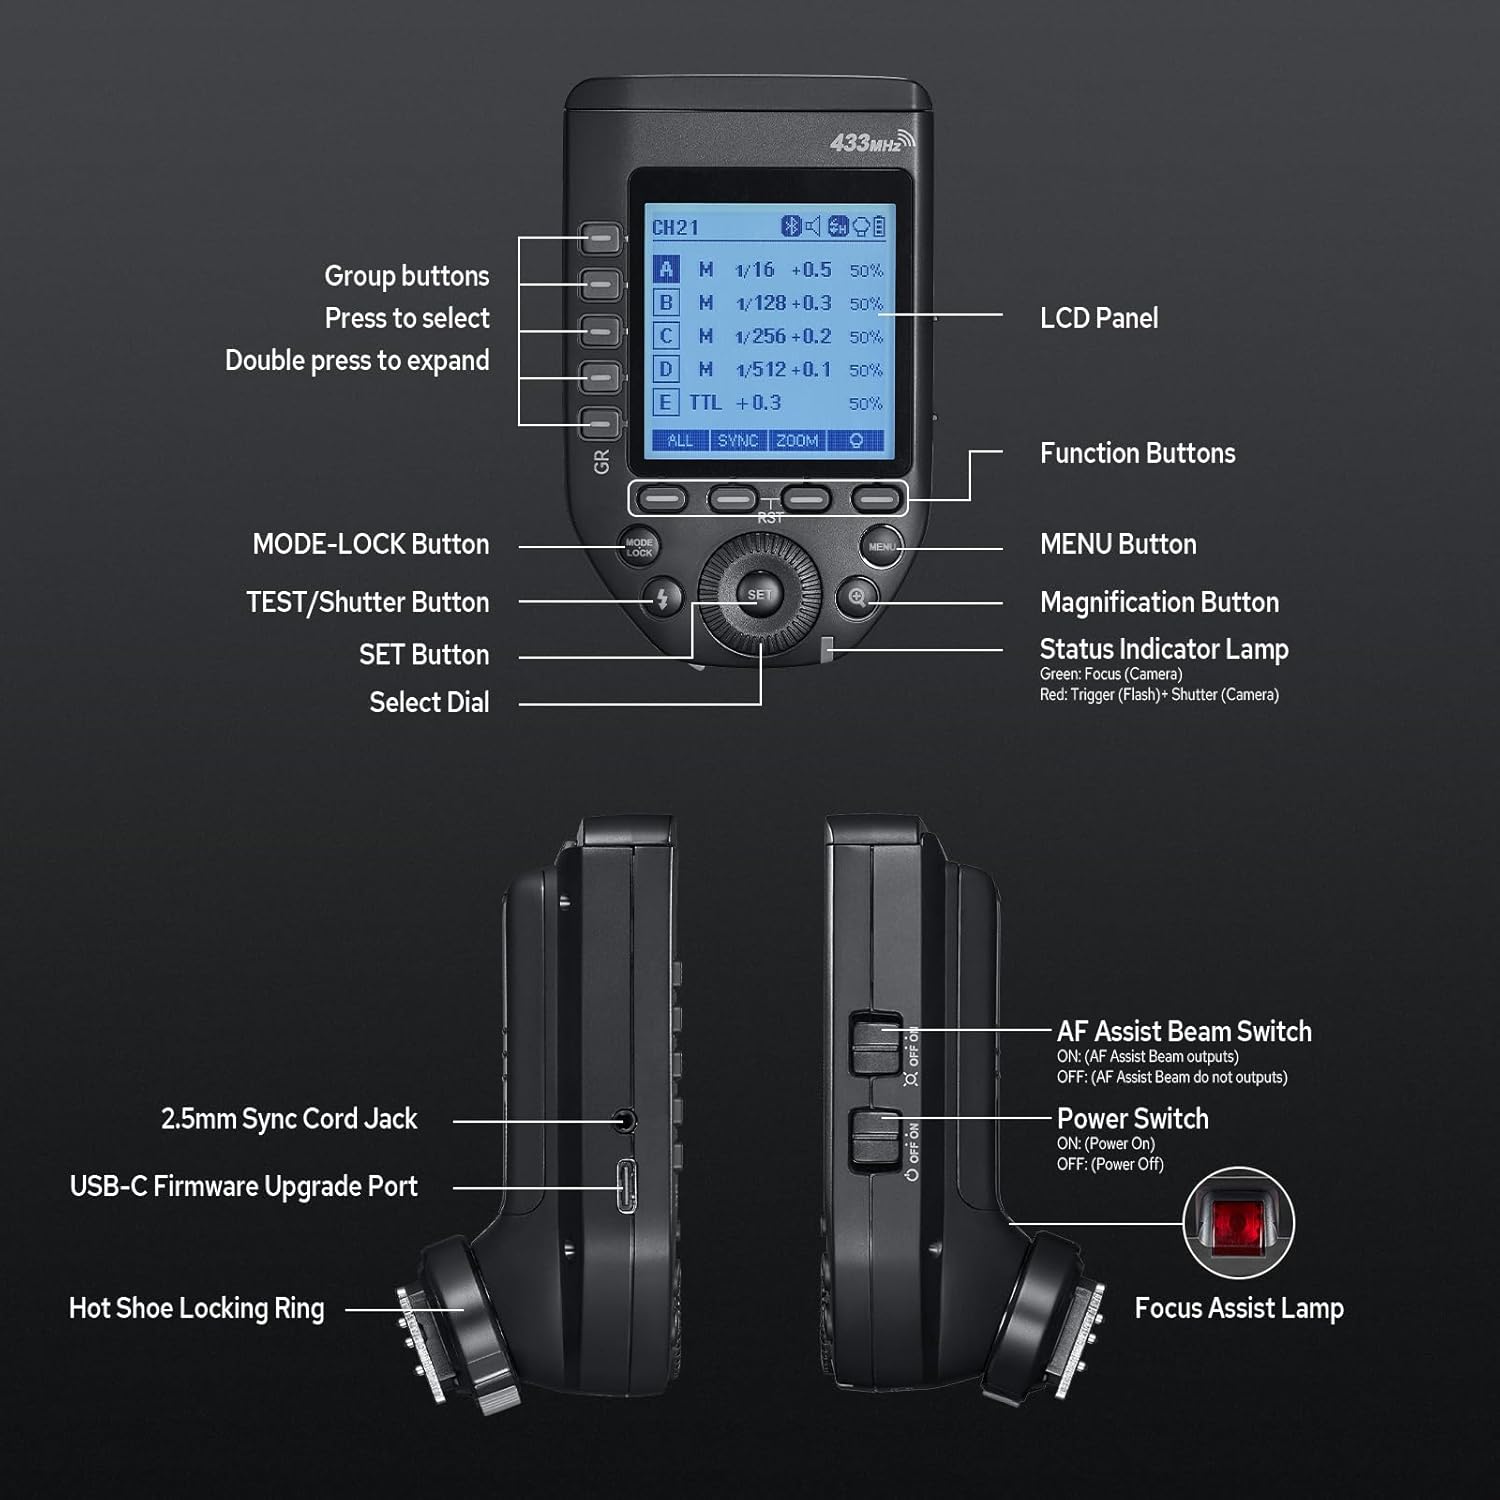
Figure 3: A detailed diagram providing an overview of all physical controls and ports on the FT433N trigger, including the LCD panel, group and function buttons, mode-lock, test/shutter, set button, select dial, AF assist beam, power switch, 2.5mm sync cord jack, USB-C firmware upgrade port, hot shoe locking ring, and focus assist lamp.
2. Flash Modes (TTL, Manual, Multi)
The FT433 N supports TTL auto flash, Manual, and Multi-flash modes. Use the mode button to cycle through these options and the dial to adjust parameters within each mode.
3. High-Speed Sync (HSS) and Curtain Sync
Achieve shutter speeds up to 1/8000s with High-Speed Sync. The trigger also supports front and rear curtain sync. These settings can typically be activated or adjusted through the sync menu on the trigger or camera.

Figure 4: This image highlights the versatile features of the FT433N, including TTL auto flash, manual flash, multi-flash modes, high-speed sync up to 1/8000s, and second-curtain sync, illustrated with a dynamic sports shot.
4. Wireless Sync and Bluetooth Control
The FT433 N operates on the 433MHz frequency band, allowing for reliable wireless synchronization. It can manage 16 groups and 32 channels, with 1-99 wireless ID settings to prevent interference.
For enhanced control, wirelessly manage the trigger via Bluetooth through the Godox Flash App on your iOS or Android device. Adjust flash mode, power levels, modeling lamp, beeper settings, and more remotely.

Figure 5: This image illustrates the wireless synchronization of the FT433N with a flash unit, managing 16 groups and 32 channels. It also shows the Bluetooth control feature, allowing adjustments via the Godox Flash App on a smartphone. Download the Godox Flash App from here.
5. TCM (TTL Convert Manual) Function
The TCM function allows for a one-click switch from TTL mode to manual mode. This converts the TTL metering parameters into manual settings, streamlining your workflow and eliminating repetitive manual adjustments.

Figure 6: This image details the FT433N's high-definition LCD screen, showing the TCM (TTL Convert Manual) function for quick mode switching, and the intuitive display of group and channel settings, along with its memory function.
6. Single-Contact Mode
The single-contact mode ensures faster continuous shooting by eliminating extra data exchange between the trigger and camera. This mode is ideal for rapid-fire photography scenarios. Note that this flash cannot be used with cameras without a single-contact hot shoe.

Figure 7: This image highlights the single-contact mode of the FT433N, designed for faster continuous shooting by minimizing data exchange, and clarifies hot shoe compatibility.
7. Video Tutorial
Video 1: This official video tutorial provides a visual guide on how to set up and operate the Godox FT433 TTL Wireless Flash Trigger. It covers battery installation, mounting the trigger on a camera, connecting the FR433 receiver to a flash unit, wireless synchronization, flash capabilities (TTL, Manual, Multi, HSS), Bluetooth control via the Godox Flash App, TCM function, and single-contact mode.
Maintenance
- Cleaning: Use a soft, dry cloth to clean the exterior of the flash trigger. Avoid using solvents or harsh chemicals.
- Storage: When not in use, store the trigger in a dry, cool place, away from direct sunlight and moisture. Remove batteries if storing for extended periods to prevent leakage.
- Handling: Handle the device with care. Avoid dropping or subjecting it to strong impacts.
Troubleshooting
- Trigger not firing:
- Ensure batteries are correctly installed and charged.
- Verify the trigger is securely mounted on the camera's hot shoe.
- Check that the FR433 receiver is properly connected to the flash unit and the flash unit is powered on.
- Confirm that the channel and ID settings on the trigger and flash unit match.
- Poor signal or interference:
- Change the wireless channel or ID settings to avoid interference from other devices.
- Ensure there are no large obstructions between the trigger and the flash unit.
- Check the distance between the trigger and flash unit; ensure it is within the effective transmission range.
- Bluetooth connection issues:
- Ensure Bluetooth is enabled on both the trigger and your mobile device.
- Reset the Bluetooth connection on the trigger via its menu.
- Restart the Godox Flash App and try reconnecting.
Specifications

Figure 8: This image displays the package contents, which include one FT433N transmitter and one FR433 receiver. It also presents a detailed table of specifications for both the transmitter and receiver, covering compatible cameras, power supply, flash modes, sync triggering, transmission range, built-in wireless, modulation mode, channels, wireless ID, groups, flash exposure compensation, ZOOM setting, dimensions, and net weight.
Transmitter FT433N
| Compatible cameras | Nikon cameras |
| Sync Triggering | Support for cameras that have PC sync socket |
| Power supply | 2*AA batteries (sold separately) |
| TTL auto flash | Yes |
| Manual flash | Yes |
| Multi flash | Yes |
| High-speed sync | Yes |
| Second-curtain sync | Yes (need to be set on the camera) |
| Flash exposure compensation | ±3EV (exposure value), adjustable in 1/3 EV increment |
| Flash exposure lock | Yes |
| ZOOM setting | AUTO/24-200mm |
| Transmission range | 0-100m |
| Built-in wireless | 433MHz |
| Modulation mode | GFSK |
| Channel | 32 |
| Wireless ID | OFF/1-99 |
| Group | 5 groups or 16 groups (selectable in the menu) |
| Dimension | ≈2.44" *3.98" *1.93" |
| Net Weight (without battery) | ≈97g |
Receiver FR433
| Dimension | ≈0.98" *1.97" mm*0.91" |
| Net Weight | ≈10g |
What's in the Box
- 1x FT433 Nikon Flash Transmitter
- 1x FR433 Flash Receiver
Warranty Information
This GODOX product is covered by a limited warranty against defects in materials and workmanship. The warranty period typically varies by region and product type. Please retain your proof of purchase for warranty claims. For specific warranty terms and conditions, refer to the official GODOX website or contact your local distributor.
Support
For technical support, product inquiries, or service, please visit the official GODOX website or contact their customer service department. You can often find FAQs, firmware updates, and additional resources online.
- Official Website: www.godox.com
- Godox Flash App: Download Here


